SIGN UP FOR MY NEWSLETTER AND RECEIVE 3 FREE SEED BEAD PATTERNS PLUS 15% OFF

0

Your Cart is Empty

Shop
  • Read our story

  • Each of our carefully researched, styled, tested and distributed collections reflects a particular aesthetic and ethos. We hope some of these speak to your own style, and help you refine and redefine your own look and style philosophy in the process.

  • MASTERING Beaded Wrap Bracelets with the Beadalon Jewel Loom

    November 08, 2024

    MASTERING Beaded Wrap Bracelets with the Beadalon Jewel Loom

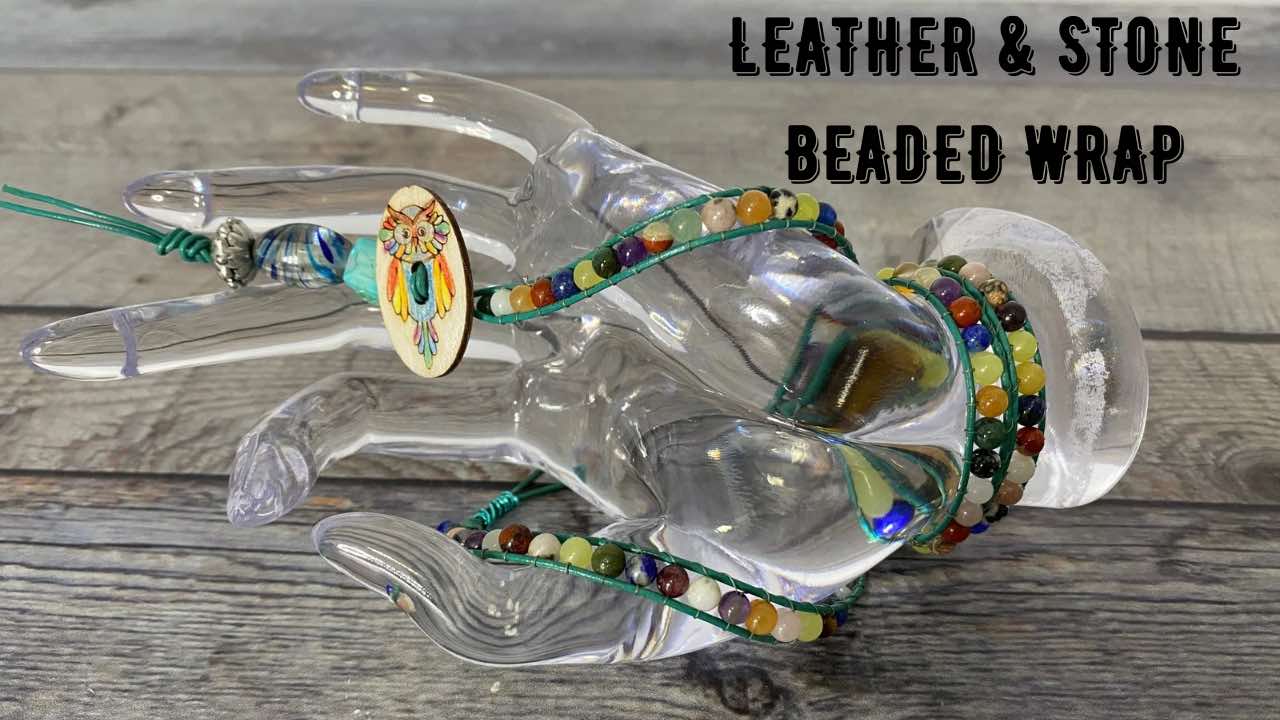
    Do you know you can actually make a beaded wrap bracelet with Beadalon's Original Jewel Loom? Learn the tips & tricks on how to make them with Julianna C Avelar (Jewels), the creator of the Jewel Looms & international designer & innovator. Her clever techniques & tips will have you making a wrap bracelet in no time! Below are the videos on how to warp the loom & weave the full length on the Jewel Loom, plus some tips on how to extend your bracelet to a longer length, if you need more than 21". 

    Watch how to warp the loom below.

    Learn how to weave the beads & adjust the warps as you need more beading area.

    If you need a bracelet more than 21', because you want it to wrap around 3 times & have a larger than 7" wrist, here are some suggestions. For these suggestions to work, you will need to leave longer lengths of cord ends for your warps to create the "extenstion".  You will need to remove the bracelet project from the Jewel Loom to finish these suggestions. Once you acheive the length you want, you can add on your button.

    • Use larger hole beads to slide over the extra length of warp cords, putting both ends through each bead. To decorate this extension more, you can tie knots between each bead or use spacer beads between these beads.
    • Decorate the extra warp cords you need with macrame square knots or half hitch knots, using waxed cord or chinese knotting cord.. You can either do the macrame around beads you put on the extra length warp threads, or just macrame over the warp threads with more beads. To give this macrame section more decoration, use small seed beads, such as 11/0 or 15/0, on the cords you are doing the macrame with & slide up a bead between every knot or three knots, depending on the look you want to acheive.  
    • Add a barrel knot over the cords you are using to make a button loop, if you are using a large button like the one Jewels is using. You can then slide it down to close up the loop, so the button hole is tight around the button.
    • If your cords get too short before getting the length you want, leave enough to tie the ends over a closed jumpring, then tying another length of cord (in another color or material) to the other side of the jumpring for your button. You could also add some more beads or macrame to the new cord, if you haven't reached the length needed yet. Hang a charm from the jumpring to make it look intentional.

    Buy the Jewel Loom or the Jewel Loom Starter kit, which contains 1 Original Jewel Loom bead loom, 1 Baby Jewel Loom, one 6 pack of Jewel Loom Needles, one 50 Yard Spool OneG Beading Thread -color varies, 4 Strands Czech Glass Beads - colors varies but are within the same color pallet, 2 Yards Beading Cord, & 1 Baltic Birch Jewel Loom Button:   https://jewelloom.com/collections/jewel-loom-bead-looms-for-jewelry-making 

    You can sign up to hear from Jewels via email when she releases new tutorials, is having a special product sale in the shop, tips and tricks for creating on a bead loom along with more! As a Thank you she is offering you 3 Free Patterns for signing up! https://jewelloom.com/pages/get-3-free-bead-patterns-and-save-15-percent-on-supplies?  

    Did you know Jewels has a Book? Its true! You can get a digital copy here: https://bellacraftspublishing.com/?affiliate=juliannajewel  

    You can find Jewels here:


    Transcript Video 1:

    I am going to show you well we're going
    to get started anyway on how to make a
    beaded wrapped
    bracelet multi-
    wrap
    using the jewel loom the original Beeton
    jewel loom I'm so excited about this
    project I was blessed with an email from
    Moren who is a jewel loom customer
    a jewelry designer and she makes her
    jewelry for sale and she really wants to
    be able to use the original jewel loom
    to make a wrap bracelet now wrap
    bracelets are long and the jewel loom is
    great for bracelets and we've made many
    of them on here but it only has a
    beading area of about 10 in or so and I
    knew we had had made a WRA bracelet many
    years ago in fact Judy Hayes who was on
    the jewel loom design team actually
    wrote instructions in everything for
    it don't know where they
    are and so I said to Moren I was like
    you know what let me think about it
    it'll come back to me and so it did and
    I thought you know what we'll we'll get
    ready today we'll set up our Loom talk
    about the materials and then this
    Thursday we'll do we'll go to the next
    level we will at find my words where we
    will bead
    our wrapped bracelet and so we're so
    excited about it now what you're going
    to need is some cord now Moren
    specifically said she wanted to use
    05 leather or a 05 hemp cord that is
    thin all right so it's a lot thinner
    I
    usually I usually warp with like a 1 mm
    of leather or of hemp cord it's all a
    personal choice there's not a right or a
    wrong it's just that with the 1 mm hemp
    cord or leather it's going to be
    thicker so it's it's more of a choice
    okay so I am going to be using 0 five
    hemp cord so if you're going to be set
    up your loom you're going to want
    66 66
    in of hemp cord and yes you are going to
    want to cut it so you won't be working
    off of the spool or um off of you know
    yeah off of the spool you'll want to cut
    66 in of hemp cord or leather if it's
    your first time doing this I'm highly
    going to recommend that you stick with
    hemp cord or something else because
    leather you really it's very fine and
    very delicate and 0 five is super
    delicate so let's do that okay I ended
    up using four strands of beads these are
    little six U millim Bic cones they're
    just gorgeous pink beads each strand has
    25 so that makes a 100
    beads I had one left okay so one one
    left out of those hundred so 99 beads
    wait isn't that a
    song don't sing it don't sing
    it all right so so the cord the beads
    the original jewel loom um I also use
    pink Wildfire it's so precious and
    beautiful and of course my jewel loom
    needle so you don't have to you don't
    have to use a Jew Loom needle you can
    use a a needle that works well for you
    and your normal tools like your
    scissors the Wildfire burner you know I
    really enjoy using this a lot when I'm
    working with
    Wildfire um I said
    scissors here's the thing you are going
    to need so you might got you might have
    to go out into the garage or run to your
    hardware store painters
    tape okay so traditionally it's blue but
    you could probably find it in any color
    and quite frankly it doesn't matter what
    color it is what matters is that it's
    removable right so it's not like um duct
    tape you're never removing duct tape so
    make sure that you get a painters tape
    that's removable it doesn't matter what
    cover it's just how we're going to hold
    things in place all right so my original
    jewel loom is is
    all to
    go in this
    project we are going to be leaving the
    metal rod in we are not removing it so
    9.99 times out of 10 we do remove it but
    for this project we are not removing the
    metal rod so you're going to want to
    leave it in now I already have
    have I already have my 66
    in I'm giggling because I I was like
    how' I come up with that but that's what
    it is so I've got the two ends and I'm
    just going to show you right so here are
    my
    ends and then this is where okay this is
    this is the long piece I've got my ends
    and I'm going to
    take we'll say that this is the top and
    we'll say this is the bottom okay so I'm
    going to take the completed looped in
    and it's really important that
    everything
    stay
    um nice and even those are the words I'm
    looking for nice and even okay so here's
    the
    bottom and again here's the jewel
    loom let's just give you some idea of
    how my body and what hand is what uh
    right hand is holding right now the cord
    left hand is holding the uh jewel loom
    and I'm pretty much in front of my
    working
    space I'm in front of the jewel
    loom and I'm in front of the camera
    hi and so what we're going to do is
    we're going to take the jewel loom and
    we're turning it over and you might know
    this you might not I mean I kind of
    think it's easy to know but hey who
    knows this is the back side of the jewel
    loom okay you see the two two buttons
    this is the back side of the jewel loom
    if I were to turn it over with all the
    engraving on here that would be the
    front side we're going to start from the
    back of the jewel
    loom and the way I'm going to do this
    now is this button
    is furthest away from my body so it's
    closer to you than it is to
    me and I'm going to take that end where
    that constant Loop is right the bottom
    of the
    cord and I'm going to put that on the
    back button that is furthest from me all
    right so now this back button is
    furthest from my body this is my
    body all right and then what I'm going
    to
    do and obviously when you're not
    teaching this on
    air okay you're going to be down on the
    table right and you're going to be doing
    it in your own
    Rhythm but still
    learn how I'm doing it because this part
    is important all right so the loop once
    again right the bottom end of the chord
    went around this back button furthest
    from my body and now I can take my
    pointer just to keep it in place and I'm
    going to
    grab the
    cord and you could see that I'm bringing
    it down the back side of the jewel loom
    so this is still the back side of the
    jewel
    loom okay and then we can walk our hands
    down and we're definitely keeping it
    nice and
    taut and we're going to be using the 6
    mm Bic cone so we need to have a good
    one two
    three grooves that we're going to
    skip and then we're going to flip the
    jewel loom
    over so now see this is the front so now
    its back side is facing
    you and the front side of the jewel loom
    is facing me all right and then we're
    just going
    to lay those lay the cords down again
    into the
    grooves skipping three grooves at the
    bottom there let me bring that
    up and then we're going to flip it over
    again okay and now we're at the opposite
    button
    and we're going to wrap the two ends of
    the
    cord around the
    button a few times just to really get it
    in there the cool thing about working
    with cord especially the hemp cord is
    that it's so strong and when you're
    wrapping it around the button it's like
    it's locking into each other and so you
    don't um I just I just love that because
    then you're not so stressed out about
    tying knots and what have you so I'll
    just go around a couple of
    times and then this is where the
    painters tape comes in because we're not
    tying
    knots no
    knots unless you think you can get them
    untied
    but sometimes that's iffy all right so
    no knots so this is where I would bring
    my painters tape and you can see that
    the entire time right the entire time
    I'm really keeping tension and I'm just
    going to come in here with the painters
    tape and I'm going to secure
    that all right
    now let me see I might do another one
    hold on one second
    here yeah just to make sure it's all not
    nice nice and tight so when we go to
    bead one of the most important things to
    remember is to
    start in the right
    direction and you can see this was our
    original Loop and then we went all the
    way up to the top and we came over and
    so we're going to want to start our
    beading with that original loop at the
    bottom okay so this is going to be the
    top and then we're going to bead all the
    way
    down and then when we get all the way
    down here we're going to remove it and
    we're going to do this together so don't
    start beating I just want you to play
    around with the idea of the
    warps so that you
    get the hang of it it's not really all
    that
    hard I kind of feel like if you could
    say could you do that again you would
    you want me to do it again because I
    can let's take the painter tape off so
    you could see why it's important to have
    like painters tape right cuz it
    literally just it just comes off okay
    so let's just undo we're just going to
    undo it
    and we'll start we'll start over we're
    going to do it again just to make sure
    that there's a there's an understanding
    so 66 in of
    cord I've folded it in
    half in my right hand are the two opened
    ends right two opened
    ends and in my left now now is the
    bottom where that little Loop is
    okay so I'm going to grab that with my
    right hand I've got the jewel loom
    already in the warp position with the
    rod which once again we're not going to
    be removing that metal rod it's going to
    stay in during the entire
    process so backside of the jewel
    loom okay back side of the jewel loom
    it's in front of my
    body the buttons are on the back side of
    the jewel loom they're facing up to the
    sky this to the roof to the sky to the
    heavens this button is furthest away
    from my body all right so the button is
    closer to you in the in the screen right
    now and that is where I am going to put
    the end of the cord the looped part
    and so we're going
    to put it on the back button there and
    then we can bring in my left hand and
    I'm always working with my hands left
    right brain and it's just the way this
    all works you might do this differently
    so just watch me and then if you can get
    to where we're going in a different way
    then that's fine um but I've got my my
    right hand now
    [Music]
    grabbing grabbing the
    cord and I'm working down the back side
    of the jewel
    loom and I'm just going
    to see how the cord is just on the sides
    of the bottom button and now it's going
    to come up and over the grid and I want
    to skip like three three grooves to
    accommodate the 6 mm Bic cone bead and
    then we'll flip the jewel
    loom okay and now the front of the jewel
    loom is facing my body all right and I'm
    just I I'm always keeping I'm it's you
    know it's a very
    tight tight grip right so I don't want
    to lose that tension so then I'm going
    to come down
    here and I'm going to skip the three
    groups
    again and then I'm going to flip the
    jewel
    loom over and then I'm going to wrap the
    hemp cord
    around this button right here and I
    could just do it a few times like I was
    saying the hemp cord is so cool to work
    with by the way it's by hemptique my
    favorite it's sustainable familyowned
    love the company amazing color selection
    this is their pink and it's beautiful so
    I'm just going to do that one more time
    I'm going to wrap around this back
    button and then I'm going to bring
    in bring in the painters tape that has
    found each
    other and we're just going to get that
    in
    place okay just to hold it because we're
    not doing knots we're not removing the
    metal Rod so we have to have some way to
    keep everything in
    position
    okay so that's how we're going to warp
    the loom in order
    to make our wrapped
    bracelet and again this process is going
    to make here's another one isn't this
    gorgeous this is going to make a 21 in
    Long wrapped bracelet
    I have a 6in wrist and this has gone
    around my
    wrist three times all
    right they're just and you have to wear
    more than
    one I don't think you can get away with
    not wearing more than
    one so if you have a wrist that is um
    maybe a little bigger you're probably
    going to end up with like um your
    your wrapped bracelet going around maybe
    only
    twice okay but look it oh my gosh
    seriously look how fun it is when you
    have two of them
    on love love love that and I mean I had
    to sorry but I had to I had to bring in
    a sparkle
    ring they kind of all go together right
    shiny wrapped bracelets so fun yes Karen
    I love all the colors together too so
    that is what I want you to work on I
    just want you to play with the idea now
    this was a a specific request from
    Moren one of our New York girl I love
    New
    York um because I'm also a Jersey girl
    right part Jersey part California girl
    so New York's always got a
    spot but um yeah Moren jewelry designer
    selling
    her items I'm so proud of you and she's
    not quite ready to go into one of the
    bigger looms like you could do this on
    the large Sun Weaver in one pass you
    could do this on the large wisdom
    warrior in you know just on the front of
    those looms but that's going into
    another investment so until you're ready
    to do that it's so awesome to know that
    you can use the original jewel loom to
    make the longer
    pieces I was also speaking to somebody
    um online in regards to the hat band
    kits and so you know you can downsize
    those if you don't have a large wisdom
    Warrior to make a bracelet to make
    earrings um or you know before the large
    wisdom Warrior came
    along Mama she's a Powerhouse let me
    tell you so we were making pieces and
    sewing them together
    so the original beet on jewel loom does
    a lot it does a lot she's pretty cool if
    I don't say so myself so I truly hope
    that this helped um this is Sneak Peek
    Tuesday I will be back on Thursday um to
    get into the demo make the bracelet it
    took
    me an hour to make my bra
    bracelet and uh that was consistent
    consistent beading and so I think that
    once you get your Rhythm down and you're
    not trying to tape
    something um and fuss with stuff you're
    going to be at least at an hour if not
    maybe a little less so there's going to
    be a great margin in this if you are a
    jewelry designer who's making items to
    sell and and now is the time right the
    holidays are upon us and and people are
    looking so super excited for everyone
    and Moren yay my heart is happy she says
    beautiful exactly what I was looking for
    thank
    you I was so determined Morin like
    seriously since I got your email I have
    just been like what was the visual what
    was the visual now I know that Judy
    used um clothes
    pins I do remember remember a photo and
    somehow I feel like she did something
    around the side buttons and then did
    some clothes pens and and if she sees
    this maybe she'll let me know but um but
    I think that this just works perfectly
    and you know I will be beating and then
    we'll take the tape off and readjust and
    beat the rest and call it a day so
    anyway I love it I'm so happy that you
    found the channel Moren and that you got
    what you were looking for I'm really
    excited to see what you make and I'll
    see
    everybody on Thursday at 400 pm. Pacific
    Standard time which is California 700
    p.m. New York time and um yeah okay one
    last thing where says now I can't wait
    until Thursday I've got a lot of holiday
    parties coming up and the ladies love to
    craft thank you that's so awesome yeah
    yes and the jewel loom the original
    jewel loom is a p Perfect Price Point um
    to get into weaving so the full retail
    on a jewel loom just by itself is
    $33.99 you'll probably see different
    prices you know all over the interwebs
    but um such a great price such a great
    value always remember that the jewel
    loom is made out of
    a flexible plastic not a bendable one so
    you always need to be con conscious of
    that and this is the perfect warp
    remember from the bottom belly to the
    top of the warp about 2 in if your loom
    is up any tighter you have just done it
    way too
    much all right y'all have a great
    evening I will see you um in a couple of
    days I'm so excited and by the way
    there's I just uploaded another
    video in relationship to in relationship
    in relation to in is that the right
    where where's my English teacher I'm
    sure somebody will jump out and tell me
    anyway it's another video showing you
    how to how to warp the jewel loom to
    accommodate um different sizes and types
    of beads and so that's actually going
    live at 5:00 Califoria California time
    that's a recording so not me just a
    recording so have a beautifully blessed
    evening and I will see you all again
    soon love
    you I have no
    idea this is too funny now what do we do
    there's literally nothing that says
    end oh my gosh this is hysterical this
    is true behind the scenes I'm going to
    touch this one button and I hope it
    works let's see what happens
    Transcript Video 2:
    so I'm really excited to share with you how to actually make the wrap
    bracelet as you can see here it's quite long usually a wrap bracelet is 21 in
    plus and so it's the type of bracelet that will wrap around your wrist
    multiple times with this particular wrap I used a check glass
    bead and it's in a Bic cone type of shape and what I wanted to show you was
    how you can use a leather cord and some semi-precious
    gemstones and all of this is being done on the original beon jewel loom which
    I'm so excited about it really uh just shows you what a Powerhouse
    of a loom the jewel loom is so this Loom has already been warped
    and I will definitely make sure that you have the link to that video on how to
    warp your loom and as you can tell I've already done the beading on the top of
    the Loom now I ended up way down here so I really took advantage of the entire
    just about 10 10 in or so let's let's do a quick
    measure for you I always like to have a sewing tape measure tape around and oh
    actually actually it's 10 and 1 12 in that I was able to to bead so then
    basically we would need another 10 in if we were going to make a 21 in Long
    wrapped bracelet so what we need to do right now is I want to secure the
    needle and um thread which by the way let me show you what I'm using I'm using
    Wildfire so this is the Wildfire green it's the
    0.006 and this is the one that I like to use most and this is my jewel loom
    needle it's extra long which I really enjoy um you can use a different needle
    if you like but this is the one I like now I
    really I kind of cut it really close up here because what I was hoping to do oh
    did I do it so what I want to do is I want to get my needle back through back through that last
    bead but I want it to be under the warps and I might just yeah I I was in I was
    overzealous I should have stopped with the lighter color bead right here but I was like oh let me just get one more so
    anyway um I don't know let me see for Giggles so again what I'm trying to do
    is I'm trying to get the be I'm trying to get the needle to be under the warp but I don't think it's going to happen
    and the reason why is that this bead is sitting on the grid so again I was just
    kind of a little overzealous so what I'm going to do is I'll just come down a row and I'll go through this bead and I'm
    just trying to Anchor the extra thread which by the way I just want to point
    out a couple things to you um this is my left hand and this is my right hand the
    jewel loom is in front of my body and um my mat is also right in front of me so
    let's just take the needle and thread and we'll just go back and
    forth just to yeah there we go yeah it's like I'm
    trying to bead on top of the grid and it's a little challenging you don't have to do that I was just
    being has just being a little wild with my my beading there so I don't want to
    spend too much time on this because I really want to get to the exciting part where we actually are able to use the
    jewel loom that's only 10 and 1 12 in of beating space and turn it into 21 in so
    let's just go ahead head and um we'll bring the needle up right here and I will do I'm going to go
    through through the loop and I'm just making a knot okay and then I am going to cut it
    and I'll come back with my Wildfire burner and I'll get really um close with
    that but um when we're just kind of going through things I'm just going to
    nip it right there okay so what we have to do this is the top of my
    of my loom of my bracelet and we're going to turn this
    over and you'll learn all about this taped process when you watch the first
    video and we're just unwinding the leather so this is a
    leather and we're just going to unwind I want to really show you
    what's happening here so here's the wrap right and here's that Loop and we've got
    to bring that up now we got to bring it
    up to let's see what would we call that we
    just got to bring it up to the button to the button that's closest to your body
    all right and we're only skipping a couple of grooves this bead is a little bit
    smaller so we don't need to skip get about maybe two or three grooves and then I'm going to turn this
    over and we're just going to focus on being in the center of our
    Loom and I can see that I've got to adjust this a little
    bit so you want to make sure all of this is nice and even and I think we did a little
    crisscross so let's bring this back so you can see what's going on on this end
    as well whoops too
    many okay perfect all right and so
    now what we're going to do is you see this was that original piece that I just
    beaded and we've got to secure it to the back side here so we're just going to
    get our tape again we might need a little bit
    more so by all means you could use one of the larger looms like the large
    wisdom Warrior or the large Sun Weaver but I really um was
    inspired by a jewel loom customer to be inspired and challenged to to do it on
    the original jewel loom which if you're not ready to to advance into a bigger Loom to a more you
    know that's an investment type of loom then this is perfect okay so what I
    would say is just remember that you have glass beads back here so you're not going to you don't want to like smush
    the loom into your work surface all right so we're just going to come over
    here and it is going to be a little you know it's going to it's going to you
    know kind of tilt or go back and forth a little bit so you're just going to have to learn how to maneuver the loom when
    you're dealing with this being on the back it's it's not like a huge deal so I
    don't want you to overthink it I am going to really quick here just want
    to yeah create a little knot okay so I have a new needle and
    thread i h let's see well I don't know I
    might have enough on that original needle but I cut another yard over here
    so I think I think this should be plenty to hopefully get down and uh off we go
    all right so what we're going to do and I just want to make sure we have a good camera spot here um I want to go ahead
    and find the end well I could do a couple of things let me see I could because I got to get
    back over here on the left side so I'm going to come through the left side of that second
    bead and then I'm just going to pull okay and I want to leave a tell and
    then I'm going to come through the next spead on the right side
    here oh where oh where is your come on little guy I know you have
    a hole okay there you go and then we'll go ahead and pull that
    and now we're in business okay so I'm over here on the left side of my loom and I'm going to come under
    and I'm just going to start to pick up my beads and you can follow a pattern or
    not um again this is a multi- strand gemstone a gemstone multi-
    gemstone strand of beads so they're about um I want to say they're closer to
    a 5 mm and they're round and they've had a hole
    drilled so they're gorgeous you know you've got some lapis and some um
    amethyst and some quartz I mean there's just uh several
    different types of gemstones and this is where you know
    this is where depending on the type of product you're using if you're making these to sell you can definitely charge
    more because your stones are going to cost you more and you're going to have a
    higher ticket item so again I'm just I've been trying
    to follow a little bit of a sequence um so that my colors are spread
    out and you could certainly work on you know how you want all your if you do use
    like a multi strand you could work on that prior to um beading so let's
    see yeah so much
    fun so again we're just going back and
    forth I think the great thing about using the original jewel loom is that it empowers you to really make um a very
    high quality project a very high quality piece of jewelry and you
    know you don't have to if you're not ready you don't have to invest a lot of
    money yet but hopefully you sell lots of wraps and then you'll be able to grow
    into a bigger Loom but um I do love I do love being
    empowered by my jewel loom she is quite quite the
    loom so you can see like I'm just um balancing the loom because again we've
    got like this chunky section of beads back there so it's not necessarily laying flat oh and by the
    way just another um I would have mentioned this in the previous video again that I'm going to tag for you um
    make sure you leave your metal rod in Okay the reason being is that we're all
    taped up right so we need all the security we can have to keep our warp and so we're going to leave our metal
    rod in in case you were just sitting there foll in me thinking Jules always tells us to take our metal rod out what
    is she doing so that is why and again this is a real leather cord it's 1
    millimet uh you can certainly work with a faux leather cord um you know if you
    prefer you could work with a hemp cord you could um I I will tell you that
    leather cord that is natural in color is going to be
    very um temperamental it's it's very you have to be careful not to pull it too
    hard or it will break when you have a leather core that's colored like this this is a
    turquoise it seems to be more durable and I'm sure that's because the process of coloring versus a natural piece of
    leather is just going to have like more sturdiness to it all right I think we're
    ready for a Lapis this is a little baby lapis look how cute little baby where you at little baby lapis bead I love
    these strands they're really a lot of fun to work
    with okay oh he was a little he was a little smaller that's funny well
    gemstones gemstones all right what color haven't I let's see I think I could do one of these
    so my goal is to just um bead all the way down to the end
    here and then I'll be taking the piece off of the Loom um and adding a really
    fun button I decided to go with one of my wood buttons that's uh an owl and
    I'll have to show it to you here so
    see pretty quartz actually that
    one that might just be a I love when quartz is kind of dirty looking
    I've had some quartz uh Crystal pieces that are just um really
    fun because they're not like really white but they're they've got like that
    just that kind of dirty shabby we'll call it shabby
    they've got like a Shabby Hue to
    them okay so B basically you're just constantly going back and forth right
    it's just like how we would um you know do any other
    beading project on a loom and so we're just popping that up
    and then I'm going back through the hole and then you could see how my hands are always working to make sure that
    everything is nice and you know uniformed and that there's no excess
    Wildfire um yeah got some little Shadow there little bead
    Shadow so needle and hand a needle and hand needle and threader and the left hand right here I'm pointing to it and
    it comes under the warps transfers over to my right hand and then I'm going to pick up a
    bead so let's see once again this is really this is the hardest part picking
    out which which bead you want to pick up and then I'm just going to let that fall
    and then then I take my pointer finger and I help to bring it up and in
    between now a couple of these beads are smaller than than the others but they
    all were on the same strand so just keep that in mind because that does that does happen and so if you don't like that you
    might want to go through your beads and um through your gemstone beads and and
    separate or not use those I'm don't have an issue with it I think it just adds
    more more
    personality okay and let's see what do we got I know there's this one did I already use it all I don't even it's
    like a well that's cool um yeah there's just all kinds of
    different different Stones yeah this one was a little bit
    smaller so you can see how quickly I was able to you know to go so once you get
    your Rhythm once um you know you have your beads
    organized yeah I was able to do a bracelet and under an hour you know I
    would give myself a good hour so you have to think about um your hour ear L
    rate and then your materials costs and then you know a lot of it too is about
    the area that you're in you know every every Community every County and a state
    can be different every state from State could be different like it just you need to know your clientele
    right um but you want to pay yourself correctly so I would say you you need to
    really think about your hourly rate and um the cost of goods
    and the cool thing with the jewel loom is that you're not going to have a lot of money invested into your tool and
    so again once you get your Rhythm down I mean I have seen these wrap bracelets
    just depending on the quality of the materials I mean definitely have seen them as much as a um you know
    $150 just depending on the size of the gemstones and you know the quality of
    the leather and um so you know and and you don't if you're
    not selling stuff you know if you're not making things to sell then my goodness
    what great gifts can you even imagine like if this is what you were giving your friends and family for the holidays
    oh my gosh or your favorite teacher at the end of the school year um you know your
    girlfriends I mean my goodness the these would just be people would be so
    incredibly delighted to to get this as a gift all right where are we getting
    we're getting down to like what is next okay that's cool let me see if I can get
    this guy on my it's almost like like their little
    hole disappears come on buddy where are you oh my heck I know you let's see oh
    oh I've had a couple of them jump out of my hand already because they're tiny let's see there we go we'll do that
    one you certainly could use bigger beads by all means you know and so you just
    what you're going to do is you're going to take your bead and you're going to put it up to the grid right and then that determines how many grooves you're
    going to skip which then determine you know where you're going to place your
    cords so you definitely have just a lot lot of
    options but again I think the cool thing was
    having having the challenge of can a wrap multi- wrap bracelet be made on the
    jewel loom and then figuring it out
    and and um saying well yes yes
    can all right so keep checking along
    here and again I want to say that this is more close to a 5
    mm um definitely not six so it is a it
    is smaller so when you have a smaller bead it can take a little bit longer because you're you're just you're
    beading more beads right so if you had like big 9 by9
    squares check glass you know floral squares for instance that probably would
    go a lot quicker right I mean you could even do like a two-hole um beaded
    bracelet I mean they're just there's so so many so many options
    oops and because the jewel loom is so portable and lightweight this is a perfect thing that um got little Dancy
    things going on over here let me get this out of the way whoops I was like what is that noise
    it's it's the uh there we go the earphone thingy
    they were like doing a little Jingle All right so
    what what haven't we done here oh we could do a light purple bead let's do
    that okay bring this up so you could see I've got like I don't know what 4 inches
    or something left to
    do and okay [Music] okay I still want to get that guy and I
    cannot see come on buddy I'm I'm going to get you there we
    go there we go yes do we talk to our beads yes we
    talk to our beads they're little bead buddies okay
    so I feel like I could do like this dark blue this is gorgeous
    so it's a real repetitive um motion you know I've I've also done wrap
    bracelets where I have warped the loom to accommodate
    different styles and sizes and shapes of beads so you can really take this o
    that's a tiger's eye um um let me got all excited I love me tiger's eye super
    cool um what was I saying see I got all excited by a bead doesn't take much with
    me uh what was I say okay yes you can you can set up your warps to accommodate
    um different different size and styled beads and really have quite quite the uh
    wrap bracelet
    and these are always fun to layer like I like to wear I like to wear a
    um a wrap with another
    bracelet so okay where we at maybe something like this
    guy I think we could do this guy come on this is like a rose quartz
    it's just the funniest thing trying to find that little
    hole and we'll come in I get a
    little that's a little Amber or citrine I mean there are so many
    I know somebody's yelling back at the camera right now telling me what it is all right
    looks like we could do a purple like an
    amethyst and again I'm sorry I don't know if I mentioned how many strands so
    I Ed two strands I'll show you what the Strand looks like and the length of it so that if you want
    to um try to find
    and this is from my you know I I get a lot from a company
    called Dakota stones and I do believe that you know it's a very popular brand
    within the jewelry making industry and um and so you know with that name you
    know that these are very very high quality um gemstone beads
    and I feel like we could do a little dark something what's that what's going on
    here come on oh I have to laugh because it just
    cracks me up I know there's there we go I know there's
    all and just going back in
    coming under and is the time for a blue yeah
    let's get one of the this little lapis guy
    here y almost there okay what do we need now maybe like a
    green my jom is dancing all out of the screen out of the
    screen it's excited to be finished com to a home stretch
    here and let's see we could go for
    and okay um I feel like let's see is there
    uh well that would be fine that's
    pretty I mean for little beads this is going this is going rather fast
    so um I think you could probably imagine then how quickly you
    could maybe get one done with bigger beads because a bigger bead's going to take up more space
    and but I feel like these little guys are
    definitely definitely to L along okay I don't think I've done like a really light colored what do we got going on
    here home stretch home stretch what do we how many want to guess what three or four right three or four more
    beads um oh purple I don't know if somebody
    just screamed that but that's what I got the message let's do the purple one
    obviously too if you're doing a single color wrap it's going to be it's going to be most easy right like I did I
    showed the the pink one that that went really quick because I didn't have to
    make choices I just picked up the beads which is fine like it's totally pretty
    and and um you know I could wear another bracelet with it and get like my color
    get some more color so oh it looks like maybe two more um
    oh sugar okay this is gorgeous let's use this guy come
    on and now you got there oh I almost at it where' you go there you
    go they're feisty okay
    so getting this one up and under
    there and I'm just going to stretch my needle out a little bit and I know we
    can do at least one more what's going to be our let's
    see I guess we could do another blue and then we'll see if we have room
    for another bead you know this oh that's a little guy to little ones are
    hysterical that's so funny okay well I could now I can
    definitely get another one in um um okay final color final color what do
    we got what do we got oh this guy is super cool let's put that one up in there hopefully I can get it in
    there yep perfect yeah okay
    fantastic so yeah that went really quick I think that was less than a half an hour so now we've got see look it now
    we've got another right another section and let's see if I can't do what
    I wanted to do originally I want to make sure so I like to take the needle and come
    under if I can find the stinking where you at there you are
    right I don't want to break my needle though okay so I'm under the warps I'm
    going back through the hole and I'm going under the warps and this is just a
    little thing that I like to do it's um oops s
    for it just is a way to Anchor the last bead in and then I'll go back through
    the top okay oh I don't want to go through
    my leather okay hold on let me get positioned correctly it's like I'm
    trying to trying to stand on my head Sho gum and get the needle through this this
    bead okay there we go all righty okay oh
    don't okay perfect and then what I'm going to do is I'm just going to sneak
    up in here oops and come back through this
    Loop I'm just going to do it one more time for giggles and like I mentioned earlier I'm
    going to cut this but then I'm going to come back with my wild fire burner and and get a lot closer I just don't want
    to screw up that would not be good okay let's get our scooper and so so there's
    still quite a few beads if you wanted to do like matching earrings you know that's that's a lot
    left so I'm going to put these to the side and then I do want to show you the
    string again so let me measure that for us and cuz
    they sometimes are sold in lengths
    so okay what is that looking like 15 in about 15 in long this strand so I use
    two of those and again this is about a five 5 millimeter
    bead all right so we'll put that to the side put all of this other stuff to the
    side we're going to turn this over and very carefully oops take our painters tape off this is
    painters tape typically comes in a blue don't want to use like duct tape or
    anything okay and then very carefully we're just going
    to get that off put the jewel loom to the side it looks like I
    got a long one here all right so now we have our two
    ends okay and what I want to do with one end
    well you know what I'm going to see if I can't okay let's just I got a good okay
    I'll do it if I could see it you know what I mean like you don't want to do this and think you can see what you're
    doing cuz then it's not going to work out things are not going to end well
    so that came right back in my my throat
    don't do that okay so I'm just creating like a little n loop
    knot this colored leather is a little bit more um shiny so it's a little harder to
    now I really want to make sure that I get this knot
    right I want to get that as close and as tight and snug to the end as I
    can okay now you can certainly use like a
    slip knot technique um I'm just going to trim these again
    I'm going to do this one I can open up the the door and not have that come back into my
    face okay there we go yeah we need to definitely clean that and then I'm just stretching making sure that's all nice
    and even and so on this end we're going to put
    the um we're going to put the owl I decided to use the little owl button I
    just thought with the gemstones and all the colors and so I brought in
    my my pencils my colored pencils these have been really good for
    me like I really like these I do need a sharpener I've used them so much it's
    time for a sharpener so what we're going to do here again I like
    to come over here and do a
    not whoops but I like to keep my finger okay
    so we're just going to again you know you can you can see
    like one there we go one of the yeah we're going to come in and we're going to clean up all those little
    guys with the burner make little like burnt knots and not really knots they're
    just like little they kind of disappear once you do that all right so now I'm
    going to take the
    coming from the back side of the button and then we'll go
    down we'll go down his other little belly his other little belly
    there now when we did this with the wild uh with the hemp it moved very easily
    with the leather it's doesn't seem to want to Glide so I'm going to have to go all the
    way down I could in other words I could pull it and it
    would but it's being a little bit more a little bit more okay so I'm just
    going to come down like that no big deal no big deal I just have to approach it differently and then this
    one is coming this one's coming this
    way and yeah so that's going to work out
    just fine okay perfect aome sauce cool oh it's so cute all right so
    now what we can do I'm going to do another one of
    these another one of these knots and just want to get that as close
    to the back button as possible okay and so now I did bring in
    some I brought in the guns I brought in the big ones right the big guys the big
    big guys here um trying I was trying to think like would any of these I mean it's hard because I know
    these are gemstones and I know these this is not um let me see what I got in
    this this box I was just thinking like you know you could if you wanted to like
    slide some beads up in here let me see what I got going on
    like this is kind of cool like we could do you know like that right so it's um
    like you could have like a finished and then what's what's going on
    in my box of Tricks over
    here I don't know again I don't want to take away from the gemstone so this is a
    little this is a little I don't know if I'm going to
    be if I want to do that yeah I don't like that okay so
    that's an idea though it could work for you it may not all right so with
    that I'm just G to now I'm going to leave those I'm going to leave those
    because if I do come across something that I feel Works cuz I have like a lot
    a lot of gemstones in another bag you you know maybe I'll find something that
    might work so let me get my wrist in here and let's see what we got going
    on I'm going to hold that and so I have
    a 6 in wrist look at how pretty that
    is all right just going to get that up and over there and then my
    Loop and oh I was doing so good okay and then my
    owl yeah awesome so yeah so I'm going to I'm going to think about you know what
    maybe I could do to that maybe macet it maybe um yeah I'm going to think about that
    but check it out so dainty so precious again this was
    another one that I had made with a little bit of a bigger bead and you could certainly wrap these around each
    other so yeah so I have a 6 in wrist and
    this has gone around it three times so if your Li your wrist is a larger size
    then you might have like two layers um if you have a bigger Loom then you know
    you can bead all the way up to 25 in so that that's kind of the difference in in
    using the jewel loom versus using one of the bigger looms that has a a bigger
    your beading base but so easy right and so much fun I mean my goodness the
    possibilities are just endless with the beads and the material and the buttons and the and the ending and you know it's
    just so cool and I'm I'm so proud of my jewel loom I'm so proud of it so proud that we
    can do really cool stuff like a beaded wrapped bracelet
    with gemstones very very cool right very nice okay don't forget I'm going to have
    the in screen it's called an in screen it's going to pop up it's going to tell
    you what to watch next and so that is going to be the video where I show you how to warp your jewel loom and I also
    want to mention that I have a newsletter and so when you sign up for the newsletter you get three free seedbead
    patterns and a code to save 15% off your first purchase which for you might be a
    jewel loom right maybe you don't have one yet and so yeah so like And subscribe
    the YouTube to the YouTube channel and and show your love and please leave your
    comments ask me questions I totally answer and I love that I really love helping you and I love serving you and I
    hope that this empowered you and I can't uh wait to see what you make