SAVE 15% OFF ON YOUR FIRST ORDER PLUS GET 3 FREE PATTERNS. SIGN UP BELOW!

0

Your Cart is Empty

Shop
  • Read our story

  • Each of our carefully researched, styled, tested and distributed collections reflects a particular aesthetic and ethos. We hope some of these speak to your own style, and help you refine and redefine your own look and style philosophy in the process.

  • How To Make A Button Loop Bracelet That Pops

    October 01, 2025

    How To Make A Button Loop Bracelet That Pops

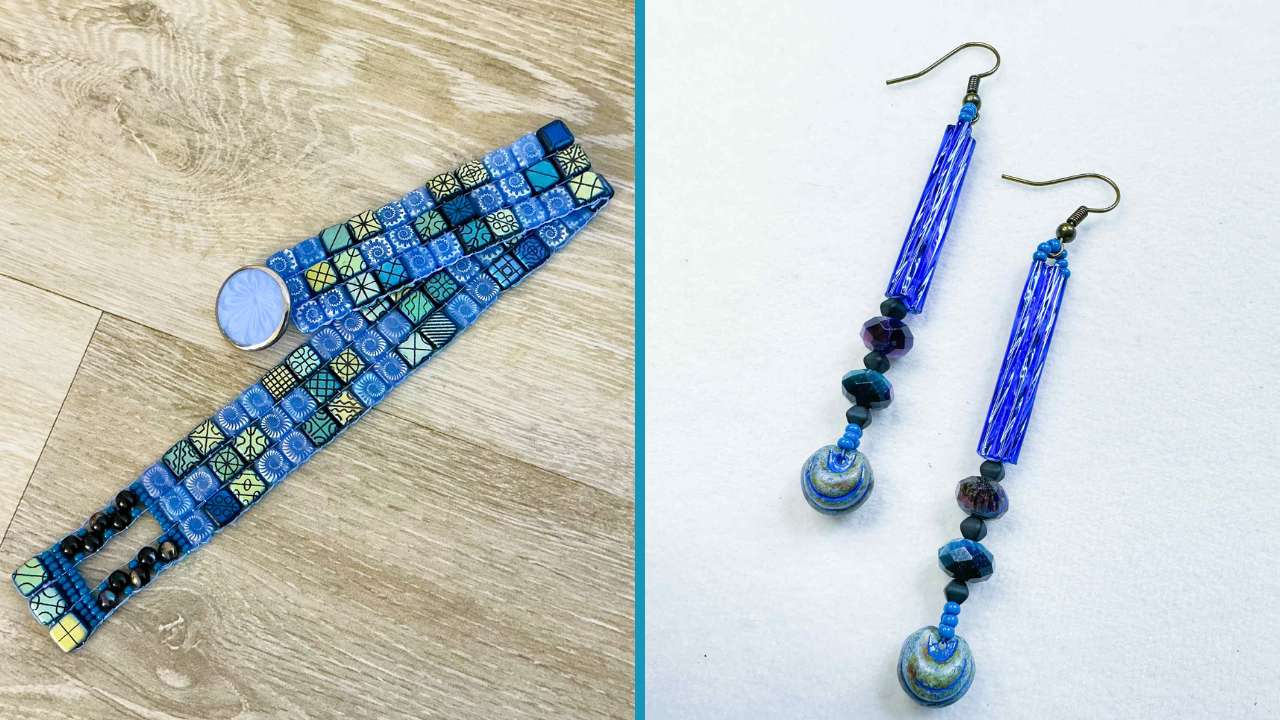
    Learn how to make an exquisite bracelet with a rectangular buttonhole, using the Original Jewel Loom. Danielle Wickes will show you how, using 2-hole tile beads for the main part of the bracelet, plus other beads for the buttonhole and button placement. And, as a bonus, she teaches how to make a stunning pair of earrings to compliment the bracelet! 

    Though Danielle is using the September Jewel Loom Jewel Box in this tutorial, you can design with  your own beads! The 2-hole tiles are 6mm wide. She also uses druk beads and 8/0 seed beads for the bracelet. You can use any size bugle beads...the earrings just may be longer or shorter than the earrings Danielle teaches. Watch the tutorial below:

    Learn how to warp the loom and weave with 6mm 2 hole tile beads with the following tutorial link. Remember to skip 3 grooves between warps. You only need to have 4 warps for 3 rows of beads. https://youtu.be/jivt5TzUYy4?si=o4I-XGqEDMIpFU_w

    Watch the tutorial to learn how to create the buttonhole bracelet with the complimentary earrings below.

    Supplies available in the Jewel Loom store:

    Buy a Jewel Loom Starter kit, with supplies to make a bracelet (not the one for this tutorial), besides an Original Jewel Loom, Baby Loom, loom stand, plus more:  https://jewelloom.com/collections/jewel-loom-bead-looms-for-jewelry-making/products/jewel-loom%C2%AE-beaded-bracelet-starter-kit-with-bonus-baby-jewel-loom-and-needles

    Save 15% off your first order, plus Get 3 Free Patterns: https://jewelloom.com/pages/get-3-free-bead-patterns-and-save-15-percent-on-supplies

    Did you know Jewels has a Book? It’s true! You can get a digital copy of the Jewel Loom Inspirations book here:  https://bellacraftspublishing.com/jewel-loom-by-julianna/ 

    You can find Jewels here:

    Follow Danielle at these links:

    • YouTube channel:  https://youtube.com/@daniellewickesjewelry
    • Danielle Wickes Jewelry Website (store & tutorials):  www.daniellewickesjewelry.com
    • Facebook:  https://www.facebook.com/DanielleWickesJewelry
    • Instagram:  https://www.instagram.com/daniellewickesjewelry/


    Transcript:

    Hey guys, in this quick tutorial, I'm going to show you how to take a gorgeous loomed design in a style we've been
    musing on for um the past couple of projects, creating beautiful check
    tiles, loomed pieces. And then um in this tutorial, I was just going to focus
    in on a technique. I was going to focus in on how to make a button loop. Button loops are so fun to make. They seem a
    little bit like, you know, like, whoa, that's kind of cool. How'd you do that? But when you're making them, they'll they'll be super clear. You'll see on
    the loom like it's it's total um what's the word? It makes sense. It's intuitive. And so you'll get it when you
    look at it. You'll see how that works. And then of course attaching the button. We go over that in this class. But um
    I'm going to link you in the description to a previous tutorial where we did the warping of the jewel loom. And it's
    three warps. Each of those uh sorry, four warps spaced um three coils apart.
    Sorry, it's three spaces on the coils. The little coils are these little things right here, and I'll show you it when we
    get started. But the um the looming is the process that we've been using for
    creating these gorgeous checkile designs over the past couple of months. So, here in the playlist, you can find a
    reference to that. In this tutorial, I wanted to just zoom in, focus on making a button loop.
    And so, that's what um I have planned for this one today. And then um there's
    another technique where I highly recommend that you can off loom do button loops and that's also in some of the previous tutorials. So you can try
    both. We do a cool chevron pattern with this one. It's a lot less little seed beads, more big beads, so it goes a lot
    faster and I hope you will enjoy it.
    All right, so after you complete your basic looming portion of this design, you'll have something that looks like
    this. It's a little chevron pattern made with the two-hole check beads. And
    again, the looming started on a warped jewel loom. I used
    some blue wildfire. It's four warp strands. In each of those
    warp strands, I skipped three coils in between.
    And then the looming starts with three beads per row in the pattern provided. and it basically makes a cute little
    chevron. So, this part is um what we know and love when we already have done
    a lot on the Juloom, but what we haven't done yet, at least not with me, is created a button loop right on the loom.
    And I think this is a really cool way to finish a lot of different designs, um including those you not just with check
    two hole tiles, but lots of other designs. So, you could complete the next steps of
    this design exclusively with seed beads if you'd like. You can also complete them with some 4mm droo beads. And so
    since I have those available, I'm going to go ahead and put those here. But the concept I'm going to show you could be
    worked with just seed beads. And so the equivalent seedbead count to the check
    tiles is uh four beads across. So, if you're working
    a design like this and you want to create a button loop with four,
    you can go like that and it will work out great. I'm going to create a whole row here,
    four and one, two, three, four of all seed beads.
    And this is just to, you know, switch from using tiles to using a a different bead.
    And it'll give us places to weave into and turn later in addition to the tile rows we already
    have. So there's a row of 12. It's basically four of those little seed
    beads for each tile. So for the next part, if you would like,
    you can work starting with a droo bead,
    we're going to start. Basically, what we're going to start doing is working a button loop up one side.
    So you can start with
    um one of the dukes and you can do either one or two seed beads. Two seed beads is going to be really full and one
    seed bead is going to be a little thinner than the four seed beads that we're layering up over.
    Um, but I'm going to go ahead and go with just one droo and one seed bead. You could probably get away with switching that, but that's what I'm
    going to do here for mine. And right now I have my warp thread running underneath
    everything. So you can see it's it's just here underneath all of these strands. What I'm going to do is come up
    through the center. And when I do that, it's going to allow
    me to go back through these two beads.
    And so I'm basically just switching now to looming only with these two warps on the edge here. Currently working on my
    left side. So I'm going to get something that looks like that.
    So bring your needle underneath the warps again. And this time we're going to pick up the seed bead first and then
    the juke bead. And again, this is just style. If you wanted to, you could work
    this with just all four seed beads instead. And all of those are going to work really well.
    Come up here through these two beads.
    And so essentially what you're going to start to see is a little pattern like this.
    So here's the next one.
    Bring those to sit here and bring that needle in between and through the beads.
    So, I'm going to carry on doing this for the same length as my button. So, now is a great time to bring your button over
    and just hold it under the warps and set it so the edge kind of touches your seed
    beads there. So, you can see I'm going to want to do at least two more and then
    check back. So, let me loom on two more just like this.
    So, there's a total of five rows like that.
    And that looks like it's going to be just enough. But what I might do is I might put on one more row
    of just seed beads just to give it a little bit of height.
    And so what you'll want to do for this row is pick up eight more.
    So a total of 12. You could do this all at once or you can do it in that set of four like that.
    But basically you're going to be putting four between each one.
    And then just bring your needle back through.
    Oops. And it's going to move around on you. Don't worry about that. I'm going to put another row.
    Okay. And that's just to stabilize things for a second while we test our button. And you'll want to do this with
    any design like this that you're working on. And what I'm noticing is that it fits pretty comfortably.
    Yeah, I think that is going to work. So that's what it's going to look like
    when it's buttoned. And you can always, oh, another thing I forgot to mention is you can always
    create extra rows of seed beads, too, before you start the button loop if you're looking to add length. I also had
    enough tiles left that I could have kept going another row or two. So, uh, after
    you finish a row or two of seed beads, grab some of your check tiles.
    And I'm going to go ahead and put on one row of check tiles.
    And so just a regular good old row just like that.
    H. What do we think of that? Does it look good? Actually, I'm just testing my button one
    more time, making sure it didn't make it too tight. Looks good. All right. And so, we need to get over here. And so,
    there's a couple things you can do. You can weave a new strand in or you can take the one we've got and carefully
    head back. So, what I'm going to do is work with my eye side of my needle
    and I'm going to turn and head back through the last hole of these tiles,
    which is going to put me over here. And then same thing, I'm going to head through
    just four There's one, two, three, and four. Just
    these four here. And just cautious not to hit my warp
    strands. Just want to go through the beads without puncturing any strands. I might
    need to work with a needle side just for this turn, but I'll do a little slide test.
    Make sure I didn't puncture anything. So, that looks good. All right. And so from here,
    I'm going to have to loom in a different direction. Uh, at least for the first row, but I'm
    going to go ahead and kind of match in opposition what I have here. So it looks, if you have one where the droo is
    the edge, have that be the first bead you pick up. And then you're just going to bring your needle in between here,
    like that.
    And then we're going to head over the warps now through the bead.
    Okay. And now we'll pick up seed bead and our droo bead. And again, we're
    going to go under and then through the beads over the
    warps.
    So, it's a little bit different direction with the hand, but we're going to fill in three more. Just like that.
    And here's the last one.
    There we go.
    All right. So, there's our loomed button hole. And what I'm going to do here is just go over the warp strand and back
    through a row of seed beads here.
    And I'm just being really cautious that I don't puncture any warp strands.
    And I'm going to go over and back through.
    Getting through one more little tiny spot here.
    All right. So, I'm going to weave in the rest of this later. I'm just letting that hang
    out. I was very careful here that I didn't puncture any strands. And now I'm going to go ahead and remove it from the loom. So, let me clean up my beads here
    really quick. All right. So, there's our
    everything pretty much ready. I'm going to grab some flesh cutters. So, the spot we're going to have to cut here is right
    where we did our knot. So, we did a knot here.
    And we do have a knot going on over here as well. So go ahead and just undo those two sides.
    That will free the side warp threads
    here and here. So these two, we just need to
    remove one loop from the loom. So if you have a pair of pliers, just go ahead and
    press the loom gently against your belly. Don't bend it. Just press it so you can get that loop free.
    And once that loop is free here on the other side, they're just going to come right off.
    So now we have our loom piece. And before I do any of my weaving in, I
    am going to weave in my warp strands. So I'm going to go ahead and show you
    weaving in. And this is a warp strand on this side. And this one also a warp
    strand. So you're going to want to jump over the bead and then just go under the weft thread.
    And this is how you weave in all the strands. So I'll show this on one and we'll do the rest offline. It's a little
    boring to watch, but it is essential. So step and see you just go through a few beads.
    Then I'll jump over the warp here on this side. Make another turn here.
    I'm going to make another little turn here. Here I'm going to jump out in between a couple beads.
    Go under a couple of we threads.
    Then let's go through some beads. And from here we can trim this one.
    All right. And so there's your beautiful button hole button hole of a bracelet. And so I'm going to just go ahead and
    pop the button onto this side and bring yourself to exit from a center
    center bead. So just like that. We'll need a few more of the seed beads
    from your kit.
    And I'm going to go ahead and string on two three. Just show those out of the
    way a little bit. And let's get the button.
    String the button through
    and circle through the center tile.
    So that's all you got to do to attach your button. Reinforce that around two more times. Reinforcing through your
    center tile. Then I'll show you a way to weave in that strengthens the button connection.
    All right. So there's my third trip through there. And now instead of going through the tiles, I'm going to travel
    by going underneath the weft threads. So here's the first one.
    Second, third. So there's three. I might go to one
    more. Usually there's four, five. Just bring yourself down a little bit in the work,
    especially when you look at it. If you can see like spacing and gaps, this is a good way to close those gaps.
    So, I'm just going to kind of just show you by demonstrating as I go through.
    So, see how that tightened that up?
    Now I'm going to go down one more.
    And I am usually pretty careful. If I can't get through in one swoop, I'll go ahead and pull that needle through and
    try and kind of bending the pieces open like this. Look at where you're stuck.
    Magnifier is great here because you can really see the structure of what's happening. Oh, and don't overdo it. Don't make your
    tension so that it warps your piece. But I'm going down ways because I see little
    gaps I want to fix. All right. So, here when I make a turn
    and I'm just sticking in the middle here, mirroring what I did on the way down
    here on the way back up using weft to travel.
    All right. Once you're back up to where you think you've got it pretty good, let's do a few more little trips through
    the beads just to give ourselves somewhere somewhere to go, somewhere to trim.
    That looks pretty good there. If you're happy with everything, go ahead and burn thread burn.
    There we come. Okay,
    just going to push those seed beads out of the way. Let's see what we have. Got our button here.
    Strongly attached button loop. I reinforced the button loop as I was weaving in. So, it's nice
    and strong, too. Let's try it on.
    And there you go. So, this is just a really cute minimalist way to use these these
    gorgeous tiles. You have a lot of other beads in your um your Creative Soul Monthly box. The Julian jewel box has a
    lot of different beads inside. I used quite a few of the tiles as I wanted to um see how long I could make
    it. Um, so I made it a little bigger, um, just, you know, for demo purposes so I could really see how far I could take
    the design. But I still got tiles left. So I could have made this another inch longer if I wanted to. It's already
    measuring out with this many rows.
    So if you measure from like here to here, you get like seven and a quarter. And then probably when you're wearing
    it, it's it's hanging out like right here. So you're wearing it almost the eight mark. So you can definitely make less rows
    than me and still get uh you know a really easily claspable length. Like it
    could for me I could have gone a little shorter here. But definitely try different um styles for your button
    loop. So this button loop could be made with all you know of the seed beads only seed beads and it would still still work
    out really nicely. Um you can more nuancely measure it. It also has some give because of the way it can um it's
    so wide. So that often can make up for some of the height. The width can be used to make up for some height. But
    yeah, there's just a nice simple easy way to make a button loop on your loom and create a gorgeous design.
    All right, let's get started on creating the earrings. You're going to need about 40 inches of thread um or so. um it's a
    lot of ladder stitching, so it does consume the thread a little bit a little bit much. You could probably maybe get away with 35 inches, but if you want to
    have lots of maneuvering and um be able to like tie a knot at the end, 40 in
    will give you plenty and leave a good tail and um get started with that. So, you'll also need a hard beading needle,
    the wildfire, and then grab eight bugles, and you'll need four of the gemstone
    rondell's, two of the check top drilled ball um beads, and then you will need
    six of the black biconee beads, and then you'll need um 12 seed beads
    per earring.
    All right. So, with all those items gathered, and also you'll need an ear wire just right at the end. Go ahead and
    take your four bugle beads. And what we're going to want to do is string the first two.
    So, pick up two.
    These are pretty long. They're as long as my needles. Probably to string those one at a time. And then leave a good tail at least
    seven inches or so. And so you'll have your tail side,
    working side, bring them together like this, and head up through the first bugle. You're heading up from the tail
    side. And you might want to hold on to your needle just to secure the tail a little
    bit. Hold on to the tail side and the needle
    side. I meant also um bugles can be a little sharp. So if you need to make an adjustment, I lost a little bit of my
    tail, so I'm adjusting here. Just be careful as you're edging along. Wildfire is pretty strong and it it is pretty
    durable, but just know that it can cut your thread. Um, and then go ahead and head down through the next bugle. So,
    you're just kind of making a circle right through the beads. So, you should have your
    bugle beads joined and you'll be exiting from the second bugle on the same side as your tail.
    string another bugle bead. And you'll see how your thread's exiting
    from here. Just come around in a circle and go through from the bottom with that second bugle on there.
    And what will happen there is the bugle bead will now sit next to the last one.
    Sometimes what I do is I just kind of tighten everything up by holding both strands
    and then go ahead and go through the second one or in this case it's the third one. Let's do that one more time.
    You're going to pick up a new this one over here a new bugle bead.
    String it on. And then head right back through
    forming a loop.
    Tighten that up as best you can. And then go ahead and head through that
    you just added. So I'm just going to tighten everything up.
    And what you'll have is a ladder stitch of four bugles together. And if you have any little gaps, you can come along and
    just pick at the thread bridges to tighten them
    and so on like that. So the next thing we're going to do is we're going to turn these into a quad by
    going through the first bugle that we've added. So we're currently exiting from the last one we added. Let's just go
    back through the first And what that's going to do here is it's going to join
    right here. It's going to bring these together like that into a square. And
    you're just going to want to close that at the top as well. See how it's open here?
    I'm just going to close that square. And there you go.
    And so after each of these, we're typically meeting with our tail side.
    So what we're going to do now, currently I'm exiting from one of these bugles. Going to take the thread now and bring
    that needle down through the center. So not going through any of the bugles, we're just going to go down through the
    center of this little quad that we made. You can just drop your needle down through it
    and pull tightly. And then pick up a biconee, a gemstone,
    biconee, a gemstone, and one biconee.
    Now you're going to want to do three seed beads, your check bead,
    and three seed beads. head back up through the biconee
    in each of those beads above.
    Just pull to tighten that. And then you're going to want to go through the center
    of the four bugles again.
    And that's going to bring you to the top of the earring. And if you want, you can kind of hold on to the check bead and
    just tighten all of that up.
    From here, I need to be exiting from a bugle bead. And I'm currently exiting
    from the center of the four. So go down through one of those bugles
    and then come up through an adjacent bugle.
    And if you have a little loose spot, this is the chance to tighten that up. And now you'll be here with your thread
    exiting from a bugle bead. And you can string six seed beads.
    And what you want to do is jump across the quad to the one that's furthest away from you. So don't go through an adjacent, but go through the one across.
    And you'll form a loop like that.
    And then go ahead and weave through the bugles.
    The goal being to get over here.
    and I'm just going to head back down. Now, I need to reinforce this loop. And
    the cool thing is is my tail thread is exiting right here
    from the other side. And I kind of planned that a little bit as I was bringing my thread up, but you can always weave to exit from there. And if
    you ever need to make a turn, you can use the center beads to make a turn. But the easiest way is just to get that
    tail thread going and use it to reinforce the loop. So that's what I'm going to go and do
    here. And then I'm going to meet the tail thread down here
    or meet the old working thread, sorry. which is right here at the bottom. So here you can tie a double knot with the
    thread that you just met up with. This can happen at the top or the bottom, whichever you prefer, wherever you end
    up. Depending on how you weave around, you might be just in a slightly different spot than me, but it's still going to work.
    So now we have that. And what I might do is just take one of the one of the
    strands. It doesn't matter which one. Let's go with the longer one.
    And if you want to just bring it up through an adjacent bugle
    and then you can trim that. And I might actually thread burn it
    to our thread burning.
    And then same thing with this one. I just don't like to, you know, thread burner trim right next to a knot. So,
    I'm going to move this thread. It may not be long enough to make it all the way up. But let's see. If it's not, then
    we'll just call it good. But, oh yeah, then it's long enough. And we'll go ahead and trim that one.
    There we go. All right. So, there's our earring. Super pretty. put our ear wire
    on. And I actually did that at the end after I'd already made the earring, but you could have strung it here at this
    step if you wanted to. Doesn't really have a front or a back, but try to keep your ear wire um in between the
    three and three on each side like that. And there you go.
    Beautiful pair of earrings to match your gorgeous bracelet.
    So, here it is again, just to show you one more time our gorgeous design. Uh, again, this was made using your um
    September Jewelbox Jewel Loom Creative Soul Edition. The little um cute beads
    there are all from that and there's a lot of extras so you can go crazy and get creative. I hope you love this one
    and check back with us for more inspiration in the future. Bye for now.