SAVE 15% OFF ON YOUR FIRST ORDER PLUS GET 3 FREE PATTERNS. SIGN UP BELOW!

0

Your Cart is Empty

Shop
  • Read our story

  • Each of our carefully researched, styled, tested and distributed collections reflects a particular aesthetic and ethos. We hope some of these speak to your own style, and help you refine and redefine your own look and style philosophy in the process.

  • Easy DIY Rainbow Bracelet Anyone Can Make!

    September 18, 2025

    Easy DIY Rainbow Bracelet Anyone Can Make!

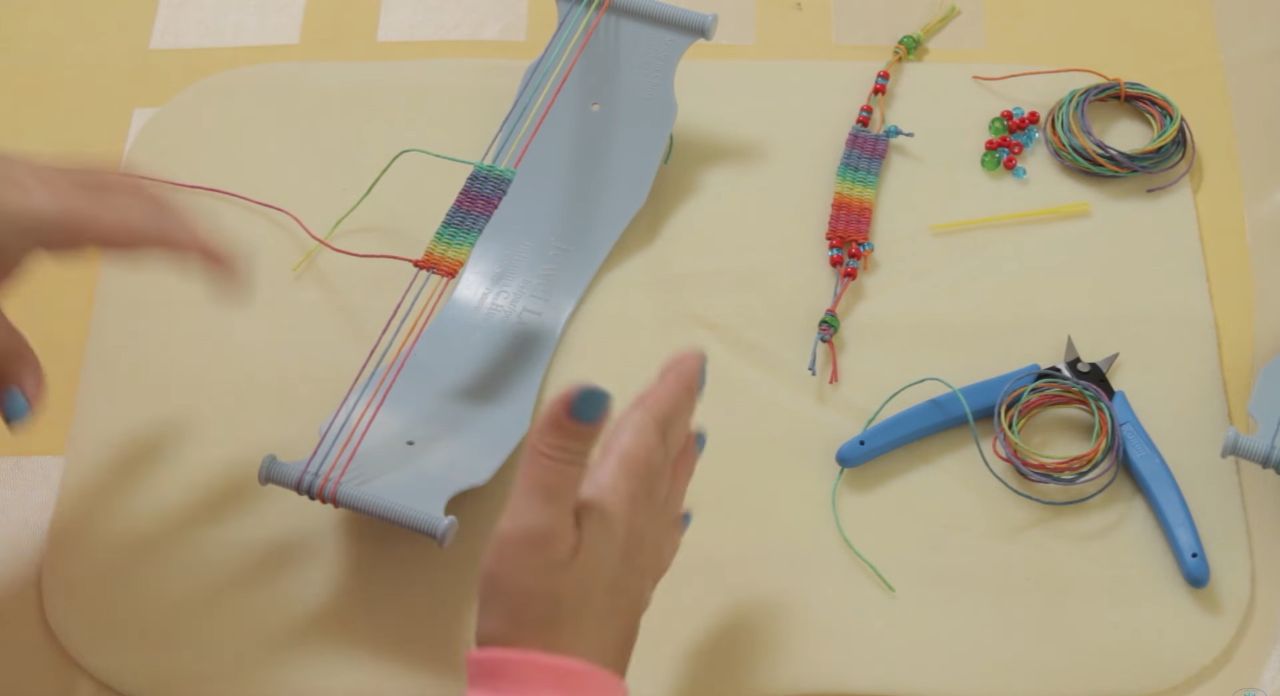
    Learn to make an easy & colorful hemp bracelet on Beadalon's Original Jewel Loom, using Hemptique's varigated hemp and colorful beads. This is a great project for beginners and experienced loomers alike! This video was originally made to teach people who are looking for a quick project to teach others, but even if you do not want to teach, you can still learn how to make this eye-catching bracelet! 

    Watch the tutorial and get the supply list below.

    Here are the materials Jewel used:

    • The Original Jewel Loom Bead Loom
    • Hemptique Variegated Rainbow Hempcord
    • A Variety of pony beads
    • Blunt Needle
    • Scissors 

    Get a Jewel Loom as part of a set, which also includes the Baby Loom, Jewel Loom Stand, and a kit to make a beaded bracelet (not the bracelet shown in this tutorial):  https://jewelloom.com/collections/jewel-loom-bead-looms-for-jewelry-making/products/jewel-loom%C2%AE-beaded-bracelet-starter-kit-with-bonus-baby-jewel-loom-and-needles

    The small wood needles, sold in the Jewel Loom store, would be great to use in this project:  https://jewelloom.com/collections/jewelry-making-buttons/products/boo-boo-needle-3-pack

    Save 15% off your first order, plus Get 3 Free Patterns: https://jewelloom.com/pages/get-3-free-bead-patterns-and-save-15-percent-on-supplies

    Did you know Jewels has a Book? It’s true! You can get a digital copy of the Jewel Loom Inspirations book here:  https://bellacraftspublishing.com/jewel-loom-by-julianna/ 

    You can find Jewels here:


    Transcript:

    So today I'm going to show you how to
    create this rainbow variegated hemp
    bracelet. It's really a lot of fun. Um
    super easy to make and the kit has
    everything that you will need to make
    it. So there is the variegated rainbow
    hemp and then there are a variety of
    beads in a couple different sizes.
    So to get started, you're going to want
    to use your jewel loom. And I work with
    the jewel loom in this horizontal
    position so that it is always in front
    of my body.
    So the first thing you're going to do is
    lay it flat with the top part of it
    facing up towards the ceiling. The top
    part has the words jewel loom stamped
    into it. So you'll know that that is the
    top of your loom. Now, the metal rod
    comes with the jewel loom, and you're
    going to need to insert it into the
    loom. So, what I do is I take the bottom
    hole and the rod, insert that into the
    bottom hole, and then very gently, I
    take the loom and I bend it up and pop
    it into the top hole. Pop the rod into
    the top hole. So, the next thing that we
    want to do is we want to start to create
    our warps. So, we're going to turn the
    loom over. And as you can see, there are
    two buttons on the back side of the
    loom. And this is where I'm going to tie
    onto. You can see that I've already had
    a project uh going on this one at one
    time. So, we're working from the spool
    of hemp. And we'll just put that big
    part to the side. And we're going to tie
    this onto the back button that is
    closest to our body. And what I do to
    get started is I create a little what I
    refer to as an air loop. It's just the
    beginning of your knot, but it helps me
    to guide that loop onto the button.
    And when I do that, I want to start to
    create the knots so that they are in the
    middle here of the button and closest
    again to my body. So that was our first
    knot.
    This will be our second. And each time
    I'm just making sure that I really pull
    nice and hard so that my knot is really
    secure.
    So, now we're ready to create our warps.
    And what we're going to do is we're
    going to bring the hemp and we're just
    going to let it rest over here on top of
    the grooves. This hemp is a little bit
    thicker than beading thread. So, it
    won't necessarily lay in between the
    grooves. It will lay on top of the
    grooves. And because we're only working
    with a small part of our loom, we don't
    really need to worry about how many
    grooves in we're starting at. But if you
    want an idea, it looks like it's about a
    half an inch to maybe 3/4 of an inch
    from the far left in.
    So then I'm going to take the loom with
    my hand, my left hand here, and I flip
    it over.
    And you can see that I'm just letting
    the loom right here. I'm letting the
    hemp rest on
    the groove. And then I'm going to match
    that up down at the bottom. Just go
    ahead and eyeball it. You don't have to
    be exact, but I could tell that that
    looks good. And all the while I'm
    keeping the tension with my hand. So,
    you see how that is? How that warp is
    nice and tight.
    Next, what I'm going to do is flip the
    loom forward and I'm wrapping it the
    hemp around the back button.
    Then I'm going to skip one, two grooves
    and let the hemp
    rest in the third. So, let me just get
    that. There we go. So, let's just see
    that right there.
    And then once again, I'm going to match
    that up to the top. Skip one, two
    grooves,
    lay it down in the third.
    Flip it over. And again, we're just
    wrapping that around that back button.
    And I'm going to skip to
    lay down in the third.
    Bring it towards me. Oh, and you see how
    beautiful this rainbow variegated hemp
    is is already showing all of its
    gorgeous colors. Now, we're going to do
    four warps. And let me just show you.
    See how nice and tight that is? That's
    how you want your warps to be. It's
    really important. Once again, flip
    forward. Wrap it around the back button.
    Skip one, two, lay down in the third,
    bring it up to the front,
    skip two, lay it down in the third. And
    now we're going to tie it off. So I'll
    just wrap it around that back button a
    couple of times to get it, you know,
    nice and secure.
    Pull that straight.
    trim to about six or seven inches. And
    then what I'm going to do is take the
    end of the tail and I just thread it
    underneath the warps. Let me see if I
    can't get my fingers out of the way
    here.
    So, I've got the tail threaded
    underneath the warps. And then I'm just
    going to bring that tail back through
    the loop
    to create my first knot.
    Now you want to do that about two to
    three more times. So under the warps,
    tail goes back through the loop. Pull
    tight.
    Okay. And for giggles, we'll do a third.
    So let's turn it over and we'll go ahead
    and trim that a little bit.
    We'll turn that over. And that's what
    you want. So let me see if I can get the
    sound.
    It's almost like a guitar string. That's
    what you want. You want really nice
    tight warps. Most of the time, if you
    lose the tension, it's usually the first
    warp or the last one that will be
    dragging really low. So, the next thing
    we want to do is we want to take
    the rod out of the loom and we're going
    to put that to the side. Now, if you're
    working with people um maybe younger
    people who might need some help with
    this and you're on a time frame where
    you only have so many minutes to do this
    project, you may consider pre-warping
    your jewel loom just so that everyone
    has a chance to actually get the
    bracelet done if you are in a time
    conraint type of situation. So, what
    we're going to do next is I have taken a
    piece of the hemp that comes in the kit
    and I have threaded it onto a blunt
    needle. That means that it's not sharp.
    Okay? And it's plastic and you could
    typically find these um at your craft
    store.
    And you can do this by hand as well. I
    just find that using the needle does
    help me. Now, I'm going to turn my loom
    this way just so that I can show you
    what I'm going to do next.
    I'm starting with the J in the jewel
    loom. That this is this is really a nice
    indicator of the center of your project.
    So, you can see it says jewel loom and
    that'll be my center. So, I'm going to
    come under the warp, over the warp,
    under.
    I'm going to pull all the way through.
    And then I'm going to leave a tail of
    about 4 in long.
    Then I'm going to come under, over,
    under.
    And you just want to help these first
    few rows to start to form.
    So under,
    over. And it's just this repetitive
    motion.
    And once again, let's just keep these
    nice and nice and tight, but you don't
    want to distort the actual figure of the
    bracelet. So, we're going to come under,
    over, under,
    and squeeze those little guys together.
    Awesome. Okay. So, can you see it coming
    together now? The the actual weave of
    your project is starting to show. And
    those first three rows are, you know,
    what I call the fumbolina rows because
    you're kind of trying to get them in
    there. You're trying to get everything
    adjusted nice, straight, tight. Um, and
    then you can see as we do the fourth one
    how much easier it is. See how that just
    Yeah. A lot easier. And now it starts to
    form itself.
    So depending once again on the time
    frame that you have, you know, if you're
    if you're teaching this,
    you could create, you know, the length
    of the original bracelet that I made
    here, which is basically the words jewel
    loom on the loom. Or you could do
    something shorter. Um, either way,
    you're going to have a very colorful,
    fun bracelet that anyone of any age
    would be super excited to wear. So, let
    me go ahead and show you what I've done
    over here, uh, with a finished one. So,
    we'll push this out to the side here,
    and I'll go ahead and bring in my
    finished piece. Now, isn't that just
    great? I really I love this rainbow
    variegated hemp. It's really gorgeous.
    So, now we're ready to secure these
    tails to the warps. And what I do is I
    just simply, and by the way, you could
    tell mine are a little bit longer. Um,
    do at least 4 in. If you feel more
    comfortable leaving a longer tail,
    that's fine, too. It's not a deal
    breakaker. But all I did right there was
    I just created a little knot to secure
    that. And it looks like we need a little
    one up here, too.
    So just, you know, creating little slip
    knots.
    And there we go. Perfect.
    So then the next thing that we want to
    do is we want to take the project off of
    the jewel loom. So we're going to turn
    this over. And you can use uh scissors,
    you can use cutters similar to the ones
    that I have in my hand. And basically,
    we're going to cut. Now, remember,
    there's a lot of tension in this loom,
    and so it is going to possibly make a
    sound when we cut.
    There we go. Not too bad.
    We're going to put the loom to the side
    and then we'll start to build our
    project. So, if I bring the finished one
    in, we can see that we have these two
    blue
    beads. And I'm just sliding that one on.
    And then I'm going to tie a knot.
    So after you add that one bead, next
    what you'll want to do is to start to
    string the other colorful beads onto
    the warps.
    So we're going to try to get both of
    those through there.
    There we go. And so what you can see I
    did was I spread the warps out so that
    you have two warps here and two warps
    here. And we're just going to start to
    string the other beads
    on.
    You just want to pinch these together.
    Sometimes if they're a little frayed,
    you can nip them
    and that makes it a little bit easier.
    There we go.
    There we go.
    Got this really nice hemp cord. It's
    really, really nice and sturdy. So, what
    I did, let's let's go ahead and take a
    look at the finished one here, is I
    added a red, a blue, and a red bead. And
    then I did that on the opposite side.
    And then I tied a really good knot. And
    then I added a big green bead. And then
    I tied another knot really nice and
    tight. And then I have like my little
    fringe right here. So again, we're just
    spreading the warps,
    stringing the beads onto the warps,
    tying those together after we have the
    beads on. You know, just a really nice
    tight knot. And then you'll go ahead and
    add the green bead, tie another knot,
    and then the project would be finished
    once you completed it on the opposite
    side. So, let's take a look at what it
    looks like when we put it on.
    And just to give you an idea with the
    closure here,
    unless I've expanded over the last
    couple of days, which is possible. I
    have a I have a new puppy, so who knows?
    But look at this. Isn't it gorgeous?
    Just a really beautiful quick and easy
    project, not only for the kids, but a
    great idea for summer fun for parties
    and um you know, just all kinds of
    gatherings. What a great girlfriend
    bracelet. And I think the guys are going
    to love this as well. So, there's your
    finished bracelet. You're going to have
    everything you need in the kit, as I
    already mentioned, your jewel loom. And
    my only suggestion is is as I had said
    earlier that if you are working in a
    time frame that is limited, you may want
    to go ahead and pre-warp your jewel
    looms just so that everybody has a
    chance to get a finished bracelet
    completed.
    Have fun. Super fun, super easy, and
    extremely colorful.