SIGN UP FOR MY NEWSLETTER AND RECEIVE 3 FREE SEED BEAD PATTERNS PLUS 15% OFF

0

Your Cart is Empty

Shop
  • Read our story

  • Each of our carefully researched, styled, tested and distributed collections reflects a particular aesthetic and ethos. We hope some of these speak to your own style, and help you refine and redefine your own look and style philosophy in the process.

  • How to Create a Bougee Coaster with the Boo Boo Coaster Maker

    December 19, 2022

    How to Create a Bougee Coaster with the Boo Boo Coaster Maker

    Learn to make a coaster/square from Designer Tricia Giazzon on the new Boo Boo Coaster maker. Learn the ins and outs of this beautiful Loom. (Hint: you can combine the squares to make other items.) Relax and loom along!

    Supplies Used:

     You can purchase the different materials at the Jewel Loom website. You can also support Tricia by using her affiliate link: https://jewelloom.com?aff=6  

    Subscribe to the Jewel Loom YouTube channel to access past & current tutorials: https://www.youtube.com/c/JewelLoom   

    You can subscribe to the Jewel Loom Jewel Box with course here: https://jewelloom.com/collections/subscriptions?aff=6   

    Sign up for the Jewel Loom newsletter & get 15% off your first order, plus a free pattern:  https://jewelloom.com/pages/save-15-on-your-first-order-get-a-free-pattern?aff=6     

    Receive text notifications for Jewel Loom shows & special deals by texting "Sign Up" to  1-805-768-0568

    You can find Tricia online through her link tree: https://linktr.ee/pinkpoodlecraftstudio  

      Check out the Jewel Loom Blog for past & current tutorials, plus read details on project:  https://jewelloom.com/blogs/craft-hangover 

    Join the Jewel Loom School Community (off Facebook) to share your loom creations, be inspired by others, & a place to ask & answer questions: https://www.juliannaavelar.com/offers/5ss8HfCp/checkout 

    Jewel Loom Facebook pages: https://www.facebook.com/Jewelloom  &https://www.facebook.com/JuliannaJewelsAvelar 

    Jewelry Making with Jewel Loom community page:    https://www.facebook.com/groups/228056324285807 

     Please contact Jewels with any questions you have about her looms:  email -hello@jewelloom.com or text - 1-805-768-0568


    Transcript:

    hey guys there you are you're already in and waiting how I love that it's so
    great to be here I do apologize for um missing last night's live but uh we had
    some issues here with the puppy dog so um always want to put put Mark our girls
    first you know so um but I thank you for joining us today my name is Trisha gaison and I am here
    for jewel loom I have a studio called pink poodle jewelry studio
    um I enjoy working with Jules and we have a great time this week is going to
    be super fun we're going to be using the boo boo Loom
    coaster maker and this is so adorable guys if you haven't seen it check it out it's so so
    I don't even know the word for it but I just totally enjoyed and relaxed making my
    coaster it was just fantastic so I need actually two so far and I'll show you
    those here in a bit but I want to do a little bit of housekeeping first so if you are joining us on Facebook please
    share and like this post for us we greatly appreciate it and if you have
    not checked out the jewel loom YouTube Channel please do head over subscribe we keep all of our stuff
    um all of our videos all our lives all our classes on the
    um julum YouTube channel we also have our school that Jules posts
    everything and I post everything in for the the workshops that go with her kids
    every month um we always
    um enjoy when we see over there commenting on our YouTube channel as
    well as I also have a YouTube channel it's Patricia's pink poodle jewelry studio if you have not subscribed over
    there please do so as well okay so I'm gonna say hello to some of our friends
    here who do we have I saw a bunch of you waiting here
    gal good morning gal good morning Robin hi Maria
    oh wow guys you've been busy
    okay just making sure those questions aren't for me cool cool
    hello hello my girls how is everyone doing I hope you had a great week so far
    it is Friday and there I see Miss Barbara she's come in to join us again I
    ask that y'all just share this out for us it makes a huge difference um a Joan is posting some housekeeping
    as well um want to pay attention to those notices that she's putting up especially
    about the shipping over Christmas okay
    so I'm gonna go ahead and just get started here and I'm going to turn my camera down and we're gonna get
    acquainted with the boo-boo Loom coaster maker okay guys let's turn this around
    as you know there'll be just a black screen momentarily as my camera turns
    we are okay guys so here is the adorable
    boo-boo Loom just cannot be any cuter but it's also
    very functional and fun as well the loom is of course made with our sustainable
    Baltic Birch it is made um where it has the teeth on the
    underside sticking out and then we have our grooves up on the top we have group
    these aren't really teeth Guys these are grooves as well but they're sticking outward and I'm sure Jules would have a
    better name for these but today I don't know if my head's even on straight so bear with me so when we have
    our grooves up on top very well made it makes the perfect size coaster of course
    there's all all jewels looms are very well made and you can see how the back
    is dovetailed here and how solid that'll be for you very very beautiful such a handsome boy on there
    right and then we get our adorable I love my boo comb this is great for
    pushing your warps down so that is absolutely adorable and then you of
    course get a fiber needle which says Zoomies and has paw prints on it
    so here are the uh coasters that I've come up with this is one that I made
    last night this is just like some of that bubble yarn that I did
    um I you know me guys I can't do anything simple and plain I like to be
    able to do over the top stuff with whatever I make
    so this I did it was super fun this is just one kind of yarn here
    and I really am happy with the way that came out Marianne hi Marianne she says
    Trisha your tutorials were fantastic for November creative Soul box mine turned out wonderfully and it fit perfect oh
    thank you so much Marianne I appreciate that so much so to get to our project let me turn my
    other light down here so we can get a little bit more this is our
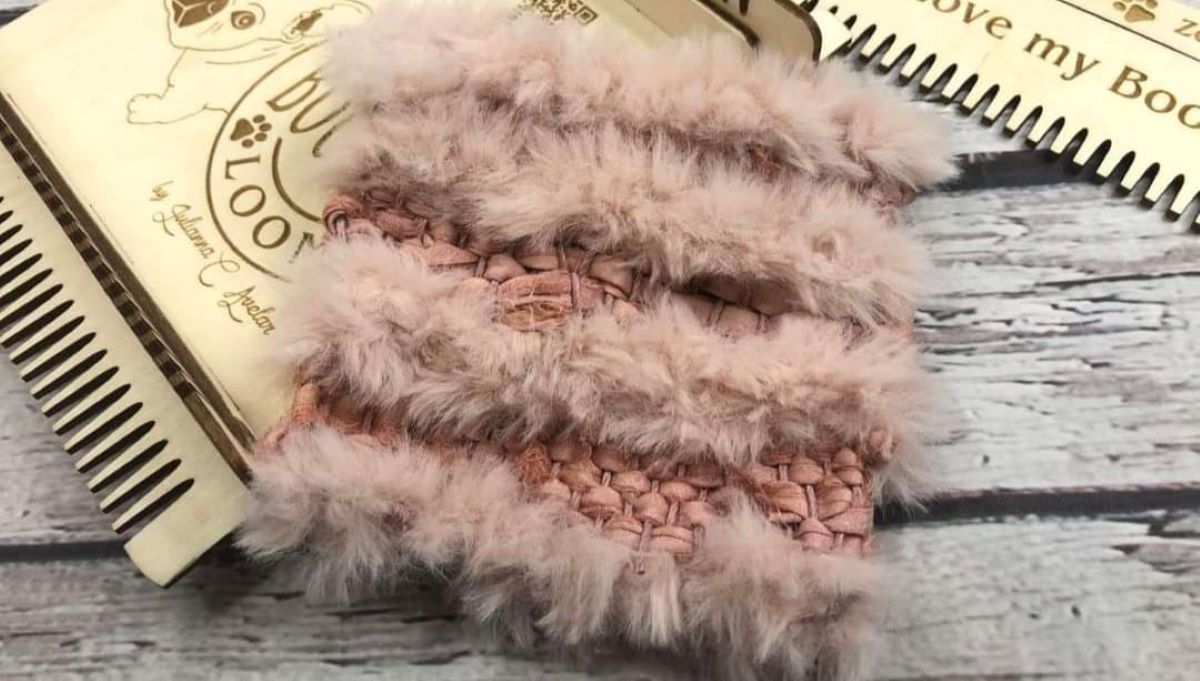
    um coaster that we're making this week and this is made with just like a furry
    um yarn and then I just used some sorry soak that I had okay just so cute this is like me over
    the top I just love it so we're gonna make this one today I'm going to teach you how to do that now you want to have
    all of the things that I showed you here that come with the loom I actually keep a crochet hook nearby because that way I
    can weave my ends in as I'm going so at the end I don't have to go back and
    weave everything in and then tie it off and then do all that stuff and I just have some
    like I said some of this furry yarn cut here into lengths I have no particular
    lengths cut I just like to do it this way because then that way uh I'm not messing with the roll as much
    I probably will have to um cut some more but that's just a good
    start for me and then I have some sorry silk strands cut okay I have a pair of
    scissors here as well you're going to need that and I'm using hemp as my base
    so I'm going to show you how to go ahead and Warp this lovely Loom
    let me get my ends off here and this is just 0.5 guys you can use whatever string that you have whatever
    hemp you have whatever you like as your base if it'll if it'll string onto your
    loom and it's not stretchy um it'll work perfectly for this okay so
    I'm going to start here on the left and I'm just gonna take my hemp and wrap it around this outside
    um tooth for lack of a better term guys a
    couple times and I'm just going to tie that on oops there we go
    I just want to snugly tie that on if it doesn't pop off on me go
    now we got to keep in mind Trisha is a late Riser so this is still actually morning for me so bear with me
    [Music] all right so we're just going to tie a
    couple knots in that just to have it secured there so it's
    easier to go ahead and work okay we just tied that on that larger one
    there so then what I do is I lay
    my hemp into the first Groove up here that I've just tied on here I lay that
    in there and then I go over to the first groove on the other side I'm going to drop down
    in to the bottom set of grooves and I'm going to skip a Groove
    and then pull my hemp up and over and skip a Groove here I'm doing this
    because I'm I'm working with a um a fuller yarn a fuller material but you
    wouldn't have to if you want to thread every single one you certainly could but I'm gonna do it where I skip
    so then I'm just going to drop down in here
    and Skip sorry that's off there skip grooves and I'm catching this bottom
    part as well guys and the reason I want to do that you could do it the other way but it doesn't give you as much material
    to tie off with so this makes it very nice that we have this down here all right and so I'm skipping up here
    and then I'm gonna go into my next Groove
    skip up here and the one nice thing another nice
    thing about this uh Loom is especially with the thicker materials the The Wider
    um fibers and stuff it takes less time to make and make a coaster you know you
    have um comes up comes together pretty quick
    okay and I'm just going to continue doing that as I skip as I go
    foreign okay
    and even warping it is pretty easy and pretty quick too
    I'll tell you guys if you haven't gotten one of these I highly recommend them because what great
    gifts you could make
    for any time of year and I really think I'm still gonna whip
    a set of these set of coasters out for my mom for Christmas Even though she's supposed to be done
    technically with Christmas games just have to make her some
    okay so we're just going to continue that and I'm just keeping this taut as I'm going
    guys just keeping her taut
    we're just skipping every other one here
    okay almost there
    okay and then through the last one and then
    I'm just going to do the same thing on this side onto this um outside
    um tooth Groove piece of wood however you want to refer
    to that and I'm just going to cut it from my hemp
    and get it out of there so we're not having a mess with our
    sorry silk and then I'm going to do the same thing guys I'm just going to tie this off it looks like my hemp is a
    little frayed there so I'm gonna have to foreign be careful when I'm tying this to make
    sure I get everything right I know this is hard to see but you're
    just going to tie this off the same way you would tie off any of your Looms
    um usually it's on to the knobs but we're just using these larger
    teeth to tie off on okay
    almost there we're just tying knots I know it looks like I'm doing more because it looks a little more difficult
    but we're getting it all right pulling that
    yeah that frayed hemp isn't helping matters that's for sure okay let's do one more and then
    I think we're pretty good
    thank you yeah my fingers don't like working in the morning either
    there we go okay so that's it we are all warped ready to roll
    so I'm gonna start one of the Great Tricks that helps a lot with making your
    um coasters is if you do a section here on the bottom and then move up to the
    top and do a section at the top because when you go to finish if you have
    everything in there uh pretty snug and you don't have much room to groove it's
    hard to get your last few few rows up here can be hard um and to fit your needle through and
    get that weaving so if you just do the top and do the bottom and then work in from there
    it's easy peasy so I'm going to start with some of our little fur yarn
    and I am actually going to use a little bit smaller needle only because I really
    love this one but I I kind of uh damaged mine because I like to crank on things
    and the wood is not it's a great quality but I am just too
    aggressive my point is so I was using this to try to correct and pull warps
    and just doing things with it I shouldn't have been so this is in no way the product's fault believe me I've
    broken original looms it's just because I just crank on them
    I get crazy they are very high quality it is not the maker it is the the actual
    it's not the maker of the materials it's the person that's creating on them believe me
    so I just have a little bit little of a needle just um which works just as fine with it so I'm
    just going to start by going over top of my first uh strand
    under the next over top under of the top under upper top
    under and you can see how I'm like flexing my needle as I'm going
    so I can get the um get the needle into the areas I want it
    to be so I'm just kind of just giving it a little Flex so I can get under the Looms or the warps and over the warps
    okay so I'm just going to pull this strand through and it's okay it doesn't bother me it
    just twists a little bit um the yarn because you can see there's a right side and a wrong side to it but
    I'm just going to pull it through and I'm going to leave a little
    end there because I'm going to weave that back in in just a minute and I'm just kind of
    moving my yarn around to get the right side up no big deal
    just want it to look as cute as possible and we'll just take our little comb in there and just push that down and we
    have this little end so what I'm going to do is I'm going to take this end and
    immediately I'm going to weave it back through because as I said I've found that this
    is the easiest way to do it so you're not done with all that at the end
    especially if you're using multiple pieces of materials if you're doing it in one color no big deal because you can
    have a long enough strand to do the whole thing all right so we're going to start again from the other side from the
    right and now I was over top of the warp here now I'm going to go
    underneath the warp same warp and continue back doing the
    opposite of what we did the first time we went through okay so we're under over
    under over under over under over under over under over under
    okay
    okay and I'm just kind of gonna work the material here and again guys or not
    again but keep in mind you don't want to pull this stuff too tight when you're making because it's going to warp your
    looms and it's going to give you or your it's going to warp your warps not your
    loom see um it's gonna Warp your warps and it's
    going to make them kind of wonky if you're pulling too tight you kind of just want to keep a steady
    tension as you're working your way up okay so I'm going to go back through here
    from the left now and the same way
    okay you like that way Robin weaving the ends
    back in when you're doing it okay guys so look here is something I didn't catch
    the warp that I wanted to in the end so look that's what happens so that's easy fix
    we can just pull that
    out I wasn't paying attention that's my own fault very easily comes out
    and then just put your thread back through your needle
    or your yarn and we are under this one so we're over under over under okay
    foreign okay
    and now we're going back I'm checking this side make sure I didn't pull it too tight and then I'm going to continue from left
    to right and we're just going to continue this the whole way
    now once you get so many rows done on the bottom
    I'm going to do one more I think then we're going to pop up to the top and we're going to do the same thing up
    there okay so I can see here I'm over this Warp so I want to go under this warp for my
    next row and you can choose how tight you want
    your materials to be what I mean by that is tight up and down
    wise okay so we're just gonna
    push that down [Music] and I'm just going to leave this here
    for now because I'm going to start working up top here so I make sure when I get to the area
    uh up there that I already have my materials there and I'm not going to
    um run out of room so I just put a piece on just like I did
    before and I work right to the left with this because I'm right-handed handed and it makes it easier for me
    um but you can certainly work left to right to start however but either way you're going both ways at one point
    so we're going to do the same thing I'm just going to put my needle in and go Under and Over
    the whole way across
    okay pull our needle
    okay and then I'm going to leave a little piece of
    material hanging over okay of the yarn right let me put this back on
    see I told you I get aggressive I pull the needle off so it's the yarn and everything there are a certain number of
    rows you should weave on either end no not really
    you do what you're comfortable with what you want to do I usually do about three
    or four but you just want to make sure you have you know enough rows here that
    when you get up close you're not trying to jam your needle in between the warps
    and the materials okay so again I'm going to take this end and I'm just going to put it
    weave it back through just doing the under over just using my fingers
    just hiding that little towel in there okay and then we're going to work our
    needle back from the other side
    okay
    and then an ideal another row from right to left here doing the same thing
    okay so I'm going to leave that as it is I'm actually going to cut
    this down just a little bit this strand that I have out the um side there the
    tail that I have and I'm going to do the same thing I'm going to weave this back through
    so we aren't looking at all of it later and just kind of Tuck everything up
    there you can take your little comb in and just kind of put the material in position
    okay so now what I want to do I'm going to do I think well maybe we'll
    just leave that there and we'll start with the sorry silk how about that so this is just regular old sorry soak that
    I have here guys um let me cut this and we're going to weave this back
    through okay just back and forth and that's in
    place so now I'm just going to take this piece of sorry silk I love this Loom made my first coaster last night Nancy
    says awesome Nancy awesome so I just again put my sorry
    silk whoops put my sorry silk through my needle just like so
    okay and I'm just gonna start let's see this one was over so I'm gonna go over under
    over under over under it's the same concept as we did with the Fluffy yarn
    and we're just going to pull and I just cut myself pieces like I said for my for changing the materials out I
    like to just cut pieces since I'm going to be doing multiple materials um
    like I said it makes it a little easier and then we have our end here and we're just going to weave that in
    as we go and I'm going back and forth on the
    materials too if you um weren't going to use multiple
    materials you wouldn't have to worry about doing that as I said so again we're going to go from the left
    and do the same thing hopefully you can see that guys
    oh thanks Robin I love the combo too you know me and my pink and my fluffies and
    sparklies and the fuzzy princess look reminds me so
    much of Trisha hmm
    oh well you know if nothing else everybody knows me well right
    all right so I'm just gonna do another row of our
    sorry silk
    okay I'm gonna put that in position and take my little comb in there and
    just kind of put everything where I want it again making sure I'm not pulling too tight
    on my warps and I think we have enough here for one more row
    this is I've always loved art that I could create and fly by the
    seat of my pants with it it just to me is so much more enjoyable now there's
    something to be said for you know seed bead patterns and things like that they are absolutely gorgeous but I have
    always been the one that I just want to be able to create however I want to create and this is Fiverr art basically
    is what this comes down to and it's very freeing and very enjoyable
    I'm going to cut this a little bit off of this so I can weave it back in because we're done with that that
    material
    that's why I like patterns and stuff are I mean I do them believe me I do them
    and I'm happy when they're done they look pretty but it's a struggle bus for me because I'm like isn't there an
    easier way isn't there a more creative way to do this you know
    so let's get some more yarn I don't think well let's use this we already
    have this one cut we'll use what we have of it see how far we can get
    so I'm going to start over on this end my last one was over so I'm going to go under
    [Music] and these come together nice and quick
    and I am just adjusting my yarn there to make sure the right side is up
    as much as possible it won't be perfect but all right and then what I'm going to do
    here you guessed that I'm going to weave my end back through
    all right
    and now we're going to go over the outside Warp and do the over under the whole way
    across again
    and I'd like to take a moment here to thank everyone that has been using my affiliate link and
    um commenting and liking on my Facebook Channel it really means a
    lot to me that you have subscribed and you continue to be involved in my
    channel and take the time to use my affiliate link when purchasing through jewel loom it really means a lot to me
    and I greatly appreciate that guys foreign okay let's see do you think we can do
    one more no so we're just going to leave that as
    is and I'm going to cut this reminds me of a pink
    imagine that imagine that guys
    okay so I'm gonna grab another piece of sorry
    oh thank you Nancy says this is such a sweet piece thank you
    foreign so we were over on that one so we're
    going to go under and the sky's the limit guys you can use
    however many fibers you like whatever textures you like you can combine a lot
    of different textures you could do things with ribbon you could do it with lace I mean believe me
    I have this all swimming around in my head um that I want to do one with laces
    okay and I'm just gonna weave my end in I think that would be so pretty making a
    lace coaster okay
    and then we're going to continue we're going to go over that one on the leftmost warp
    and then work it through
    isn't this relaxing I just find this so relaxing and so
    just calming and just totally enjoyable
    fiber is my spirit animal so I like to create my jewelry with it so being able to use it in this aspect
    is certainly certainly fun
    and you can see how far we are already guys it doesn't take long
    again you can push everything down tight as you want to we don't have to go too
    crazy with that but you know it's however snug you want those fibers to be
    if you want it to be a nice tight solid if you're using like a cotton um
    string or whatever to make your uh wefts then you know maybe you want that to be
    tighter but I like the the loose feel of this a little bit I don't want it crazy loose because then it's not going to
    hold together for me but a little bit looser okay
    okay
    all right so let's again cut our end it is meditative
    oh Marianne I love love love it oh thank you you guys are so sweet and so awesome
    and we're just weaving that back through
    and now I'm going to get some more of my yarn
    easy peasy
    um oh thank you Robin okay so we're gonna go over
    starting from the right again that's my comfort zone
    that's a long piece I got there all right and once we get that in
    position we're going to weave this back through the end back through
    I hope everyone is ready for the holidays and excited
    I know I am my family laughs at me because like a
    little kid at Christmas my mom we don't my mom doesn't have any grandkids my brother nor I
    um had children and so she still spoils me
    she knows I like to open a lot of gifts so she like goes to the Dollar Tree she gives me nice gifts too but
    um she goes to the Dollar Tree and gets all this stuff and wraps it up for me so I can open like 100 gifts it's so cute
    but it's so fun
    I think they enjoy it almost as much as I do they like watching
    see my faces and stuff okay
    we are getting there guys
    foreign just checking my ends again there just making sure it's where I want it
    so it's not too tight
    it is sweet isn't it Maria they are I have awesome parents I couldn't ask for
    better that's for sure and of course they have to get the
    puppies gifts and you know so do we that's like a big event too you know
    probably a lot of you get your fur babies gifts
    right I think I'm gonna do one or two more rows of the fur and then
    I can just fill in the next row between that with my sorry silk
    because we're almost done
    I love our children I want to make them happy even when they are grown off
    oh Debbie Debbie Debbie you would be wonderful at looming
    you would be wonderful looming don't be afraid and we have such a a good group
    of uh good group of ladies who is a great resource to you
    um if you have any questions concerns we have so much information out there so
    much um so many videos on how to do basically everything you can imagine with the
    Looms um I highly recommend it's a degree it's a great it's a very beginner friendly
    and Jules has a starter kit that you can get that that is pretty
    darn awesome and it's a good place to start and it'll help you kind of get
    your feet under you with looming but once believe me once you do it you're going to be hooked but I know you
    would be good at it and we are here to help with any questions or concerns that you have
    always I highly recommend doing it I was always a wire girl and I still am
    I love wire but once I started doing this
    um I was like okay okay I think I can do this I was never like a
    bead stitching person so I thought well this is pretty close to bead stitching it's going to be very
    uh monotonous and blah blah blah well no not at all this looming to me
    you have so much freedom to create your pieces
    and just completely um relax and meditate while you do it
    you know once you get the hang of it you're you're going to love the feeling
    you get when you do it it's just such a wonderful experience
    just just to do it I know I'm building it up but that's how I feel
    you know it's helped me with a lot of when I was going through a lot of
    issues at times I still am and I grabbed my loom and then I can just focus on
    that relax and create something beautiful
    and I feel that that's really where Jules jules's heart is with it she
    wants it to be like that she wants it to kind of be a meditative and
    a loving experience you know a a great experience for you
    that you want to go back to time and again you know so I've set my piece
    I have anxiety and it really helps release the stress as Nancy says yes exactly Nancy you said it better than I
    did you'll notice uh my husband always tells me are complicated I could complicate
    complicate a Q-tip so that's all right it's all right
    oh Marianne says I just started a few months ago with the starter kit and I love it all right Marianne
    that's what we like to hear all right so I'm just putting another piece on I weave that end back through
    and I'm just putting another piece of sorry silk on just
    filling in now
    okay they're too tight here
    a little bit too wild
    I think I'm going to do one more row of this and then maybe add a little bit more fur just to fill in there
    foreign
    okay
    all right so I'm going to cut these ends here and we're going to weave them back in
    sorry guys I was going off screen a little bit there I get into it you know
    foreign
    all right and then just get another piece of my fur yarn
    and we're going to fill in
    probably get another two to three rows in here foreign
    it's like I said it this is a great tip that Joel's had about doing the top and the bottom first it really
    saves you and uh Joan had recommended weaving the ends in like that and I just
    it works fantastic I just changed it to do it as I went
    because I felt like it just was easier in the end
    but you could do it either way remove my stuff so I can see here what
    I'm doing with all right and it's easier to move Trish where did
    you get that fur yarn I'm going to tell you what I'm gonna guess Michael's but I have had
    this forever because I like to throw it into even some of my um
    uh jewelry pieces I have a whole um drawer like um roller cart full of
    just fibers and Yarns and laces and trims because I like to use it but I'm
    gonna guess that it was Michael's because that was really all I had back then we now have a
    Hobby Lobby but um yeah I'm gonna bet Michaels if they
    still have it they should have something like it if not the exact
    ly okay so there we are
    and I'm just going to cut our final end here and leave that back in
    foreign
    and it's great that you can see in real time this is a project you could do in under an hour
    you know so it wouldn't take long to just make a set of them for someone for
    a gift you know I'm happy with that
    and we will um deal with our ends a little bit more
    once we get this off we can see them on the back okay just make sure they're and that's when I put my crochet hook into
    action okay so we have this done we have everything weaved back in
    from the sides I'm just going to turn it over thank you Carmen
    thank you I I love the pinks you know me so I turned this over on the back and
    I'm going to trim the strings back here because I want to have as much room to groove as I can as
    far from what I mean by that is to tie off to finish so I'm just gonna trim
    these across and I'm not going to trim the other end because my scissors aren't
    cooperating of course um because I want to be able to pull those Loops back through ever since our
    friend dying or um Danielle Diane has shown us that technique on how to
    weave uh the loops back into things it's just been
    uh life-changing basically for looming anyway okay
    foreign cutters
    here and see if that doesn't help more to get in there better and I bet it will
    yep much better to use your cord cutters for this guys
    or if you have a smaller pair of scissors that would probably work well too okay
    so then you can just lift that up and we have this side tied on as well so
    we're going to want to take that off and then we're going to lift
    our piece off of the Loom just like that okay I set this to the
    side and you can see our back here we have some ends sticking here and there but we can go back in and put those exactly
    where we want them later on for now I'm going to show you how to
    finish off your piece and what I'm going to do first this
    single one that's on the end here I'm just going to tie it onto this Loop
    a couple times so that way then when I pull that Loop down it's going to pull that strand down in there too okay
    just knot it onto that first Loop
    okay and then I'm going to cut the
    end of that and then we can start carefully pulling our Loops down and I'm
    just pulling on the strings on the bottom and I'm keeping my hand very firmly over top of
    my piece so nothing shifts as I pull down okay
    and I want to get these loops pulled into the piece
    so it gives us even more to tie off with on the bottom here as well okay
    and I'm just pulling these little bits at a time
    just making sure my end doesn't come off there as well
    just pulling those in snugly
    I'm going to move this down so you can see those Loops being pulled a little better
    thank you
    now you want to be very careful with the bottom because it could easily come loose there as you're moving these
    Loops down right I'm going to pull that one a little bit more
    thank you
    okay this is something you definitely want to
    take your time with guys and be super careful because you don't want to ruin your piece after all the work you put
    into it okay and then I believe this is our last one
    set up
    okay so now we can start tying the bottom off
    so I'm just going to go across taking two threads at a time and that's why I
    use the hemp that coordinated so well with the yarn because when you tie it off you're not going to see it
    as well okay that's a good rule of thumb to do with any kind of material you use
    so it coordinates
    okay so I'm just going to tie these in double knots as I go across the bottom here
    okay
    foreign
    double knots to hold our
    coaster in place here
    all right so get that one
    so now we're going to tie these
    foreign
    that back through my end that's my end I'm talking about
    there while I have it here just push it back
    down through and we'll go from there when we get to the back of it
    oh thank you Deborah I love them I think they're so cute with
    the fur laughs I think that should be my middle name
    over the top Maybe
    or furfu or sassy or princess one of those
    all right almost there guys
    and with this fur yarn on the ends it makes it nice because you can uh
    your knots will kind of disappear into it so you can just glue them and then cut the strands but you can also weave
    the ends back through you know into the yarn if you want to of your hemp
    um just take your hemp ends and glue them then weave them back in as well okay
    all right so that's our last one
    you go and now I'm just going to cut the strands quickly here and we can turn it
    over to the back and do our final cleanup
    foreign let's tie these two together because I
    think that one is a little loose [Music]
    as I go through I'm just making sure everything's attached everything is where it needs to be tying off anything
    I may have missed
    and just come back with a little bit of GS hypo and put it on your knots so they're nice and solid
    these cord cutters boy you can't beat them
    so that is our square and like I said on the back you can see these ends are kind
    of poking here poking there so what I normally you'll do is I take that's where I pull my crochet hook out and I
    just put it up through my piece and then I grab it and pull it
    through to the front and then from behind I'm grabbing it and pulling it into the back
    and weaving it through a little easier and then I can
    go ahead and cut that all right
    good trim him and I'm just trimming those off because they're going to stay in place
    um because of that we already have them weaved through enough they're pretty solidly in there
    all right let's check this baby I think we're looking pretty good
    here's one doesn't want to cooperate they're put
    him into place and that's basically it guys you just clean your back up
    and then you have your finished coaster cute cute cute now we have two
    [Laughter] oh thank you Nancy thank you I always
    enjoy when you guys are here with me and just a fun fun thing let me get my
    camera turned around here and we will sign off if you have any questions make sure you put them in the
    princess pink fruit yes that's a good one put them in the chat or if you're
    watching the replay make sure and put them into the comments
    so that's it guys we're in business we're frou-frou
    yeah so now you have a pretty princess coaster too to uh set your coffee cups
    off in the morning I'm still drinking my coffee that's for sure well thank you thank you ladies so I
    hope you enjoyed this one with the Booboo Loom coaster maker if you have not gotten one guys check it out
    as always thank you so much for joining me it's always so much fun
    and so I hope you all have a wonderful holiday and enjoy your holidays with
    your family and cherish every moment thank you guys for a great year
    of always hanging in there with us and we'll see you January 5th oh and
    something else I want to let you guys know I didn't mention it last week but I didn't want to go over it again that we
    are going to be permanently not permanently but we're going to try um changing the time to during the day
    so it's a little bit more convenient for me because it's hard on me with my chronic illness to do things in the
    evening because I'm already pooped out so um we're gonna go to 3 P.M Eastern
    Standard Time that's going to be 12 p.m Pacific Standard Time okay so starting
    January 5th we'll be back but we're going to be at 3 P.M Eastern Standard Time okay so make
    sure you're all looking for us make sure you join us and start out the new year with us we're excited about this next
    year because this past year has been absolutely fabulous and we couldn't do it without all of all of you so
    have a wonderful holiday guys and I'll see you next year bye