SIGN UP FOR MY NEWSLETTER AND RECEIVE 3 FREE SEED BEAD PATTERNS PLUS 15% OFF

0

Your Cart is Empty

Shop
  • Read our story

  • Each of our carefully researched, styled, tested and distributed collections reflects a particular aesthetic and ethos. We hope some of these speak to your own style, and help you refine and redefine your own look and style philosophy in the process.

  • Fire Polish & Tile Bracelet - Jewel Loom School with Tricia

    December 10, 2022

    Fire Polish & Tile Bracelet - Jewel Loom School with Tricia

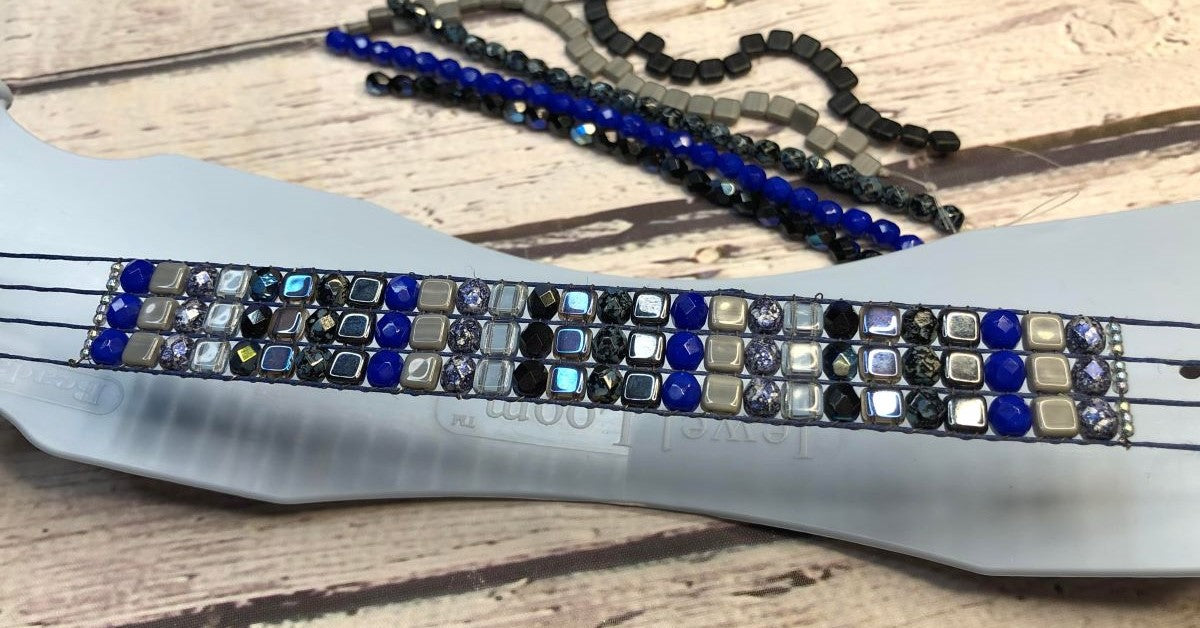
    Designer Tricia Giazzon teaches how to make a beautiful loom bracelet, using 2 different types of beads - one hole 6mm Fire Polish & 2 hole 6 mm Tile beads. This design is great for beginners & can be made on the Original Jewel Loom or the Wisdom Warrior Loom.

    Supplies Used:

    You can purchase the different materials at the Jewel Loom website. You can also support Tricia by using her affiliate link: https://jewelloom.com?aff=6  

    Subscribe to the Jewel Loom YouTube channel to access past & current tutorials: https://www.youtube.com/c/JewelLoom   

    You can subscribe to the Jewel Loom Jewel Box with course here: https://jewelloom.com/collections/subscriptions?aff=6   

    Sign up for the Jewel Loom newsletter & get 15% off your first order, plus a free pattern:  https://jewelloom.com/pages/save-15-on-your-first-order-get-a-free-pattern?aff=6     

    Receive text notifications for Jewel Loom shows & special deals by texting "Sign Up" to  1-805-768-0568

    You can find Tricia online through her link tree: https://linktr.ee/pinkpoodlecraftstudio  

     Check out the Jewel Loom Blog for past & current tutorials, plus read details on project:  https://jewelloom.com/blogs/craft-hangover 

    Join the Jewel Loom School Community (off Facebook) to share your loom creations, be inspired by others, & a place to ask & answer questions: https://www.juliannaavelar.com/offers/5ss8HfCp/checkout 

    Follow Jewel Loom on Instagram: https://www.instagram.com/jewelloom/ 

    Jewel Loom Facebook pages: https://www.facebook.com/Jewelloom  &https://www.facebook.com/JuliannaJewelsAvelar 

    Jewelry Making with Jewel Loom community page:    https://www.facebook.com/groups/228056324285807 

    Please contact Jewels with any questions you have about her looms:  email -hello@jewelloom.com or text - 1-805-768-0568


    Transcript:

    hi guys I'm back I'm back I'm back yeah
    I was gone for a while I was off for a few weeks there and Jules and Joan did a
    great job last week of showing off the new boo-boo Loom which will be super fun
    um to use and you know what I'm I'm planning a project for that for next week because I just can't stand it it's
    so cute and I have a really cool idea so make sure you tune in next week to check
    that out so my name is Trisha gaison I actually am with pink poodle jewelry
    studio and I am here today for jewel loom we're gonna have some fun making a
    project and you want to make sure and share this live for us if you can
    um always give us a thumbs up and a comment uh we always appreciate that
    very much and don't forget guys I also have a YouTube channel and it is uh
    Trisha's pink poodle jewelry studio and check it out my links are all in the description
    we do not have Miss Joan tonight so if you need a link to a product it will not
    be in the chat tonight it will be underneath the description so feel free to check that out as always
    um so that is enough of the housekeeping there so I hope everyone's doing well today
    um we had a regular old day here in PA it was a little dreary and
    um but you know staying busy with getting ready for the holidays making gifts you know the whole nine yards I'm
    sure everyone is doing that now so let's see who's here with us today Melanie hello I missed you all too I
    missed you all too hi Sherry hi Hermie hi Amber
    Greenies from Michigan hi Bonnie Vaughn hi hi we do have Amber in the
    um comments with us tonight guys which is totally awesome and
    she will be trying to help with any questions in case I don't see them because usually the girl uh Joan or
    whoever's helping me uh bring them to my attention and I can answer them then for you so if we don't get them during the
    live we will certainly uh check back and uh answer them after and there's Miss
    pava hello hello I'm back home I'm back home I know I missed you guys it was so
    um weird not being on it was just I felt like something was missing so
    um like I said guys don't forget please share for us tonight if you can because Miss Joan isn't here to share for us and
    we appreciate it if you can just push push the slive out as always much appreciated and there's Miss Vicki okay
    guys so without further Ado let's talk about this week's project this week's project is a very good beginner project
    um I'm kind of going back to the Grassroots of what we all started with I know that we've been having some new
    folks uh joining the uh group lately I've been seeing them you know trying
    out the loom doing you know some different things which is absolutely fantastic
    um I love to see that I love to see folks um just going for it and that's
    fantastic so I thought this week we're gonna go ahead to
    sorry um this week we're going to go ahead and go back to our Grassroots like I said and we're going to make a basic bracelet
    we're going to use some six millimeter fire polish and some six millimeter tiles and just do a basic project on our
    original Loom I will show Some Loops just some simple Loops things like that
    and hopefully for the newbies this gives you an a good idea of the steps that you
    need to do to um use the loom and enjoy the loom and
    for the old folks that's not old folks excuse me girls the folks that are Pros let's use that
    for the folks that are pros and have been with us from the beginning and this is just a refresher course so let me
    turn my camera down guys and we're gonna get started
    and you know we're gonna get black for just a moment but I haven't gone anywhere I'm still here
    okay whoops and I have a new camera set up in case you couldn't see um earlier
    it was showing there a bit in the shot so um it's more overhead and you're seeing
    everything from my Angle now which I thought would be a little more beneficial but here is our bracelet
    that we're going to do this week and this can just this is a a bit of a
    statement I think because this is a very simple bracelet but look at the impact
    it has because of the beads that we've used in it so that's something to keep
    in mind if you are doing a simple project you want it to look a little more
    um difficult or raised not difficult but
    um kind of make it a little bit more elevated use some pretty beads and
    some abs and just different colors and textures with it okay this is before we
    put the loops on I want to try something this week and when we get to the loops I'll tell you about it uh let's go over
    what we're going to be using tonight of course we have our original jewel loom here with our bar
    um we have some as I said some six millimeter fire polish and if that was a
    look at that Under The Lights guys that just makes my heart sing Oh My Gosh and
    then I just have some six millimeter tiles and some different colors and textures
    um my mix is actually here that I'm going to be dipping into the bracelet so I'm going to slide this on over so you
    can see it a little bit and it has a lot of
    um different colors of Grays in there there's just like a silver there's the
    opaque silver there's the Mac you know it has a matte texture to it or finish
    not texture boy words are words are hard um
    so anyway guys so I have just taken some of my strands I've cut them apart isn't it pretty long a sparkle I love it I
    love it but we're gonna need to start with um warping our Loom we are going to use
    uh some 11 O's today um and we're going to put them on the end so we can go ahead and do a
    um what you call class beside a slide end on our piece okay so what
    we're going to do first and I'm gonna wear my other slide end went oh there it is okay just want to make sure I have
    everything I need so what we're going to do first is we're going to warp our Loom and I am using the 0.5
    um hemp I think I'm actually gonna go off my roll just to make sure I have enough but 0.5 hemp in this gorgeous
    blue color the reason that I'm doing the 0.5 is because I'm going to turn this
    out the light down maybe that'll help guys um is because that way we can do our single
    knots at the end and then slide on our clasp um so that'll be for that so first we're
    going to start by putting our bar in and what I do is I just hook it down into the bottom of my loom just like so and
    remember I'm down here I know you know that because my hands are going that way but just in case and I'm just going to
    take this piece right here and just put it into my belly just a little bit and I know you can't see that but I am doing
    it I'm put I put that against my belly and I'm just going to give the loom just
    a little Flex and pop that bar in okay so now our Loom
    is bowed okay so this is good we want this to be like this so we're going to
    turn this over apparently my dogs are having fun downstairs
    can you use aslon or other cord absolutely Anisa absolutely
    yep anything that is cording nine times out of ten you can use it on
    the loom in one way or another so I'm just tying this hemp here
    onto one of our knobs underneath okay and I'm going to flip this over but I'm
    going to take the end that I tied onto and I'm going to lay it or move that up
    to the top and then I'm going to lay in my hemp into a Groove
    okay and I'm just gonna keep that taut as I'm pulling that down and lay it into
    relatively the same Groove down there at the bottom I'm going to wrap around the
    knob underneath keeping tension with my thumb wrapping it up and around I'm
    going to skip four grooves for this one guys for the six millimeter beads that
    seem to work best so we want to put it in there double check my grooves because my
    eyes cross sometimes but there's one two three and four and we're just going to keep that tension on there
    and moving on down and we're gonna go one two three and four
    there and we're going to do the other knob underneath we're going to catch that keeping tension
    up and around skip four
    okay and we're going to keep that tension as we go across
    and lay that in for grooves wide and catch our other knob
    okay and then we're just going to bring that up over the top skipping four grooves one two three four
    and pulling that on over to that other side so we're going to skip our four
    grooves here okay oops one extra and then we're gonna wrap this around
    the knob on the back the hemp a few times
    I like to do that because then I know that I have a pretty good grip on
    the loom itself and then I'm going to take this cord and trim it
    from the spool and you want to leave yourself enough because you want to be able to
    tie a couple knots so I'm going to slide my um end of my hemp and underneath the
    warps there and then I'm just gonna tie a knot
    and I'm keeping tension the whole time there and we're gonna pull down oh on that
    knot and you can see there my circle I my knot caught too soon
    so what I'm going to do here is I'm just going to try to tighten this up just by tying those two
    together hey you know things happen like this to us
    so let's just tighten that down make sure that our our our
    warps aren't going to be a sacrificed because of it so I'm just going to do this
    keep that around the knob and tie that you could of course try to
    take the knot out and redo your but I think we're going to be okay redo your warps but I think by doing that we're
    going to be okay so I'm just tying that again
    just making sure everything's nice and snug so we're pretty good there
    so then you want to do opposite of what we did before we're going to take the bar out so I'm going to do the same
    thing and press that into my stomach and flex the uh Loom just slightly up it's
    flexible not bendable guys you've heard me say that 100 times I'm going to pop that Rod up and out and then pull it out
    of the back and now you're ready to go now we have a really nice taut
    warp and that's what you want that gives you the best finished product
    okay so I'm going to cut that so that doesn't distract anyone or myself which is more
    than likely and I did thread my um needle I'm using the wildfire in the
    0.006 whoops I'm used to turning it for you guys there we go
    there we go and now what I'm going to do is I'm going to take the end of my Wildfire that doesn't have the needle
    I'm just going to tie on to the outside of my warps the furthest left warp I
    um Loom from the bottom up a lot of people do from the top down it's your
    preference whenever's comfortable for you okay so I'm just putting a couple knots in
    that the first thing we need to do is put on some seed beads because we're going to
    need that for our slide clasp here uh Vicki has a tip I always have blue
    painters tape close by to really stick it down because I'm a flipper okay
    that makes sense so what we're going to do is start with nine seed beads I'll move these over so
    you can see those
    okay and we're just going to pick up nine eleven O's the this color is a
    transparent rainbow black diamond it is gorgeous and one of my favorites so pick up nine eleven O's
    okay three
    six and nine I think we're good there just
    double check yes and we're gonna drop those beads down as we always do
    and then I'm going to shuttle my needle across underneath and as I'm doing that
    I'm going to hold on to my thread this is my technique this is what I've developed to be the most comfortable for
    me okay and as those beads come up I'm kind of going to let go of that and then take
    my hand up underneath and divide the beads up so I have three beads per row
    okay so there's one two three six and nine so
    now that I have those divided I'm going to hold these with my left hand pushing those beads up
    uh Anissa no there's not a kit but all of the items can be found in the
    description they'll take you right to joloom.com and you can find beads just like these
    I don't have the exact things listed you go right to say the fire polish but
    um these are you know the colors I'm using you can see are in the royal blue
    family silver gray black you know make your own you know combination that you
    really like you know so we're gonna go up and over through the beads over top of the warps
    and we're gonna put our needle through there and just
    pull that needle out the other side and then we have our first row which is
    our 11s okay easy peasy so what I like to do is
    go through this a second time and I go underneath the warps
    and the reason is is I like this to be very solid because this is going to be our row that our bracelet is hooked to
    the clasp will be hooked to so I like to reinforce it a few times you could even
    go through three times if you wanted to um but I just go underneath and catch my
    beads I'm slightly pushing down on my beads a little bit just to make sure that my needle goes through them
    and we're out the other side
    and let me just go back across
    okay
    okay now I'm just gonna pick up my first row bead so I'm going to pick up three six millimeter fire polish
    and drop those down
    and shuttle the needle across underneath
    and push our fire polish up and then we're going to go through
    up and over through the fire polish through the beads and over the warps
    that's what we like to say make sure you're going through the beads but over the warps
    because if you don't go over the works the beads will become loose or they will
    fall out certain beads will fall out if you don't catch your um
    needle through all of them so we don't want that so this is a basic guys I'm just doing
    every other row with our fire polish and our
    tile beads I'm just going to pick up three of these beautiful silver tile beads
    and create your own pattern create your own bracelet that that sings to your soul
    um like I said you don't even have to use these colors but I do like the combination of the blue and the blacks
    the Grays and the silver and then we're just gonna I caught in
    that second hole of those towels I didn't talk about that I apologize so all of my tiles you can see are dangling
    here the front hole is open the back hole has our thread through it
    you want to make sure you always do that because you want to go through the same hole and you want it to be either the
    back or the front if you're going up or coming down and
    it will be um okay for you to go ahead and run your
    needle crust and get that hooked in there what size beanie needle do you use when
    the seed beads are really tiny the Dual Loom needle sometimes too big for
    several passes yes that is true
    um I actually use a 10 or an 11. if they're really tiny
    I'll use a 12. but uh oh Robin you're fine thank you
    for joining us we're glad you could be here those are usually the ones I go for depending on how tiny
    and I I'm not one to use like a 15 honestly guys I I've never done it and I
    really don't have the urge to do it so as I am
    uh getting ready to put my needle through the front of the towel beads you can see they're tipped down and through
    there okay you can see that they're hinged so what we're going to do is I'm going to take my finger on my right hand there
    and I'm just going to pull that up slightly so I can put my needle through all those holes you can turn your loom
    sideways to see better um a lot of people do that I do that sometimes myself
    so we're pulling that thread through
    okay and we're gonna go
    through the beads and over top of the warps
    yeah as I said um like I said you probably 11 is a good a good size to be
    the middle of the road for you Vicki for tiny seed beads um I think that would work just fine for
    you and now I'm just gonna pick up three more fire polish
    for here okay these are really cool they have the silver and blue I love them
    and we're going to continue with the same pattern
    thank you for putting that into the chat Amber I appreciate that
    all right so we're going to push those up through the beads and over the warps
    again okay
    let's pick up some of these pretty matte black beads how about those
    don't worry I'll get to the ab you know I will
    so I'm just gonna pick those up again all on the same side in the same hole
    okay remember the same thing as we were earlier we have the back the needle through the back hole and
    the front is kind of dangling whoops wild in here sometimes
    so once I drop those down welcome Lisa you're not late you're never late
    what thread did you use for the warp I used 0.005
    um hemp actually
    you could use whatever you like
    and then we're gonna tip those up and I'm gonna go through that back hole I'm going to go through the beads and over
    the warps foreign
    hi Jackie I didn't see you come in welcome in
    and then we're going to do the same thing we're going to tip the beads there
    with our finger we're going to support them with that that uh
    finger on whatever finger you're comfortable with on your right hand and we're going through the hole underneath
    the warps you can see that okay I'm pulling that across
    all right and then we're just gonna go up and over the warps and through the beads there
    and we'll just continue this
    so I'll pick up about a couple of our beautiful black AB beads
    well maybe not because we're right there with the black I don't think I want to put it right against that because it
    won't pop as much so let's pick up a couple of this other
    one that has a really cool almost Picasso finish on it but in maybe like a
    little lighter of a shade but they do definitely look Picasso to me
    this is when I flip it because my left hand is stupid
    you crack me up so we're just gonna push those up and in
    and the needle through
    okay and I'm going to look for some of these really pretty a b tile beads now grab a
    couple of those I want three of those
    okay Jackie has a question supplies are non-existent on the island I usually
    travel to the US or back to Canada to buy stuff I have a ton of Steel on and some hemp
    can you use sealant warp absolutely 100 you can Jackie
    that would work just fine for you okay
    some great questions tonight guys okay so we're tipping down here
    and I'm gonna grab those beads and just tip them up slightly and put my needle through
    thank you
    okay the the the warping materials you kind of want to
    stay away from are anything that has like give in it you know like a quite
    you know quite a bit of give and if they they do have give say for instance leather has some give and it'll stretch
    out um you can always leave your bar in your original Loom or you can just use your
    wisdom Warrior or uh one of those looms to to make the same thing because this
    and the wisdom Warrior are equivalent except for um this one has the bar and the wisdom
    Warrior doesn't but just because it doesn't have the bar doesn't make it less than this because it's just as good
    if not better okay I love them all I love the modules you know I do but I'm just saying you know that gives you an
    idea on you know how to to use the Looms you have you know
    so we're going to lock those in or want to get it's always fun to buy a
    new loom you know so those are those gorgeous a b beads in
    there oh my God notes okay now we're gonna go to our black because I think
    they're gonna pop off of that ABB better okay
    oh Jackie that sounds great a beach day and looming tomorrow that sounds fantastic
    okay
    and then we'll do some of these
    shiny gray ones they're really pretty too
    okay
    and we're just gonna keep working up
    foreign
    through the holes
    gotta catch that last hole and give me turkey sometimes especially if you're looking down on it
    okay
    so let's go back to our see we've used each one so let's go back to our really
    pretty royal blue
    okay and then we'll go to our silver again
    and I'm just going to repeat this pattern guys it's just a simple
    repeating pattern that we're doing here but you know you can Jazz it up any way you'd like
    I think this would be really pretty for Hanukkah or even New Year's with the pop
    of silver in it and the ab beads
    okay
    oh Brady
    all right guys so I think you've got this down if you don't you can always go back and watch the replay and see how we
    put this pattern in pretty simple pretty straightforward okay so I'm going to set this to the
    side and here is the one that I have done not done but as far as the pattern is on
    the um the one we just did this one has the full length of what I need I needed
    six inches I always make my bead apart six inches because I was seven inch wrist so that gives me that inch on
    either side four um my clasp and I just when I ended guys I
    did [Music] um yes a row of bugle beads would be
    interested is interesting in this project as well Vicki I agree um I just did the nine seed beads across
    on this one on the ends both ends have it you just do the exact same thing when you come to
    the end of whatever length you need yes through the magic of the internet
    um you put you know your 9 11 0's 9 11 0's because
    we do need those so what I think I'm gonna do here guys is I think I'm gonna
    play with an idea for loops normally we would do our Loops the whole
    way and do our loops on or on the top um I'm thinking I wonder what it would
    look like if we just did loops on our tile beads
    and kind of it would be like every other row so I'm thinking let's try it why not
    thank you Mary thank you so I'm just gonna thread it another needle here guys I'm just going to take
    about um a wingspan for the loops usually when I'm beading a
    bracelet I take about um a wingspan and a half to two Wing
    spans to make the base of a bracelet
    yeah it did come out really nice I was really pleased with the colors and The
    Bling and all that stuff you can't go wrong with fire polish and tile beads really
    so just bear with me here as I thread another needle
    so I don't know how this is gonna look I hope it'll be cute but you know let's
    just explore and do some fun stuff huh
    think outside the box a little bit so I just threaded my needle there and what
    I'm going to do here is I'm going to take my needle and go through
    this first row of fire polish if I can get my needle in
    the hole there there we go through that first row of fire polish and I haven't tied onto anything yet
    okay and I'm just going to pull that through so later I can weave that back in I'm
    going to leave a little bit of a towel there you know just enough so I can make sure
    and weave that back in so we can't see that because this not the knots on these
    ends will be covered with our slide clasp okay so then we're just going to go into the
    first row of that tile bead and work our needle across and that's one of the reasons I really love jewel
    loom needles because you can see as I'm rocking it there I mean you can't go too crazy with it but it'll allow you to
    kind of work your needle across through the bead holes okay
    and I think maybe we'll pick up six seed beads
    11 0's
    six okay
    I'll thank you Anisa and then I'm gonna go through the next set of holes on our
    tile weeds okay if you want to guys you could do it on either side
    on both sides I mean um certainly
    but I think we're just going to do the one side for now but you could work
    you know both sides as you're going so I'm going to go ahead and go back
    through go through not back through this next row of fire polish
    and we're just going to repeat this as we move up the bracelet
    so here I'm going to be going in through the bottom row choke down on my needle a
    little bit that'll help me have a little bit more control and then work my needle across
    because we need to get it to a place where we can put our beads in on the
    side we want just in those two holes of that um
    towel bead okay all right
    and then back through the dot pole so what this is going to enable us to do then we're coming out that hole the top
    hole and we're going to put on six seed beads at that point
    to make our little Loop you can certainly make whatever size that you like guys whoops I hit my mouse here we
    don't want to do that do that so we're going to pick up six more
    and work our way up
    okay and then through that bottom hole again
    all right there we go there's another loop
    I don't know we'll just have to see how it turns out guys but back through those fire polish
    okay Challenge on experiment with the design it might look
    nice I cannot work with bugle beads why why do you seem to have trouble with
    bugle beads Anisa
    um while Roberta asks is Wildfire the best choice for beating wire or can you use
    anything else Wildfire is the best choice for your stitching this is your
    Wildfire fire fire and its thread and it works I like it I think it's the
    best thing to weave your projects with as far as beading wire if you are
    specifically asking for beating wire I really like soft Flex or if you
    um are talking about regular wire that you know you work with
    I would recommend uh the beadalon German style wire so that kind of covers all
    the bases I hope and answers your question
    okay so we're just gonna go back through that
    whoops back through that those tile beads
    and around yeah I think it's cute I mean it's not
    it's not over the top which is out of my character but you know for just a simple
    look sure just hard to find patterns that I can
    understand oh well you know we're always here to
    answer questions for you Anisa don't hesitate to reach out in a group and we would be happy to help you
    four five and six and if you have not
    um joined the a jewel loom group yet is jewelry making with jewel
    loom you definitely want to do that it's a great place to ask questions to post
    your finished pieces um it's just a great group of people in there so if you haven't done that make
    sure you do and then I'm just going to go back through and
    through the fire polish and we'll continue working on this for a few more minutes for a little bit
    just to make sure everybody has the groove of it okay
    and if you missed it guys I'm for next week I'm going to do a fun project on
    the Booboo Loom if you have not seen that yet you do need to check it out it's Jules
    newest Loom and it is absolutely adorable and I think it's going to be really fun
    to do some great projects on okay so Roberta says sorry poor choice
    of words I guess like I have some stretchy cord that I have no idea who made as well as some soft Flex eating
    water not thinking of using 26 or 28 gauge wire
    um see here
    I would say so if you're looking for
    um like I said if you're looking for something to sew in your beads Wildfire
    if you're looking for something to string your beads on you know
    um and then you said you have some soft flecks but you know just like that is what I
    would use and you know the wire so I hope that answered what I said but it's
    a little confusing for me because you know words are hard for me it's not you my dear I'm sure but I'll look at that
    question again afterward or maybe Amber can um
    uh answer if she understands better okay so I'm picking up six more
    Roberta oh good I'm glad I'm glad because that
    worries me when people people don't understand or I'm not being clear enough is usually what the problem is
    um so Robin asks what thread or wire are you using I got here late
    um as far as the base of this project I use .05 hemp and for my
    stitching of my beads I'm using black wildfire 0.006
    okay I'm just gonna try to fin angle this through because it can get a little tight in
    there when you're running through your beads multiple times you like the edges in these sub
    yeah hey live a little right
    has anyone have a chance to check out the new Booboo Loom
    I've just started playing with it I've had it for a little while but um I think I'm gonna enjoy it
    all right and back through
    one two three four [Music]
    five and six thank you Robin
    hey you know some people don't like over the top this would be something just
    simple but elegant you know
    I've never done it where I've skipped and I wasn't sure if it would look weird but I think it's gonna be okay
    and that would give you an opportunity to put something else in in the middle sorry I was off the screen
    there in the middle here I don't know what but I'm sure all of your brains could figure
    something fun out to do there
    okay let's do one more Loop and then I'm
    gonna show you how to remove this off the loom and put your tire knots and put
    your ends on oh Don I don't ever say you're sorry for
    being late no one has to I mean we're here we're here and this will always be
    in replay and you can always reach us in the group if you have any questions or place them
    in the live chat and we will get them afterward no problem
    okay two three
    six and thank you everyone for sharing out the live for us tonight as I said we are
    journalists tonight so um I appreciate the extra help for sure
    okay if you have not subscribed to subscribe to julum YouTube channel that
    is where all of these um we they live basically and they'll be on Facebook but eventually you know
    they'll move down and it'll be harder to find but the jewel loom YouTube channel
    has every week's um lives on there too guys so make sure
    you're subscribed over there okay and I think that's where we're gonna
    call it for now I'm just gonna do
    a knot here so then I can go back at a later time if I want to continue putting
    my Loops in so actually I took my needle off but I don't want to do that I want to keep my needle on because I'm going
    to weave back through my thread
    so it's more in the middle so I'm going to go in to I'm in this row
    here let me do my Loop and then we can move into that fire polish let's do it that'll be a little easier on me
    okay let's just do that one
    and then drop back through and then we're going to go right into that fire polish like we did before
    but I'm only going to go through the first bead and I'm going to angle my needle up
    just like so if you can see that I know it's hard to see but I'm angling
    it up and out of that bead there that first fire polish and then I'm simply
    just going to tie a couple knots on this warp between the first and the second
    bead I'm just going to go underneath with my needle and through the loop
    make sure I'm doing the right way and then pull
    and I'm going to tighten that down there and then I'm going to do one more knot
    and see the same thing is trying to happen like it did when we first started our project where the knots catch sooner than you
    like there we go I got it and so I'm just going to send my needle down underneath
    again and then I'm just going to give that a little tug I'm going to pull it right between those beads and just give
    a little tug so that knot now will drop to the bottom
    okay and then I'm going to do the same thing with this other thread that we started
    to do our Loops okay
    and guys I do want to let you know um starting in our first live in January
    we are actually going to start changing our time that we go live we are going to
    start going live at 3 P.M Eastern every Thursday
    I hope that still works out for everyone I hope so anyway um we're going to give it a try
    and see how it goes so let me know what your thoughts are on that
    and I will keep uh let it keep reminding you and I will also make sure I put
    posts in the group and things like that but we're going to go ahead and try an earlier time
    no reason other than um just to kind of do it during the day
    because it's usually um seven o'clock it's seven o'clock here Eastern whenever I do it and I don't
    finish up till after eight and then by the time it's like 8 30. so we're gonna give it a go
    so first we get loopy then we get naughty Santa Paws is gonna make note of
    that okay guys so we weaved our threads back in now what we have to do is take our
    project off the loom and I have this end into my belly again and I'm just going
    to give it a slight Bend actually I'm going to cut it on this end
    because these are the ones we tied off my Loops I may just pull back in okay after Danielle has showed us that
    trick and then I'm just gonna cut my Loops I'm supporting my work under here like this and I'm supporting my
    loom with my thumb and my index finger I know it's hard to see because the angle but and then I'm just going to pull that
    off and the reason I didn't cut it on the side with the loops is what I was saying
    is um Danielle opened our eyes up one day and said
    um you know you can try pulling the loops down into the work you just have to be very
    careful um just making sure you're supporting your work as you're doing it I'm just going to grab I know it's hard to see
    I'm just gonna grab one of these threads here and see if this is the one that I need to be pulling let me try the other
    one yeah so one will come easily and one will kind of be more stiff but as I'm
    doing this guys I'm going slow and meticulous I'm pulling but I'm keeping all of my work supported
    and just pulling that Loop you can see how it's coming down there and it's going to go against
    that way you only have knots that you have to deal with on one end
    how do I dispose of my needles you're talking to the wrong lady
    if you would see the amount of bent out of Crazy Needles that I have in my stash
    I the only time I've ever thrown one away is if they break which and usually what
    my husband has me do is poke it into like cardboard or something like that so
    that it's less likely to harm somebody so it usually just kind of put it through the cardboard or if you have
    styrofoam or something like that that way then you know there's less chance of somebody hurting themselves on it
    plastic container with blue tape there you go there's a good one
    so we're just going to pull this thread supporting our work I'm going to
    try this one it might be easier yes it is and I'm just slowly doing this
    pulling these down this is the best trick in the world I just love this but
    just be very careful I'm keeping a good bit of pressure down on my work and I'm moving slowly and
    meticulously okay so now that those are pulled down I want
    to make sure they're snug in there and but not too tight because I don't
    want to um work my work
    so let me just make sure everybody's good looks like everybody's good that everyone stayed straight
    it is a great idea I can't take credit for it though that was Miss Danielle so I'm gonna do now guys is just tie
    some single knots here on the end and I've shown you this before but we're
    gonna do like I said we're doing a refresher this week this is something I found by using the
    0.5 hemp if I did the single knot and made sure it was really a snug knot and
    made sure that it was glued thoroughly it would work for me to put a slide
    clasp over top of it Jody Jody says your tips are awesome I'm
    writing them down so I can remember them well thank you and Jody I appreciate that I think you all need
    to go talk to my husband tell him how smart I am right
    he just gives me a hard time you know typical guy there we go get that one done
    okay and I'm just making sure I'm working that knot down because I want it to be as tight up
    against those 11 O's as I can get that gives it a better chance of being
    able to weave back through to my um weave back through my uh side slide
    clasp my slide connector I mean I always call them a class but they're not they're connectors
    and I'm just working my way over
    I'm pushing that down okay
    I'm going to move that one hand so you can see a little bit more what I'm doing and I'm just pushing my two fingers down
    and pulling the thread with these two fingers to make sure my fingernails are
    above the knot just so I can make sure and pull it as close to those 11s as possible guys
    like I said all right
    again you're going to be careful with this you don't want to warp anything
    ah oh Mary we're thrilled you're here
    thanks for joining us
    all right we're on our last night here and I need to grab myself
    a little paper towel and move my beanie mat because me and
    GS hypo have a um not difficult relationship but just
    special relationship where I always end up getting it all
    over everything let me grab a paper towel in your face
    and again I want to check these ends again before I finally glue everything and make sure I have everything where I
    want it
    yeah Vaughn you're right um I do it doesn't work for every loom project but like you said most of them
    the uh pulling the loops and and that it it works
    um with most of them though
    so I'm just worming this GS hypo up on my hand and it's getting a small bead on it and
    I'm just going to make sure that I am covering that knot pretty darn good with
    this glue and then just going to move on to the
    next and do the same thing
    okay
    so I've got those pretty well covered and this is a good tip guys keep
    your tip of your GS hypo right next to the paper towel as you're trying to put
    the end into it because you know how the Globs always come out and you can't get the tip up in it if you keep it against
    the paper towel the paper towel will absorb the Globs and you can then easily get the top on
    without um gluing your lid shut
    and Vicky makes a good point she says that the loop technique did not work
    with the suede lace that she used so FYI on that guys
    for you know a few minutes home that's what you would do but today
    you know we're live so we're gonna cut the knots or not the knots excuse me the thread
    above the nods guys and then just trim that
    it's like so and I'm going to go over to the other side I'm going to move this paper towel
    so we can see better here foreign
    connectors this is a 20 millimeter so that will work on the project that we
    just did and a lot of times guys I will take my pliers where's my um
    chain nose here there I'll get my tweezer pliers and I'll take my pliers and I'm sure a lot of you do this use
    season pros and I'll just stick that up in there and just try to kind of open
    the end up a little bit because it makes it a little easier to maneuver and once you get it on then
    it's no problem but you kind of just start putting your seed beads in your
    knots into your connector and just I rock it back and forth and it seems to
    really work to get the um connector to go over top of everything
    and then once you get to the end we're gonna pull that and this is all
    done gently guys don't be aggressive with your beautiful work because you don't want to end up
    messing it up right at this point or ever really but especially at the end
    when you're finishing and I'm just going to take my pliers here and that last knot I'm just going to take the tip of
    my pliers and kind of just start it down into the end there
    I want to pop in my last seed bead
    okay push that through and again I'm just going to take this and push this knot
    down in there a little bit
    like so and then we're just going to close the end up you have a finished end there
    and we're going to do the same thing over here with our loops
    and just open that end up
    a little bit too much there
    there we go that's better
    and we're just going to slide that on that one goes on much easier because you don't have the knots to deal with so
    it'll slide right across for you
    and then just close that end
    and there we go all you have to do is add your clasp and you have a finished
    piece this one is not quite finished because I didn't put my loops on yet but
    you get the meaning but that is our beautiful piece I hope that helped you with a
    little bit of a refresher for everyone and also for any newbies out there kind
    of gives you basic jewel 101 let me get my camera turned around here
    guys
    yes Roberta um you need to use a bigger Loom to make that area or to make it longer
    the um large wisdom Warrior is the the way
    to go with that you can make pretty much anything under the sun on that one
    and here I go I'm gonna actually turn my camera here guys
    so there we go so I hope you enjoyed that refresher
    thank you Rose rose says beautiful as always thank you I don't know what I do
    without you guys you're always here to support me I appreciate it so much Vicki says great demo as usual Juan says
    beautiful Trisha thanks for the refresher thank you thank you all for being here with us
    um there would be no jewel loom without you all so we love and appreciate all of
    you and we love when you come and join us on our lives it's a blast
    so like I said guys next week I'm gonna do a fun project on the Booboo Loom so
    stay tuned for that if you are looking for any of the product products
    they are always in the link in the description um and I think that's about it I hope you
    enjoyed it what was the approximate length of that I make my bracelets six
    inches and then I can account for a clasp
    and I have a seven inch wrist okay so you could actually and I've seen this
    before I sign off here guys I've seen folks take these and use them as the middle of necklaces and maybe a choker
    or something and hook on chain or hook on sorry silk and then just put a focal
    on this piece you could do up to um I believe seven or eight inches on
    the original Moon so you could do that that's an option
    you know always options guys always options all right guys so I'm gonna sign
    off for tonight I'm gonna go join the hubby and relax a little bit work on some more Christmas gifts I hope you all
    are having a wonderful holiday season so far um tis the season let's all be kind and
    I'll see you guys next week bye