SAVE 15% OFF ON YOUR FIRST ORDER PLUS GET 3 FREE PATTERNS. SIGN UP BELOW!

0

Your Cart is Empty

Shop
  • Read our story

  • Each of our carefully researched, styled, tested and distributed collections reflects a particular aesthetic and ethos. We hope some of these speak to your own style, and help you refine and redefine your own look and style philosophy in the process.

  • DIY Backpack Tassel Charm With Your Initial!

    September 06, 2025

    DIY Backpack Tassel Charm With Your Initial!

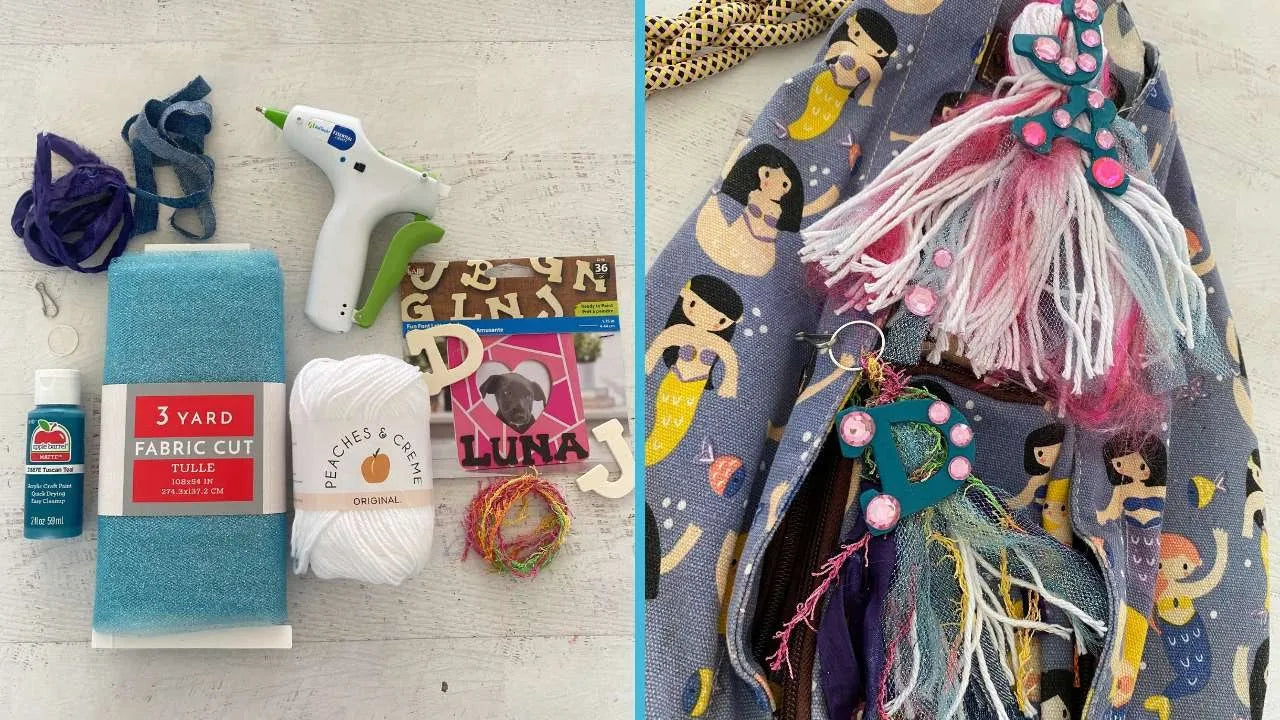
    Learn to make a quick and easy decorative tassel for your backpack or purse, using an AdTech Essential Liberty glue gun, a Jewel Loom Tassel Maker, plus fibers and a decorative initial or charm of your choice! In this short tutorial, Julianna "Jewels" Avelar shows you how! This tassel would also make a cute decoration on a gift box or bag, then has a second use as a backback decoration! Only your imagination is the limit. And if you are looking for a project to do with a child or teenager, this would be a great one! Watch the tutorial below, then check out the supply list Jewels used below the tutorial. 

    Materials and Tools Used By Jewels in this Project:

    Save 15% off your first order, plus Get 3 Free Patterns: https://jewelloom.com/pages/get-3-free-bead-patterns-and-save-15-percent-on-supplies

    Did you know Jewels has a Book? It’s true! You can get a digital copy of the Jewel Loom Inspirations book here:  https://bellacraftspublishing.com/jewel-loom-by-julianna/

     You can find Jewels here:


    Transcript:

    Let's make a decorative tassel for our
    backpack.
    The first thing that you want to do is
    to paint your letter, your initial that
    you want to add to your tassel. Pick
    your favorite color of paint. I'm using
    a gorgeous teal. Of course, I have my
    favorite paintbrush.
    And I'm going to be applying a layer to
    both the top and to the bottom. And you
    want to make sure that you get the sides
    and that you get all of the little
    crevices. And you might even use a pair
    of tweezers to help hold the letter as
    you are painting it. When you are done,
    you're going to be placing it to the
    side to let it completely dry. So go
    ahead and do all of your letters right
    now.
    So then we'll go ahead and make our
    tassel. You could make a tassel out of
    cardboard or you could use one like I
    did right here that's already made. I've
    got some really cool teal uh tool.
    And I'm wrapping that first because I
    really want it to be prominent in the
    back. And um and then I'm going to use
    these fibers. Oh, these fibers are so
    beautiful. They stretch so you can
    really layer them on top of the tool and
    they're connecting naturally which is
    kind of neat. And so you just wrap those
    around. And then you're also going to
    bring in whatever other fibers you want
    to use, yarns, ribbon. Here's some white
    yarn that I chose just to help make it
    all pop. And you're going to do multiple
    layers of this. The more fibers you add,
    the bigger your tassel is going to be.
    So you know my motto, go big or go home.
    And then once you're done with that,
    you're going to get a piece of yarn.
    You're going to tuck it underneath and
    um this is going to tie it all together.
    And so yeah, there's just so much fun to
    be had with these. So we're cutting it
    off right now. We're cutting the bottom.
    We're we're just using a big pair of
    scissors. And as you can see, I'm being
    really careful to cut the bottom. And
    then we're going to have that um piece
    of yarn that I was speaking to. And
    you're just going to come under all of
    the fibers there. And you're going to
    tie. You'll just make like a a knot. Uh
    one or two is fine. Just you could see
    how you just really want it to be all
    nice and even. I just slid the tassel
    maker out. Oo, look at it puff. That's
    cool. That's way cool. Okay.
    And so next, what we're doing is we're
    actually adding that big old ring right
    there. That's a solid ring, by the way.
    And a clip. You know, you It's a
    finding. And so, whatever you have that
    you can attach to the zipper would be
    fine, but this is a solid ring along
    with a clip. And then I'm just giving it
    a really nice little knot there to make
    sure that it's secure. You could do a
    few.
    More knots the better.
    And then what's going to happen is we're
    going to give it a shape. So now I'm
    bringing in another piece of yarn and
    I've come down about I don't I'm going
    to just call it like an inch and a half,
    two inches. And then we're just tying
    that and putting like a bow. And um you
    could just make knots, you know,
    whatever is most easy for you. And so
    this is just forming the tassel. Some
    people don't do this step, some people
    do. I think it's just gives more more
    personality. So, next what we're going
    to do is we're bringing in my most
    favorite glue gun, the Liberty Essential
    Glue Gun by Atte. Um, love the glue
    guns, love the company, and we're using
    flatbacks. These are plastic, they're
    not glass. Um, and so I'm adding little
    dots of the hot glue, which by the way,
    this glue gun is cordless, so it makes
    life so good. And uh we're just adding
    the rhinestones,
    putting a little bit on the wood, and
    then again, this is where um tweezers
    that are angled might come into play if
    you if you felt like you needed some.
    And again, we're just using the glue gun
    and a little swirly swirly there. Always
    makes it fun.
    And we're just going to continue to put
    the rhinestones on there. Again, I like
    a lot of bling. You could be, you know,
    you could use one, two, whatever you
    want. It's your choice. And I'm using
    colors that I chose.
    So, here is my finished initial. Again,
    I'm using my glue gun glue gun that's
    cordless. I love love love that feature.
    I also love the blue light because then
    I know that it is on. Um, and I'm just
    going to place that down onto like that
    little little head. It looks like a
    little head on the uh the tassel. And
    then I'm going to bring in my other
    letter A, which I already put my
    flatbacks on. And putting some more glue
    on there. Um, you know, pretty generous
    lines. I mean, not like overkill cuz the
    glue is like pretty strong. Like once it
    goes down, it is definitely connected.
    And so we have our our personalization
    on our tassel. I just I love that. It's
    so much fun. You could just do I mean so
    many different variations, right? And
    what a great great gift these tassels
    would make for any time of the year. And
    so here's my backpack. So now you can
    see why I chose the colors that I did.
    I attached it to one of the zippers and
    just, you know, flared it out a little
    bit, of course. And then, oh, here's
    another one that I made. This one is
    smaller. So, this is a version of like a
    smaller tassel that you can make. You
    can make them in a variety of sizes, but
    look at how fun that is. Oh my gosh,
    it's so personalized.
    And you know, all of my materials and my
    glue gun. Love it.