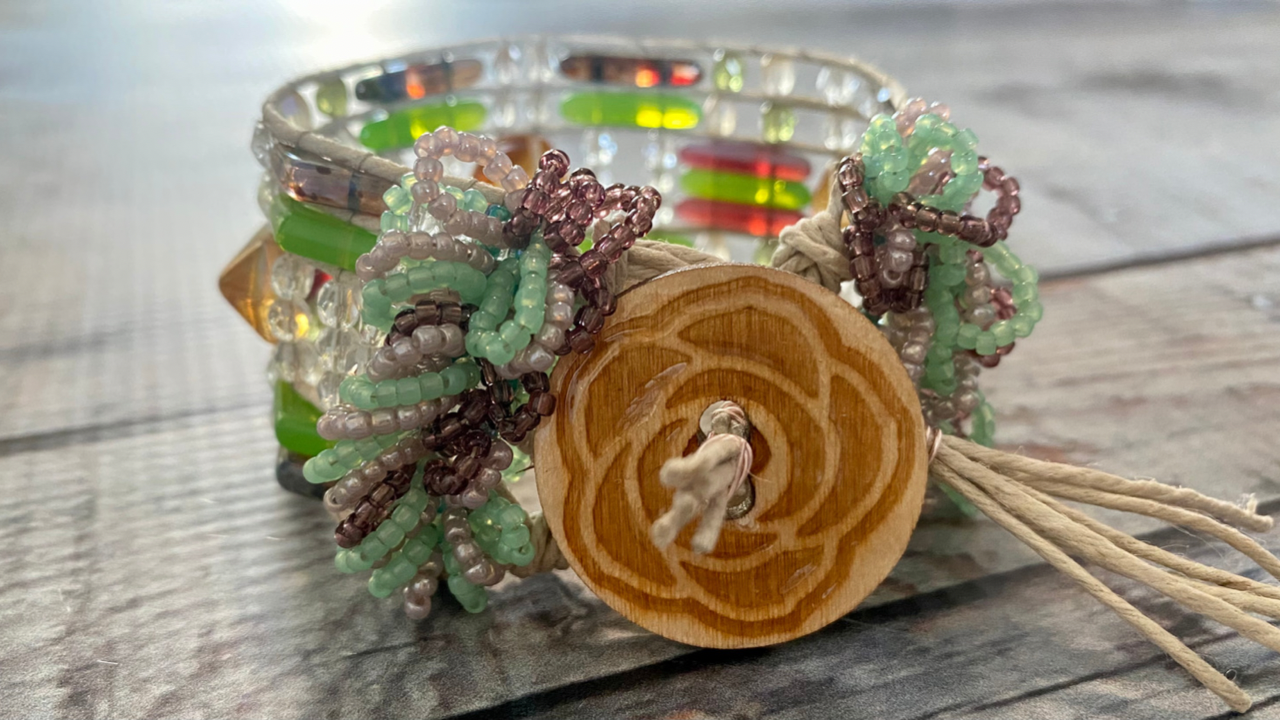
Learn how to make this cuff using 2-hole hexagon and triangle beads on the Jewel Loom Bead Loom This tutorial is part of the May, 2022 Creative Soul Workshop (kit provided). This video is provided to the public to show some of the Jewel Loom Workshop, which not only teaches new techniques, but also to help develop your creativity.
VIDEO
Included in the Workshop Subscription:
Kit components & Instruction to make one jewelry project designed by Julianna C. Avelar
Step by Step Video Tutorials Course Content lives on the Jewel Loom School online Platform.
All packaged in a Secure Box delivered straight to you with love *Private Group online located on School Platform & on Facebook
Texting Community which gives you access to Julianna for guidance on your account, projects etc
VIP Status! Save 20% OFF All purchases in 2022. Some exclusions will apply. Code given when you sign up!
Be first to know when new items are added, new courses etc.
We get together LIVE once a month via Zoom to discuss project and check in. Some subscribers show their completed projects & explain how they changed it up to suit their individuality & tastes.'
4 May Subscription Workshop kits are still available! You can subscribe to the monthly workshop with kit (Creative Soul Box) here: https://jewelloom.com/collections/subscriptions (choose 1 time purchase or subscription)
Sign up for the Jewel Loom newsletter & get 15% off your first order, plus a free pattern: https://jewelloom.com/pages/save-15-on-your-first-order-get-a-free-pattern
Receive text notifications for Jewel Loom shows & special deals by texting "Sign Up" to 1-805-768-0568
Shop my store: www.jewelloom.com
Facebook pages: https://www.facebook.com/Jewelloom & https://www.facebook.com/JuliannaJewelsAvelar
Jewel Making with Jewel Loom community page: https://www.facebook.com/groups/228056324285807
Please contact Jewels with any questions you have about her looms: email - hello@jewelloom.com or text - 1-805-768-0568
Transcript:
can you still hear me okay
oh my lance okay so we are live and um joan is hiding in the background we were
just chit-chatting and then all of a sudden the timer ran out and i had to remove her and um yeah it was quite
funny he had to be there but anyway welcome welcome welcome this
is a um an interesting uh version of a presentation so this is
the creative soul jewel box um
presentation normally we do it on a zoom but the uh memorial weekend coming up
usually i try to get everybody that last last monday of the month and and that's not going to happen so i kind of like
got a little wonkadoodle with my schedule but i thought you know what how fun would it be to share the love
with um you know the creative family out there
uh on the youtubes and that way people could get a little taste of what the
monthly workshop is actually like and so
right now where we are at is that everybody has received and look at let's put this in here to make it kind of look
prettier um everyone has received their uh creative soul
box now there's possibly a couple international people that have not um
when i say international i'm pretty much referring to canada and uh
and so i have started to upload content
into the jewel loom school so every month a course is developed and it lives at
jeweloom.com and then i start to plug in all the
different steps and so for this particular course the rose trellis cuff
the materials list is up there the um i just uploaded the warping
of the loom how you're going to warp your loom for this project when we get done with this presentation i'll be
uploading this to the course and then whatever i don't um finish
i will then record separately and then upload that
and so um i just i thought that it would be a really great idea because it's kind of
funny we kind of are like undercover won't you say so joan [Laughter]
the workshop is like is like an ongoing amazing thing
um but we kind of do it behind closed doors right and that's just the way it's been and i thought well you know what it
would be really fun to to share um what goes on a little bit
with again our creative family out there so uh with all of that said this is
this month's bracelet okay this is the rose trellis
lots of times when i design i either have a vision or i have a technique in mind um
and so we collectively i think i can speak for the entire group we really really love the
um two hole triangle beads those are these guys right here
and we've done a couple different cuffs using that bead and then most recently we got real
wild and um we we did a bracelet with the um hexagon with the 12 millimeter
hexagon bead and so i thought oh my gosh well why don't we merge those two loves
right together and and so my original idea
was that i was going to take the center here okay and that's where i was going to make
like all these fabulous loops well i discovered
that um when you were warping and i should have known this warping with the one
millimeter uh hemp and the four millimeter fire polished beads
uh there's no room there is just simply no room no room for your um
needle and thread and so i then decided well i still want to show
off the looping technique and i'm really loving the rose button right that came
with the kit this month let me get where are we at okay there we go oh okay there we go hold still
so what i decided to do was to actually do the looping on the ends on each end and then that
way if your bracelet were to you know turn itself around on your wrist
you could show off the focal piece of the button and then you'd have all these
great loops so with all of that said i just love it it almost looks like
stained glass that's what it also kind of reminded me of like a rose trellis stained glass
so again if you're just joining us i just kind of want to give you a heads up of what this is this is actually
um the creative soul jewel box uh part of the course i thought that we would share a little
love with everybody so um the entire contents
content the entire content of of this uh collection oh claire i'm
so glad you're here and uh is going to ultimately be available in the jewel loom school now
there are four kits left that's it for may's project the rose trellis
um you can either subscribe for 45 or you can buy one month at 55 but i'm you know
if you want to do the 45 and then at the end of that you're like you know what i tried it it's not really my jam i just
kind of would like to come and go that's also fine with me if you want to test drive
the may kit i'm cool with that so your call whatever you would like to do but we
always love to have new students so um again this is the project and i'll
just open up the box really quick so i'm very grateful for you
[Laughter] very very grateful and this month you know every month i put a
tea bag and a cookie into the box and i shouldn't say that word too loud or brando might come running out of
nowhere and so this month we had um
we had the hemp that everybody needed okay uh to warp we had a full strand of the
lime green triangle beads and almost like a i would call this like
a soft burgundy it's really pretty very very pretty and so you know these these are um
strands that retail anywhere from i think the lime green was six and uh the
burgundy was ten so i always try to do really nice nice beads um the other beads that came
in this kit or do come in this kit we've got the um hexagon beads that are in here
and the fire polish beads oh and there were
some amber beads so i think it was like half of a strand of amber
and then of course i always try to make something a little special for the students and in this
case we ended up doing the rows button and i put the um oh gosh what's the
stuff that i always joan do you remember um the glaze that we put over the wood pieces i know
trisha has a whole technique too and i'm hopeful that um we'll get to see a video from her
on how she stains the wood because she does such a beautiful beautiful job yeah there's patina paints but then there's
the um just the gloss that that can be used so anyway there are
four kits why did i just pack can you imagine somebody getting the finished bracelet
[Laughter] the modge podge thank you rosalinda okay let me save the finished piece i just
stuck it into the kit all right so i'm gonna put that away
and um let's see here and again jones putting up the different um
uh links you can go to jewelroom.com and you're actually going to find it on the front page but the links that joan is
providing will take you right there typically it comes in a box um and or a
padded envelope regardless it's all always fabulous and we pretty much just haven't it's it's
like fluid the we've talked about this before the workshop is just fluid it doesn't ever really
just happen and go away it's been and it's been well over a year
now and i'm so grateful for everyone there's so many of you who have like
every month and i can't i can't even because i'll start to cry you know me i wear it on my sleeve but
it's just fun we're always um you know we're we're always doing
something and there's always something to be done okay so i'm gonna pull in and i'm just gonna see
uh see what's going on here with my camera
now i went ahead and um like i said the instructions and the demonstration
are in the school already i did that today you're going to see that i have a
vertical shoot and a horizontal shoot same exact video but when i was taping
it and i uploaded it it was in the screen where you have the two black sides you
know and then the the videos in the middle and i was like okay that's cool and all but i think i'm gonna i'm gonna
rotate it and editing and upload that as well and so that's
all you can either watch it and and you're probably just gonna be like jules it was cool the first way but
whatever i always want to make sure that you understand what i'm talking about and you understand the position that
your loom is in so with all that said i am going to um
i'm going to remove this okay and oh this is exactly what you
would see right so this is kind of like what i'm talking about um how it uploaded
so we have our jewel loom and i am sitting
and the loom okay here's the loom and let me just say this is my right hand
this is my left hand all right and um
if i point this direction okay this is my body and
i um already have my wildfire and there goes brando
i already have my wildfire strung onto the jewel loom needle
and what i'm going to do is i'm just going to go ahead and tie
the far left warp and i'm just gonna do one little
one little um oh i know i have these here i was like why do i have all this stuff here
so after i made my breast bracelet this was on my leftovers i mean crazy right that's one thing the
most the time there's always something left over and so you can make a pair of
earrings um you know a thinner bracelet but this was um and i i apologize
obviously these these guys are extra but um yeah i had a lot of extra in my kit
so not in my kid but you know what i mean anyway i'm gonna stop talking
okay so what we're gonna do first is i am gonna put the um single row of edos
so that if i want to go back and do some looping i can that is optional all right
if you're not going to do the looping like i did then you don't need to do
that row of edo's okay does that make sense but i'm going to go ahead and do it
because i want to do some long stringy fringe ones this time and i just want to see okay
just going to do a little adjusting there okay so i'm going to come under the warps
i'm transferring the needle into my right hand and i'm going to pick up 13 8-0 seed
okay and then i'm going to let all of those fall down
all right and then they're just hanging right here underneath
the warps and then i'm going to pop them into the little alleyways
first row is always a little fun okay there we go cool and then i'm going to take
the needle and i'm going on top of the warps
and i want to make sure because this you know kind of having a free-for-all here whoops
and we're just gonna get in there
okay so gliding on top of the one millimeter hemp with the little beads it's it's
tight but you just want to take your time and you can see how beautifully they
just stay on there i'm going to bring this up to the camera so hold on one second because i don't want to lose my um
okay so that is the row of
edo's now if you wanted you could do two rows of eight does
and that's what i did on this cuff right here and i just went back and
forth with the looping so it just depends again like if you
want that look on your bracelet or not okay so now what i'm gonna do is i'm gonna
come under my warps again and i am going to pick up one two let's
see how many was it gotta look at the back since my um two four plus three so
we have um seven okay so we're going to pick up seven little four millimeter fire polish beads
six seven and then we're just going to guide those
now um you're probably wondering okay well jules if i am going to do the looping when would i do it you know
because you're going to be using um the little guys the little eleven o's that were in your kit
um i i went back and i did it at the end
and so i think that you could do it now or you could do it at the end
and i'm just um trying to get the needle up and over
the one millimeter hem it's kind of funny too i don't know if any of you have noticed but the color of the one
millimeter hip hemp really dictates stick ticks um
the uh the experience i have found the dark purple
to be a lot more i don't it doesn't seem as thick but it
is and this natural hemp definitely seems to be heavier so it's
kind of interesting that the color um you know the color would be
would make that different but it does all right so right now we have a row of
edo's and you can see how fun it is when you warp your loom for um you know different when you're
skipping different amounts of grooves so i did two two seven two and two
and then i've got a row of edo's i've got a row of the four millimeter
fire polish so really inspiring to know that you can literally mix it up it just depends on
how you warp your loom and what beads you want to use okay so so far we've used two different
sizes and two different types so now what we're going to do
is and really i call these i i call these kind of like filler rows
right so you know in all honesty it's the back of your bracelet so if you don't want to
like really uh i don't want to use the word waste but hide let's say hide you don't want to
hide all of your good beads um then you could you know you could use like this first
inch or so to do what i would call filler rows but totally up to you um i did just
notice on this bracelet i did two rows so i'm gonna grab me some more
oh maybe i have enough of these guys let's see how many was that seven so i'm gonna pick up some of these
greens i was also thinking when i was making
this bracelet um great you know bead soup concept right
like if you have especially with the fire polish like if you have a lot of fire polish left over
it would be a really fun way to use um to use those beads all right so i got
okay so we're going to put this up just pop them in there it's a little tight
and again i'm just going through the hole
on top of the warps and you just want to like really
help to get the needle through these middle ones because they kind of want to
pop up everywhere so i'm just going to take a look yeah i'm i'm i'm in the bead so that's good news
and scooch that down a little
and we're going to pull that
for a sure there i thought it was going in a different direction okay i want to make sure everything is nice and tight
and i'm going to bring it up to the camera so you can take another look so at this point i have
three rows again a row of eight o's two rows of the four millimeter fire polish
okay so now we're going to go into our two holes
so i'm going to pick up a triangle
so so i've got two of the triangles
and then three three fire polish so one
two [Music] three and then i want to do the um
i thought that was going to be a big sneeze so sorry
i'm in the rose garden i'm sneezing because i do have allergies
my cuff is making me sneeze oh wait a minute that's an amber oh do i
want amber uh no i want yes i do want amber okay
i want amber not like it's a deal breaker
okay so we're going to string those on
[Music] and let me get make sure i'm down here
in the camera and then once again so this is a little
you know oh look what jules did she put her pyramids on backwards ah
how funny is that i thought i had it the right way do you see what i did hysterical
okay live lesson i'm gonna bring this up here so that's not what you want okay you
want their little pyramid heads to be facing up towards the ceiling i put my needle in wrong
okay that's okay not a deal breaker we're gonna take those off and restring
so i love it when things like yes exactly teaching moments
right so just um take this slow don't get all
too fast you know fast and awesome
thank you beads for being okay so let's uh
let's look here and see so i need to go into
ah i see what i did so i think this is the proper way
hopefully this time i have it right
yeah i was just backwards
okay now now the triangles are facing upwards so
that's awesome and i want to get them as close to that row as i can let me come up to the
and i'm going to go right back through the hole on the top just like we were doing
and i'm going to go through the single row of a single hole
of the four millimeter beads up and over
and yep just gliding again um it's very very tight okay there we go
thank you and we're going to pull it through
i hope you're also watching the dance with my hand how i keep the jewel loom um from wiggling
okay and so we're gonna scooch those up and then what we're gonna do here all
right so i'm let me see what i want to do i'm going to bring this up and you see
how their little bottoms are the bottom hole is underneath the warp correct
but i've also not only have to go through the bottom hole of the triangles i need more
fire polish so what i'm going to do is i take the needle i'm in the my hand
is over here my left hand i'm going to take the needle i'm going to go through the bottom hole
of both of the triangle beads do a little wiggle wiggle and then i'm going to hand feed
the next three fire polish onto the needle
okay and then i'm going to go through
take your time with this because you don't you know want to get frustrated with the fire polish falling off all
right and so i just went through the bottom hole of the other triangles and we're going to pull the wildfire
very gracefully and then we're gonna pop everybody up okay and then we're gonna go back
so let's see here okay cool and we're going to pull and now we
basically have that first combination of the two hole triangles
and the fire polished beads
all right now our next row
is actually going to be the hexagon so i'm super excited to show this so we've got two fire polish i think i need to
well here we go one so we got two fire polish
and i've got the hexagon two hole bead here and i'm coming in on the top hole
on the left side and then i'm gonna pick up two more fire polish
now when i got to this point i kind of had to
uh give a little um lessen the tension over here because
this fire polished bead wants to keep turning let me come up do you kind of see how
it's not exactly straight across correct and there's quite a distance not like a
big one but a big enough distance from the bottom of the triangle here
and this fire polish my advice is to do
what i'm showing you because it'll make life a lot easier by
taking the needle and the thread and just being
flexible with the way the beads are
aligning because you have like these different shapes and sizes and it gets a little challenging to get
the needle to go straight across so you can kind of see how the needle is a little angled
but we're gonna um we'll make all of that right okay so we're going to pull the thread and
then we will just help to guide these little guys back into their
and then we'll give it a nice little little tug and we're just going to help to
straighten that out so see how that all comes together
let me tilt that a little bit all right so now what we're going to do
is we're going to come under the warps and i'm going to pick up two more fire polish
okay i have to go through i have to like back out a little right
and go through that bottom hexagon
and then i'm going to feed
the fire polish the other two fire polish onto the needle
okay and we're gonna let that we're just gonna guide it the more you help to guide your wildfire
the easier life will be so we're going to pop those up
and we're going to go through the hole over the warps back through the hexagon
okay and again i'm just helping to guide and see this just comes out so
beautifully when you take your time and then you just help it all come together
okay so then after that row i just love mixing up the beads so it makes me
excited okay so after that row we're gonna do um
we've got two fire polish we have three
okay and i just realized i don't have any of my burgundy ones let me
i did have some cutters here all right don't go anywhere
these burgundy beads are gorgeous
okay so i'm scooching myself back in
so two of the fire polish and what did i say
three triangles okay so we have to what did i do i did a burgundy
i did a burgundy hello okay and then i did a lime green
and then i did another burgundy
and two more fire polish [Music]
and then i'm just gonna let that all fall down
we're going to pop those all into their little alleyways there oh my goodness this is looking so pretty
and then i'm going to take the needle go back through
that top hole starts to get a little you know you got a lot to kind of maneuver but that's
okay just take your time okay and then we're going to pull that
oh did i not go through that i missed two whole beads
i did how funny is that okay let's do that again
okay there we go all as well all right and then we want to pick up uh
and this is again where we kind of have to back out actually to the left side so that i can get the
needle to go through the bottom
oh where are you guys there we go
those bottom three holes do a little wiggle wiggle and add two more fire polish
and then we're going to pull the wildfire
and we're going to help lay those in the right place
this is where it gets a little tight to make a straight straight shot so you just kind of want
to see how my again my needle is a little at an angle but i'm going to straighten that all out
once we get right through so let's pull this through
once i bring my tools in everything goes crazy because they're all over the place so keep a clean surface
so then i will um look at my piece and just help to align
you know the beads so let's bring this up for just so you can see and i'll put my hand
so basically i'm just kind of doing a free-for-all pattern now right like it's not a do or die
this is what you have to do um it's it's basically following
um the the pattern so the next section so like this is pretty
much like the first section right so this is the first section
minus the eight dose so let's call it the fire polish this is like the first section
and then we did the two triangles the fire polish and the triangles and then we came back with fire polish a hexagon
fire polish then we did fire polish three triangles and then we did more fire polish over
here okay so now we're going back into um this section
now you could certainly if you wanted like say for instance if you have a larger wrist so
my wrist is six inches and um if i needed to
add some length to my bracelet but i didn't necessarily want to
um waste my triangles or my hexagons or maybe one of my higher end beads then
this is where you could put like a row or two of your fire polish to give it a pretty little spacer so you could think
of this area these two rows of your fire polish as your spacer
added length okay and then decorative
and then repeat so i think what i'm gonna do is i'm gonna add
for this bracelet i think i'm gonna do let me see what am i going to do
i think i'm going to do what i did [Laughter]
that is the triangles and and then let's put that over here
and we've got the lime and then we've got three more fire polish
so we'll do this one more time for everybody this kind of gives a good demo
let's see where's the third one and then um i need another lime
these actually that's more of a candy apple green i it's so beautiful it's really a
beautiful green so and then amber okay and then we're going to let that fall
yeah it's basically a repeating pattern stephanie you know just one that i
um [Music] you know that i just did right it's not
like not like a scientific one and it'll definitely be in the course
because you'll be able to um you'll be able to see that
so i'm just going back through
and like i said before it kind of starts to get a little tight i did have to and i might have to on this one i might have
to just and i'm going to show you actually okay you see where the needle is right now
and i'm having a hard time getting it to go into the two top holes of the triangle because of
it just gets tight you're dealing like i said with that one millimeter hemp and so what i'm going to
do is i'm going to go ahead and bring the needle out okay because there's no sense to mess
with it i'm just going to bring it out okay
and then i'll just go through so all is well
and we'll go through the green one and are you gonna give me a hard time too
buddy come on okay i will go through the amber
and i just the only thing i want to make sure here is that i didn't like
miss anything so i'm gonna get this adjusted
okay and then again we're gonna go through the bottom holes okay so i'm going through the bottom
holes and then i'm gonna feed um some fire polish on three of them
and if i need to i'll probably just do that so that i don't lose them and then i'll go through the bottom two
do a little wiggle wiggle pull the needle out
push these up and go back through the bottom
hello come on now where you at
so again you're just going to go back and you're going to straighten everything out so it looks good
oh i see what i did okay so
i'm gonna i'll correct it off off camera but it's okay this is why it was giving
me a hard time how did i pick up four of these guys that's what the problem oh well not a
deal breaker but that's why it was being kind of weird i was like what is happening it's kind of a cool little
look right it's like like creating a little bridge but i'll probably go back and take that
off i'll just unstring myself [Laughter] boy teacher moments
[Laughter] yeah so stephanie it's um you know you can kind of get a good idea like just
with this shot right of what what the pattern
what the pattern would look like let me come over a little bit
you know and you can switch it up um this this demo right here is just really
giving you an idea of like how to mix and match the different beads
you know because now we have seed beads we have fire polish beads we have triangle beads and we have a hexagon
so all in one project super fun it's one of my most fun things to do there we go that's
cool beans okay so i'm gonna go ahead and come back up
let's see where am i gonna do here
now can you hear me joan okay
you like the far the bead arch yeah it's good yeah we're gonna go with that [Laughter]
you know what it is it's london bridge and havasu if you've ever been to lead kava suit we're we're just going to call
it the london bridge and havasu [Laughter] once i got it popped up it didn't look
weird but um i was like what is under there so i accidentally picked up four instead of
three but you know we always make uh what's that saying make out make
lemonade out of i don't know joan's gonna type it in because she knows the sayings
all right i'm gonna try to get that out of my face yes it's a pretty mistake there we go
that's what we're gonna call it so again well um i hope this gave you a
good idea of you know what we do every month i design
a project i curate it i get all the products that we need
typically um the student has their loom you know you always provide your your
loom your jewel loom one of your jewel looms and your needles um and your beading thread
but i do try to always add the warping material unless it's beading thread and
then of course all the beads and again i always try to make something whether it's a button or some
charms it's always fun for us to add a little um
piece that's not necessarily in the shop yet and so the students get it first and so that's always really a lot of fun
because the rose button is not in the shop um just as as of yet so
uh yeah and then you know there's a lot of perks when i
um when i get a good deal i share it with my students and and you get 20 off all
year as long as you're a student in good standing and you've not had to go to the principal's office
which i don't think we've had that yet maybe with joan
like or she's like not me but um yeah all good stuff so i will be
uploading this recorded version of the demo into the school
and then i'll get the bracelet finished and then just a little a sneak peek going forward
we are using the large um wisdom warrior
in june and the hat band is off the charts it's so beautiful
uh 14 or 13 rows across by
22 some inches right um i'm headed out to tandy i'm gonna go and
grab some leather because i want to do the leather endings for the uh for the hat band
and so i'm super excited about that and then in july um i want to do um
i want to do some beaded earrings some seed beads so summertime is going to be
seed bead palooza we're going to do a we're going to have
fun i think it'll be cool for the uh for the summertime and
and uh we'll work on our our seed beading and so i'm super excited about
it and i hope you love the hat band just as much as as i do because it's really beautiful six different colors
there's terra cotta and turquoise and black and gold and teal and we tried to
get some gray in there but the pattern wouldn't accommodate a seventh color so
but it it's gonna be it is gorgeous so so that's june july is gonna be some earrings um
if you don't have the large wisdom warrior for june you can always use
your smaller loom um your jewel loom or your small wisdom warrior you're just gonna have to sew two ends together
doable i did that technique in my book it's how we used to do it before we had the large wisdom warrior
but um uh if you don't have it then you know i don't want you to feel like oh i can't
do that because i don't have that loom it's a big purchase but um but if you do take the if you do join as
a subscriber um then you will have that big discount so
i think that's about it i know that there are some people who are going to be so bummed we didn't get to do our zoom
uh for students if you have another date between now and the end of the month
i was thinking about the first monday in june even though some of us might not have
our box yet for june i'm more than happy to do that or if you throw some other times out at
me i could i could try to do to do that as well
our live zooms are usually off the charts they're more about
the students it's kind of like a share time um
and more business talk we talk about people like if they have businesses if they're
selling their jewelry we do a lot of that kind of talk and so we don't really get a demo in
and and so that's fine because i do all the demos in the class but i thought that this
might be a really good way to let you know what you could expect um
and so yeah that's my spiel and i'm sticking to it
and uh we have five-star ratings on the workshop so a lot of people have been extremely happy
with the classes and um and so yeah
i think that's i think that's my story and i'm gonna stick to it and i'm sorry that i can't get this thing out of my
face but uh yes joan exactly thank you for articulating that for me so joan's
comment is we inspire each other with how we changed it up so
you know when you take a workshop there everyone's a different student right
and and so you may like to make exactly what your teacher told you to right what
your your person that you're learning from told you to do and you want to do it exactly as
they did and that's cool totally down for that i get that but then there are also other people who are
like you know what i love learning all that technique and i'm gonna follow you and learn from you
but i'm gonna give it my own style and if correct me if i'm wrong but
wasn't it was it last month where people didn't a few people like add their
swarovskis to their project one month they had some personals uh swarovski
stash was it last month's project it might have been i don't know if it was last month or
yeah okay yeah so it's really fun because you get inspired to um not only learn the
original design project but you also
get to see what other people are doing so i know that this monsoon needs to happen i
am just hopeful throw some dates out to me peeps because um
i know i know you love that rosalind is like yup
and i know diana i know she's probably like beating with beating me cyberly with my loom right now because
she she oh there she is [Laughter] deborah i was just thinking you're
probably over there beating me with the loom deborah this is like also um
for a lot of people this is like it's like therapy let's just it's therapy for me right and so when we get together and
we are on a zoom we get to see each other's face and um it really kind of just reassures
all of us it's a really it's a sweet group of people so um
if you throw me some dates and times i'm more than happy for our students to try to figure something out it's just this
holiday weekend memorial weekend i think really kind of threw me off so
i'm going to a big country concert on monday or yeah memorial memorial day so i'm super excited i got
like this cool stevie nicks thing to wear
so i do sadly have to return my cowboy boots they're not gonna work it's just
not gonna work so i'm kind of bummed but that's all right i'm a high heel girl oh good okay deborah so all right um
i love you i'm so appreciative of you i hope that um this was a fun way to demonstrate the beginning
of this bracelet again the warping is already up there i'm gonna upload this recording up to
the school and then whatever i didn't get finished um i will and that will be up there and so
yeah and i don't know if claire is still watching but claire did you get your um box already
so claire represents south africa and it's like so cool to even think that
my looms are over there don't know if she's still on because i think the time um i think it's pretty
late in south africa right now so okay have a great evening
joan thank you so very much for being behind the controls you are the best ever i see amber and trisha don't forget
to watch them this thursday they'll be on the youtubes and um
i'm pretty sure it's very sexy earrings that i'm probably let's see am i going
to be around oh i okay well we have we have double trouble on thursday i totally forgot we have
oh not yet okay um nelay and i are on first on thursday at 3 p.m my time
pacific california time and then after that um
trish and amber will be on with the sexy earrings but neely nilay and i will be
doing the silver silk loom uh and then trish and amber will come on
and they'll show you how to have some sexy earrings
okay and claire says she hasn't gotten her box yet but it takes sometimes it gets there quicker than other times so
and hawaii i love that everybody's just everywhere that's so cool thank you kara
all right party time okay take care y'all have a blessed evening and i will see you again this
thursday with elay and then trish and amber will see you right after that okay