Your Cart is Empty

0:02
hey friends hi guys welcome in
it's that time again yay and we're both here
two weeks in a row how did we manage that i don't know
yes say hi when you join us friends i see a couple friends who've joined us here
over on youtube on the youtubes youtubes yes come on in guys
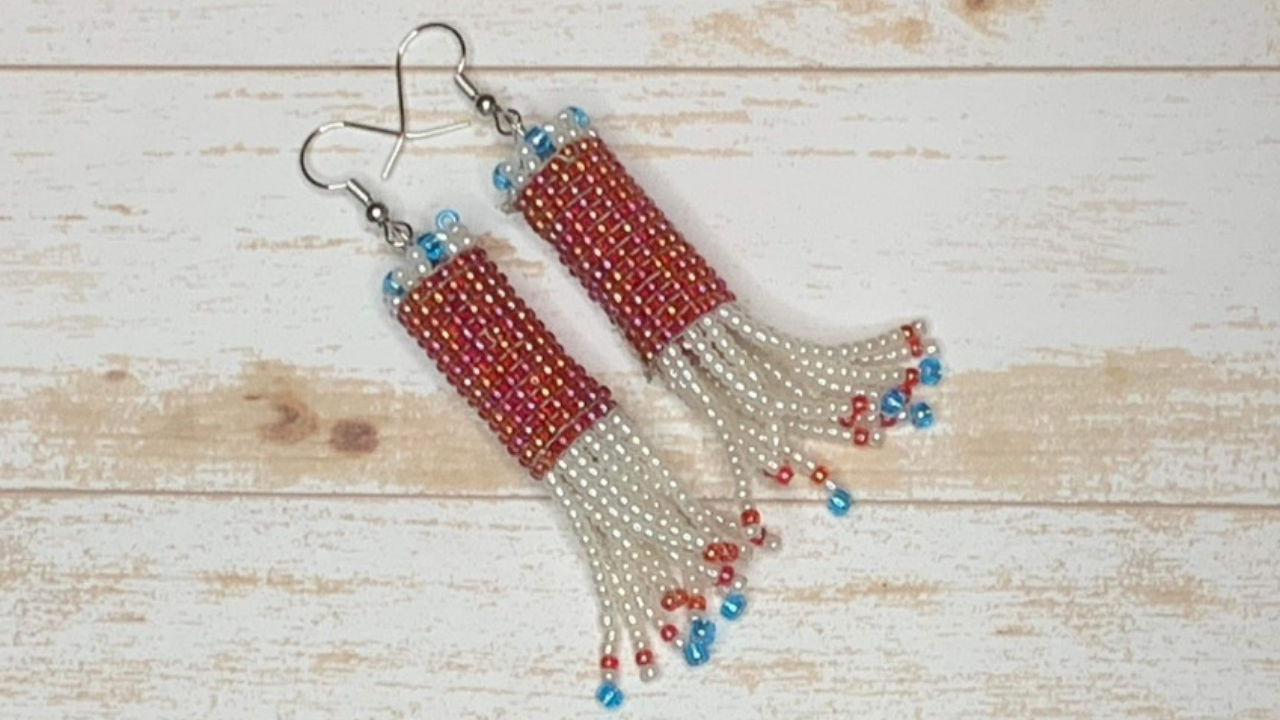
we're gonna make a super fun project this week we're making some fun dangle earrings amber has designed these they
are absolutely adorable look at that firecracker earrings she's calling them
yeah just it's good good go ahead go ahead no go ahead i was just gonna say it's gonna
be a fun project i originally called them chandeliers see there's but you can definitely use all kinds of different
ways of doing it but in honor of memorial day beautiful yeah the firecracker
hi zach hi sandra hi becky hi guys
it's very hot and where in texas are you wayne
we don't say hi girls anymore oh yes please just say hello everyone
we don't want wayne to feel uncomfortable because we like having a buddy here that's a gentleman
so nice hi elena hi austin area he says oh that's where
my brother lives so fun yeah so cool cool very fun
yes i'll have to ask them if they've ever seen your creations they go to all kinds of street shows and
everything in austin yeah so very fun very fun
i don't know tonight well i think we should say happy early
birthday to somebody i forgot to put my ears my thing on i was gonna wear my birthday crown too
and i did okay that's fine becky
she was just saying hi to us oh no i didn't see that i that was completely out of my brain honey it wasn't you
i didn't even see that comment so oh sorry i think she was meaning more us
and what we say yeah amber and i no you're fine honey
i didn't even see that comment oh my god my brain sometimes but
you are just fine becky so wow what cinder says and gentlemen and gentlemen yes
so excited wayne's here to join us again so if you want to join us in beating
tonight you can grab your original jewelloon
hey paula hi paula but um get your original you can do this we're
going to be doing wildfire and wildfire can be hard to warp so
i find it easier on the original but you can certainly do it on
the small wisdom warrior oh the ladies comment and zack says happy birthday uh her
birth her birthday birthday on sunday yeah 64 years young so happy birthday to
zach and to trish early yes i'll be 47 so
yeah so fun
hi sherry hi coral but our project's big tonight so
i'm gonna go ahead and go go right to it um i gotta flip my
flip cameras here okay um so you can talk for a moment i'm here for your entertainment
[Laughter] so i am actually just putting on
the bottom clasp on the the silver soak pendant that we made last week onto this one
because it was still up here and i've been so busy i haven't even put all the bottoms on yet so i was just messing with that so nice
let's go here to you amber and let her i'll let you be little
okay it's okay sure so let's see so grab your original jewel
loom or your small wisdom warrior which i don't have next to me or i'd show you
mine isn't either i can grab it off the wall though yeah you could sure i'll grab it while
she's grabbing it give you some clues i've seen a bunch of people having trouble
with it i really my hands are warm tonight so i probably don't even need to rub it but take your loom and just warm
it up a little bit um it's it just helps it be more pliable
um and then lift up my camera a little here you know put it on your goddess belly
and take your rod so here is our small wizard moyer
yeah very nice so either of those looms
if you got the baby loom for this project it would be difficult to have both earrings on it but if you wanted to
just make a pendant show everybody just crown here
i got to put my birthday crown on whether i stay on there or not is
another question and it's probably crooked because you look lovely darling hold up your
loom again since you're a little bigger now can you oh okay sure
there we go there's our small our beauty beautiful wisdom warrior here
hi carmen hi rose yeah the only thing is this is really heavy on my head well take it off when
you're ready then yes you know what i couldn't do is just switch it out with these oh yes
that's what i was gonna wear hi rosalind all right so take your loom
you know put it on your goddess belly gently push it after it's been warmed up
you toss zach says you look lovely and now we're we're set up
here and ready to go so i'm gonna since this is such a big project i have
all the steps kind of laid out on different looms and stuff um so i'm just gonna review warping with
just a couple lines um but we i did write everything out for you
um and trish is gonna put that if she can uh in the comments
and we have our friend joan joining us um
so you're going to use wildfire for our project tonight and as i said our loom
if you want to bead along or you want to start looking for the materials this is the siam ruby we're gonna use
red white and blue um so the siam ruby this is the rainbow light but that's also just a regular
rainbow one as well and i did the the example in that so
they're just slightly different um but they both turn out
beautifully uh you're going to need some wildfire now i did the original
with a tan i'm just going to show you warping with a red here
i also use the tohos that jules has this is the aqua
the dark aqua and then
though the white that she has i actually didn't have this this is mine but it's the same
as what she has um so for those of you who are just joining us we're making firecracker
earrings um so there's several steps to this so i'm going to show all the different
steps but i do have a write out for you guys to print out um
so that you can go back and do that so uh donald
trump she has a moment joan do you john do you have that the
link to the um instructions you can post for us honey so
i got a yes thank you joan um
so so grab your wildfire and
flip over your jewel loom and i apologize so i'm my hands are
having trouble tonight so i'm just gonna just do a couple
warps um but it virtually the big thing even though it's a big project it's a lot of
repetition so i will try my best to and trisha's hands
are hurting her too so we will try our best here to get this to review how to warp so you wanna test one and not
message that's why we do this together because
together we make one person
and i and one thing i do for those of you who have trouble with your hands i actually use my pliers a lot with
wildfire so just tie it off
and i did the red too so you guys could see a little better here because the tan just blends right it's beautiful
it's great for your project but so there you go the the the link to the pattern right up
is right above your comment there and um joan has posted it for us
thank you joan yeah so then after you tie a double knot
you come around and you go in one of the grooves
and you hold it tight now that's the thing with wildfire yes we have the tension rod
um but you still need to hold wildfire pretty tight and then you come around
lay in one of the other across make sure it's lined up
grooves and wrap it around you can do one or two either one and for
this project we're just going right to the next the next groove so we're not skipping any tonight
come up next groove wrap it around and i'll go through one
more here go down
next groove and wrap it around and on the last one i
wrap it a couple times to kind of try and hold the tension and then you want to find
your we have these great cutters that i love
that cut it so beautifully make sure you don't use them on anything else they're wildfire cutters
anything else but your wildfire it really dulls them but then
i hold up here to try and hold the tension while i not
and this is another spot as you can see with my
arthritis and stuff i can use the pliers so i got it underneath the warps
grab it with the pliers if i can without losing the tension
and then of course i am so you as you can see you just want to
tie it off up here and i'm sorry my hand my i have a blood clot on this side on this arm so it
makes it difficult plus you have arthritis all the time on time and chemo
yeah we got a lot of problems honey ignore that awful knot
they get the idea i'm sure to take a lot of smarties in this group they know their business and jules has this kind
of video on there multiple times so imagine it's knotted
and you're going to push on your goddess belly again and gently pull this out and mine's going to come
undone because i didn't knot it but that gives you an idea how to warp your loom
right thank you yes joan you will if you look at the write up you will need 15 warps
tonight so when you get down to it it's going to end up
looking like this beauty so
of course my needle fell down in there um so the one thing
you can definitely use the jewel loom needle but sometimes
we have fined if i could figure out how i tied my string through here
oh my goodness um one thing i have found that sometimes it
doesn't go these are the 11 0's it doesn't always go through oh and the eight o's the blue is eight o's
everything else is 11 0's but the blue is an 8-0 just so you know if you're
looking to purchase get my
i want you guys to learn from my mistakes too all right let's see if that unties us
here that way all right so we're gonna go through and take the needle off and just
hope pull for the i carried it downstairs into my office from upstairs so got a
little tangled all right so this that's how you want your warp to be
when it when you're done um so you want 15 across
okay um because we're gonna 14 is a big number in this project so it's going to
be you're going to bead 14 across and 14 down
um yes thank you joan for uh reminding them well i'm putting my needle back on trish do you want to tell
them about the giveaway yes every week we're doing a giveaway
and this week is no different and we're giving away a jewel kit
this kit includes a baby jewel loom an original jewelry jewel loom
100 beads and some hemp so if you'd like to try to win this
just sign up for the newsletter subscribe to our youtube channel
and like the jewelry page three things
and we do have i'm gonna look for this week's winner but you go right ahead honey and you
keep going okay so i did have another needle and thread here all ready to go
and i don't know i how it always goes
i think i found it there it is all right
done done and done lizzy sounds awesome lizzy awesome lizzy awesome awesome
um so this is what what we will be being i'm gonna keep the thread attached to that
so when we go back we are adding all kinds of beauty to our piece tonight we're going to add
a picot stitch on one side and some tassely
dingle dangle all those technical terms on the other so
so you're going to want definitely technical things you're gonna want
um two arm lengths of wildfire i found i could do pretty
much the entire project with two arm lengths you're gonna take
the wildfire you're gonna bead with and you're gonna make sure that's that's the
big thing while why we're not using the baby loom tonight you need to make sure you have enough room to tie everything
off um so and get two on here so i'm going to come
all the way down here because i need the space from this one and this one to tie off the bottoms
and they don't have to be pretty we're gonna hide them on the inside of our earring
you will also need i think these are about eight millimeters some
beads from your stash so they will give we're gonna create the
cylinder and as you can see they will help give it shape i can get
it to yes the beads go through the inside of
it yes is that right okay so that'll help hold the shape and
create where we put our ear wire the structure there in the middle cool
so yes so all of the directions i typed up for you guys because there are a lot of steps
but a lot of repetition
now this needle i have on here is a beading needle but i'll switch it to the
uh joule needle because when you do the picot and stuff
sometimes it's helpful to have a beading needle versus the jewel loom
but when you're doing the original steps when you're just doing the the looming
having uh having the the jewel loom helps
and of course so that's a little trick take your flat pliers
i'm doing here but i can't see it because i'm blind
but it helps helps it go into the needle easier
so this is shorter because i was using it earlier but um you definitely want to make sure you
have enough space for when you're finished so then take the siam ruby
so that's the reddish colors that jules has and they're so pretty so so so pretty
see if i there we go go under all your warps and we're going to pick
up 14.
you still there me yeah is that quiet yes
i got quiet i'm just paying attention yup i'm still here honey
all right so all of them thankfully fit and that's the other thing going back
through the 11 0's it helps to have the the beading needle for later if you have
one and as always the first row is always the hardest
so you try and especially when you're doing this number of beads
so lizzy we are making a design that aimer created they're called
the firecracker earrings and they're a cylinder earring that have
beads inside of them to make this the structure and then
lots of dangles on the bottom so it's going to be a super fun project this week it is being a super project
already quite interesting and to answering let's see um vicky said this pattern
would make a great flag do blue with red and white fringe oh yeah
um okay so give girl i can't remember who you said
you were but it left me already i'm sorry i was wondering what question you all were answering because i didn't get
a facebook notification i just noticed i didn't like the facebook page lol
look what i am confused
and notificat uh did you say who the winner was
no not yet no no not yet i didn't say
well i don't know what we're answering oh okay we'll we'll work it out here
sometimes we're a little slow on the go so maybe somebody knows what
you're talking about all right so see how i make sure so as i said 14 rows down and 14 across
so if you're just joining us we warped 15 and then we have 14 and 14.
so i'm going to pick up another 14.
so this is you it's it's what takes it so long as the repetition
and since many of you know how to beat on the loom i'm only going to do this
part a couple times and i lost count
of course and the 11's are always eye crossing hi devil
so bring it under the warp first
and then lay it between each
of the warps and make sure you go on top
and a great way to check that is to see if you can see your needle in between
each bead sometimes it's a little harder with the lemon o's but if you just stop for a moment
you can kind of look in between before you pull it through because if not you lose a bead and i do
that all the time yes
so under the warp sometimes i don't pull it under until after i pick up the beads
you could do it either way um jones said she didn't get a facebook
notification either um i thought we were supposed to stream to the group jules
page and youtube and i don't think we are oh no yeah we forgot the facebook
page a group i'm so sorry can you pop a link over there
uh joan can you do that
sorry i'll blame it on my chemo brain oh honey you're fine all right so here we have some safe
changes i'm trying to broadcast there as well we'll see if it actually works and it did it's broadcasting over there now
great the this uh lebano got stuck so it's not fitting over the jewel loom
and these break really easily so i just go back take it off put it to the side
and just pick up the three again you don't get all aggressive like i do i you know how many i've broken of the
lebanos well and especially we're going through them so much it's not worth
yeah if it was a project where i what i like wasn't going through them multiple times
then yes i probably would be aggressive and just push it through but because i know i have to go back
through it again i i mean they just this little they can break so easily
it wasn't on the group though joan because i had to add the group in it was on the jewel loom page
um but we added the group and now my lights like flickering for some reason
huh oh that's awesome
aggressive is my middle name from uh things getting hot that's the main
reason so i'm gonna stop there because it's just it's just the same so you pick
up 14 go under the warp line them all up in between and then go
back over top 14 times so 14 across 14 down
and if you're in oh great mary you got a text if you're new there it uh look in the chat there is a
pattern right up so if you've missed anything all of this is written out for you that you can go back
and check it all out so there was some so many steps and i
wanted to make sure i got them all out there for you guys so i've been leaving
i'll go back and finish that one and then i'm gonna pick up we're gonna
work now on as you can see we have a pico stitch and
we also have the tassels so how many rows did you do of seed beads
there there are 14 across and 14 down okay
so see vicky knew that but i hadn't been paying attention see that's okay
so you do the same thing flatten the end of my thread but of course i'm so blind
i can't see the hole but i have a 12 a 12 beading needle here
i tried a 10 and it was too big so i just jumped down to the 12
um for the picot stitch and everything um
get that out of the way so 14 down and 14 across so 15 warped
so for the pico stitch that's when we bring in can we see my
is that good yeah that looks good that's where we bring in
our lovely whites and then uh i think it's like opaque
white or something on the website and then this is the aqua this is an 8-0
so the others are 11-0's and then the blue i used in 8-0
um now you are very welcome to change this will make the earring
dangle down after wiring everything about two and a half inches if you don't like it that
long then by all means what you'll shorten up is um
how many warps across so if you want it shorter you can do it that way
uh so or they can make their dangles shorter too oh yeah yeah so make it your own
um yes so we'll start here with the picot stitch so
for the picot we're picking up and that reason i went with the beading
needle is because the levenos are so small and i just makes it easier doing the picot and the
tassels so you're going to pick up two 11 uh two of whites one blue
and then two whites and you certainly could do this any color pattern jules has so many
beautiful um seed beads in her shop i just went for the memorial day
look so here's kind of what it'll look like
when we take it off the loom so we're gonna we're gonna come out
we're already coming out the first one we're gonna skip a row
and just go in the top bead of the third row
and you pull
don't get caught on the desk knob drawer knob and then i find if i pull up on the
the blue on the edo it lays really nicely then you're going to go into the fourth
11-0 so you go over to the next one
and you're going to come out there and when i was making these i kept forgetting to do that and then i'd have
to unbeat everything yeah i've done that with pico stitch before myself
and just hang it and then you just repeat pick up two a
white eleven o's one eight oh and then two
white 11 0's and once again you just go
into the so now it would be we have 3 4 five six seed bead for the next third
you could certainly make this a bracelet and just do the picot on one side and the tassels on the other
don't have you probably make it a ring there's all kinds of things you can do with this technique so when we finish it
off it'll be the same technique you would use for a ring except it's just going to be much smaller so
and once again i was just about to do that make sure you go through the seventh seed bead come out before
you pick up your beads and we're going to just do a total of it
says in the i wrote it all out uh the fit we're only
going to do five picots is what fits on there
i can't even tell you how many samples i made to make it get it all worked out
i was doing a lot of pico and a lot of feeding yes this project took a lot of uh work
on the front end didn't it it did but it's it's really cool
yes it is yes it is well we we appreciate that for sure
lizzy said pretty bracelet you were wearing amber oh thanks that was one of uh our lives
with the silver silk loom trish taught that so if you want to go back and learn how to do that
uh we did it with the bracelet
so so far we've got three so we got two more to go so make sure
now we're going through that's nine so now we're going through back up
through the 10th
so that was just recently that wasn't too long ago yeah it's up on the youtube channel
and if it's not on jules which i'm sure it is it's would be on either one of our youtube channels as well probably mm-hmm
soon i didn't get that one up yet but it's okay i think it's online yeah blog
too you might have that one over silk loom yet lizzy says okay
you can certainly make this project on the small wisdom warrior or the original
it the with the silver silk though the uh sorry silk just falls really nicely
yeah it does so once again just picking up two white eleven o's and eight oh and
two more eleven o's for the picot and just going through the top there's
no need to go all the way through all 14 beads
if it was a you know if you wanted to it's an earring so you don't need that extra backup
but if you wanted to do that you can certainly do that for a bracelet or for
but with the earring there's no need for all that extra beading well there you go joan uh link the sorry
silver bracelet tutorial right there thank you so much joan you're always on it
you don't want it she don't want it
the square fiber loom works as well vicky says oh yeah if you have that one
it's not one i have they are jules is not selling that one
anymore so but the silver silk loom works a lot like the fiber loom
and now we're on to our last picot stitch perfect
and with this one you can go all the way to the other side
and it doesn't matter if you're on top or bottom if you find it difficult to go all the
way to the other side just be careful that you don't break any of your beads you know be gentle
so now we have our pico stitch very cute and i love that uh siam rainbow that's just
gorgeous beads right there so you are aware one of them i was wondering what happened
will be only two apart instead of the three in order to get it to fit right
just okay i meant to do that on the end but i wasn't paying attention and did it sooner
but it's very it works when it's all wrapped up and everything
you don't notice it as much so i like to and i did this over here
tie a knot off before i start uh my dingle dangles
my task my tassel is that would you say i said dangle dangles well
you said start my danglings i am a tingling sometimes i got jones
i wouldn't be surprised if that's what came out of my mouth there we go
all these technical terms after tying your knot make sure you go back through
so it just lines up right there with your seed bead
oh and i'm messing around she's impressed by how ambidextrous amber is
oh because i keep switching hands yes yeah yeah yeah that's not a strength of mine
that's for sure my husband on the other hand as well but not me oh interesting my mom is left-handed so
i learned a lot of things going back and forth okay
so i'm all the way alrighty that's i don't even know why this is here so
um okay so with the tassels you are gonna have
and this is totally up to you with the pattern there are two that are open
that don't necessarily have a little dangle down if you want to fill those in by all
means it it's not noticeable when we roll it up um
but uh to keep the pattern i just skipped them
so that is totally there's a total of um [Music]
so there's three to the pattern um we have one the first one
here if you can see it is white with a red ending
and then we have white with a red and white ending and then we have our white with the red
white and blue so that's that's the pattern that repeats
and i believe it's how many times is a one two
it's all written in the note four times for you guys so it repeats four times the the the first of each set is only 12
and then white and then the next two are 14. if you want to do them all the same length
you can but it gave it uh this each one is a different length by doing that
so completely totally up to you want to do all them white twelves it was just
the pattern and i had decided on um
so we actually are skipping the first one and coming and why i do that is the way we close it
off i'm gonna have to go through all those seed beads again and so
just gives gives it that space to do that
so as i said the first one we're going to pick up 12 whites
how are we doing on time we are uh you still have 25 minutes okay
you're doing great
we're moving right along great
all right they all fit so you got your 12 and then
i like i said we're ending with the red you pull them all up close to the bead
work like that
and then you're gonna skip that red bead
that's going to kind of lock it off and then you're going to go back through
all of your white 11-0s now make sure you do or you'll see it'll i can show
you where i've messed up but it'll make that one seed bead stick out funny
not totally noticeable but if you have any ocd or any
it will drive you bonkers like it does me so you go through all of them and then you go back through
just that one seed bead
sorry my hands are not super steady at the moment
take your time honey always happens live we will add the project write-up link to
both the blog and youtube video write-ups for this tutorial guys so you
it's here and she has kindly put it into the comments here but it'll also be
um on the blog and the youtube video so you'll have lots of chances to get ahold
of that so make sure your dangle is as close to your bead
work as possible and then you're gonna pull as if i don't know if you can see i'm holding
the one thread to try because sometimes it can get all messy like it just did
and uh if you hold the one closest that and it'll hold it up next to the bead work
until you get down here and it just makes it a little easier
and there we go now with the wildfire it does make the tassels um
[Music] like stiffer if you wanted to change out to a
less stiff material you could but that is completely up to you i find it
easier to just do the whole project in one thing so then you just you came up through
that same seed bead and now i'm going to go down through the next one
and this time i'm picking up our lucky number 14 for tonight
carmen says she loves the design amber oh i'm so glad
yes that's a very cool designer but i was thinking of trish and her birthday when i
i've made this you pick up your 14 white 11 0s
your one red and then pick up another white
so you just think of the ends as we we did the red now we're on our end is the
white so it's the red white and blue it was what i was thinking in my head i was also making these
red white blue red blue absolutely that's gonna be adorable
but you can certainly make this with whatever colors you want
what jones says happy birthday trish i'm sitting here with my party horn
party tiara he is oh my goodness thank you joe i will see you
oh we'll pop her up on the end of the show yes we sure will put her up there so everybody can see it
i had my tier on but it's really heavy this is like like one let's go big or go home that's
my whole life and boy it is big because that's like if i lean forward
[Applause] so here we go all right or something but anyway we've got our
two tassels i'm working on our third
yes tiaras need to be pinned down so as you can see they're a little stiff
um with the wildfire but it works and now we're going to pick up 14
white 11 0s and this will be the last one i'll do since the pattern just repeats
um yep you're still doing good on timing
about 20 minutes
great so sandra says everybody calls her sandy
huh we can cover sandy from now on we will try and remember sandy
and susan says very cool ladies would have never thought to make a fringe on a loom piece
wow look at that so i've picked up my 14
did i pick up 15 by accident probably let me count them
not that it's a deal breaker
no maybe one's just bigger or i picked up 13 lots who knows anyways
so then we pick up our red we pick up our white
and we pick up our lucky number blue there we go
yeah that blue color right they're all pretty but that blue is very it just pops doesn't it does
so same thing as the other tassels skip that first bead so our ending bead and
then go through all of the rest so that kind of holds it all on there
and then back through that first seed bead
and then just etc until you get to the end so
as you can see as i said you skip two rows this last one i kind of
put through dangles between the two to make it even out but so repeat this pattern four
times so red white blue red white blue
and repeat it four times thanks um and then you just tie it off after
that and you cut and make sure you do the second one and then repeat
and cut the project off the loom so you just would trim it back here make
sure you hold it and trim it i'm gonna finish these so i'm not gonna do it right now
um and you have your base for your earring
and then the next part all set up for you guys
is leave you want to leave your line on there with your needle
because you'll need it to sew up our inside or our cylinder
so you want to get i think this is a one and a half inch um
eye pin oh that's a small one with the length that i made them i found
that having four eight millimeters so jump into your bead
stash find some that are similar all that's important is that the top one
is the only one that's going to be seen so what you put on the other ones really
doesn't matter the ones i have came from jules's check mix one of her
check mixes um she has a really pretty blue
and that's where actually this this blue matches really well with that check mix
um but all of these seed beads and these beads are all
in her shop
you can also if you wanted to change it up this also came from a check mix so you
could make the ends with bigger beads or smaller beads um but here's a learning experience
the check mixes are beautiful make sure you count how many of the beads you have
oh and i do have um some white ones i can spare you by the way awesome awesome
i really like that here is the blue mix that amber is talking about i believe so
yes it just has some really pretty blue beads in but
they're all they all have some really nice colors in them this one has some reds in it you know just
yeah either of those are what i choose from yeah so
you're prepping your um eye pin and i like my handy dandy
looper here so i use the 3.0 that's not something
jules has but these are very handy dandy tools or you could just make it yourself no
reason i just like it if you're good with wire work make your own pinheads
or i you know what i mean eye pins that's the word
and you want to leave i put the blue on the top because that's the one that's going to be poking out
um it's it's not needed but you you might not be able to see it online but i can see it
you know looking down on the earring but totally up to you
so put that to the side after we no i should have knotted some of these
beforehand oh well you're going to go through and gently
knot all of your threads i find this that's why i spread my work
out to find make sure i have enough room to have a decent size for knotting
um where it's comfortable and i don't feel like i'm struggling to knot it yeah because there's nothing worse than
that yeah but you don't want to not like secured yeah
and you don't want to knock too hard then you kind of warp like your
loom piece so just
once again and it's et cetera et cetera et cetera et cetera
so it's not just go ahead you're putting two knots in right when you're knocking on the sides
because we will be pulling on the beads uh when we close it off so you don't
want to run the risk of having the loom works you know spread out too much
wayne says i picture putting a red white and blue on the end of the whites
and then skipping the red white and blue and making a picot like ending
oh yeah by all means swain i love it really cool
yeah i was just my goal tonight was to give you the technique but you guys can certainly run with it and make it your
own so just how to make the little tassels in the picot stitch
on a loom tearing and it makes it look like a firecracker
i thought definitely or chandelier was the other word i was calling it
yes i think either one of those are very fitting
looks like we have about 10 minutes great
thankfully we're almost there right yeah you're doing a great job i don't know that's a lot of project to
get through in one sitting but you're sure doing it yeah well i'm nodding this off do you want to
tell about the contest again and who last week's winner was sure sure guys um
maria from riverside california is the winner now maria um
jules says she doesn't have any info on you so if you are listening to this
if you could please either textuals or email jewels uh to get in contact with her so she can
get your prize to you that would be much appreciated so that was maria from
riverside california so just go over if you want to be entered
for next week guys and it runs till midnight of next wednesday so the night night
before our show day which is always thursday at midnight is when it cuts off
and you subscribe to the youtube channel sign up for the newsletter and like
jules's the jewel loom facebook page good job yeah i'm getting it you know me only it
takes a few times but yeah so maria um as i said just reach out to
jules if you get a chance so we can get that to you
awesome congratulations maria yes most definitely congratulations because that's a great prize
so after all these little knots it can be good to add a little bit of hypo cement
um i won't be doing that tonight but that's a great glue for
you don't necessarily need it because we're going to be sewing through everything but
just in case yeah definitely
i should have put a picture of how i sewed this but i will try and do that
well it's just it's a zigzag right yeah it's like a zipper closure which is in
essence a zigzag so if you've made rings with us before
you have definitely seen this technique yeah i tried it with the single right down each side and it just
it was gapping too much i guess because it sat like being small
yeah so the zigzag works better yeah it just seems like you said like it
just neatens everything up then yeah keeps it from gapping
so uh if you're just joining us i'm just nodding away here
and if um you amber was kind enough to uh write
everything up for us so that'll be linked in the blog and also in the description of the youtube
channel guys when this video is uploaded oh yeah i didn't put it in the original
description because i just wrote it today oh that's okay we're gonna forgive you
on that one okay thank you thank you very much you're welcome and we're almost there folks
you're doing good that's an adding but it's well worth it
let me tell you i think i'm getting some crazy hair here from my crown
it'll be funny when i'm done i'll just walk downstairs with this on and see what my husband said
i'll be like man my birthday weekend starting you better get prepared
whip out that wallet here where are we going where are we going i
know right hopefully to bead fest in august that's
my goal yes anyone else going to be going to bead fest and it's in lancaster this year
always was in philly and it's going to be in lancaster for the first time this year lancaster pennsylvania with all the
amish yes of course you probably won't see him because we'll be in the city but you
know right so i'm gonna just trim these guys up oh go ahead nope that's okay it wasn't very
important so we hope to be there that's our plan for sure so if you want to meet up with
us let us know if you're coming yep we can plan an impromptu meetup or
that would be awesome bring your looms we could get together and loom maybe
yeah that would be fun so now you just want to go through and
trim after you've got everything knotted because you don't want them in your way
but make sure you don't cut your original thread
i mean if you do it's not a problem but it'll be just harder to knot it in there
and these are all going to hide inside the earrings so they don't have to be pretty
they just have to hide yeah that's one nice thing they do turn in when you do your um zipper stitch
yeah all right get them all out of the way so
now we're here and you go through
and look at what side looks prettier i think they both look pretty
and you just push all your knots toward what side you're gonna put on the
inside okay
now this is where it gets a little tricky you're going to lay this sucker in there to help hold the shape
and i find you just have to go through and push down those little threads they'll pop up but you can just sometimes i even take
my needle in and just kind of lay it in the in between the two openings and kind
of push them down and that's up sometimes that works real well yes especially if you have glue on them
that's another reason to glue them it help like they'll stick down in there
right and this is where you can test to make sure your beads
you know fit in there because you want them to be snug in there but not causing your
beadwork to pop out so depending on the size it's a good bead stash throw in there
and so i already have my thread all ready to go so you're gonna take it and go in across
only into the first seed bead
and pull it through the first couple are always the hardest
just getting it to all and as you can see my knots are popping
up but you just keep pushing them down or trim them up a little more yeah
and now it's coming out over here gonna go across to the second
seed bead so we're doing a zipper stitch we're doing every other bead and then we'll
come back and do the ones we missed and sometimes
your knots pop out thank you lizzy for subscribing to all
of our pages and channels and all that we appreciate your
support
how are we doing on time [Music] we got about five minutes okay
no yeah five minutes by my computer um and we're about at an hour on the
live so right well we started five minutes early yeah yes so you just
finish up we'll have plenty of time to do that awesome
we try to stick to the hour but sometimes we run over by five or ten minutes
so as you can see this one's being a little finicky so you just took your pliers and pulled
on that needle yep sometimes i don't crack the bead when i do that
do you have a seed bead needle one i do and it's still with the knot and the
extra layering going through that's why i recommend pulling out your seed bead
needle yes we got it in there good
and just once again push i think it got caught a little on the knot so
just keep pushing everything back in yep just keep working on it as you get
it stitched and this is the same technique you can use for making rings
or you can make a pendant cylinder all kinds of things that you could
come up with i'd be excited to see what you guys could come up with by nicole thank you for stopping by
we appreciate you being here dear bye nicole
and just back and forth
and make sure you don't get caught on your tassels yes don't want to do that
joan you have a question there in the chat uh where is the link to sign up for the
newsletter on the website somewhere i couldn't find it
joan will get you hooked up i know that and rose says amazing design amber thank you very much oh you're welcome rose
it is an amazing design i love it i'm so glad you guys like it and um
sandy uh joan just put the link for the a newsletter in the chat there
and lizzy said thanks for taking the time to show us how to do something different with the loom oh you're
welcome
we have such sweet hearts don't we we do i can't wait to see what you guys do
with this design that's like the funnest thing to see how you guys make it your own
but sherry says love the tutorial thanks to both amber and trisha
i i didn't do much this week i'm just kind of enjoying it
but next week i will be so i'm actually going to stop there my hands are starting to not work
but that's that's just fine honey you will just once that's the the big thing with this
project you just keep keep going so just the opposite bead back and forth and then go back through
back and forth through all the beads that you skipped last time i know we have ring videos
and and you will finish it off the same just kind of knot it off put a little glue
and then you'll be all closed up and you pop an ear wire on the end
and you have love it your firecracker you're so cute and it does look like a little
firecracker so there we go friends
is it alina i am probably butchering your name dear i'm sorry lena
diaz or diaz diaz i'm sure uh trisha and amber you are great teachers thank you
um she says i'm sorry if i put your name clever from project sandy says
awesome uh joan loves the earrings great job amber so much jewelry to make so
little time i know we feel your pain there janice yes we just love our amber and we are
so glad to have her with us during this time she's a strong lady that's for sure
coming in and doing all that designing and being with us we just love it
yay and trish has a fun project to share with you guys next week so we'll
announce that in the facebook group here soon yes that'll actually probably be going
up by monday yes hopefully yeah
maybe tomorrow maybe no yep we have our projects all planned out
for june so far so we'll be putting those up and you'll be able to see what's coming down the line in case you
want to go and get the products that you need to meet along with us that's always fun
yeah we originally had another project tonight but uh this just came about that
it happened but this worked out you did an amazing job amazing job my friend yeah so again
maria from riverside california is our winner for last week and please sign up
and get into the drawing so you can possibly win that wonderful kit that jules gives
away every week and i'm going to take your tiara oh
got a pattern no honey this is amazon i could make it
here i'm sure but this one's like metal it has little butterflies on it and i
had to have the butterfly that is just so cute well i'm gonna pop joan on the stream so you
can yes let's put our team we'll have our assistant
hey happy birthday thank you happy birthday trish and
joan's birthday's coming up too happy yes that's right so we're just going to be the birthday
girls yeah same week yeah three days apart actually
yours is the second yeah it's sad we need to come on special
and have a party with joan
happy birthday they love they're loving that you're bored neela and jules were
singing at the end of the last show and maybe we can get them to sing for us
what were they singing and you know i'm not a singer so i can't sing but
they're singing um you know that wake me up before you go go with yourself
before you go they're saying it makes fun of us
well happy birthday to everybody yes i see someone someone said the 29th i missed you yes
oh no rhonda emery robbie yeah happy birthday rhonda go
girl get your tiara out and put that baby on
once you have a couple of drinks you can just
we're family friendly i have a fat head so mine doesn't even
want to stay on so cute all right ladies well
we are going to end our broadcast on that note thank you for all the happy birthday wishes guys i appreciate
love y'all we enjoy your time and come join me next week and uh yeah
next week guys possibly with leather just a little heads up set your hair chain and leather
get them all excited [Music] all right guys we will see you in the
next one we'll see you next week thursday at 7. i was trying to do something
sorry there it goes all right bye everyone bye
guys