Your Cart is Empty
Leaf Pile Bracelet with Tricia Giazzon

Learn to make a pile look of seed beads & czech glass beads on a simple base. On this Jewel Loom School Live episode, Tricia Giazzon teaches how to make a beautiful Leaf Pile Bracelet. She demonstrates how to weave a simple base of gorgeous Oval Fall colored Beads, as well as how to do multiple passes through the beads to make a piled look with Seed Beads and the Romance Czech Mix.
Items Used:
- Czech Glass Oval Sunset mix: https://jewelloom.com/products/czech-glass-bead-5-mix-color-luster?_pos=2&_sid=6e9a8a9c5&_ss=r&aff=6
- Transparent Rainbow Topaz 11/0 Seed Beads: https://jewelloom.com/products/toho-round-11-0-tube-2-5-transparent-rainbow-topaz?_pos=3&_sid=0549a250d&_ss=r&aff=6
- Czech Mix in Romance: https://jewelloom.com/products/bead-mix-romance-czech-glass-40grs?_pos=7&_sid=8796938b4&_ss=r&aff=6
- 1mm hemp: https://jewelloom.com/collections/accessories/hemp-cord-1mm?aff=6
- Designer Series Baltic Birch Buttons: https://jewelloom.com/products/value-pac-wooden-decorative-buttons?_pos=1&_sid=86882ced3&_ss=r&aff=6
- Jewel Looms: https://jewelloom.com/search?type=product&q=loom*&aff=6
- Wildfire: https://jewelloom.com/collections/accessories/beading-thread?aff=6
- Jewel Loom Needles: https://jewelloom.com/collections/accessories/beading-needles?aff=6
You can purchase the different materials at the Jewel Loom website. You can also support Tricia by using her affiliate link: https://jewelloom.com?aff=6
Subscribe to the Jewel Loom YouTube channel to access past & current tutorials: https://www.youtube.com/c/JewelLoom
You can subscribe to the monthly workshop with kit (Creative Soul Box) here: https://jewelloom.com/collections/subscriptions?aff=6
Sign up for the Jewel Loom newsletter & get 15% off your first order, plus a free pattern: https://jewelloom.com/pages/save-15-on-your-first-order-get-a-free-pattern?aff=6
Receive text notifications for Jewel Loom shows & special deals by texting "Sign Up" to 1-805-768-0568
You can find Tricia online through her link tree: https://linktr.ee/pinkpoodlecraftstudio
Check out the Jewel Loom Blog for past & current tutorials, plus read details on project: https://jewelloom.com/blogs/craft-hangover
Join the Jewel Loom School Community (off Facebook) to share your loom creations, be inspired by others, & a place to ask & answer questions. https://www.juliannaavelar.com/offers/5ss8HfCp/checkout
Follow Jewel Loom on Instagram:https://www.instagram.com/jewelloom/
Transcript:
hi guys here we are again another jewel loom School live on a Thursday evening
here I hope everyone's doing well we are doing okay here in the guys on household
it has been a beautiful day but a chilly day here in Pennsylvania North Eastern
yeah that's where I am um chili but that's that time of year fall and that's what I love about it so
I hope you're all doing well hello I see my friend Maria is already here she's on
it as usual hi honey um this week has been super fun because
I've been working on um some new projects I've been playing
with some uh some beautiful beads as always
um preparing our our uh pieces for the lives and also
um just making some things for myself as well uh I think I let you guys know uh
last week that I'm struggling with my health at this Point's been about six eight weeks something like that so
um I have kind of been limping along with my jewelry making and things like that
so um just keeping my head above water and that's all you can do in situations like
this so hopefully um this week it'll see some improvement
so um we have some fun stuff to show you guys today
we um Jules launched a really fun designer button mix that I'm going to show you
that I'm going to go over all the beautiful things that we're using um this
um excuse me using this week um in our
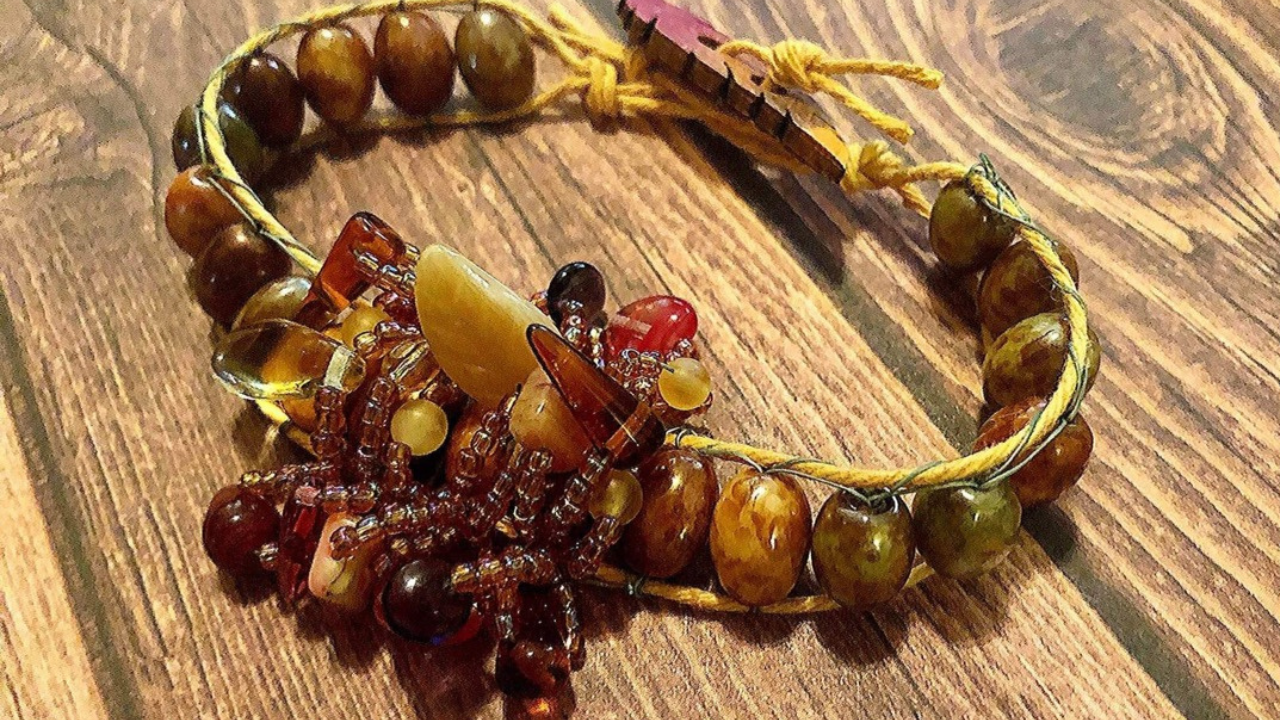
beautiful project so here's a glimpse at our beautiful project for this week I'm calling it and again this this light
harshes it out but I'm calling this our leaf pile bracelet I did color one of
the beautiful buttons from the designer series uh button set
so just like last week I just used my colored pencils and did that but you can use anything you like
um it's a basic design um using one kind of bead but the nice
thing about these beads and I'll show you um they're multi-colored so it's like
you used you know same size but all different strands of beads to get those multi-colors so guys as always and
especially this week if you could please share to your groups share our live right now
um like us and um make sure when you come in you give us a comment
um so without further Ado guys let's get the camera down because we have a lot to do this week so let's get moving
so I'm going to turn my camera down and it'll be just a moment it'll be
black and then you'll see my tabletop
oh thank you Jules I appreciate that but I don't know about that but I do
appreciate the compliment um Jules if you could and you may have already done this share this to the
jewel loom group maybe to Queen beads whatever wherever um that Joan shares it so people know
that we're live that would be so much appreciated and thank you so much for the compliment sweetie I can use it
um so again here's our project I'll give you a look with the overhead camera and I love it I just think it's super kind
of wacky with all these Loops going on different ways and just very fall vibe
so I'm like I said I'm calling this our leaf pile bracelet because basically we're putting everything kind of in a
pal on top of three beads so so there you go so start here guys with our beautiful
um it's called the designer series Baltic Birch button 20 piece set collection excuse me
and I'm going to tell you right now guys it is a fantastic deal because you get like I said 20 pieces and tonight I
checked and it looks like it is on sale for twenty dollars it's regularly 29.99
so I say um Rondo walk if you would like to get in on this deal you want to head over
there so I'll show you what what you'll get here though out of this beautiful mix
I mean there's so much and so much variety that you could use it with a lot
of things first and foremost I want to show you these super super cool huge
buttons look at this look at that aren't those fun aren't
those fun this could be a focal on top of one of your bracelets or just the
closure if you do a closure and I'm going to come on here um one week here and I'm going to show you how to make a
adjustable closure because to be able to just put your uh end that you make your
button loop around this it would make your bracelet way too big unless you just accounted for this which you could
so um these are super cool and then I'll
just go over what else we have here here's our Leaf button this is the one that I'm using this week I love it I
just think it adds so much so I'm gonna put that one to the side because I'm gonna use it we have a beautiful sword
button and it has the dark background I really like that I really like that one a lot a lot of potential
here is a swirl oblong button that is gorgeous as well she outdid herself on
this one guys foreign and then we have three of these beautiful
um seashell starfish uh conch shell buttons
boy when the weather gets cold this will put us in the mood to
think of Summer right so we have those um we have a variety of the round
buttons here and our beautiful crown this is my
favorite I love the crown and then I mean I love them all basically but
here's some of the ones that look sort of like mandalas
you could color those in gorgeously guys yeah Jennifer
um that that big button would be gorgeous as a focal fur necklace for sure and of course we have our
wisdom Warrior button and these are our sea creatures
and then we have the sun and the flower and of course the butterfly
and last but not least our sword and our wings so like I said guys it looks like
it's a great deal tonight and I would head over there and grab it if you're interested in that
okay and we're gonna go over here what we're gonna use and then we're gonna get started
okay but those Beauties over here tonight we're going to be using this
gorgeous um oval bead like I said this is um the Czech Sunset mix luster
it gives you a lot that you can do with it because I mean look at the variation guys I mean it's like having six or five
or six different strands because you get all those different colors on there and it gives you that that pop with just a
strand or two so I'm really in love with these it looks to me I also checked for
these and these are on sale tonight as well all right so those gorgeous beads are
going to be our base and then this is called the romance check mix and this is
what I use for the top for the leaf pile and I just am in love with these colors
and you could use them any time of year but I think it really lends itself to this time of year I really love it
and then we have our seed beads and we're using transparent rainbow topaz
there this one's a beautiful one let me see if I can get it but it has all the beautiful rainbow effect in it and then
I'm just going to use some yellow hemp which is always a good thing and it's also on sale today guys so so let's get
started I'm going to need my hemp here and I'm as usual I'm going to use my original jewel loom because I have a
crush on it and of course we're going to use our Wildfire tonight guys on that original
bracelet I use the Green wildfire and it Blends in really nice I'm actually out
of green so I'm just going to use uh black for this demo right here okay
so so if there's no questions I'm going to go ahead and move forward yes they are
beautiful Maria I agree yeah Jennifer I I I just love him and
don't forget guys the the link is in the description for all the products that I talk about
um there if you are interested so this is the 0.5
10 court and of course I'm going to start by putting my uh rod in and I'm gonna push my loom into my belly just
slightly and just I hook the rod in the bottom okay just like so push it in slightly I
don't know I have one that I kind of think I got this one and I
probably shouldn't have because I might give this one a run for its money the other day it's kind of like it wants to
go but I think we'll be okay I'm so hard on wounds I don't know why
I'm just I'm hard on everything clothes and shoes just purses everything
so I'm just tying this onto the back guys with a double knot like usual and this is a very very simple warp and
this but the base is extremely simple so I'm just going to lay my
um hemp into one of the grooves you can take your pick on whatever Groove that you want I'm gonna pull that across
using still keeping tension on that cord and I'm going to lay it in approximately in the same place
across the other side okay I'm going to turn over and I'm going to take my string keeping pressure on it and
pulling it around the back button up and we're going to skip six spaces
for our beautiful oval beads so we're gonna go one two three
five and six so I need to move that over two
baby over
I just take my thumbnail usually because it's easy for
us that don't have the best eyes to lose our spot with the grooves one two three
four five and six one more over and we are set so yeah it's gonna be six
grooves wide and we're gonna pull that tension across and flip the loom around
and also do Six Wide on this side one two three four
five and six okay one two I think I'm missing one here
nope Perfect Look At Me Go so I'm just going to take that and wrap that around the button on the back twice I'm going
to flip my loom over still keeping my finger on top of that strand that I
worked with because I still want to keep that tension I'm going to take my cord cutters and
I'm going to cut the Strand so I have enough that I can tie it off with
okay you don't want to cut yourself short and then it's really hard to um
it's really hard to tie the knot okay so I'm just going to slip that underneath
those warps and we're basically just going to make two knots here guys keeping my finger on the hemp to keep it
from to keep it from um
not being snug and tight on your loom because that's the trick to a good warp you want
it nice and tight and Jules does such an amazing see that's looser than I would want but it'll work with the original I
could get away with that because I'm gonna take this um brought out of the middle and we're
going to uh be fine so I'm just going to do a reverse I'm going to push that into my tummy and lift my rod up and there we
go up and out guys if and I also just want to tell you tonight if I'm struggling for words I do
apologize it's just part of what's going on with me so I hope that you can
understand and be patient and I know my girls you will be so so again this is our gorgeous bracelet
and I'm gonna start by I threaded my needle and this is Henrietta Henrietta holds my needle
and I threaded my needle already and I'm just going to use black tonight guys I mean that won't be my first choice but
it'll work or you could use white or whatever you have that would go with it I think red would look pretty
um but I did like the way the green looked but this way you can see better so I'm
just going to tie this on with two knots we don't really have a place to hide the knots because we only have two warps so
it's going to be on this warp or that work so um just tie it on the outside there and
if you have used a different color it's not going to show up as much as this does so I'm just going to pull out my
gorgeous oval beads oh thank you thanks girls I know you're
so patient and understanding oh thank you Maria you're a deer
and Melanie so I'm just going to pick up one of these oval beads put it on my
needle and I'm just going to drop it down as I said guys this base cannot be simpler this is a great beginner project
and I'm just going to pull that strand I ran my needle underneath and see it's such an instinct I don't even talk when
I'm doing it I ran my needle underneath and pulled my
string across and now I'm pushing that bead up between those two orbs and look how simple that is it's up it's in there
now we're just gonna go and put our needle through and go across the top there as we always do guys
and this is going to be our base for a base we're going to use 20 beads this
will give you approximately a sick a six inch long beaded section which once you
get your button on and your buttonhole made it'll give you approximately a seven inch bracelet okay
so just scale it from there all right so I'm just tightening that up getting that where I want it
on my loom I want to make sure I always leave enough this hole right here is what I kind of use for my guide
kind of gives me the place I like to sit with my first bead okay I'm just going to do the same thing I'm
going to pick up another bead I'm not even paying attention to what color it is because it doesn't matter these
colors are all gorgeous and they're all going to look great together
we can always fill in our words too well maybe not or I assume you met my words
yeah I know that I don't know about that [Laughter]
all right so we did the same thing we're just locking those beads in again pick one up
now I'm just gonna grab this one
and drop that down
run it underneath Suzanne yes the colors are absolutely gorgeous I agree with you
I love the Fall colors as well and then I just ran my needle underneath same thing guys just push that up
through the middle I mean this base couldn't be any simpler
okay I'll do a few more and then we'll move on to our Loops which is the main part
of this bracelet so we'll do a few more just in case we have any newbies with us
they can watch and learn the basics pretty easily with this one
okay
and I just like the patina that's on these beads too make some kind of vintagey looking
antique Picasso I think it is to me or something like that I get that and what
is the other one I get it confused where they um sort of look up the same way like they're aged
but I love that look rustic looking you know
all right and see there those are the same beads
but it doesn't matter guys to to me I just like the randomness of whatever
works for color here okay because that's what a leaf pile is
it's just random colors when you rake up all the leaves in your yard and make them into a pile
okay and we'll put this one on and then we're gonna go ahead and move on
okay and that is locked in so there you go that's the basic start
of your base for you okay I'm just gonna set this to this side
and finish that later and I'm going to bring this one in
that I already have done okay so this is what it's going to look like once you get finished I did tie
this off so I have my needle here but it's not hooked to anything because I want to
just be able to go into the middle and not have to run my needle back through if you wanted to when you finish
you could just run your needle all the way back through until you get to the center three beads and go from there but
I prefer just tying it off again so we have 20 beads so I'm going to count in
one two three four five six seven eight nine ten so this is our Center area okay
this is our 10th bead so what I'm going to probably do here is
do the 10 the 11th and the 9th
for my leaf pow you could do go down here and do 12 11 and 10 2 if you wanted to but it's just the middleish three
beads that you have okay so now that I have those
I know I'm going to be starting here on this bead because I want to work
um my left to right that's most comfortable for me so I'm just going to do as we do at the beginning and I'm
just going to tie this off okay and just do a double knot again
because we have nowhere to really hide our knots on two boards
yeah we just tie off just like the start
yes it does look like an easy way to make a ladder stitch yep just like we do at the beginning we
tighter a little knot we're going to tie a little knot here on the bead
that we're going to start on for the three metal ones okay so I'm going to move these over and put
them back in the bowl here Henrietta come watch those
and I'm just gonna pull pull out my seed beads and I like to
work off the mat with seed beads that's my personal preference but you know we have a gorgeous bead board you could
just use you could use you know just any dish or anything that works for you as well so I'm tied off
and what I'm going to do is work each bead with those techniques we're going
to be doing at a time instead of going up through with one technique and then coming back through we're just going to do them all on each bead okay and we're
gonna need our beautiful Tech glass mix so first off I'm going to put three
loops on to each bead okay just on the top and what I did is I put
12 seed beads so it's six and six on
either side and check glass in the middle but thinking about it I wish that
I would have varied it so maybe do like six eight ten and that'll give you more of a variation there so I think that's
what we'll do tonight so let's do six seed beads move this so
you can see it okay two
three four five and six
and I'm just going to take like two I have one extra on there
um a beautiful piece of Czech class your choice what you want to use that's for sure
look at these beautiful these are like a a lavender color there's red in here
some pink some gray some really beautiful stuff it looks like I got some of my beautiful
oblong beads in there too so but yeah I think I'm gonna pick up actually one of these Brown spikes or
these um yeah the brown Spike these are super cool so I'm going to pick up one of those
it doesn't matter guys it can be random just pick something out of the bowl it's probably going to be a lot less painful
okay Jennifer says all I have done all I have done were just seed beads on
Wildfire I'm going to work on some Fiber awesome that's what we like to hear yeah
brunch out honey it's fun to use different materials on your loom or
four five and six there we go so I'm just gonna run those beads down
and then I'm just going to go over top of this bead because that's where we're
at we're on the left side of that bead and I'm going to go over top of it
and go through the right side of that okay these these holes and these beads
are pretty big so you can get quite a few passes through them luckily which
makes it easy to build up your Loops okay so you see how I just ran that
through and there is one okay that has my my point on it I don't
know if you can see that but that's our first one so let's do the next one and we're going to do eight on
each side one two
three four five
six seven and eight and again we're
going to pick up a piece of check glass let's just do it random for fun how about that and I say that and as I look
in the bowl but we'll we'll use this really pretty lentil bead or it's like a
a flower petal beautiful and then add eight more
I like the pop of red in it I did that in a few beads on my first one that I made my My Demo one and I was
really digging it there's five six seven
and eight
and again up and over and through the right hole back through the left
we're gonna make another loop on top of that same bead we're on the same bead guys
okay I'm just got ten that with my hand to
try to make sure that it goes exactly where I want it I'm going to get that little strand out of there
I left sometimes that likes to get in on your
work all right we're just going to pull that snug so there is Loop Number Two through
the same bead okay so let's do a 10. that'll be fun one two
three four
five seven eight
nine and ten and let's add
another piece let's do some lavender
beautiful and ten more thanks Sue I appreciate it thank you
for five six seven
eight nine and ten
okay so this is going to be our third loop on the same bead on the top okay
and we're going to go go over the bead put through the right and pull it out on the left
so as we would go across I'm just going to do I have another set of Loops I want to
make on the outside of the beads on both sides so that's what we're going to do next on the same bead okay so you can
see there we have our three Loops they flip and flop and that's how we want it okay
so I came out the left side of that bead excuse me
and so now I'm going to do outside loops on this same bead so again I say we're
doing a lot of passes through the same bead okay
but they seem to really handle it well all right so I'm just going to pick up six go back to that sixth number
and six you could add even more um
Loops if you think that you're you want to build your bead and your bead will take it
the whole of the bead you know there is
five and six and you might be thinking to yourself well we like to
be able to go out one hole and into another to make our loops on the side
well what I discovered is you can just go back through the same hole
with to make a side Loop because your seed beads are going to stop it from going
back through the hole there okay so I'm just going to go back we came out the
left side I'm going to go through the left side as I go across I'm going to make sure that I feed my needle across I'm not
going through any of the seed beads that we put on okay
I'm going to cut that string off it's getting to me so we'll just pull that through and there we have
a loop on the bottom and it's not going anywhere let me cut this strand off guys
okay so now we're on the right side of the project and the same bead we're going to
do the same thing we're going to pick up six more seed beads
he's such a class [Music]
I have not ever braided a few Loops but I bet you could I bet you could and I'm just going to
put a little leaf on here because hey that's what we are making as a fall project
three four
five and six now we're going to do the same thing on the right side we are
going to just go right back through that right oh
okay and come out the other side into out of the left one so so far we have three
loops on top and one loop on either side of our bead and we're going to put
another loop on either side like I said you can build up more if you like guys
um just all your preference if your bead will take more passes okay so I'm going to pick up six more beads six more seed
beads these are 11 0's okay and six
a random piece of Czech glass I see my friend Danielle is here hello my friend
I hope you are doing well
okay and then pick up six more
okay three four five and six and I do apologize for
my neighbors revving their cars if you hear that they just have they um do that more
often than not so back through the left side and I turned my loom this is still
the left side this is our main side here but it's easier for me to see now than I
have it built up with a lot of Loops I want to go in under those
and back through the hole and I don't want to catch any of those seed beads okay
so there we have back to the left side here so flipping it back where it was so
now we have two two loops on one side and we're going to do the same thing on the right side okay so you kind of get
the um concept here we're just kind of building Loops upon Loops is basically
uh what we're doing
that one didn't want to come on for five
and six I mean you just can't go wrong just picking a bead out of here
because they're all so pretty and it's fun to see what you what you
pick out each time without looking so this is a cute little bicone
two three four five and six
and then back through the right hole okay and we want to make sure I'm gonna
pull these all to make sure they all have the tension that I want them to have
before being done here I want to make sure that everything on the sides
especially is locked in there so I'm just going to lift this up and I'm going to put my needle back through
that right hole carefully I said not to catch seed beads and there
you go so there's like I said we have three loops on top
and two loops on either side of the same bead okay
you guys catching on there so now we're gonna move on to this next bead this yellow bead and we're going to
do the same thing okay
all right so let's add
oh nope we don't want to add anything yet oh there I caught myself you want to go into
well no you don't excuse me guys I'm sorry um you want to as you're coming out of
there we're just going to take our Loop and go through the right side we're not going to go through the left side then the right and over and over we're just
going to start right here okay where we come out because it's going to cross over here and it may not be exactly
straight but we're not looking for straight that's why I decided not to go through that bead and do the loops over
top over top like that because I thought that would give it some interest just where we come out on the first bead to
be able to add some interest to the piece so we're going to pick up six
beads
and these are going to be our loops on the top now guys
lavender bead there okay Maria yes I'm following you that's
good to hear I'm glad that's what I like to see there's three
four five and six all right and now we're gonna go over
into the right side of this bead into the hole in the right through and to the left
okay I'm gonna pull that and I I like to keep it kind of up when I pull just so I
don't get it tangled with the other pieces that I have there the other Loops
that I have okay so there's our first one you can see it kind of comes over here at an angle and that's fine it's
the kind of look that I want that's what I'm going for all right so let's pick up eight now
looks like I'm gonna need some more
three four five six
seven and eight and it's just as simple as this guys
pick up your seed beads put your Czech glass on pick up your seed beads
oh Cheryl so sweet of you Cheryl says I'm so excited to do this project just
order my beads really enjoy watching your two tutorials thank you so much sweetie and I appreciate that I enjoy
teaching them that's for sure you guys are deers five
six seven and eight
hi Zach thanks for joining us tonight
all right and as I'm doing this Loop like I said I'm going to hold it up here
again I don't want a big mess so I'm just going to kind of guide it where I want it to go with my finger okay and
pick it up I dropped it there and there we go
and let's do our third loop on top okay
so we have our 10 there has anyone been working on any fun fall
projects they are those B these beads are cool I really love them I think and they think
they all just coordinate so beautifully and they just scream fall
rain and ten
yes you could also use your small wisdom or your guys anything I do on the original just because I have a crush on
the original Loom I love them all don't get me wrong they are absolutely gorgeous and wonderful but for some
reason I just go to this one I think it's because of the tension rod you know
oh that is a sweet comment thank you so much Cheryl
um you cannot do all of them on the small wisdom Warrior as well if you own that one that's a
gorgeous perfect one and it would be great for this project as well anything I do on my original you can always do on
that
and I'm just trying to guide this loop again so I don't get it all tangled up all right so we have our third on the
top there and we're coming out the left side of the beat again I spun my
um I spun my loom this was our left starter
side but I just spun it to the side so I can see it a little better to start my side Loops question if my beads whole
isn't as big can I make the loops onto the warp
um that I don't know honey you could certainly try it I'm of the school try it see what happens you know and that's
how I kind of design um so you could you know you may come up with something completely different than
what we usually do I've never seen it and never done it but you know if you feel like you want to
give it a try go for it yeah and it you know and that's the key
to this project guys is these beads have nice big holes on them for the base it does help very much with putting your
loops on so we're just going to pick up six
throw the side Loop piece of Czech glass oh that's a big one
look at that baby love it
six and again back through the same you make Thursdays fun Celia thank you
so much honey I love doing it like I said it it makes my heart sing I'm glad I am still able
to even when I'm not feeling well come up and spend this hour with you guys it's
wonderful I wouldn't want to trade it for the world
so there's our one loop on our left and now we're coming through on the right side I'm just going to spend that back to the original position
okay and I'm gonna pick up six
once you start I I get into these projects once I start building the loops I just I think that's super fun part of
it so I just go and go you know how many more Loops can I get on here
three four five and six
and then back through the same hole
so as I'm pulling this through I'm going to show you something guys you can see how like the string is kind of showing
on this it's only while I'm adjusting these Loops so make sure as you're pulling it snug when you pull it across
and over both of those Loops are snug again okay it might give a little way
because you know they're all connected basically because we're just going back and through back and forth through the
same hole so I'm going to pick up six more
we're all about thinking outside the box or Loom the loopy and the crazy loopier
and the crazier the better absolutely [Music] um
back through the scene same rule guys keeping everything like
nice and pulled tight there I'm lifting up my seed beads to make sure I'm not going through any of my
seed beads and I'm just putting that needle through and sending it across
to the other side so now we have two of our loops on our left on our second bead
okay and look how that's coming along isn't that super cute I just love it I love lupees they're my faves all right
so let's add one more loop on this bead
yes we absolutely appreciate all of you absolutely Jules
that is could it is the truth without you we couldn't do any of
anything that we do so we do appreciate and love you guys so much
okay and I'm just picking up six for that side
and shuttling my needle back across the same way all right so we have one more bead to do
but I'll tell you what we're gonna do guys since it's about 15 minutes out I'm gonna go ahead and tie off before I do
that third bead because I want to make sure and show you you know how to take
it off the loom and put your button on okay so you would continue and add
the same amount of Loops that I put on each of those beads into the third one you're only using three beads if you
wanted to go crazy you could do the whole bracelet but the reason I didn't is because I don't want to cover up
these gorgeous beads any more than I have to so that was just my my thought process
so I'm just going to tie this off as we usually do just put my needle around that warp and then through the loop
okay and I'm just going to tie that off underneath and now I'll come back once
once everything's once I show you guys how to take it off I'll come back and put those last Loops in you can certainly do that off the loom it's not
as easy but you can do it I had a lot of fun going through the
archive videos last weekend I saw that Maria and we so appreciate that we love
it when you guys go onto the jewel loom YouTube channel and check everything out
that we've made I mean we enjoy making them and to hear the feedback and
everything and um posting them to show people maybe that weren't around back when we you
know did some of the older videos that makes a big difference for us and we certainly appreciate that thank you
Maria so here we are we're assuming we did all
three beads here guys so we're just going to cut it off the loom like we usually do okay so what I do is I flip
my loom over I take my two fingers and I put it around my work this is always
hard to see okay yes Jules is with us tonight
you watched about a hundred hours you did wow that's awesome
that is fantastic thank you Jennifer so again I'm going to take these two
fingers and support my work I'm going to take my pointer and grab onto the loom and my thumb and hold on to my loom okay
so I'm supporting everything and I'm going to get my Cutters and just as I'm getting ready to cut this I'm
going to flex it back just a smidge to let off some of that pressure so my work
doesn't fly and I'm going to snip both of those strings okay just as
simple as that with two it couldn't be simpler so on this one I'll show you what I did
this is just your basic um I'll thank you Jennifer thank you for
your order we appreciate that so so much it helps us keep doing what we're doing
here um there's our button side but all I did was a basic knot and then left room for
the button and the knot but we're gonna go over it just in case we have some folks that haven't done that before and
as I'm doing this guys I always want to make sure I'm keeping my beads nice and straight keeping my project straight
where I want it laughs I'm just going to take both of these
threads of these uh hemp cords and I'm going to just wrap it around and put it
up and through and just make a basic knot I'm going to work down see how I
left that loose there okay I'm gonna work it down with my fingers as I'm
pulling up with my right hand just because I want to get it right where I want it and if
you leave it Loose as you're working it down that helps you to get it where you want and then you can just pull it snug
okay because you don't want this to be too tight because it'll you want your beads will pop over the side so I'm
going to back that off just a hair because I want my bead to sit comfortably in there all right and then
I'm just going to hold my knot and then give it a little tug
and I'm going to leave some space here and I'm going to tie another loose knot
right I'm just kind of
get that other one
thank you Maria thank you um yes please don't forget to like like
our videos share them that helps us so much your comments help everything and
as I said before there's a link in the description to all the products that we we use so if you're looking for those so
I'm just putting a loose knot there and I'm just going to let that hold a minute while I tie my button okay
because I'm gonna once I get my button on I'm gonna adjust that Loop to the size I want it so we're gonna do the
same thing over here and we're just going to make a knot
okay and we're going to work that down like we did on the other side again making sure I'm keeping enough room for
my bead here on the end so it doesn't get Warped and pop out
yes I am sure that I am not doing a good Joan job she will probably fire me
oh you're doing just fine jewels and you're very much appreciated by by all
of us and I appreciate having you in there with me having you in here with me okay
so there's our first knot and I just cut that Loop in half simple
simple and I colored mine with colored pencils again like I said you can color
this with whatever you like I'm just using it plain for now I'll probably go back and judge it up a little bit but
you could even just leave it as is it's beautiful the Baltic Birch is a beautiful wood
so I'm just putting those strings through those holes this couldn't be any simpler guys because
we have um only two holes and two strands so
that works out well all right so I give myself a little bit of breathing room here on this one so I'm kind of gonna
gauge that and I'm going to tie a knot right about there okay
I just like to have a little breathing room because you're gonna need to move your button around to be able to get it
through the loop and you don't want it tight against the knot you always want to make sure you leave yourself a little bit of space here for some room to
groove okay and I'm just gonna make sure I have my
space the amount of space that I want as I slowly work that loose knot down
okay Joan is being crazy in Knoxville I'm so
happy for her that's a great experience so that's about the amount of space that I left there guys I'm gonna get my
fingers out of the way so you can actually see it okay so now what I'm going to do I'm just going to take this I'll probably trim
these back you could always put beads on the end if you wanted to um be very cute
and I'm just gonna take my leaf and I'm gonna put it through this hole that I have tentatively made here and make sure
that it fits through for sure or that it's not too big or not
too small so as I'm taking it through there I can see I could just take that
down just another smidge so I'm just going to move that down just a hair
and then I'm gonna check it again check my button in there make sure okay
I can get it through there good but it's not going to pop out you don't want it to be able to pop back through easily
all right so that's perfect that's perfect so I'm just pulling that tight you're going to want to glue all
your knots guys as always don't forget to do that and there is our project
done and done guys does anyone have any questions I would
be glad to answer any questions that you have tonight
I gather up these seed beads momentarily yes Jennifer I did use hemp I used the
0.5 yellow hemp and it is actually on sale right now
ucpz that's exactly what we like easy peasy pumpkin squeezy as Jules like
to say but this is this beautiful yellow hemp that is in um at jewelloom.com and
like I said it's on sale let me look here what I have it is usually oh no I don't have the usual
price but it's marked down it's at 249 right now and you get six yards for that
so it is a bargain thank you so much Maria I'm glad that you liked the project and I'm going to get my camera
turned back around here guys
and we will
area there I am okay guys well I hope thank
you thank you super cute full fun fun fun Trisha can you take over I have to
go to my meeting yes honey I'm good I'm almost done you thank you so much I love you and I'll talk to you soon Jules
because we're going to be um signing off here anyways so I hope
y'all enjoyed this live video if you're watching the replay welcome and do not hesitate to comment
down below and give us a thumbs up on the YouTube video share with your friends that always helps us out
um again everything that we use tonight is in the description of this video
and easy peasy an easy peasy project for a fall day you can get done quickly and
easily and it's adorable oh thank you so much thank you so much Maria I appreciate everything yes we do all love
Jules she's she's a dear dear person we love her dearly so I'm gonna sign off
guys I'm gonna go get some rest and I hope you all have a good Friday tomorrow and a wonderful weekend
and I will see you next week guys bye