JULIANNA CHRISTINE AVELAR

0

Your Cart is Empty

Shop
  • We are a brand born of a love for the beauty of restraint in design, the inherent grace of feminine strength, and the necessity to treat our environment and each other with love and respect.

    Read our story

  • Each of our carefully researched, styled, tested and distributed collections reflects a particular aesthetic and ethos. We hope some of these speak to your own style, and help you refine and redefine your own look and style philosophy in the process.

  • Hexagon & Loops Late Fall Necklace

    October 27, 2022
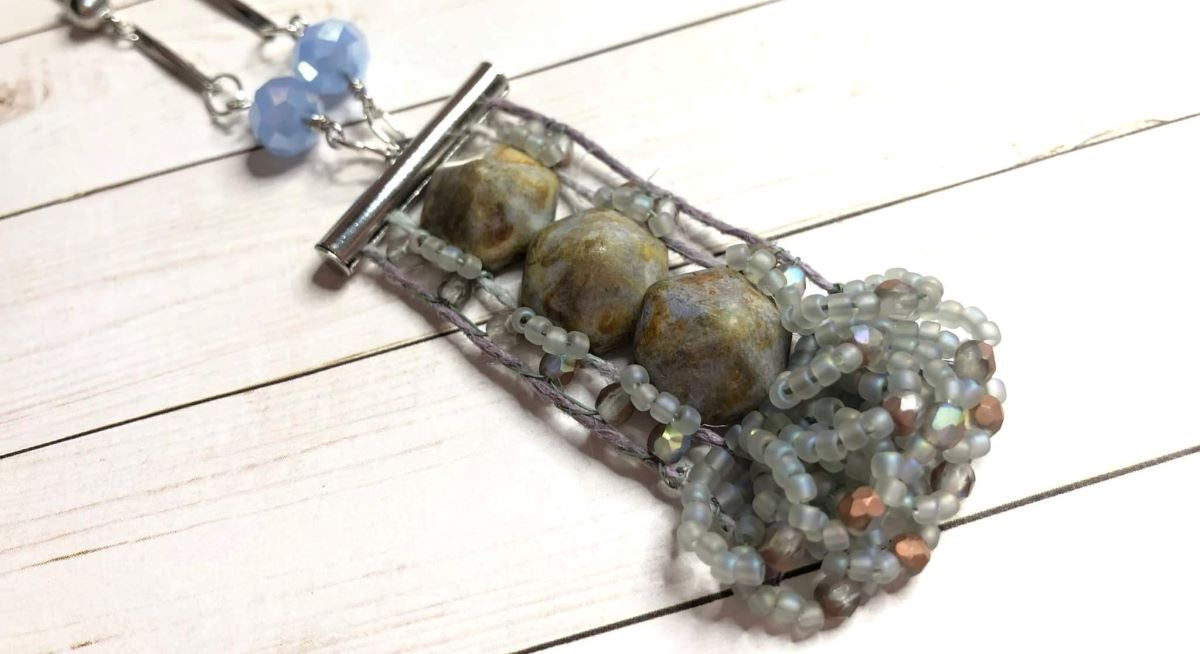
    Hexagon & Loops Late Fall Necklace

    Have you used the Baby Loom lately? Join Tricia as she teaches how to make a Pendant on the Baby Loom. She will show how to use Hexagon Beads and do some fun Loops. She will also talk about the Jewel Loom Baby Loom and the Benefits of using it on small projects. 

    Items Used:

    You can purchase the different materials at the Jewel Loom website. You can also support Tricia by using her affiliate link: https://jewelloom.com?aff=6  

    Subscribe to the Jewel Loom YouTube channel to access past & current tutorials:  https://www.youtube.com/c/JewelLoom   

    You can subscribe to the monthly workshop with kit (Creative Soul Box) here:  https://jewelloom.com/collections/subscriptions?aff=6   

    Sign up for the Jewel Loom newsletter & get 15% off your first order, plus a free pattern: https://jewelloom.com/pages/save-15-on-your-first-order-get-a-free-pattern?aff=6     

    Receive text notifications for Jewel Loom shows & special deals by texting "Sign Up" to  1-805-768-0568

    You can find Tricia online through her link tree: https://linktr.ee/pinkpoodlecraftstudio  

    Join the Jewel Loom School Community (off Facebook) to share your loom creations, be inspired by others, & a place to ask & answer questions.  https://www.juliannaavelar.com/offers/5ss8HfCp/checkout 

    Follow Jewel Loom on Instagram: https://www.instagram.com/jewelloom/ 

    Jewel Loom Facebook pages: https://www.facebook.com/Jewelloom  &https://www.facebook.com/JuliannaJewelsAvelar 

    Jewelry Making with Jewel Loom community page:   https://www.facebook.com/groups/228056324285807 

    Please contact Jewels with any questions you have about her looms:  email - hello@jewelloom.com or text - 1-805-768-0568


    Transcript:

    hey guys welcome in welcome in here we are on Thursday for another jewel loom
    School live um I hope everyone is doing well tonight
    uh it's been a beautiful day here today in Pennsylvania just plain gorgeousness a little chilly
    but that's just par for the course this time of year and I I don't mind it at all so
    um nothing too eventful this week going on in my life except today I did get
    some injections in my knees and they were not fun let's just leave
    it at that so but I am plugging along here
    empowering through and we are gonna make a fun project tonight let me see who is
    in with us tonight oh and there's Maria right on time always in hi Maria I hope
    you're doing well today sweetie um a little caveat
    um daddy is not home doggies my doggy's daddy uh so you may hear more barking
    than usual because when he's here he can kind of stifle so I do apologize ahead for that so hopefully you can't hear it
    but if you do I mean par for the course at my house so uh hi hi everybody's coming in
    Sherry's here Amber's here Zach Kelly hi everyone nice to see you in tonight and
    as always we have our wonderful Joan in the background helping us out so wonderfully we really appreciate that
    so I'm gonna start out here guys doing a little housekeeping
    um I want to let you know that we do have three of October's kits
    for the workshops a available um so if you're interested in those and
    I can tell you this the October box is absolutely adorable it's beautiful
    um I'm actually going to be doing project a project with it next week on the live so you may want to uh grab one
    so you can make along with me um it's called the birthday cake box and
    girls it's so cute it's right up my alley with the colors so those are available but keep in mind
    too if you're not ready to jump on And subscribe you can just go in and purchase too if you'd like to that's
    never a problem if there are kits left over okay so I wanted to let you know
    that we have some more folks coming in here an Anisa
    it's going fast Anissa and Lucille and Vicky oh I look
    gorgeous oh God bless you because I don't feel gorgeous today thank you Vicki I appreciate that honey I I really
    appreciate it and there's Carmen Gwen okay so other than that I think we're
    good there and I want to show your project here I do have it on a chain
    simply on a chain um but this is our pendant that we're going to be working on tonight if I can
    get it to level out for you there that is our pendant and I just simply
    have it on a piece of chain as you can see if it's even there we go
    as you can see and it's just a basic hexagon and loop get straight there
    um pendant but super fun just quick and easy you can whimp this up in no time
    um really really love the loops on it and of course we have some beautiful uh
    fire polish with that as well we are using some three millimeter fire
    polish this week which is a little bit a change of pace
    so let's see how we do and everybody's coming in all right so
    oh I'm glad you're excited Gwen I'm glad you're excited so we're gonna get right to it hi Robin we're gonna get right to
    it tonight and I'm gonna turn I think the um other camera on and switch
    cameras and you know it'll get black for just a moment guys and we're going to go down to the map
    foreign guys when I get quiet I hope you don't hear it but our neighbors have an
    annoying Halloween decoration and I apologize it talks says all kinds of
    stuff so anyway all the housekeeping is done
    my friend's not here sorry and I don't have baby boom have to just watch I
    guess well I'm glad you brought that up because just because I put this on the
    baby Loom it doesn't mean you can't do it if you have an original Loom if you
    have a wisdom Warrior if you have any of those this will work exactly the same the only reason I'm using the baby Loom
    is because there's less waste okay for something that's that little here I'll
    pull this down so you can see the size of it so instead of if you want to use your
    original or your wisdom Warrior you could just put a couple on the the hemp so you don't waste your
    hemp or you can make earrings as well just make two of these you know so
    there's always options don't don't feel bad if you don't have the exact Loom that I'm using because there's you can
    always make the one you have work so we're going to talk about the baby Loom
    here a little bit first as you can see I have already warped for tonight guys if
    you'd like to learn how to warp the baby Loom there are always videos on the
    jewel loom a YouTube channel those are out there um don't hesitate to watch but this is
    basically going to be um work just like say your wisdom Warrior something that doesn't have a
    bar in it it is made out of the same material as the original but you can see this isn't a bar this is just part of
    the the um making of the Loom okay it's part of
    the Loom just so they can get that nice curve in it okay and it's the same as the
    original in the back it's just much smaller and I have this warped in it Warp
    it's not quite six inches but I'm gonna go on the loom and say it's about six inches when it's flat
    um so you would do the same thing like I said for warping that you would do with
    your wisdom Warrior and you can see there's nothing different there than we normally would do except we're not going
    to take the bar out like we would in the original because there isn't one foreign
    and please chime in and let me know if you have any questions on the baby Loom I'm always happy to help you guys
    so like I said I did warp this already and how we're warping this you just want
    to make sure you're keeping all of your tension just like you do on any of the Looms that don't have the bars while
    you're warping this because you still want it to have a nice uh tension to it so it's not uh dragging or you can get
    your stitches in there very nicely okay so on this warp we are going
    uh two eight two and what I mean by 282 for
    anyone that doesn't understand is two grooves apart on the first one
    put that over there a little bit eight grooves apart on the second one
    and then two on the third one as simple as it could be so what I've done on this
    we're going to put a slide clasp on this project on the top on the bottom we're
    just going to tie a single dots in the bottom of each one of the uh hemp
    strings that come down so I've put three rows of 110 seed beads this is 11
    11 0's wide 11 11 0's wide say that three times fast but I just do uh three
    rows because this is going to be where our Loops go I even on one of them that I made I uh put four rows and just left
    the bottom one open with no loops on it and it was fine that was actually my
    first one I think let me find it yeah so you can see on that last
    we did the knot sorry if this focuses we did the knot I did the knots and then
    I had the four rows and it doesn't hurt that there's an extra one there so I did the three rows and then we're
    going to start with our project we are using these gorgeous hexagon beads that
    are at jeweloon.com super pretty super vintage right up my alley these colors
    and it's really funny how I deal with colors because I love pastels I love you
    know those kind of colors but I also like this dirty boho look too
    but that's that just kind of sums me up my house is kind of like a a vintage Victorian something or other
    so it's weird I'm very eclectic so and then we're gonna do our three millimeter fire
    polish beads those are super pretty they have this a b coating on them and some
    copper really pretty and we're going to use some 11 0's of course like I said and
    this right here is the transparent rainbow frosted black diamond and then
    just the transparent rainbow black diamond okay I like the Frosted the best
    some reason it always my uh hand always grabs for the Frosted but these are
    actually very gorgeous as well so it's a kind of all in the same color family kind of monochromatic
    so let me get my hexagons out here and our fire polish
    and you're only going to need three hexagon beads that's it for your pendant
    okay so we'll set these other ones to the side
    uh yes it does kind of makes me think of rocks as well okay so I already got my needle threaded
    and I've got my three rows in here and I'm on my left side where I always like to start and I'm going to trim this
    because it will be in my way if I don't speaking from experience okay
    so what I'm going to do here is I'm going to grab a fire polish
    again three millimeter I'm going to take my hexagon and I'm going to put it in this back hole here because I work
    bottom to top if you're working top to bottom you're going to put it in the top hole coming
    down okay and then I'm going to pick up another fire polish all right and I'm just gonna
    head push those beads down and then I'm going to shuttle my needle
    across just like so and I pull my string
    that caught and bring my hand underneath the loom and as
    I'm bringing my hand underneath there guys I'm putting some pressure with my fingers on the actual Loom so it's not
    be bopping around and then I'm going to flip my hexagon over and put my beads into the lanes
    that they're supposed to be in so I have my fire polish my hexagon my fire polish
    okay and then I'm going to go over top of that outside warp and all warps in
    between and I'm going to go through this fire polish through the hexagon
    and through the last fire polish okay
    so we have that linked in there what I do like about this pendant too is there's open space
    I like sometimes to have some open space in the pieces I think it really
    showcases the beads and the project when you do that
    so now we're going to do the front set of holes so I'm going to pick up a fire
    polish tip my bead down there
    and I'm going to put that fire polish bead down on my Wildfire and when I after I do that I'm gonna just sort of
    pick my hexagon bead up a little bit just so I can see to put my needle through it
    and pull that through
    and then we're going to pick up another three millimeter fire polish and drop
    that in okay so basically the difference between doing the first one to the second one is
    you go through a fire polish then you go through the holes on the existing bead that's there and then you
    pick up another fire polish and go through that and then you do the same thing going back through so we only have
    to do this three times to get
    across there to get our pendant built so there is one set already done
    so we're going to pick up another fire polish go into the back hole of our hexagon and another fire
    and then shuttle crossed
    and then push our beads up through come up and over and through our fire
    polish and through our hexagon and then our other
    polish on the other side and we're locking it in just like we do
    that's what's going to hold your beads onto your warts
    okay we're going to pick up another fire polish
    it's and drop that down and then we have tipped our bead forward
    so I'm gonna lift that up just a smidge and put my needle through
    that top hole and grab
    another fire polish once I get that string pulled through okay
    Jen if we have any questions go ahead and pop them up on the screen for me because not really paying attention to
    the chat but no problem no problem honey I know you do that
    usually okay so we're going to lock this in
    and there you go there's our second set already
    right we're going to do one more
    and I'm picking up my three beads
    Gwen maybe go out and come back in sometimes that helps if you're having trouble with the video
    if it seems to be just you
    okay and shuttle crossed
    yep and our last
    row here
    your top is my bottom from this view oh that doesn't sound
    oh Vicky you're silly correct me up
    how many rows skipped for hexagon no rope no rose skipped
    we're doing a bead through each on either side of the hexagon bead
    there's two holes in the beads and then we have two beads on either side
    if you mean between here I I wouldn't know but um we're not skipping Weeds on the
    actual rows of beads we're just um
    creating and as we go up it's making the space okay
    how many grooves do you skip for the hexagon oh there we go makes more sense
    grooves are um eight this is eight here in the middle we have two eight two
    yep that's helpful that's more helpful isn't it
    yeah and we're just going to lock in this last row and we are already at the top
    so now I'm going to pick up 11 seed beads and put a top row of seed bead so I can
    slide my slide connector on so we have something to hang it by
    sure no problem honey one two
    read three four five six
    seven eight
    ten and eleven okay and usually what I do when I'm
    doing rows excuse me to put my slide clasp on I go back and forth through
    those beads a few times just to make sure they're nice and secure
    and because that's what your piece is basically going to be hanging from so I just put my 11 O's on I popped them
    up and under like we do and what I that's what I did here and I'm actually
    seeing this is going down into my beads a little bit so I want to just kind of space this out before I lock my top row
    in I want to make sure I have the spacing exactly how I want it because these will kind of push together because
    there is space between them so get your your beads where you want them before
    you lock in that top row okay you could probably still move it after
    but I'd rather not have to do that so I'm just going to lock this in by
    going up and over the top of the works and through the beads okay
    all right and then once I get across there
    I'm going to go underneath and I'm going to go through my beads again this can get a little tricky but
    I'm going underneath the warps and through the beads underneath because we
    want to make sure and be able to just put another lock it in again completely okay
    if that makes sense I'm just trying to get through all those beads and that's what comes in handy
    with the jewel loom needle you can bend it and flex it to be able to move it in to get it into
    your beads so that's why I always love using those the seed bead needles aren't made that
    way they're not as I would say as flexible as the jewelry needles and then I'm just going to go up and over
    just like so all right and we're locked in there
    so now what we're going to do we're going to put some loops on beside
    the hexagon beads and these are very simple they're just tiny little Loops they almost blend in
    on the side but those are just you put five 11 O's on either side and you just
    Stitch your way down and it's a good way to help you get down to the bottom without putting on a new thread as well
    okay so I'm gonna pop down and I'm turning my
    loom over right now and you'll see as I'm putting my loops on I'm going to be flipping it back and forth and I think a
    lot of you do that as well so I'm going to drop down in to go through that first fire polish
    in through my hexagon bead and then not the last fur polish I'm just going to
    let my needle angle up and pull that out okay and I am using the gray Wildfire so
    it's blending right in with the hemp that I've used okay so I'm just going to add five beads
    okay
    and then I'm just going to put that needle back through that hexagon bead on the second hole
    okay if I can there you go and then out through the
    hexagon beam you're angling back up you're not going to go through that fire polish just shut
    because we want our Loops to set great beside our hexagon
    okay does that make sense okay
    so we're going to put in five more
    and then we're going to go through the top hole of the hexagon bead
    now when I do it this time I'm going to put it through the hexagon hole and out
    the other side without grabbing onto the seed beads that are on the other side and then through that fire polish on the
    other side of that hole okay [Music] all right so then I can drop down easily
    so there are our first set of Loops these are definitely optional but I just
    thought they really kind of uh looked pretty cute on it and more is more right
    so I'm going to flip my boom over because now I'm on my right side here working
    okay and I just what I got to do now is I need to shuttle my needle down so I
    can move on to this next one so I'm going to drop down here and go through the fire polish on the bottom through
    the hexagon second hole and then out the fire polish
    is that making sense to everybody [Music] and then we're going to drop down into
    the next fire polish okay and we are going to do the same thing
    we're going to go through the fire polish and through the hole in the hexagon and up and out of that hexagon
    bead [Music] okay and you can see that thread Blends right
    in there you can't even see it as you're stepping your way down we're using a wide eye needle I'm
    actually using a jewel loom needle which they are fantastic I love them
    they're my favorite to use even when I do some seed beading I grab these sometimes it just depends but they're
    very nice flexible needle that work well and they're longer for your loom so as
    you're going across you can kind of flex it again flexible not bendable just like our
    Looms our original Loom anyway
    so I'm gonna have five more beads does anybody want a dog
    [Music] you hear a barking
    and then I'm going to put the um needle back through drop down into
    the second hole on that hexagon and pull it across and there's that Loop and we're going to
    add five more
    okay and then back through the hexagon as we're going
    across this top one we're going to grab go through making sure we're not grabbing those seed beads that are in
    that Loop and then going through the fire polish as well
    okay because we're going to need to drop down
    and then I'm dropping down into that next fire polish to be the hex
    Salon bead and through that fire polish right now like I said we're just working our way down here
    and then into the next fire polish dropping down
    and then through that hexagon bead and up and out
    Marlon Brando is his name um Jules Dog is Marlon Brando motorcrafts yes we just have uh
    we have our doggies that's just par for the course so let's pick up five more
    and you can see just how quick this is coming together it's it's a simple project
    but it would make something that would be a great gift for someone that you could make fairly quickly and just put a
    beautiful chain on it and I'd be it
    all right and we just go across that hexagon grab five more
    okay and then through the top hole and back
    and we're going to grab that fire polish as we're coming across there the one that's on the right of us now
    on the top if I can get it through that there we go
    and then through the fire polish not the seed
    beads I'm just gonna have to remember this a little bit
    there we go a room needle to the rescue
    okay and we're just going to drop down now
    because we want to get down to our last three rows so we can I can show you how to make your Loops here
    so I'm just going to shuttle it across and through all these beads on
    the bottom row except for the seed beads
    and then we're just going to drop into our next row
    okay and you can see I turned it because these beads are on this outside and it's easier for me to get out of
    them this way so don't hesitate to move your loom around guys it's a very helpful so I'm going to go
    up and through these two outside beads here that are in our first row
    and it is our first row if we're looking at it from the bottom up okay and I'm just pulling that string through
    I'm dropping down so we have it in place that we want it okay so now what I'm
    going to do is I'm going to add six seed beads
    and then I'm going to add a fire polish and six more seed beads
    and then what I'm going to do is I'm going to go back through that first seed bead so if we were sitting like this
    like I showed you earlier we put it through we're coming out of that second seed bead and we're going to go up and
    over and go back through that first one okay so I'm just going to grab it this way and I'm going to twist it again just
    for ease so I'm going to put it through bead 1 B2 and on my way back through I'm
    going to put up through B3 and 4. and now I'm going to come out of bead four okay I hope that makes
    sense yeah I it certainly is um
    is one of the best things Paula to be able to move it around and do you know it's very versatile like that that you
    can you know absolutely move it around and make it more convenient so we're gonna pick up six more sure we are
    put some more out okay excuse me
    we'll do a few of these loops and then we'll move on to me showing you how to take it off
    there's three four five six
    and you can make your Loops any size you want to guys if you want them bigger than the ones I'm making feel free or
    smaller just lessen your beads down a little bit four would be nice on either side if you
    want smaller loops
    so that's giving out 12 beads total I I know I'm saying that just because
    I'm not necessarily the best person for math so I like to assume that maybe other people are neither so I'm going to
    go back through that third bead I'm up and over through third fourth
    and then five and six and that needle is going to come out of
    six up and out okay
    oh thank you Vicky thank you for my nails I'm actually going to start having a link to my nail lady in the
    description on my YouTube videos and things like that so you will be able to check her out
    so I'm gonna add six more beads we'll do this last one and then we'll
    move on six
    six fire polish and six
    okay yeah because uh she actually is not like a nail lady at a salon or anything
    she she sells color straight so that's what I use that's what I like
    it's my favorite so I did I'm going back through then
    we're on five six and we're going to go through seven and eight
    actually I'm going to go through the ninth one or two because I see we have six speeds left so I'm gonna do three
    and three okay it's just to kind of scooch it along if you know what I mean
    but you don't have to do that so now that we're outside of this bead we would just continue the same way
    across that we have been doing so that one will be easy peasy to finish right there
    so I have one here that I have done
    on our Loom you can see all the flurry seed beads at the bottom and I just love how it looks Lacy it's really cute
    um so easy enough to take this off the loom
    we're just going to take our trimmers and I'm going to just hold my fingers on
    these strings just because I don't want it's not going to pop back like it would on the original Loom because again there
    was no tension bar taken out of there but you just want to secure your work so it's not getting
    thrown around okay and I'm just cutting those hamstrings
    all right and I'm so excited my dad sharpened my cord cutters for me and figured if it
    could be done he could do it much much better so we'll start here at
    the bottom simply on the bottom we're just going to tie each individual strand into a single small knot and we're going
    to glue those I did not bring my glue up with me but I know you all have some so
    you're just going to put your GSI bow cement on and you're going to want to let it dry for a little while until you
    use it just make sure it's nice and secure you could also put two knots because you're not going to see them behind these loops on this part anyway
    on the top you will need to just do one so you can get your slide over it okay so I'm just going to
    work my way across does my father take
    no mail orders yeah knowing him he would do it for you honey
    he would do it for you he's just he's a talented fellow if he can't do it I
    always say if he can't do it again if he does it's a talented guy that's for sure
    so we're just gonna quickly tie these single knots and what I do is I like to glue them
    then cut them I don't cut them until the glue is dry on them normally
    um because I like to make sure everything's nice and solid in place
    before cutting them okay so that's just as simple as that on the bottom
    all right tighten our knots on there
    and then we're gonna move on to the top here we're going to do the same exact thing
    we're going to tie a small of single knots as we can across the top there because I like to like I said we want to
    be able to put our slide on and just as I did on the bottom we're just going to do these knots that we're going to try
    to move down as close to our work and make as Tiny as we can okay so I know
    that's a little hard to see but I'm just as you can see I'm just kind of working that knot down
    as I'm working down the the strand of hemp and I'm just working it down as
    close as I can get it pulling it a little bit at a time making sure it's in the position I want
    and I'm using my fingers on on both hands just to kind of adjust that back
    and forth just to make sure and then when I get it in the place I want I'm gonna hold this knot between my
    fingers and squeeze and then give it a really good pull because you don't want to pull too hard
    without holding really tight on it because you may warp your work and you don't want to do that okay
    okay so we're just going to do that
    this one's up a little higher where I started it so I want to be careful because I don't want to knot it up
    at the tops there
    just rip these down
    okay so that one got a little bit uh too high on me so what I have done in the
    past I have pulled on the Strand below holding on to my work just to kind of adjust that butter in place because
    underneath it doesn't matter if the knots are a little lower or whatever because of the I'd prefer them not to be
    but if I had to choose and I can't get that knot out that's what I'll do I just
    kind of want that and adjust it the make sure you hold your work when you do it because it'll get all weird on you if
    you don't foreign
    two more knots
    I like how everybody's talking about something completely different
    place to gab right you can place the Gap we can go back and re-watch to learn
    right and then we're on our last knot here and we would
    then glue thank you Joan for posting those links
    all right so now I have all of my
    um knots tied and I'm going to go back in here I want to make sure I have this all straight the way I want it on my
    knots because I want to be able to slide my piece my um connector on very easily all
    right so I'm going to cut the knots assuming that we have already
    glued them I'm going to cut them as close to the knot as I can and again that's why I say
    glue them first [Music]
    and then just trim those just like that that's all there is to it okay and then I can go in the back here and also trim
    these so it doesn't look like it has something growing out of it
    [Music] okay get that out of the way for you
    [Music] um no Nicole this is actually hemp [Music]
    it's actually hemp and I do need to grab my plier here and just open this end up
    because I do when I am putting on to hemp over seed beads I like to put the
    nozzle of the tip of my chain nose in and just kind of open the
    the um connector up a little bit and it helps to kind of get things moving
    okay and I'm just going to put that over the end and then I'm going to slowly push
    those knots in sometimes I just take my pliers and push the knot through
    and then go on to the next one and it's kind of a little maneuvering
    game to get the knots to go in get your piece
    to slide over the warps and over the seed beads did you just kind of kind of work it
    across slowly okay so we're through there we can
    go with our work and push some more seed beads in there
    now we're known to our next knot here and I'm just gonna push that in there
    once I get it out somewhere up on it I know it's hard to see guys with my
    fingers in the way but I hope I'm describing it enough that you can understand what I'm saying but I'll show
    you here where we are we have one more knot to put in this one is starting to go down in this this second one here
    just going to take my plier and you can see how I pushed that down inside there it goes in very
    nicely can it be done with wax cord Anisa I I don't see why not
    you could certainly try it there's any kind of cord you can really use on the
    uh jewel loom I've never tried wax cord but
    you very well may be able to do that I always say try it that's my that's my
    motto and I I'm batting back out here a little bit guys because I see I missed a couple seed beads so we want to make
    sure and have all those up in there as well so I'm just going to pull it back out a little bit push those through
    and then push in my final knot here [Music]
    and then we have everything inside and we're just going to close the end of it
    yeah I did it first too Nicole I had a hard time with slide connectors but once you get the hang of it
    um you know it it seems to me though once you get the hang of it that you can you
    know do them fairly easy so there is our one that we
    did tonight cute little pendant and then this is our
    finished just the one that I made for the photo
    what's Maria's idea what did she say
    opening the channel helps a lot yes it does opening the channel on the um
    thank you I'm the slide connector does make a big difference
    so a little bit shorter of a show tonight guys and I do want to give you a heads up for November and December I'm
    going to flip back here before I tell you go into it I guess so I can see your lovely you can see my
    face anyway there we go so hey here I am so here is our pendant
    again just to show you again it comes together very quickly and easily
    really fun to make um just kind of want to give you guys you could make it as an ornament Zach
    yeah most definitely that could be a beautiful ornament um for November and December we are
    going to have a little bit of changes I will be doing projects but they won't the videos may not be as long for those
    two months so just kind of giving you a heads up um we're kind of just playing it by here
    here for November December we know everybody's busy and um
    you know usually has a lot more going on so that may even be good for your end of it so I'm glad you guys like it thank
    you so much beautiful gorgeous very pretty thank you guys
    I appreciate it so that is really it guys that's it for
    tonight it went really easily and quickly didn't it so hopefully we will see you next week again I'm going to be
    using the beautiful birthday cake Workshop box kits
    um to make a fun really adorable bracelet so don't miss that
    thank you so much Vicki thank you okay guys take care and I'll see you next
    week bye