Your Cart is Empty
How to Use the Flat Stitch Technique to Create a Cabochon Bezel - Jewel Loom School with Tricia Giazzon
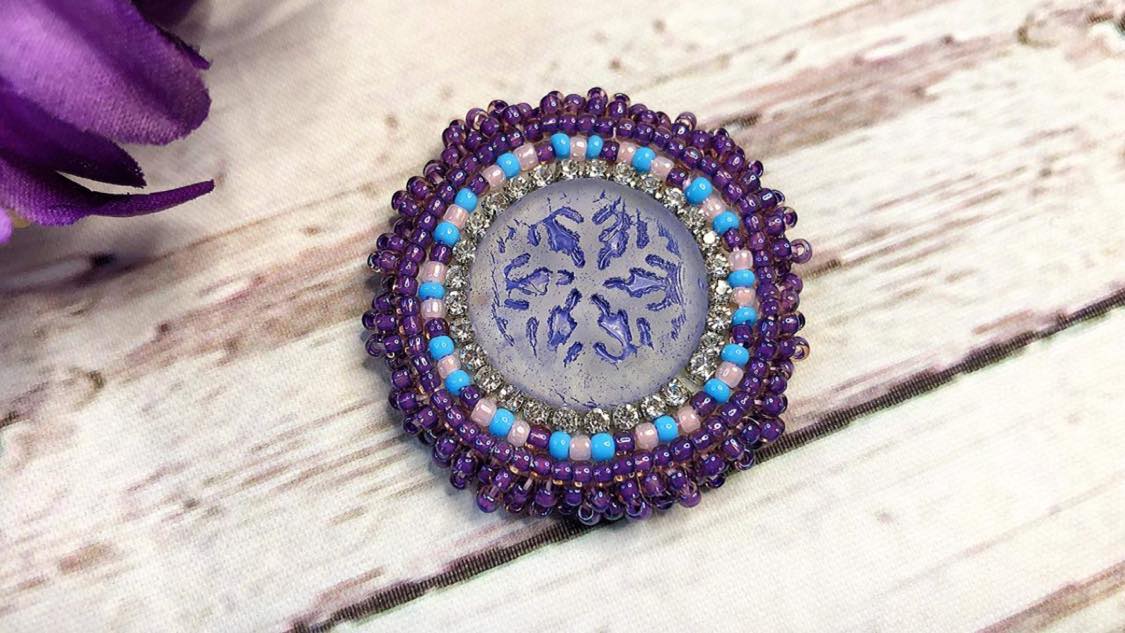

Join Tricia Giazzon on this week’s Jewel Loom School Live, as she shows how to stitch beads around a cabachon to create a bezel. She uses a Czech Glass Cabachon from the Dreaming of Prague Box Jewels put together for her Creative Soul Community when she was in the Czech Republic. This is a great technique to learn to create your own bezels.
Supplies Used:
- 11/0 Seed Beads: https://jewelloom.com/search?type=product&q=11/0*&aff=6 - colors used: Ceylon Innocent Pink, Inside Color Rainbow Rosaline/Opaque Purple Lined, Blue 11/0’s from Dreaming of Praque Box (Currently a 25% off sale on seed beads through 7/31/2023. Price will show up in your cart with $10 minimum).
- Cabochons from Dreaming of Praque Box
- Wildfire: https://jewelloom.com/collections/accessories/beading-thread?aff=6
- Pellon Backing or Felt Leather or Ultra Suede for backing
- Cup chain if desired
- B7000 or E6000 Glue
You can try out 1 month or subscribe to the Jewel Loom Creative Soul Box with Workshop here: https://jewelloom.com/collections/subscriptions?aff=6
Jewels currently has 3 destash boxes left of Artistic Wire at the low price of $50! https://jewelloom.com/products/original-artistic-wire-destash-box Shipping will be around $10 - 14, due to the weight of the product & depending on where you live.
Thank Tricia by using her affiliate link, when shopping at the Jewel Loom store: https://jewelloom.com?aff=6
Subscribe to the Jewel Loom YouTube channel to access past & current tutorials: https://www.youtube.com/c/JewelLoom
Sign up for the Jewel Loom newsletter & get 15% off your first order, plus a free pattern: https://jewelloom.com/pages/save-15-on-your-first-order-get-a-free-pattern?aff=6
Receive text notifications for Jewel Loom shows & special deals by texting "Sign Up" to 1-805-768-0568
You can find Tricia online through her link tree: https://linktr.ee/pinkpoodlecraftstudio
Check out the Jewel Loom Blog for past & current tutorials, plus read details on project: https://jewelloom.com/blogs/craft-hangover
Join the Jewel Loom School Community (off Facebook) to share your loom creations, be inspired by others, & a place to ask & answer questions: https://www.juliannaavelar.com/offers/5ss8HfCp/checkout
Jewel Loom Facebook pages: https://www.facebook.com/Jewelloom & https://www.facebook.com/JuliannaJewelsAvelar
Jewelry Making with Jewel Loom community page: https://www.facebook.com/groups/228056324285807
Please contact Jewels with any questions you have about her looms: email -hello@jewelloom.com or text - 1-805-768-0568
Transcript:
hi guys here we are here we are I am back I'm like a bad rash you can't get
rid of me right so yeah we are back today I am back
today and we are going to be making a super fun project this will not be on a
loom it will be on
I'm getting sorry I'm getting for some reason I don't know why um but anyway it will not be on a loop
it will be done by hand and be stitched I'm gonna take this off for now
um it will be stitched if I hate no room here today but we're gonna learn a fun
technique hi Maria Trisha is back with the Vengeance
uh pop up every now and then in the jewel loom lives
um so here we go we have this is the one that was in the photo that we're gonna
work on this is a flat Stitch and I recently learned this like in the
past six months um and I've been really enjoying doing it with cabochons these are the
beautiful cabochons that came in the uh Prague box that Joel's curated for us
when she went to the Czech Republic so we wanted to make sure and show you some things that you could do with it and
this is definitely something you can make into a pendant um or make earrings if you like bigger
earrings you don't have to go with it you can put less roads around it things
like that and that can give you more of like an earring size I don't mind the
size for earrings really because I usually go big or go home but here is
another one that I did with one of the um green ones let me grab that better
we go and I'll show you them on the mat as well but that is the green one that I did now
I did use some cup chain on this guys so if you have that handy you can use it if
you don't we can just use the seed beads no problem hi everybody hi so glad to see everybody
let me just say hello to a few folks before we go down to the mat Deb is here
hi dab so good to see you Gloria and Stephanie and Sandy and Bonnie Harry
Maria all my girls it's so good to see all of you again
um I will be going back to starting my live very soon Thursdays at 3 P.M on the
beach so you can check that out and as always guys
um I have a YouTube channel I have Tick Tock Instagram Facebook if you're not
following me or subscribe to my YouTube Channel please do so that helps me a lot
I'm really close to get to a thousand on YouTube so that would be amazing if you
have not subscribed certainly done that for me all right great so hi Rose how are you
sweetie um I'm gonna go ahead and turn the camera around now just fair warning guys
um I'm going to it may take a little bit for the camera to turn so you may see my
face Frozen a few minutes
it'll take a little while um to turn so don't don't worry we will get
there hopefully um with no problems but let me get that turned around for us
sure
okay here we are it wasn't so bad right so here is let me turn this light down
because this does help shed a little bit more light on the subject here
hi Rhonda nice to see you too sweetie um here are pieces that we are gonna learn we're gonna
learn this one today with these beautiful blue purple and pink beads just really adorable and then this green
example that I made and just shows you like on this one I kind of color blocked a little bit
and you know
this one I just kind of kept it sick I did one row of variegated then I did the
purple on the outside and then the purple around the edges
guys I hate to do this to you but can you hold on for just one moment
hey no no you can't get down there
okay we actually have an extra dog in the house tonight and that's part that's the
main problem my brother has a um huge yellow lab and he has a mind of his own
and there was a baby gate at the bottom of the stairs and he kind of you know knock that down he's you know it's
so anyway getting on with our project here so here are our projects and the
first thing we can start out doing is like I said if you have some cup chain it does really Pop there's Julie hi
Julie okay and the cup chain does really make it pop so I like to
um use it again your preference is kind of I'll put these here so you can kind of look at them as we're working on them
so what I did is I just took one of those beautiful cabochons that we got
and I will show you the cabochon just in case you did not get them you can you'll know what to
look for so basically this is an acrylic cabochon and there's a lot of companies now that
have these that you can purchase from them um that they have the flat back on them
you could also use natural stones anything
um like that that has a flat back works perfectly so what I do is I just use a
little bit of this Pell on now pellon is not necessary but I do like it for these
projects because it's it's a backing that's made for stitching sewing and
wardrobe machines things like that some of you Crafters may know about Pelon
but if you this is a medium weight that I have doubled they do make a heavy weight as well and
um you could also use felt and just double that up just to get a stiff material to stitch on it just makes life
a lot easier you can get the pill on at Walmart or Jo-Ann Fabrics if you are
looking for that I would recommend getting the heavy weight versus the mid so you don't have to double it so I did
is I just took some b7000 you can use E6000 super glue whatever is your
desired glue of choice and glue your cabochon to the middle of
your backing okay once you let that dry which I did ahead so we would be nice and dry here
um you're going to add your cup chain so what I like to do is I take my cup chain
and I lay it around my cabochon okay just like so
and I kind of see how much I'm gonna need
doesn't have to be exactly perfect as you're doing this but
it gives you a good idea so as I get to the bottom here
I can see I'm gonna be able to cut right at that cup and that's going to give me the exact distance around that I need
so I'm just going to take my pliers in here and I'm just going to trim
right at that cup at the end of that uh and then all we're going to do is we're
going to take a little bit of the beat 7000 or whatever you oops and we're going to glue our cup chain from the
reason I like this glue is because this smaller tip on it which makes it a
lot easier to control doing things like this so we're just going to go right around the outside edge of our beautiful
cabochon just like so just putting the glue the
whole way around it and then put your lid back on
and then you're going to lay your cup chain into the glue so we're going to start here at the bottom
and I'm just going to work that down and pushing it into the glue
so it's nice and snug in there
okay I'm just working around and if you do happen to measure wrong
which it looks like I do have one extra cup here I don't know that it's I kind of spread it out and with cup chain you
can spread it out or you can push it together because they have those little um hinges in the middle so now that I
pushed it together it's perfect okay just push it a little closer back together and now it was
perfect for that so you see that was just very simple you would just let that dry before you start your seed beading
so again I do have another one here that's ready for us to roll and to start
our seed beading on now what I did on this pattern is I just
went um blue pink blue purple pink blue you know
it's just a very simple pattern I just use the blue pink blue purple and then
pink blue pink purple so just going back and forth on that so I'm going to take
um Phillip I'm peeking behind the curtain of Wizard of Oz it looks so mysterious
but maybe I can do it you can do it you can do it Terry just hang in there and you'll be able to see you'll be able to
do it honey okay so now we're gonna do is in my needle this is a two needle
it's my perfect I'm using the wildfire in Frost it's the
0.006 0.15 millimeter and I've just
pulled about my wingspan of wildfire off and I've tied a little knot on the end
of my Wildfire okay that's all you need to do just something to stop it from coming through the front of the backing
and then I do like to wax my my Wildfire this is the wax I use I got it off
Amazon but there's waxes out there everywhere all the stores have them when businesses so I just like to wax mine I
feel like it flows a little easier so all we're going to do we have our cup
chain is now dry we're going to take our needle underneath and we're going to poke that up right
beside that cup chain just leave maybe a millimeter space so it's not tight tight
tight against it adjust a little bit here
just gonna finagle that up through just make sure I have it where I want it yeah and it's just enough away from it that
everything's not going to be um tight roll tight against it okay so we're going to pull our needle through
and then pull our thread and it's just as simple as that and we can serve seed
beading so we're going to start our pattern like I said whatever pattern makes you happy these seed beads that
I'm using are all the nose these were also in your frog box
you don't have the ones from the Prague box you can use whatever you have whatever colors you like this is a
beautiful pink this is the ceylon in innocent pink I love this it's one of my
favorites the Jules carries and then this one is inside color rainbow Rosalina
link drawing which is also stunning and I Jules picked out a good combination here
um that went perfectly with these cabochons so we're just going to pick up a blue
pink a blue and I like to usually pick up six beads
but I'm gonna pick up seven because I want to make sure um that I have the space bead between
them the purple spacer bead between the two runs and then I'm gonna go pink
oops pink blue pink okay
so I'll show you that so that's going to give us seven beads
and then we will end with a purple as well we'll start with a purple and the
other one excuse me I'm sorry so we're going to drop those beads down
and we're just going to start laying that against our cup chain okay
just like so and you're going to see here I use my thumb here to kind of keep that snug against my cup chain all right
and I'm just going to take my needle and again about a millimeter in front of the final bead that you put on there I know
it's going to be hard to see I'm gonna put my needle down through
the backing okay we're gonna pull that
all right so now
you've got that pulled it's in place it's nice and snug around the edge but that's not going to be good enough
because that's going to still be you know it's easy to see on there and that's not what we want so with the flat
Stitch what it consists of is that when we take my needle and I'm going to go through beads back and I'm going to go
between the seed bead and the cocktail with my needle
okay on the inside near the cup chain okay you can see
where I'm putting that I hope and then I'm going to pull that up through
and this is the flat Stitch Part guys a big part of it so there is a thread that goes through these beads so what we're
doing is we're literally tacking down the thread between the beads we're not tacking down the literal beads but the
thread so I went between the cup chain and the seed beads here so I'm going to go between the second and third bead
okay and I'm going to put my needle down right beside that
outside on the outside okay so that that thread so if our thread runs this way
through our beads This Thread is going to run across and it's going to tack it down for us if you understand what I'm saying
so we're going to pull that through
and we're just going to kind of keep it lined up so we can get it between that second and third bead so it doesn't pop
over don't wanna pull that down and that first section
has now completely packed in place so that I'm going to go back two more
beads and I'm going to go between that second bead and the cup chain
again and pull that up through
then I'm going to go over top of the seed beads over top of that thread
that runs through there and over to the other side and take my needle and go down through the backing okay
and we're tacking those two down and then we're going to go two more because we have an odd number so we'll
do the do two more which is normally what I do with the six anyway but our seven will be fine just
that last bead will be fine so same thing up between this is now the six
speed and the seventh speed that we're gonna go between camera doesn't decide there we go
and then just pull your thread go over top and on the other side of the
thread running through the seed beads down through
Tech all right does that making sense to
everybody so far so now what we're going to do is we need
to get our needle back up here in the front because being right-handed I like to work work right to left around my
cabochons is just more comfortable for me um so you may want to work left to right
I don't know if you're left-handed but what I like to do then once I've gone through and tacked down my beads
I'm going to pop up right at the end of those beads okay back end here
put my needle up through okay
makes sense yes okay good and we're pulling that
up behind that last bead and we're going to put our needle through all of these beads you may not be able to do it at
once once you're really going around a curve like this up here this pink bead so what I'll do is I'll put it through
the beads that I can and then go through that bead by itself
if need be okay
and now we're back out at the front and we're ready to proceed with another
set of beads okay so let's do another set so we're going to do the purple
and the blue pink blue
purple and pink
hello pink okay so now you can see there's not
seven beads there's eight beads on there so for our first run we have our seven but on the next one we're gonna have
eight and then going forward we're gonna have eight because that's how we're going to
get our speed that is in between the the runs of the pinks and the blues okay so
we're gonna do eight beads and put that down
and we're just gonna pull that again so it's nice and snug and I'm going to
keep my thumb there to keep it in place and I'm going to push my beads back a
little bit with my finger just to make sure everything's nice and snug and tight there and we're going to come up between
the cup chain
he's popping up a little bit of room to breathe there we go
so we're going to go between the cup chain and the second bead right there
now what are we doing here
Harley Quinn from the front the front hold on one second guys let me just re-thread this quick
it's a little bit
there we go on the top sorry about that get my needle back threaded and we'll
continue sorry about the dogs barking the guys
left and kind of on our own me on my own Muslims
so par for the course okay so we drop our a beads down and then on the front we're holding that
in place and we're going to go down in front of that last bead okay
and pull that down through how did I map it out to know that my
pattern would work um I gotta tell you really Terry I'm Gonna Fly by the seat
of your pants type of gal so I really didn't map it out I just kind of went with it and then
just would deal with it however it landed but you guys a lot of you are a lot more meticulous than that so you
know you might want to just kind of um
measure I mean how that would be around a cabochon I'm not sure but for me I
just kind of eyeballed it and I was like okay we're gonna fly by the seat of our pants I like this pattern we're gonna go
for it now I have no problem if it doesn't land on exactly the bead that
it's supposed to that doesn't bother me because nobody's really gonna notice that when they're looking at this piece
because there's so much to it you know if there's a purple where it's not
supposed to be or whatever you know as long as it's not um right next to each other you'll be fine
you know but that's just how it worked out nephew that's the truth so what I like
to do guys that is the perfect answer okay so what I like to do and I don't know if I showed you this but I'd like
to kind of wrap this around my finger a little bit on the back and hold on to my Pelon
as that's keeping that down as I'm going to put my needle up between the cup chain and that second bead
okay just to kind of keep it nice and snug and then I'm going to pull up through that and we're tacking down between the
second and the third bead okay
down through
and again I'm guiding that with my left thumb just to make sure that it pops between the second and the third B
because that's where I want it okay so we're gonna go another two
go between the cup chain and the seed beads
we're gonna go between four and five
and again I'm going to guide that with my thumb to where I want it
okay I'm kind of keeping my thumbnail over top of that bead behind it so it does not pop
somewhere else or onto where I don't so we've got
four or five now we're going to go 11.
so six and seven
and then we're just gonna go over top again tack that down
and then we have seven and eight so we'll tack what we're going to do
here I think is we're not going to attack anymore I think we're good it's back there I'm gonna go between the eighth bead
of this run and the first beat of first run
that makes sense so we're going to count down to eight there's two four it's
eight so we're going to go up between excuse me the first feed and the second
bead on the first run guys so basically what we're doing is we're just securing
this next row to the first row by going through the first bead and then up
through uh the rest of the beads on the top like we did before but we're just
hooking it to that first row by grabbing that bead so this pink bead right here
is from the first row that we did so we're going to go up through that
I'm just kind of gonna work with your needle to get it go between and then we're going to work our way up
through the new row that we just put on okay and again you need to just do some
of them and then catch the rest of them you can certainly do that so now it is secured not only to the
bottom of the pedal on it's referred to that but first row that we did so
there's two runs right there guys so that is the basic if you want me to
do one more run I can do that just let me know in the comments but
that is all you do to go around your your piece and then when you go to put
your next row on you're just going to pop your needle out on the outside of your seed beads so say
if we had the whole row on here I would go down through this whole amount was
filled in here I would go down through the Pelon on between the last bead and
the first bead okay
to get that underneath there what is the ideal run length is there such a thing as too long
um I prefer six yes there is such as too long because I think that
you don't get it be as well with a longer run there's more of a chance of
it becoming more wildly and because you have to kind of keep everything snug and
I think for me six is manageable and everything stays nice and snug and nice and tight
but that's me personally you could certainly experiment maybe you would be more comfortable more
but I like sex so we've gone down through as if we finish this whole row around
and what I would do then is I would just pop back up
between on the outside excuse me of our seed bead roll that we've just made because
we're going to start a new CP row so you want to be on the outside of that so if you're going to start another row
around that's all you'd have to do just go down through and then come back up on the outside of the road that you just
finished that makes sense so you can see here that I did two rows
I did the row the variegated and then I did a row of the purple
and that's all I did I just put my needle down through when I was done and brought it back up on the outside of
that row and then started my purple row okay
all right so if that makes sense to everyone so once you get your rose on
however many you want I did two you can do one you can do however many if you want guys so I'm gonna put my needle
onto this one because we're going to go ahead and move forward with putting the backing on
so I'm just going to use a piece of felt today you can use leather I left mine downstairs so we're just going to use
with what we have here so I just have this little pink
a piece of fleece up here that I'm going to use that works just fine but it's
whatever you like whatever works for you the leather looks nice suede looks nice
you know all of those got that done we're gonna thread this
needle and I'm going to show you the next steps on putting your backing on okay
because we're going to need this in just a minute after we do our back okay so now we've got our whole pattern
finished here I might have missed did you anchor the cup chain to even with gluing it I did not but you could
certainly do that you can anchor it with a thread Terry um go for it but you can certainly just
tack it down between the cups like we did the seed beads I haven't had any problem with the cup
chain moving with the glue but you know if that's something that you'd like to do go for it okay so now we have all of
our rows on and what I'm going to do now and you can see this is basically what it looks like
on the back it's pretty it's pretty neat it's it's you know kind of it's condensed in there behind the scene
beads so you know you're welcome Terry that you can go ahead and cut around it and you're going to be fine so I always
use these shears um these are the cord cutting shears and I know I shouldn't be doing it but they
work so well for me but if you have a nice um sharp pair of scissors they would as
well and what I do is I'll just cut in with my card patterns
so and
angle them out just so okay
and just trim around and we're just angling them out just a hair
and we're cutting that backing off right now okay
so we're cutting it nice and close to our seed beads we don't want to go through crazy clothes because we don't want to cut our threads but if you keep
it this ankle when you're trimming you're gonna have pretty good luck
okay okay so once you do that then you're going to
cut out a piece of your backing hold on one moment okay
okay so we're going to just cut out a little square piece of our backing just enough that you know
would work to fit on the backing now I can tell you
um the ultra suede looks nice like I said the leather looks nice
um I actually found some vinyl sheets at uh Hobby
um so we're just going to take and
glue backing onto your to your piece okay so I'm just going to take some more
of my these b7000 and go around the edge to make sure it's nice and sealed around
the edge for us okay
okay put that back in there and then we're gonna put our piece onto our backing
just like so just hold it there for a few minutes and let it dry
I'm just making sure that that's all sealed around the edges there guys just going around
and making sure it's nice and snug and then we're going to take our shears and do the exact same thing
just angled them out and trim off that backing images all
right so then we have all of the pieces
now this backing is also going to be stitched on so you don't have to worry about it falling off now you could leave
it if you didn't want to stitch on your backing and do the edging you could leave it just like so
um some people don't mind the raw Edge I do like an edging online
of all of mine but you know that's definitely I like to you know more is
more right so that's true like I said
you got that up to the edges some snug
all right that's just what it looks like and you can go around and look if you have like a little piece sticking out I
also do that with the white if I see a little bit sticking out I'll trim it or whatever but it's going to be covered up
with an Eco Stitch and that's what I'm going to show you right now
so what I normally do is thumb is 3B
3B of the edges you may need to adjust depending on the
thickness of your piece so I did the purple on the edge of this
one Edge kind of Blended it with that last row but you could change that up if you wanted to put
um another uh color there it would certainly look cute so I'm going to pick
up three and again this is kind of a fly by this in my pants as I know what kind
of backing I'm picker so we'll see if the three work like I did on this where I use the ultra
Spade okay but you know you can play around with yours but this should work so what I'm
going to do is I put my three beads on my three eleven nose and you could also guys if you don't want to use 11s you
could do this but keep that with
me here through my backing and you can see where my thread is the front might be done already and I'm
Gonna Come through the back of the backing here the pink backing and
I'm going to angle my needle up it's not going to go through because we wanted to
catch the backing that you just put on and the backing that you stitched onto
so if you come up in an angle I don't know if you can see my needle coming out there
we're catching both of those backings without disturbing the seed beads and making threads on the front
my hands are in here so you can kind of see that angle okay
so if you do that through and you're just going to pull your thread and those beads those threads
going to go into a circle so it's automatically going to go into that Pico
Stitch let me just remember throwing back on this side it'll automatically go into that picot
Stitch Okay so there is
your edging okay it's as simple as that so now we're just going to work our way around we're
going to pick up three more beads this is really simple guys and I hope that
this project isn't intimidating and you you will try it because once you get the hang of it
there's a lot of variations you can do so I'm going right in beside the last one that I did here on the back my
Stitch is going to be right in the vicinity you'll find that right next to it okay see
just like in there and then I'm going to angle it again push it through both
backings okay up and out
pull my thread and there's my next row you can see how
easily that comes together okay so let's do some more let's do a
few more rows of this
I'm sure our seed beads down and the reason I push
they always end up falling off on me I push them into the thread so we're
going to do the same thing we're going to go inside the last one that we did an angle
our needle
just make sure I'm in the right position towards the neighbor for me there we go
and there's our third row and we're just going to work our way around
putting that edging on
a little bit okay
and same thing at an angle up and through
okay thank you Rose I appreciate that so much
honey you're such a good designer that means a lot coming from you all are beautiful designers I have to
say so that's the basic on that okay I think
you guys probably have that down I don't need to bore you with um doing the whole way around on that
piece could you back it with another cab and make it double-sided using a
complimentary color for the Pico Stitch absolutely Terry your brilliant
oh my gosh that would be so fun please do that and I want I want pictures
thank you Bonnie okay so now that we have our Stitch along the edge you would have done the whole edge of
course once that is done looking at this and this is what your backside
just tacked onto your backing everything's nice and secure everything's covered up
to get a nice like lace type appearance on the edge with your picot but now we want a hanger
we want to be able to a bale for lack of Adventure I was saying hey a male we
want to bail on our piece so on this one I just did a simple row of 11 0's again
this you could go in and use your eight O's and a bigger uh make a bigger bail for you
whatever you like but I'm just going to take this thread that I have here
and I'm going to make a knot at the end
okay I'm just gonna make it and just like we did at the beginning
and we're just going to trim it just to leave right a little bit below that knot
our needle
the right side that threaded through there
so and what we're going to do you want to find where you want the top
to be okay so to me it's easy for me to look at the way the snowflake is and
there's the the one stem of it points straight up I'm going to use that as my top Center
so if that's my top Center I'm going to go just to the right of that
okay and I'm again we're going to use that angle technique and I'm going to go everything that we
do with this um Veil as far as the stitches and stuff will be hidden inside your picot Stitch
okay so I'm just going to go in an angle here right around my row where my picot is
and I'm going to go in through there make sure I'm not too low
through there and I'm angling through both backings and my needles coming up at an angle out
of that line of Eco okay and we're just going to pull that
through and there's a little tiny thread hanging there from your knot you can trim that
when you're done so I'm just gonna add Let's see we did how many did I do up here two four
chains like that so let's do let's just do six six
one two I'm just gonna use the purple
eat and
then 12. 15.
15 and 16. depends on how long you want your bail to be
um as to how many beads you're going to put on again if you use the eights you'd use less beads
um unless you wanted a really long Bale so our beads are on now we're going to do
the same thing we're going to go to Quick Set we're going to go to the left of this way so we have our beads coming out
our string coming out to the right now we're going to go to the left and we're going to go in through the front not in
through the front of our flat Stitch but in through the front of the picot Stitch
okay because we want it to kind of be centered here so we're going to go through that
at an angle we're angling backward now and we're grabbing the pillow on
obviously and going through where the first Stitch is so we don't see much
on that okay
now this one's sitting more toward the front if you wanted to be more toward the back just bring your threads up
through there
It's a larger belt but so what I'm going to do now is I'm going to go take that thread
and I'm gonna go back up through sorry I was pulling my
clothes the ultra suede and the Pelt again sorry
I was reading comments there guys I'm gonna come out in an angle right in front of the bead the last bead on my
bow okay so it's coming up back up through there okay
guys you can just purchase I got my cup chain at Hobby Lobby Michael's has it anywhere like that
we have it on the roll so so we're back up in front of that bead
and what I'm going to do is I'm going to go back up through all of these seed beads because I don't just want one
thread going through these little bit just to be nice and secure so I'm gonna pull that
just like so and it's snugging down and I'm going to continue going through all the seed
beads that I put on for the mail going back to there and sometimes when it gets so snug you kind of have to move
your needle around um to get it to go where it needs to go
there we go and we're not going through all of them at one time
doing it and a lot of times if it's too snug you have to pull your Needle Rock
it back and forth I have
this this last bead so I'm just going to crack that off right now guys but you
get the idea sometimes you have seed beads that have smaller groups than them
and you can't get as many threads through them that's what happened there
so I'm just going to continue through my seed beat
okay and then we're going to come down through that last one and we're going to go down into the backing
that we have there in a month remember apologize down into the backing
and then out
through that ultra suede and then that Eco group
okay so you can see how nice and neat that is on the back how nice and neat it is on the front
and that's plenty strong enough we're just going to tie it off now we're just going to tie our strand off
and I usually just wrap it around one of the picot stitches one of the threads
for that so I can make a nice couple knots I'm just going to knot it
actually let's do where that's coming out and do that on the other side
gonna give us a string across see right there if we don't do it on the other side so
wear your threads coming out that's where you're going to grab onto your picot which makes sense
okay so
our thread coming out on the right side
come on okay so you see where your thread's coming out that's where you just want to
stay in that vicinity to tie it off okay
and I'm just going to rethread this quick so basically yeah that's all you're
doing you're just tying it off with the smoke knot just to um
stays in place if you want to go through your bell again you can start
I found that twice is plenty and the bell holds nicely
going to finish that note ever stop giving me trouble
that's always the last thing is that there's always a lot of things
there we go and you're just gonna knot that
do that twice and cut it and that's all she wrote guys we talked that in 50
minutes can you I taught that in 15 minutes I didn't know how that was gonna go worked out well here is your finished
piece pretty back pretty front makes a
gorgeous pendant again if you want to make them a little smaller you can certainly scale everything down
in this email without caption yes I you must not have caught that but he did say
you do not have to use cup chain you can just use seed beads you have silver seed beads you want to get kind of the same
effect you could use that thank you Julie thank you Maria you could use that kind of silvery coated bead or if you
didn't even want that effect you could just start with your seed beans I've done pieces like that
um here's one that I did was a peach in the middle of it and I
just started with seed beans I didn't put any cupcake so you can you can do
this around any shape it doesn't have to be a perfectly round item
oh honey don't worry about it Terry no problem but it can be any sheep item that you can do this technique with and
you can see that's some of the glitter vinyl that I found at Hobby Lobby that I used on the back of that one
so yeah there's a lot of options with this guys please the sky's the limit and please if you do this I want to see
photos guys I can't wait so I'm going to turn my camera around here again this may take a moment bear with me
and put my ears back in for Joan
oh boy that was
so guys that is it I was just checking something because I'm still hearing myself in my ear so that is it for our
project tonight and I hope you had fun I love love being here with you guys it's
always super fun thank you so much Maria it looks like frozen oh thank you yeah
it kind of does huh it kind of has the same kind of feel it'll be a beautiful pendant for the
winter holidays that's for sure so thank you guys so much and miss Joan you can
come on and take us out whenever you're ready but thanks guys so much for joining and don't forget to head over to
my pages and check me out take care guys bye
we'll see you guys later thanks for joining us tonight bye
okay