Your Cart is Empty
How to Macrame with Wildfire & Leather Chain on the SilverSilk Loom
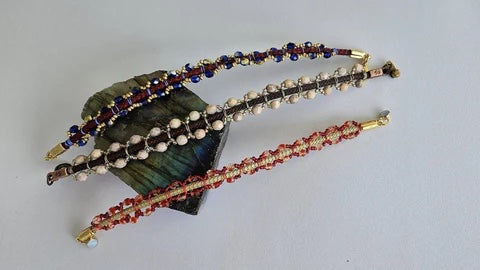

Give your SilverSilk Knitted Leather Chain a different look by using Wildfire & smaller hole beads (11/0s & 3 to 5mm Fire Polished beads) to macrame. Let Joan teach you how during this Jewel Loom School tutorial. The Wildfire aids you in using smaller hole beads, plus does not hide the Silversilk. And the SilverSilk Loom, made of sustainable Baltic Birch wood, holds the leather chain steady to make the macrame easier.
All beads, except kits, are on sale in the Jewel Loom Store through 12/31/2023! Discount will show in your cart. Cannot be ordered with wood products, but can be ordered with anything else in the Jewel Loom Store. Check your stash & stock up today! www.jewelloom.com?aff=11
Get $5 off your SilverSilk Loom through the end of the year! The lower price will show up in your cart. This special can only be ordered with other wood products in the Jewel Loom store...beads & other supplies cannot be ordered with it. All wood products will ship starting the first week in January. Great deal! Don't miss out & order yours during this special!https://jewelloom.com/collections/silversilk/products/silversilkloom?aff=11
Note: All wood products from the Jewel Loom store will not ship until the first week of January, due to holiday vacation. Other merchandise in the Jewel Loom store will ship, as normal, but may be delays in shipping, due to the holiday shipping rush.
Supplies:
- 3 to 4mm Fire Polish Beads: https://jewelloom.com/collections/beads?aff=11
- 11/0 seed beads: https://jewelloom.com/collections/seed-beads/size-11-0?aff=11
- Wildfire: https://jewelloom.com/collections/jewelry-making-buttons/wildfire?aff=11
- SilverSilk Knitted Leather Chain:https://www.silversilkonline.com/knitted-leather-chain
- SilverSilk Single Strand Endcaps: https://www.silversilkonline.com/custom-findings
Tools:
- SilverSilk Loom: https://jewelloom.com/collections/silversilk/products/silversilkloom?aff=11
- SilverSilk Bead Board: https://jewelloom.com/collections/silversilk/products/silversilk-wood-bead-board?aff=11
- Needles
- Flat nose pliers dipped in Tool Magic
- Cutters
- Thread burner
Subscribe to the Jewel Loom YouTube channel to access past & current tutorials: https://www.youtube.com/c/JewelLoom
Sign up for the Jewel Loom newsletter & get 15% off your first order, plus a friendship bracelet tutorialmini ebook for first time email subscribers: https://jewelloom.com/pages/save-15-and-get-free-friendship-bracelet-instructions
Join the Birthday club atwww.jewelloom.com and receive Free Shipping on your order placed on Birthday.
Check out the Jewel Loom Blog for past & current tutorials, plus read details on project: https://jewelloom.com/blogs/craft-hangover
Follow Jewel Loom on Instagram:
Jewel Loom Facebook pages:
We have a free group on Facebook full of inspiration, tips and techniques. It's a great community! You can join the Jewelry Making with Jewel Loom community page at the following link: https://www.facebook.com/groups/jewelloom/
Please contact Jewels with any questions you have about her looms: email -hello@jewelloom.com
Transcript:
hi I'm Joan D and I'm here to show you
how to do some mac U macet onto Silver
silk knitted leather um leather chain on
the silver
silk sustainable Baltic bir slom sorry
my brain is going really slow today but
um and I'm also having a little bit of
camera problems it's not wanting to
angle the way I want so that's why it's
kind of close
because hope hopefully it'll make sense
when we get to the other part so um
thank you for joining me today we're
going to be using like I said before um
Sil silver silk knitted leather chain
and I'm I'm also going to use some um 4
millimeter fire polish some 11 beads and
the
um um wildfire because I wanted a cord
that wasn't going to cover the silver
silk too much and plus also go through
the beads because they're smaller whole
beads so I couldn't get um any thicker
cord to go through it twice you know
because I need a needle to go through it
so um well let's get
started sorry for the slightly wonky a
angle but this is about the only way I
can get um my camera to work today um
first of all I'm going to show you how
to um set up your loom for
this you want to tuck in one end of the
silver silk and you know this is made
for thicker cords so this should work
out really
good and then tuck it into this um off
the very
end and then move your cord up see I
don't have very much
showing on this end right
here so then tuck it in to the top
Groove go down
should smooth it out I had change cord
sorry and I'm not cutting my cord that
way I can leave it as long as I can when
I'm done but I tucked it in here now I'm
going down to the thicker cord at the
end there and now we got it all held
into
place okay just to show you this is my
left hand this is my right hand
so I I know it's showing it sideways but
I couldn't get it to angle to where it
actually looks like now um
before we get started for anyone who has
never done a square knot before I'm just
going to use um thicker cord to show you
and I like tying it underneath you know
because since we're using Wildfire it's
kind of harder it's harder to show but
um usually I'll put two knots there but
since I want to take this off I'm going
to leave it here so for a square knot
once you get that on there on your left
side take the cord across the silver
silk and the um right cord take the
right cord back over the cord that just
crossed underneath the silver silk and
over the cord on the left
side and then pull now for step two of
this knot you want do it the opposite
way take the right cord across both the
silver silk and the left
cord take the left cord back over the
cord that just
crossed under the silver silk and over
the cord on the right
side and that's your knot so now we want
to get
ready to um take this off so we could do
the
um do it with the um silver
silk I mean with the Wildfire so um I
just want to um send out a lot of love
to Jules and her family right now and
I'm sorry you couldn't be
here and um but we are thinking about
you and your family and praying for
you okay I cut 45 in of the silver s and
this is for about six to six and a half
inches of weave U weaving and I'm going
to take it through wax because we're
going to be doing a lot of knotting so I
don't want it knotting in places where I
don't want it to you know so we can un
knot it if it happens normally I don't
use wax on my Wildfire but in this case
with all the extra noting I'm going to
so I'm going to take it
through I mean you could get bars of
this this is what I just happened I got
I got it from my local bead store but
I've got beads wax bars um to use
two so I'm just running it
through it just gives a tiny bit of wax
it doesn't going to coat it a lot in
fact I'm going to do it a second time to
make
sure I have enough on
it I meant to hold on to that other
end before it went through but it got
away from me
I do like this one though with the slots
because it's a lot easier to hold this
little
case
so just feeding it back through and it
made a little Groove for me because I
you know I did the same for bracelets I
made yesterday and I forgot to show you
those at the beginning I'll show them to
you real quick while we get set
up
okay get that out of the
way yeah before we get set up um here's
the bracelets I I made U we're going to
do a different look
today so I used like a a maroon
color um silver silk with a 4 mm fire
polish and gold beads and this one I use
um
I'm not sure I don't know if he still
has this in the shop or not it might
have been a limited edition I'm not sure
the color but it t a goldish greenish
creamy color but then I use like a red
clear bead and red fire polish I mean
red seed beads and a red clear bead you
know just for some variation on both
them you can see I have variation just
to add some more texture and looks to it
decoration
okay so today on the brown I'm going to
use these creamy color beads but let's
get this
started so I want to tie this since I'm
doing about six to six and a half inches
I want to take it about an inch from the
end if you want to because we're going
to be cutting off this end if you want
to leave a little bit extra cord at the
top you know make it long enough for a
PA earings or or you know to use for an
earring or something else feel free to
do so um don't worry about scraps you
know save them you know like I said you
can make earrings or a small pendant or
even um nay glued them together on the
um Balter Birch ornament you know made
for the silver silk
silkies so I tied a knot and I'm going
to turn it around because I want it
underneath that knot
underneath but that silky ornament it
looks like a Mandel on the back is so
pretty so I'm going to do the final knot
underneath too G take this wire you know
just do an overhand
knot easiest way you can if you think
you can twist it around after
you let's see I want to take one and
through trying to figure out what I'm
doing um while you're talking it's kind
of
hard so that's just a regular knot I'm
doing
there now um I'm going to use
needle I use a big eye needle because it
just if I have to unstring it and
restring it it's just easier for me but
you can use like bead weavy needles here
I mean you can even use your jeul loom
needle but it might be a little bit too
long
um you know I'm I use the big eye needle
when I'm bead weaving if you've seen one
of my t i mean when I'm
um use I mean weaving on the loom too if
you've seen any of my other
tutorials so I'm just taking some up
here um but sometimes you don't want to
take it too long I'm take you know
moving the thread you know so then
needle the thread that we're going to be
working with in too long but I don't
want this double thread getting in the
way because sometimes when you're noding
you can't tell which cord you're
doing okay so on the left now it doesn't
really
matter if you're left-handed or
right-handed because you're going to do
the
step one way or the other you know when
like you know when I was shown you at
square knot the first the second step is
the opposite of the the first
step so you're going to end up doing it
one way or another so with um one side
I'm going to pick up two 11
o and I picked a sparkly one because I
love
Sparkles just to add a little more
Sparkle to to my
design and I'm going to put um four 40
and then two more 11 O's I mean not 40
but 4 mm fire polish and then I move mov
them up oh you know what before we start
that I skipped a step we want to do um
just a
minute we want to do two sets of square
knots before we get started and that'll
hold our cord in place
too and I forgot that so I got to take
my beads off of this so remember do the
square knot take your right cord if you
want to start on the um well you need to
take your left core but if you want to
start on the right side and then go
right left right left that's fine too um
just remember you still have to follow
the steps and do
it um exactly the same all the way down
so I got my left cord over the silver
silk and over the right cord the right
cords going over the left cord under the
silver silk and over the cord that's on
the left
side now we're doing the opposite the
right cord is going to go over the
silver silk and the left
cord and um the left cord is going to go
over the um crossed cord under the sil
ver silk and over the right cord so
that's step two to a square knot now
we're going to do one more square knot
right cord over the silver silk and left
cord left cord back over the um crossed
cord under the silver silk and over the
left
cord you know you might if you've done
square knots before you probably um have
a better um way of doing it for
yourself um if this seems confusing you
can look up square knot tutorial
because what we're doing we're adding
the beads in between the
knots so then my for my second step I'm
going over the right
cord bringing my left cord up over the
cross cord under the right under the
silver silk and over the right
cord there's my T square knot so that
hold everything in place now we can put
the seed beads on um or the beads on two
seed beads on one needle
then a fire
polish and then two seed
beads and I'm moving it up I'm going to
do the same thing for the other side two
seed
beads because I want each side to mirror
The Other Side Fire
polish two SE
beads
and I'm moving them down now we're going
to go back to our square knot
again take the left cord over the silver
silk over the right cord bring the right
cord up under the silver silk and over
the left
cord okay and then step two the right
cord over the silver silk in the left
cord left cord goes over the cross cord
under the silver silk looking over the
right
cord so we're just going to I'm just
going to do one um knot in between um
each set of beads I mean you can do as
many as you want to change up the look
to so now I'm going to do the same thing
the two
um the two seed
beads fire
polish two seed
beads
on the other side the same thing two
seed beads fire polish and two seed
beads we want to bring them all the way
up to the
top and I found what you know once you
get the Rhythm you'll find it easier but
sometimes when I'm doing this and I if
I'm F going slow you know like actually
I did a tutorial yesterday and then I
found out I had no sound but my beads
kept sliding down because I was going
slower today it seems to be working
better so then I do my square knot
again and then the second side go right
on the right go
over I'm just moving the strings
down
okay okay so I'm going to go right over
both
cords silver Silk's going to go over the
I mean the left one's going to go over
the cross cord under the silver silk and
over the right
cord I'm going to do one more
and then I'll come back when I about
done weaving now since I'm weaving about
six to 6 and 1 half inch area weave I'm
going to um I end up using about 32 fire
polish so I oh I am going to use 32 fire
polish so I counted those
out
um
okay two seed beads fire polish and two
seed
beads okay move them all to the
top take your left cord over the the
silver silkon over to the right Wildfire
the right fire Wildfire goes over the
one that just crossed under the silver
silk and over the left
cord
yeah the left cord for the Second Step
goes over
both and then um the right cord crosses
over the
crossover um you know go back on top of
it under the silver silk and over the
right
cord okay so
um I'm going to keep working on this and
come back until we get to the end but if
you're trying to figure out how many how
much to
use
second I'm just kind of measuring the
section and for the um one
knot and then the grouping of beads
is
about see what is that one two 38 of an
inch so you can figure it out from there
and then you know add a tiny bit here
and tiny bit there and then I'll show
you how I figured out the length I
wanted when we get to the
endcap so I'll come back as soon as I
get this almost done
wheat okay I got the last of my beads on
and now we're gonna finish it off I want
to put two more two square knots over
the um underneath these two sets of
beads I'm just trying to keep them up so
they don't get caught in the knot so you
know you have to play with that um while
you're making the
knot trying to keep those beads
up you still not like you were doing
before
come
on okay now I'm G to do step two maybe I
should have left a little bit more cord
I think I accidentally shortened
it I told you 45 in you may want to go
48 Ines if you're doing this length
bracelet this
goes
over
and Under and Over
now the second knot maybe leaving the
needles on would make it a little bit
easier I gives you a little more
length okay there's my two square knots
now I'm going to take it over off
because I want to tie on the back
side I'm going to tie a
knot tie it once and tie it
again
and the next step you want to be really
careful I want to use the thread burner
I want to make a little ball so it
doesn't come un knotted let me try to
tighten this as much as I can okay
whoops and my thread
burner
okay so being really
careful not to burn any of them that's
part of the design you know below the
knot okay my thread
burner make a little
knot you know just that means burning
the end you know meling the end a little
bit when I see making a little knot I
just want to make a little
ball that way doesn't come out of the
knot okay
okay now my wrist is 7 and a/4
in I might want to go 7 and a half
though because that's measuring like
right here if I want to go a little bit
further up my arm so I put together the
clasp and yeah it's mixed metal um I
didn't have any clasps that was antique
copper and I didn't have any incap so
antique gold and I said oh well let's
just make it all antique and do what
metal so
um the measurement
here
is one and 34s I also want to measure
what's inside here so okay 1 34s we want
um and if I have a 7 and a qu interest
that's I probably made it a little bit
too long that's um five and a quter
weave but I said I wanted a little bit
bigger and I made it
six so um and this is like the endcaps
where the silver so will go is almost 38
of an
inch so this is six I'm going to have to
leave 38 of an inch on either
side of the knot you know on the ends so
um to make it
longer I mean to make it so those will
fit in so let's
see about 38 of an
inch okay
y okay now for this next
step I sure hope this works because I
had to peel off my
um um I forgot what is that dip that I
forget the name of it right now that
goes tool magic and it in the my old jar
is awfully thick and I didn't find my
new jar so I hope this works
out okay so I have the backside facing
up where I put the knots I'm gonna put
this up because I want the SS to
show
and it looks like I'm going to have to
open it if you need to open your incap
up some just
um take like your you know thin set of
pliers like if you have tweezer nose
plier or I like using my bent chain nose
because they seem to have a smaller tip
to open it up a little bit put the tip
in just open it a tiny bit it usually
doesn't need
much okay I'm just going to take these
apart to make it
sure make it easier on me
okay so the the SS is
up and I squeeze this
in and let's
see now take the one the um flatten
those pliers with the tool
magic push it down and the tool magic
keeps it from Maring the
incap I used to use the Nan JW pliers
and they'd end up shooting across the
like bullets because they'd slide right
out of
there
okay press on the other side
if you have any little
um wires sticking out I forgot to smooth
them out before I um did this you know
by rubbing my fingers over it between my
fingertips but you don't have to worry
about the silver so
Fray so there's my um bracelet and I
compare it to the other two you know I
use different an caps on all three of
them
well thank you for joining me today and
I'd love to see what um you come up
with by changing up the beads to the
colors of the cord you know you can make
it your own by making it seasonal or um
even um holidayish or year round
and also um don't forget you know you
can even change up the beads too for a
totally different look like maybe using
three millimeter fire polish or even 3
millimeter um gemstone beads so you know
have fun playing with it and um and
please post what you make I I'd love to
see it on the jewelry making with jolum
Facebook page and I just um thank you
for joining us and I hope you all have a
um wonderful for holiday season