Your Cart is Empty
How to loom a beaded bracelet cuff Using SilverSilk Knitted Leather
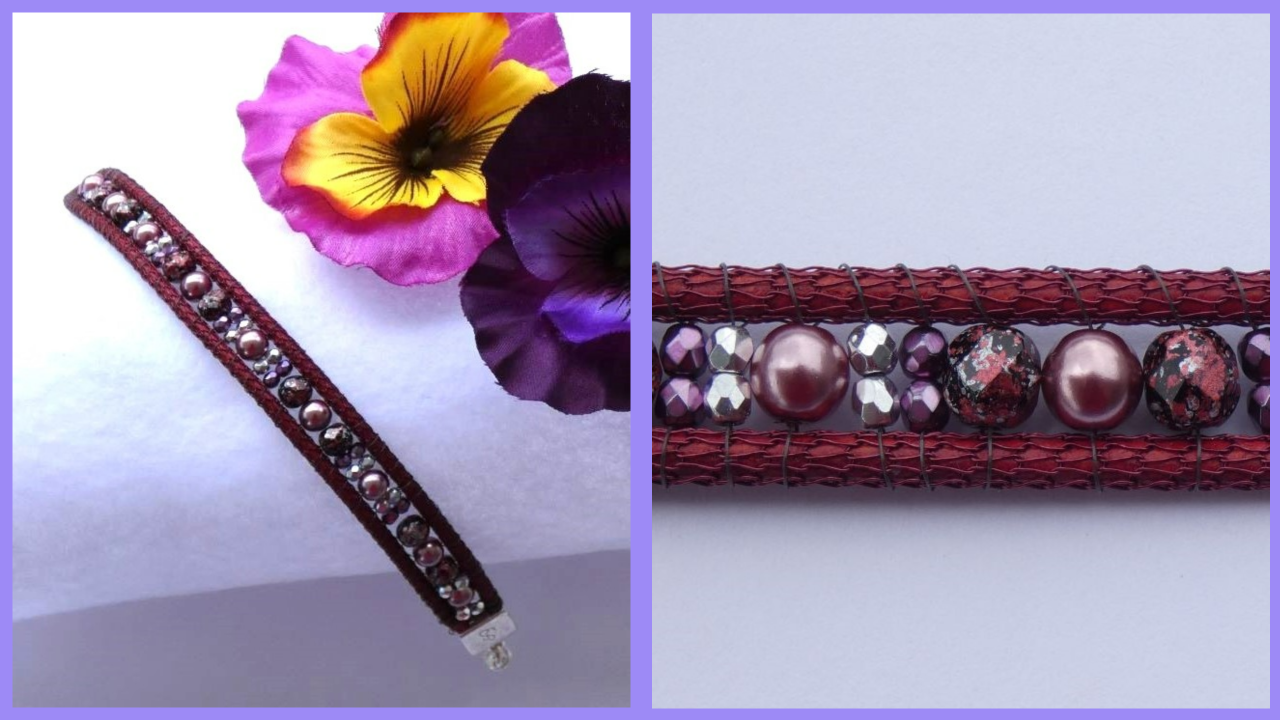

Have you seen the new SilverSilk Knitted Leather Chain? Joan is using the Cardinal Knitted Leather Cord to weave a cuff on the SilverSilk Loom on this week’s Jewel Loom School. The loom is a sustainable Baltic Birch Wood Loom, made in the U.S.A. She is weaving beautiful Czech glass (6mm pearls, plus 6mm & 3mm Fire Polish beads) between the 2 cords & finishes it off with SilverSik 3 strand endcaps. This is a quick, easy project to make which you can easily expand, change, or embellish to make it your own design.
Supplies:
- 6mm Czech Glass Pearls: https://jewelloom.com/collections/beads/6mm-round-pearls?aff=11
- 6mm Fire Polish Beads: https://jewelloom.com/collections/beads/6mm-fire-polish?aff=11
- 3mm Fire Polish Beads: https://jewelloom.com/collections/beads/3mm-fire-polish?aff=11
- Wildfire
- SilverSilk Knitted Leather Chain: https://www.silversilkonline.com/knitted-leather-chain
- SilverSilk 3 Strand Endcaps: https://www.silversilkonline.com/custom-findings/p/triple-strand-end-caps
- Clasp
- SilverSilk Loom & Bead Board: https://jewelloom.com/collections/silversilk?aff=11
Notice: Jewels is traveling across the country, so new orders, except for wood products, will not be fulfilled until at least August 21st. Wood products will still be shipped on their regular schedule, since they are fulfilled in Missouri. As a thank you for your patience, Jewels is giving 25% off of all products, except the wood products. This is a great time to stock up on your supplies! www.jewelloom.com?aff=11
Please ask any questions by either replying to Joan’s comment below the video on YouTube (so she is tagged) or by tagging her in a post on the Jewelry Making with Jewel Loom Facebook group page, in the Jewel Loom School Community group (link listed below & is free to join), or on the SilverSilk Silkies Facebook group.
Subscribe to the Jewel Loom YouTube channel to access past & current tutorials: https://www.youtube.com/c/JewelLoom
Sign up for the Jewel Loom newsletter & get 15% off your first order, plus a free pattern: https://jewelloom.com/pages/save-15-on-your-first-order-get-a-free-pattern
Sign up for the Birthday club at www.jewelloom.com?aff=11 by clicking the link at the top of the page or during checkout.
Receive text notifications for Jewel Loom shows & special deals by texting "Sign Up" to 1-805-768-0568
Check out the Jewel Loom Blog for past & current tutorials, plus read details on project: https://jewelloom.com/blogs/craft-hangover
Follow Jewel Loom on Instagram: https://www.instagram.com/jewelloom/
Join the Jewel Loom School Community (off Facebook) to share your loom creations, be inspired by others, & a place to ask & answer questions: https://www.juliannaavelar.com/offers/5ss8HfCp/checkout
Jewel Loom Facebook pages: https://www.facebook.com/Jewelloom & https://www.facebook.com/JuliannaJewelsAvelar
Jewelry Making with Jewel Loom community page: https://www.facebook.com/groups/228056324285807
Please contact Jewels with any questions you have about her looms: email - hello@jewelloom.com or text - 1-805-768-0568
Transcript:
hi everyone I'm Joan guys I'm part of the Joel Lim team plus also one of the
silver silk um ambassadors and I'm here to make a leather cuff bracelet tonight on the
jewel loom you know show you how I would do it and just to show you this is what
we're going to be making and we're going to be we're using the
um New leather knitted wait knitted leather cord from
Silver silk which currently comes in five different colors he does sometimes
like in the past before he made these permanent in the shop he has um had some other colors in the pop-up
shop and who knows he might do that again the future like he does with some of his other colors and the other chains
so keep an eye on that and um just to let you know too you know
this is recorded but I'm also in chat on YouTube and Facebook during the original
airing of the show so if you have any questions please
um bear with me if I don't answer in five minutes please I ask again because I'm flipping between Facebook and
YouTube to make sure I'm not quish missing any of the questions so um just a little let you know a
little bit more about this knitted leather chain um he takes um it's somewhere around two and a half
millimeter leather and he um and Neely puts a leather I mean a silver soap
chain around it so it ends up to be about three millimeters wide I'm not sure I think it's like 2.6
millimeter leather I'm not sure the exact same um Dimension but you can treat it just
like any other leather cord you're using so um give it a try it's really awesome
I'm I'm trying to find the the perfect bead with a large enough hole because my
drill bit didn't have a big enough hold of for the Pearl to fit over this but I would like to do barrel knots on either
side of the bead to hang around my neck I think that'd be so cool
so um so let's get started and I'll show you my loom project for tonight
okay here's what we're going to be working with with today I'm going to be using the silver silk and more jewel
loom which is made out of sustainable Baltic birch wood made in the USA
actually right in Missouri so it gets shipped directly to you from where it's made
and then also I'm using my silver silk and more bead board which is uh also
made out of sustainable Baltic Birch and you can see the measuring on it and I'm
going to use some six millimeter fire polish six millimeter um Crystal uh I mean glass beads three
millimeter um check glass beads in two different
colors um I chose this color because I like to add a little metallic to my designs and
this one's a little sparkly and I'm hoping it'll bring out some of the um darker rosy colors in this bead
and I'm also using the river no not river I'm sorry the Cardinal
um silver silk pretty the Cardinal silver silk knitted
leather cord I just love this color it's so beautiful I thought it would be a
brighter red but oh it's um between a red and a burgundy it's just really beautiful
so I'm keeping it full length so that way when I cut it I can keep you know
longer lengths of it and I'll show you how to bead this first oh and also before I move this I put my end caps
together I'm using silver silk I'm going to use the three
um cord end caps and this actually is the older one is it the last one is
silver that's from before Neely bought the company and so it's not as nice as
what you can get now it's really shiny really pretty and this is the pewter one it just doesn't look as pretty but I'm I
couldn't find any of them I was going to use copper and I couldn't find any copper closures I need to go I need to
get some so I just got something to go with uh my neck clasp I had
so when I measure this it just why I have it out it measured
um about one and three-fourths inch in length with the closure so I'm going to
subtract that from my seven and a half inches I want to make it long because that means I need a five and
three-fourths woven area foreign
warped this I'm only going to use two warps if you want a wider bracelet you
can you make something similar just remember either you can use like more than one warp of the cord or you could
tie if you don't want cord only if you don't want the cord showing only on the other one side you can warp um
wildfire in between them so
I'm going to take the warp
and I'm just you know it's a nice fit in between there let me put a little bit more in that
tuck it in there I'm going to tuck it in this groove here
go straight across make sure it's um
as tight as you can get it foreign
try to make sure the camera can see this
tuck it in here so this is going to take a little longer just because um I want to make sure you can see what
I'm doing on camera and then I'm going to weave this around
and tuck it in here
and then come back and do the same thing I'm going to tuck that right there
so since I have one of five and three-fourths inch um
woven area to make it for to add up to seven and a half inches for my length
that means I've taken five and three fours from the eight and a quarter this
length is and then um so that makes it
um a about two and a two and a half inches so
I want to start about one and a quarter away from where the um grid is
so it's about three-fourths of an inch approximately
I actually remembered it um thread my needle
I am going to excuse me
leave extra in case I have to change the ending but I also want to feed this back
through at the end
you know to hide the tail and actually I
almost done with his um Wildfire but I was looking for a color
to help blend in to um
yeah it's almost there to one and three fourths so it doesn't show as much
I just want to tuck this back here and under some tape there to keep it on
my way
so what I'm usually actually I went through some threads I mean like you know I wanted something that would blend
in I even thought about using um wire to do this because I didn't want
to take away from the gorgeousness of the um silver silk um and you might even be able to find a
brand of thread you know from um for a wire weaving like KO or something but I only had one kind of ko
and it's too RNG for this but so I'm actually using Smokey Wildfire Smoky
color Wildfire because it um I mean fire lines um because it lends in a little bit
better it doesn't show up as much as the black and the wildfire and the gray of the Wildfire set up a little bit more so
I did I made my choice according to um my design
so I'm going to start out with these small beads
oh foreign just not good at picking up larger beads
with my needle [Music]
and I am trying to decide yeah I
well I may change this I want to put
the silver next to the um Rosy color pearls
I know there's not much space here but I'm hoping that you know since I'm not starting at the end
that it will keep its you know you know spread out some as I need it
because if I went to the next groove it would have been two spread out
very good I'm going to lock it in place by putting it in again
going back going my needles going under the warps
[Music] and then it's going back over the warp so I
go through the beads so that helps keep in Center place
just to let you know sorry my throat keeps getting dry just to let you know the storms have been coming through
today on and off so um hopefully I won't lose electricity and
get through most of this you might hear some rambling in the
background now I'm going to pick up the silver
let me Okay this set's not so long I'm just gonna fix my thread and
um almost double it to swing in some working area underneath it
because I always start out with two yards and I know that's too much for some people but I really hate adding
thread I mean it's not hard to do I just one of
those things I just take taking the time out to do it
I did a hip cord bracelet um the other day and you know I wanted it
all woven hemp I don't know if you've seen this uh that bracelet on the jewel
loom um inspiration or tutorial website it um it's all rainbow made out of the hemp
cord hint hemp cord and I didn't want any knots in it so I used
all six in The Yards while I was weaving and I found something to wrap it around
I was looking for a little shuttle I couldn't find my Shadows so
um so I found a wood piece to wrap it around and I was weaving and I had to keep because it kept wanting to fall off
that wood piece but I finally did it because I just didn't want um not showing anywhere along the way if I use
shorter pieces I wanted it all one piece
so you know do what what's best for you if you don't like the way I'm doing something that's where it's great to see
different designers um you know
um you can take on what they did that works good for you
I'm going to go through this one more time because it just seems kind of Droopy and once on one side
oops
and what did I do just a minute
and that might be White Street because I didn't go back through the over the top
I'm doing it from one A different side so hopefully my hands weren't covering that's what I'm doing
lengthen the cord
okay I'm going to use my rosy um Pearl first
okay now I'm going to go back and repeat and use silver and then um
the three millimeter silver and then the um
the three millimeter of the um darker color I'm not sure if it's a
purpley color looks like a mixture of Rosy and purpley
I have to keep in mind make sure my Loops are tights on the tight on the
side because I just noticed there was a big lip but if you make it too tight sometimes I
don't know if it would happen with this cord but sometimes it um makes your own
you make it too tight it makes it all wobbly so it's just something you have to learn which I'm still having problems with
paying attention not making sure those Loops aren't too tight
so the reason why I laid it out for this is I didn't want the um this darker color washing this out I was
hoping that the silver would bring out the rosy color even more you know against this um
core and then also I wanted
um this darker one next to the red fire pot I mean the fire polished beads I'm
using to help bring that Rosy color out a little bit more than that
all those actual specs of silver in it too
so if the silver ended up next to it I mean I could have used all silver but I didn't have enough to go
all the way across the bead
I'm going to go use the um fire polish
take it under the cords after I set it on the thread
so you can see why I'm using the speckly six millimeter prior polish it has like black and silver and
um let's pick it up cover from that cord too
[Music] okay so then I'm gonna um do a Rosy Purl
[Music]
and I'm going to need another fire polish
okay now this is where I'm going to start repeating so what I'm going to do is do the two rows the
the pinky purpley three millimeter the silver three millimeter Pearl
silver and purpley three millimeter six millimeter fire polish Pearl six
millimeter fire polish and start back here here I'm going to keep doing that until I get down to the five and
three-fourths inches so um I'll come back to you when I get I'm that far okay
as soon as I'm done with the weaving I apologize I didn't have the work light
on earlier um I hope you can see the colors better uh if not y'all make sure there's a
really good picture I don't know why it looks so dark maybe it's just the way
I'm seeing it right now Okay so I finished all this and it ended
up being about six inches instead of five and three fourths which is okay by me they'll make sure I have like a
quarter of an inch to play with for the fit rid of wrist and fit on my wrist but if it worries you you can knock out the
first row of each one or even all the fire polish I like the fire polish you
know this three millimeter fire polish at the ends because the end caps are going to kind of snug up against it
hopefully okay so I'm going to tie this off
and um so I took my needle underneath made a loop and I'm going to go through
the loop
I'm going to do it one more time
then I'm just going to feed my needle back through
the beads
you know just to help strengthen them come on
I went over and then I went under this time
I mean I went under and then I'm going to go over this time while I'm going through the beads over the warps under
the over the work under the warps and then over the wall I can't it over the warps and then under the warps
okay now I'm going to go back to the you know I'm going to do that one more time it just
let's see and that's why there it goes I
accidentally went under the warps I'm just going to do it one more time just to make sure
that's locked into place because I did it twice at the other end and it's going to end up being three times when I go back to the other string
just to make it easier I went under the warmth of my needle then I'm going to feed it through because it's getting a
little tight in that area okay come on
you know the more you go through it the less flexible it is
go back under again I'm not sure if it'll let me go through it again and I'll try
I'm going over the warps
now this one now what I'm going to do is just feed it through two or three rows just so um if uh hopefully the thread
doesn't become loose um foreign
ER here come on
the Ender okay I got under the cords now I can feed it through
and I'm just going to go over the cord of that and I'm going to go under go through and then over and then over to
the next one
okay under this seemed like because the places are a little tight it's just easier for me
to go under up so I can get through the Halls
let's see sorry my hands keep getting in the way
then I went over and I'm going to go one more time I'm going to go under
and see I'm feeding it under and up just so I can get to the holes easier
now I'm going to get through the holes
going through the holes over
and since this is one bead going through I'm just going to go take this be the
last one and I'm going to go back let me go under them
over
then I'm going to take my thread burner be careful not touch any of the other
threads and I cut it off there okay so now I've got to do it to this end too
it just feed it through I'll do it similar to the other end as long as the quarter let me
and then I'll be back to um do the end cups
now we're going to take the bracelet off the loom and put the end caps on
so I'm just lifting up the silver silk at one end and then bringing it over and lifting
off the other end we got this and then I need my um
I'm gonna take my clasp apart I want to measure this to know where to cut it
so let's see
I'm gonna set out to make sure it fits in I'm going to cut it about this much
and I measured against the end caps
okay it might be better to use your regular jewelry Cutters that was a
little tough and see I still have enough to maybe make a hanging um
earring hanging earring okay now if you see that or even like a loop earring or just
something to add to a design you know there's still a long piece of that so this maybe make a scrap bag of
your leather cord that's what I started with the three needle and I still have a long piece here
that one piece goes around my neck so it's at least let me measure it real quick
it's 50 half inches so by the time you get a clasp on it or even do some things to the back
be a little bit longer than that okay
yeah before I cut the other end I'm going to go ahead and add this so I'm going to smooth out our wires and
get away the little frizzies or whatever the least stuff that whatever melee
calls them I don't think he calls them the frizzy I
just can't think of what he calls okay
now oops let's see which side do I want it
to be the top try not to get the beads to move around too much
it looks like a nicer size and I kind of squeeze them together
there's a couple loops there I hate that
you know I'm just gonna Trim It Off
[Music] silver silk doesn't Fray so I'm not going to worry too much about it
now
now I'm closing the
needles my thread went down some
just trying to fix that I think I should have checked my threads
because it got wobbly at the end here
okay so maybe don't cut it too short the next time make sure these are smoothed out
okay measure my end cap make sure the S is up
on this side just like it is on the other side or the SS
and then
see
you're going to want to cut it there so
let me get my Cutters because that was kind of the hard cutting it with a scissors
okay I'm going to cut this aside
straight across from it there
let's go down the silver silk and get the end cap make sure both sides
are facing up on each end her face in the same direction
I'm using the three three holding cap to make up for the beads that are in the
center
I'm closing this and I'm closing that and that's a little
strand see now it's done
and I put it on and it's a great fit
so maybe because of the width of the silver silk and the um
and the width of the beads you'll want to go at least a quarter of an inch higher
it would be on a safe side maybe about half an inch longer than what your wrist size is
I hope you enjoying making this project as much as I have if you have any
questions please feel free to ask here on YouTube
um I'll put a line where you can so I'm tagged in it so you can answer questions by replying to the line that I write
also um you can also ask some jewelry making with Julian page or in the actual um
Jill Loom school both links are provided in this um in the descriptive video or in the blog
so um well I hope to um see you again soon