Your Cart is Empty
How to Decorate the SilverSilk Silkies Pendant with 3-Needle Chain - Jewel Loom School with Joan
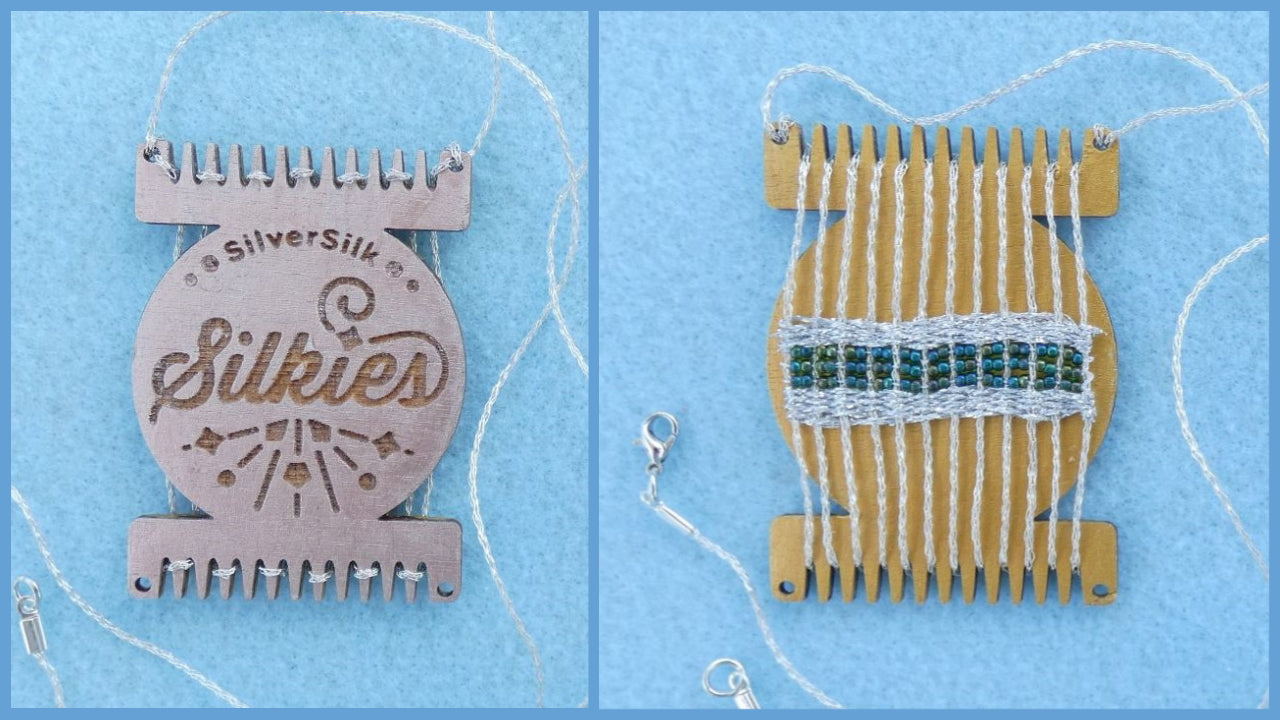

When the Jewel Loom store re-released the SilverSilk Silkies Pendant kit, Joan knew just what to use for the warps…SilverSilk’s new 3-Needle Chain, which is long enough to not only to warp, but also to feed up the top holes of the pendant to form the necklace! Learn how to do so, plus how to weave beads & decorative thread/cord between the chain-warps. Though Joan used 11/0 seed beads, she highly recommends using 8/0 seed beads or even 3mm fire polish beads between the warps.
The SilverSilk Silkies Pendant Kit is made of Sustainable Baltic Birch Wood here in the U.S.A. To protect the wood, either decorate it with colored pencils, paint, or markers (do not use any water based products on it). The kit also comes with cute little wood products: needle, comb, & shuttle, which all are good to decorate & wear or even to use with fibers on looms. Get your kit here: https://jewelloom.com/collections/silversilk/products/silversilk-silkies-mini-necklace-loom-kit
Suggested supplies:
- SilverSilk 3-Needle Chain: https://www.silversilkonline.com/3needle-chain
- 8/0 Seed Beads: https://jewelloom.com/collections/seed-beads/size-8-0?aff=11 OR
- 3mm Fire Polish Beads: https://jewelloom.com/collections/beads/3mm-fire-polish?aff=11
- Wildfire
- Decorative Thread or Cord - I used a sparkly polyester cord
Beads, Cord, Thread, Findings and other supplies are all on sale with an automatic 25% Off through August 31st in the Jewel Loom Store! No code or coupon needed! Does not include wood products. You will see the discount when you view items in your cart. www.jewelloom.com?aff=11
After the original airing of this tutorial, please ask any questions by either replying to Joan’s comment below the video on YouTube (so she is tagged) or by tagging Joan in a post on the Jewelry Making with Jewel Loom Facebook group page, in the Jewel Loom School Community group (link listed below & is free to join), or on the SilverSilk Silkies Facebook group.
Subscribe to the Jewel Loom YouTube channel to access past & current tutorials: https://www.youtube.com/c/JewelLoom
Sign up for the Jewel Loom newsletter & get 15% off your first order, plus a free pattern: https://jewelloom.com/pages/save-15-on-your-first-order-get-a-free-pattern
Sign up for the Birthday club atwww.jewelloom.com?aff=11 by clicking the link at the top of the page or during checkout.
Receive text notifications for Jewel Loom shows & special deals by texting "Sign Up" to 1-805-768-0568
Check out the Jewel Loom Blog for past & current tutorials, plus read details on project: https://jewelloom.com/blogs/craft-hangover
Follow Jewel Loom on Instagram: https://www.instagram.com/jewelloom/
Join the Jewel Loom School Community (off Facebook) to share your loom creations, be inspired by others, & a place to ask & answer questions: https://www.juliannaavelar.com/offers/5ss8HfCp/checkout
Jewel Loom Facebook pages: https://www.facebook.com/Jewelloom &https://www.facebook.com/JuliannaJewelsAvelar
Jewelry Making with Jewel Loom community page: https://www.facebook.com/groups/228056324285807
Please contact Jewels with any questions you have about her looms: email - hello@jewelloom.com or text - 1-805-768-0568
Transcript:
hi I'm Joan dice I'm one of the members of the jolim team and also one of the
silver silk ambassadors and I'm here to show you um a project that was reintroduced to
the store and it's actually the silver silk silkies pendant with um like a comb a
needle and um like a little shuttle and they're all you know with really cute sayings on
them but they um were all made with sustainable Baltic
birch wood and so it's really cool
and I'll talk more about it as I'm doing the tutorial but you know when um Jules
reintroduced it to the store you know right after the three silver silk three needle chain came out I thought what a
perfect item to use as the warps on this so I really had to do a tutorial on this
and so I got my hands on another pendant because I did use the one that um came out a few years ago and
um so I hope you have fun you know check it out and like I said the accessories can be used
you know and on other limbs too which I have used them especially the original
Joe limb or the wisdom Warrior so um I hope you really enjoy it and um
we'll get on to the tutorial okay this is what you get in the
um silver silk silkies pendant kit um of course you get the main pendant
um which I already um painted I painted this rose gold it turned out a little bit darker than I thought it would
um but you know I still like it and but I was going to do some more decorating on it
but I didn't want to take away from this if you have a really Steady Hand and uh
have like a fine paint brush you can take some like gemstone colors of paint
and paint inside these to make it look like gemstones or you know
even if you have a little real Steady Hand you can try painting inside you know the main silkies part too
and then I painted the back colored gold because I wanted
I'm using the three needle chain to decorate it and I wanted it to stand out
more than it gets to bare wood if you don't want to paint it just to protect it I would still use some wax
to um you know to code it I actually use a
um butcher blocks wax I got at one of those main um
um what do they call this the I got it at Lowe's so
um what also comes in this kit this is really cute I am a silky I think that would be a cute little pendant to wear
you know just kind of you especially on this um three needle chain that would be
really cute hanging from that and then um but also save them too because I have
used them like on um the limbs like if I want to do some Fiber weaving
um that's coming really handy for that and the same for the comb which you can put like
on the comb you could decorate it and make it like a pendant and put a strand
through each side and let it hang or put a jump ring or something
and let it hang and the same for this this would make a
good um so you can make maybe small tassels with
it if you don't want to use it as a decoration or like the other day when I
was doing a on the original Joe limb I have six yards of um
of um I'm trying to think of six yards of hint he can't and I didn't want to
cut any of it it I was wishing I could find my other one like this you know with my original silky pendant and I
couldn't find it because I would have wrapped it around this to feed do the you know the weaving through the warps
you know in and out in and out so um so these come in handy don't lose
them either wear them or um keep my little bag where you can find them which that you have to start doing
with all my things so I could find them when I want them okay so we're gonna I'm gonna start
showing you how to thread I got 60 inches of
I got 60 inches of the three needle chain but you know as soon as Jules came
out with this I thought oh my gosh that three needle chain will be perfect for it and
um you know if you use this the warps so that's why you know I had this idea
said he had an idea he was thinking about maybe working in his work one of
his future workshops and I said do you mind if I go ahead and do a video on this also I just want to show you I
accidentally started to paint this rose gold and make sure your paint's smoothed out because I made a little boo-boo
there it's kind of race there because I quit as soon as I saw what I did with the rose gold and when I wanted gold here this is antique gold
and so what I'm going to start doing let's see I want to start at the top because my final ones are going to
finish you know my on each side is going to feed through these holes so let's see
um so this is the top this is the bottom and I know there's 12 warps
and this is the center Peg and I think I have to start at the bottom
like this around the center Peg
and I folded this in half okay so I know where the center of the cord
is and it's going to be easier to start at the center and you'll see why when I get done warping
so this is the back of it I just want to make sure one two three four five six
one two three four five okay so I got it on the center and I'm coming up here to the center Peg
now I want to hold them in place and I'm going to just take one strand The Strand on the um right
and I'm just going to keep wrapping around the peg they go up and down
I mean hold it tight but not too tight because I'm going to be weaving through this I mean you could just
you don't have to weave with this if you just want to paint or if you just want to do something maybe just a warps and
just a tiny bit of weaving I'm going to try some seed bead weaving
on this and guess what I should have started no
I did this right so I'm going to take this um to the end you can see how much I have
left and I'm going to
feed this from the back side through the hole
it's not got a little kink
whenever you get a kink to smooth it out
between your fingers okay
so I got and I just to make sure it's um secure I'm going to feed it through
one more time I mean you could probably tie a knot
there but I just want to make sure watch it
I want to go in for me I may end up tying a knot I I was able to do it yesterday
there we go
there now I'm going to work this side
I keep wanting to wrap it around there but I don't want to do hide my design because I make I want to make it so I
can wear it either way
I was trying to hold the warps in place as I'm wrapping around each Peg
and what did I do
something's wrong because it's oh I see what I did
start over
I'm going to start over you can see what I did instead of wrapping around I came up
and um around the back side and we don't want that
because we don't want to um well first of all we want to make sure we have enough chain to do our
pen bit so
if this accident happens to you and it looks like I started at the wrong end too I'll have to start at the top
if you end up having to rewarp just smooth this through your fingers
two or three times make sure it's smooth there's no pinks in it
way fold it in half
and I want to start at the top so I want to go in the middle Peg make sure there's five on each side one two
three four five one two three four five okay five pegs on each side then I'm gonna go around to
the bottom around the center Peg there now I want to hold them in place why wrap
one peg around
see I'm just trying to keep them under my thumb as I wrap them around I'm trying to keep the other strand
out of the way
so then take long to warp them so just wrap around each Peg
and I come back up now I'm gonna feed my Fred from the
behind through the hole
and I'm just going to wrap it around to you because I want to hold it in place
just a little bit I'm trying to make around for a hole make sure the ends moved out
and go back through the back of the hole again
pull it through all right I thought about nodding at the
hole but I thought it might hang better this way okay now I'm going to do the other
side like a silver showing against the
antique gold and you know what I say I I originally thought about making a decoration here
and I but I thought it's going to fight with the weaving so I didn't because I was practicing on the back of some of
the buttons trying to figure out what kind of design I wanted to put on this but you know after I came up with a good
design I thought oh that's gonna fight with the weaving so I gave up on the idea
but you know don't be afraid if you just want to paint yours or use marker just make sure
you don't use any water-based on it
and don't forget if you don't paint it or use markers or something you'll want
to do um
you know wax to protect it so it doesn't dry out and break
you know and all all the Baltic Birch products
thanks
so I don't know why my throat keeps getting so um
try lately okay so there we got this now
I decided I compared like blue actually did blue I was comparing
blue white and gray wildfire and I came up I think the gray let me check this
again got the gray would blend in with the silver and I'm wondering if the white
will before the gray looked better now I'm
thinking the white looks better so I'm going to switch this out to White
you know before they came out with all these colors I didn't care what color is
so I guess it really doesn't matter it's just a matter of opinion
I mean the gray would probably work but just because I had the white I'm comparing it and I'm using about a yard
or a little bit more because I want to string
and make sure I have enough to tie at the end and hide the ends
I use a big eye needle um
and you know it's just a matter of preference if you want to look like it's a working product project I'm going to
weave just where it's hidden behind you know in the in this section but I also
want to um if it if it starts getting too tight you
know because we don't have risers for these weaves I may just make it look like a work in prod progress and stop it
you know it just depends on how many rows you can easily do
underneath I'll move that down
you know if you could figure out how many rows you can do you could make some kind of design but I don't know I'm just
going to use some colored beads I look to see what 11 0's I decided either to
use 11 0's or 15 0's because I didn't want them raising so much to where it's be you know like if you want to show
this side it's gonna you're gonna have it not laying really flat on your chest
so the color I'm using is um on this one
um yeah it's the inside color is peridot and it's
Emerald line
now this might take a look like we don't have any
I'm not sure how many it's going to fit in between each one
let me see
I guess maybe if I do it this way first I'm just going to see how many might fit
in between by
yeah it looks like Q will be great so we're gonna try two two four six eight King 12 14 16 18 20
22. oh 22 seed beads
I'm a stupor you know my needles usually has a little curve in it but you know if
I can't pick up many then I start counting them okay so I got six here
and it doesn't look like it's one night counting seven eight nine ten I guess
this is faster today 11 12.
13. 14 15 16.
17 18 19.
20. 21.
yeah I took mine all the way across because I wanted to get to these um to put it in but yeah I mean you can
always take it to where it's just completely you know knock off the two rows on each side so you're not seeing
it through the other side okay now I'm gonna pick our needle
underneath
and you know I wonder
I might kind of use this as a riser if it works so I can get underneath
easier
there we go
see if that works and just like on their limb remember the
first row is going to be hard to line up fact what
you do it this way
oops okay sorry I got off screen I I slid the needle under to make a little riser to
make it easier for my needle and my beads to go through
now I'm going to go through and you know that first row on a loom is hard to um
that the beads lined up I'm gonna since this is a little bow harder than a
regular loom I am going to line them up as I go
okay I got this
and then I'm hoping that the rest of them all will be easy
okay I want to get two come on I want two between each warps
I may not be many rows of these moving towards the center
okay now I want to get two beads in between the next one
so I'm doing a little bit different than I normally would on a loom because
some just trying to make sure I get to you and in between each um Warp
I'm hoping that after this first row it's going to be a lot easier
and when I do things like this too I'm sitting there in front of the TV with the almost up to my eyes you know close
to me at my chest so this is kind of hard doing it on camera so maybe doing it a little bit differently than what I
would do on T you know watching things on TV while I'm watching TV
okay I'm sorry my um camera died when I was doing the first row so I went ahead
and picked up two beads went over I wore picked two more beads went over a warp I
kept doing that all the weights to the end because that was the easiest way for me to get the two beads between each
Warp um so I'm gonna hopefully this will be easier
now putting on all the beads I remember I need 24 beads
I just want to say nope I'm going to pick them out or five
six seven eight nine
ten eleven twelve thirteen
fourteen fifteen
Seventeen eighteen nineteen 20.
21 22 okay
what I bring the tail over there because I want this to go
here
and then I gotta line them all up again you know I'm going to do
show you one more row of this and I'm going to stop and show you more options because I think I'm only going to do
three rows otherwise wait for my camera to um
warm up I mean to charge up my phone to charge up I um you know switch the cord
out so we wouldn't have this problem anymore I um
so I'm going to the award picking up two putting it through the line
going over the warp picking up two beads you know because I had gone under the
warps with the 22 beads before
and take that out see if I can pick them up easier
okay
and just remember and I'm going to show you some other options too with this weaving but just remember you can warp
or weave with anything you know on a loom and I'm going to try this idea with some
more rows for weaving when I'm done with making three rows so
I'm going to I got two I picked up two beads when I you know put the needle
through went over the warp I'm picking up two more beads
I went through over the warp and I gotta pick up two more beads so you know it's like adjusting to make sure I got two in
between each Warp trying to keep doing this and going I'm
doing I'm just going to make three rows and then I'm going to come back okay okay I did three rows and I was looking
at the sizes of C beads um you know millimeters and I'm really thinking
eight O's would have worked better because the um 11as is 1.7 inches
um or 1.7 millimeters and the eight O's is three millimeters and the silver silk
is one and a half millimeters to the seed beads aren't raising up high enough
to get in and out of the holes so um we'll try a couple rows of the
Adas here shortly but I'm going to try something else first as you can see this is just designing on
the Fly um okay so I kind of straightened these out
and I cut and I just slowly moved them to the middle and I'm looking at other options we can
use for weaving that would be pretty I don't have the right colors but I'm going to show you some other options
they're here's Sue Cash um braid that would be really pretty for
beading on there and then I even thought of um
like an eighth inch ribbon weaving that in and out if you had some sorry silk
that would be really pretty um
even Chinese knotting cord
and um there's also some uh what in the world's that call just a
minute rat tail but this is a pretty thick they might look um look good if you're using it with the
um with the Adas I'm trying to see how this is 1.5 millimeter but it looks a lot
thicker than uh this cord here
so let's see oh this one's too milk but they do have it in one
eye but I still don't know about that also I found in my stash let's see where
do I find the package here I I just opened it
it's a beetle on poly Sparkle thread and I know have it black with in black with
silver too but I couldn't find it I thought that'd be real pretty and it almost resembles the
um the three needle chain I mean I was even
thinking you can use like maybe scraps of three needle chain you'll just you know have to tie it off and figure how
you know how you wanted to look where you tie it off or even glue it down onto
your pendant I don't know the ends that's something that you can work out if that's what you want to do but I
think it'd be pretty seeing um three needle chain leaving it in and out of there
so but I'm going to go ahead and maybe do three weeds three to five weaves of
this um in this I'm thinking
well let me finish off this um
I'm just tying a knot on the end like I did when I started it
okay take it in go through the loop
and then I'm just gonna I'm not gonna feed it through a lot of cords I just want to kind of hide the
end and then cut it off I'm actually thinking if I knew what I did with my oh here's my thread burner actually what I
might do I think I'm going to burn the end off
and make a little ball at the end
tap it down you know I don't want to burn anything else I'm trying to be careful
that way it won't get undone now do the same thing
oh I didn't have it all the way out sorry I'm just trying to get kind of close but I want to make a little ball
with what's left too so it can't feedback through the knot without burning anything else off
there
okay take the end
and tie it
I'm not around the chain
I'm going to try a second time since that's all too short I think
around that
so I got it wrapped around this
trying to not now I'm just going to do the under over
weave under over under over under
over
sorry about that okay so I got under over under from under and I'm going to go over here
I'm going to go under over under over
under over
so since there's um since I went over on the last chord I got to go under it or
otherwise we're gonna re undo the whole row that we just did so and luckily the
same path will be under over and over since we have even number warps
over oh
so you can you might be able to take your little comb and um
[Applause] some reason it feels like it's stuck on
something there
huh I wonder if the needle went through the chain
yeah but the needle went through the free needle chain so maybe I will switch to the um wood
ones that won't do that because I like to undo this part
you know just learning from what happens
there is okay so that's the part I want to take off I don't want to undo everything
so I ended it where it went through the chain
let's move it down and now I'm going to use the wood one
okay so we got it under and then over
under over
scoot scoot it down okay now we're gonna go back under oh
trying to find my camera sorry let's see it
okay go under over
and this is what I think I do want to rise or just to make it a little bit easier
let's try that again
I'd use the needle before as a riser
gentle
I mean I got another needle like over there from when I did the um
other Loom of the um the crayon pendant like this but I don't want to use that
because I want to use what you might have on hand to fix this so now I'm going back under over under
over under
swing back I think that helps
excuse my body and my mess [Laughter]
okay under over under over
under over [Applause]
see I do this one let me too I turn it every which way it's easier to do too less than some
doing this I think you know that's three rows I'm gonna try five or six trying to make it the same width as that
so we could do the under over under over again
this is where the shuttle is going to start getting in the way
let's get it down
so don't be afraid to experiment what you think is good you know with this
you know have fun with it and make it something that you'll wear
okay
I think this may be the last row
I'll Make It Sick Rose I feed that through
okay now so my last one is under so I gotta go on
I mean I gotta go over under over okay
you know embroidery floss would be pretty with this too if you find some with silver in it which I've seen before
or something else um I'm just looking to see if maybe I do
want another row or two like that sparkle
you know I have the extra thread I think I'm gonna try doing it a little bit more
a couple more rows
okay
oh just keep your Rhythm and make sure you know if you if you don't if you
don't end with them if you have even resin you don't end with an over you know something's wrong
foreign you know I like that I think I'm going
to leave it like that so let's tie this off get off
before we do that since I'm going to try burning this off too making a little ball since it's polyester
foreign
whoops and get the thread through the loop so I'm going to feed it behind
and get it through the loop make sure it's all down
it could be on the loop feed it down
okay
foreign
rainbow black diamond I think I'm gonna try and see how it looks
um I'm gonna tie this um
Gotta Throw my needle again and this is eight O's we're just gonna see how it looks if it doesn't look good
I may just do a silver on both sides and leave it at that
I'm tying my line back um on that um
oops
okay sit down
okay I'm gonna try this Ada transparent rainbow black diamond
just for a little bit different look if we don't like it then
um or if I don't like it then I'll um
just finish it off a different way okay it's five six seven eight
eight nine ten eleven
and I need to put my Riser back in just so I can get underneath there
got enough I have enough room to work with but hopefully this will work
okay so I think I'm just going to put one bead
between each Warp and it's right now looking underneath that
okay like I did with the others just to get it started I may have to
do this okay so I'm gonna have to do the over
under one at a time so come on bead
and it keeps trying to get underneath that thread because I guess I got the okay so that's not gonna work so if
you're gonna want to use the Adas I would use it first not you know because
um it's wanting to get under this thread so I'm going to take this off
so I can figure out how to take it off
that was a fair failure just because of the um threads before that so what I
would suggest like I said put the um use the Ado so you can get do your
weaving better and one between each Warp
and I'm just going to put on that Silver Thread on each side
I think I did seven or eight rows of it
I think it
might try to figure out a way to put keep that day on it doesn't want to stay down
I may put a tiny bit of glue on it just to keep it down trying to keep them together
okay let me do that later
and then I'm going to um do some more rows of that silver on the
other side of the beads now I'll be back okay I finished the weaving
um and I put a tiny bit of glue because we can't close off the warps it's
wanting to slide so it's probably put putting a tiny bit of glue on the sides you know here on the end so they won't
keep spreading apart um okay so I already tried it on this one
and I tried different end caps I was hoping to have a tier cast in cap but I didn't have one with the small enough
hole
foreign [Music]
and I put a tiny bit of glue because we can't close off the warps it's wanting
to slide so I put putting a tiny bit of glue on the sides you know here on the
ends so they won't keep spreading apart um
okay so I already tried it on this one and I tried different end caps I was
hoping to have a Tierra cast in cap but I didn't have one with a small enough hole so I so I can finish my bracelet I
mean my necklace I'm using a fold over end cap and then you can also use this and maybe
glue some embellishment on it and add something else to the back of it if you want a longer
um pendant mine hangs right at chest level
and just to discuss a couple other things too you can always put my maybe couple jump rings and hang some things
like tassels from the bottom or Curves some beads or even some silver silk like
around if you use a jump ring here and here you might even do like three strands different
um lengths you know I mean sky's the limits
just your I guess your creativity is the limit on that so let's go ahead and do
that next one so just on the next end just to be on the safe side just to show
you what the folder and over end cap looks like let's see if I can show it to you
and um so you could see it's this is
what it looks like but
see okay sorry I have a delay because I'm
watching what I'm doing but it's delayed now all right just to be on the safe
side I'm going to put a tiny bit of glue on the inside of that
I don't have to but I feel safe I'd rather be safe than sorry
and then let me close the end cap
here's the end I don't have done
I'm going to set it inside there
and I take my flat nose pliers try my best to keep it in there
take my flatness pliers I'm just going to squeeze one side on there a little bit
come on buddy stay in there and I guess I squeezed too much maybe I
can do the ones the other side first
I hope these super glue so it stays on there faster
I just hate using super glue because it dulls the metal
so I'm going down flattening that the way it wants to go and then I'll go
to the other side
hold it like this and come on
kind of turn it sideways to get it started
flatten it so I'm just going to run my fingers up
through it to make sure it stays in place now I'm going to get a jump ring
to attach a Lobster Claw clasp
and
remember turn side to side with your Lobster Claw I mean with your jump rings do not um
do not pull open like that and then this um
do your jump rings to where um side to side and see feel enclosed I
like to take a little better protection and I know nobody else does this but I do it
I guess kind of squeeze it to make sure it's tight
and there we go and here's the other side
a little bit showing here I mean you might even figure out something to hang from these little
things too so um you know like I said it's just that's
the beginning for you to help you with your creativity on these pendants I hope you have fun making it
well I hope you enjoy the tutorial and I really hope you give your try out for it
wouldn't it be cool sometime next time you see niele or Jewels or or even meet
them for the first time I haven't met either one of them in person
um you know to be wearing that it's great reversible um pendant you know you can show your a
little looming on the one side if that's the way you decorated it and show your silkies on the other side
so um I hope if you have any questions
um and YouTube I'll make a line that you can reply to so I'm tagged in it so I
know you asked a question so then um also you can ask on the jewelry making
with Jewel and page or there's a Facebook group there's a link to it in
the jewel in school that you can also answer join and answer question and share your projects with us you can also
ask on the silver silk silkies page too just tag me and make sure I see see them
so I hope you all have a great evening and thank you for joining me see you later bye