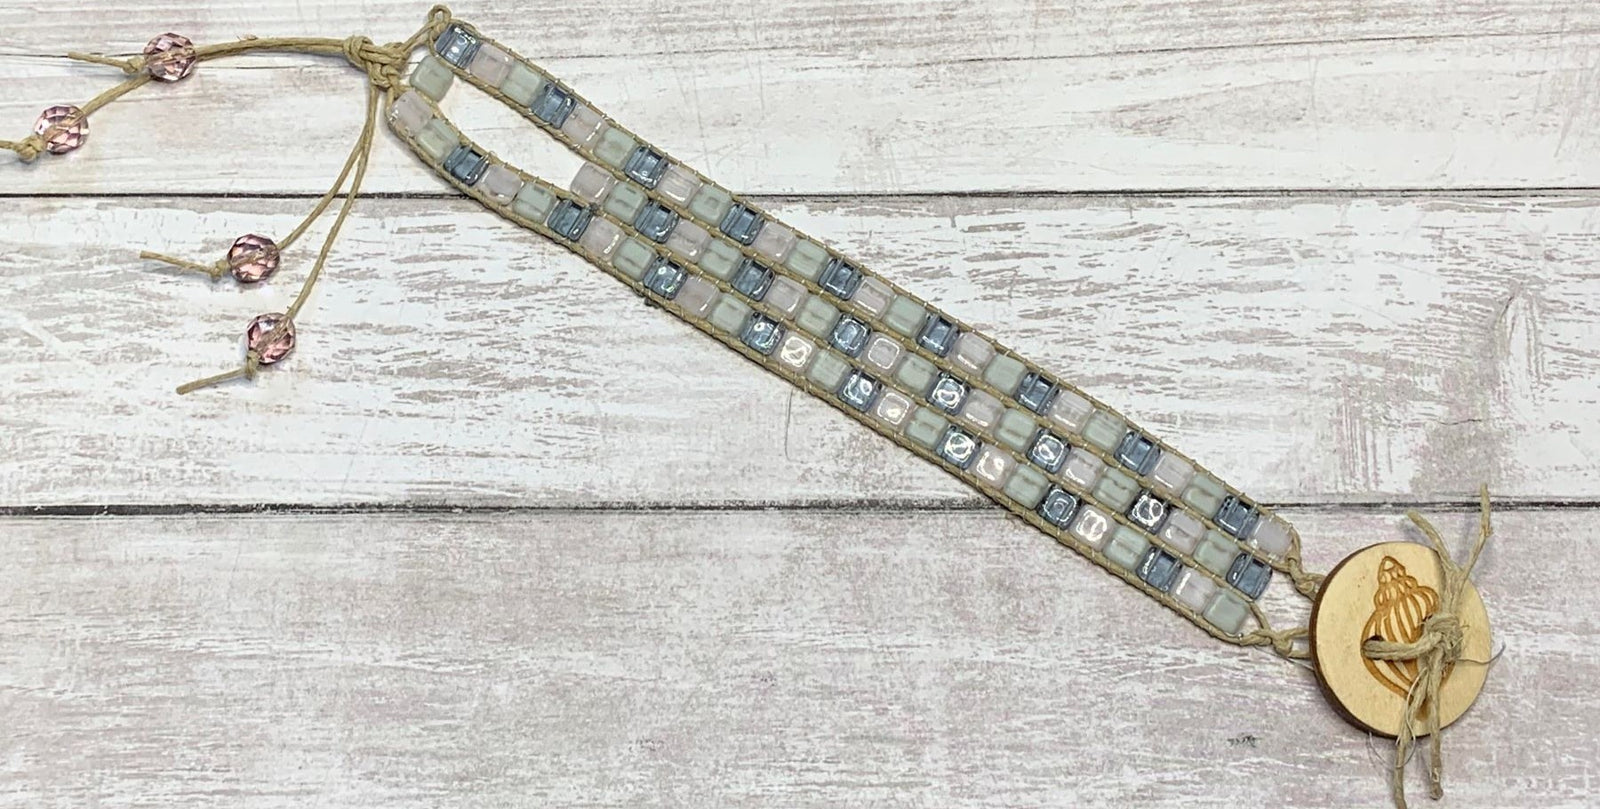
Learn how to make a bracelet with a buttonhole built into the design by Amber Scott on Jewel Loom School Live with Amber & Tricia.
VIDEO
Supplies needed:
Small Wisdom Warrior: https://jewelloom.com/products/bead-loom-wisdom-warrior-3-x-12-work-space-with-needles-sample-bead-kit?aff=4
Original Jewel Loom: https://jewelloom.com/products/beadalon-jewel-loom-flexible-bead-loom-jewel-loom-by-beadalon-bead-loom-julianna-c-avelar-portable-beading-loom-bead-weaving-easy-to-use?aff=4
You can also shop through Amber’s affiliate link: https://jewelloom.com?aff=4
You can find Amber and Tricia online through our link trees:
Subscribe to the Jewel Loom YouTube channel to access past & current tutorials: https://www.youtube.com/c/JewelLoom
You can subscribe to the monthly workshop with kit (Creative Soul Box) here: https://jewelloom.com/collections/subscriptions?aff=4
Sign up for the Jewel Loom newsletter & get 15% off your first order, plus a free pattern: https://jewelloom.com/pages/save-15-on-your-first-order-get-a-free-pattern
Receive text notifications for Jewel Loom shows & special deals by texting "Sign Up" to 1-805-768-0568
Jewel Loom Facebook pages: https://www.facebook.com/Jewelloom & https://www.facebook.com/JuliannaJewelsAvelar
Jewel Making with Jewel Loom community page: https://www.facebook.com/groups/228056324285807
Please contact Jewels with any questions you have about her looms: email - hello@jewelloom.com or text - 1-805-768-0568
Transcript:
oh thanks you're watching the street hi everybody
hi everyone we're just i am just not being over
yes we're being goofy you can't have it oh my goodness how's
everybody tonight so glad my friends is here with us again for jewel loom school
live and it's gonna be an awesome one guys cause guess
who's teaching again yep and she's gonna make a really beautiful
fun project for us one that you guys asked for you are asking for how to
make a button hole in your bracelet
it's so pretty so pretty and so easy because you don't have to worry about tying knots and
doing all that stuff and yeah as far as the end goes you know the buttonhole part yeah well you just will have to tie
knots on the end so and sandy's here and sherry's here hi guys
hey friends how are you eileena
am i saying sorry i know so i think i do but then i questioned myself
hylena's here good afternoon it is technically evening here and um we
are on the east coast though so maybe it's good afternoon to you my dear because it probably isn't where you are
yes on the west coast our west coast friends mm-hmm definitely yeah so if you want to oh go
ahead honey go go ahead amber i'm just going to say i'm just going to say i'm super excited
about this project today yes i just think it's going to be a fun one to do so yeah
i'll keep mind oh i was just gonna say if you want to make along with us uh grab some hemp some wildfire
uh some tile beads so you'll need three strands of tile beads and three colors a
jewel loom needle and a button and then the other usual stuff some uh
dipper like cutters or thread burners and that kind of thing but
oh welcome we got a pamela climber so fun
4 pm here on the west coast good welcome [Music]
we love it we love it we love it when the new ones come in too that's great honey i hope you enjoy tonight i'm sure
you will yeah yeah super excited to have you here
oh thank you sandy that's really sweet well
that's true no it's true you're very good designer and very good at
coming up with some awesome stuff my brain is not working well
super well so i was glad you guys gave some suggestions yes yeah and um what you did last week
was just superb so i'm sure this will be too uh fun pamela that you love tile beads
that's awesome i do too i think they're really cool so this is what we're making tonight
and uh for our new friends if you and we're gonna use well i'm gonna trish is
probably using her original but i'm gonna use the small wisdom warrior and trish will
show you how on her my brain sorry
for those very honey yeah i have you yeah um the small wisdom warrior
and if you haven't gotten one yet you can actually this is a great project
for the small wisdom warrior because if you buy the small wisdom warrior you get four strands of tile beads with it
uh button you get the new we uh we don't have it yet to show you but the new crown uh
bead board and let's see what else do you get um you get jewel loom needles
oh wow nice yeah so this is actually a great project um
if you are by if you haven't bought your small wisdom warrior yet so this is the
same size as the original hey fran um
oh never mind it left me i was like i was not gone
that's okay that's my brain these these days too and i'm sitting here saying i'll help
you well do you want to flip down and make a
long one sure do okay yep hey maria i can't go to single
for now there we go yeah i don't want to make anybody sick yeah so for friends who are just joining
we are going to be using either trish is using the original and i'm
going to use the small wisdom wire you'll need three strands of tile beads
you'll need a fun i'm using a round button so i think that's the best option for the hole
at least that's what i've done the project with um but if you want to attempt a different kind of bead great you need
some wildfire uh some jewelry needles
some hemp and i think i got oh and it if you see on the ends here i added
some bling bling so jules has some really fun uh czech
glass bead mixes so that's where these came from so tonight i picked she has a
black like a black and gray one and gold and i picked from that one tonight so she has
different um czech glass speed mixes so they're all under check glass beads
on her website so yeah are you flipped around there friends yes ma'am i'm ready to go
great i'm just gonna look in here and get me out some fire polish reminds me oh nice
actually all right so you want to get your hemp uh the thickness of the hemp for this
project doesn't necessarily matter the the 0.5 i think it is fits better
in the holes for um both of the looms but you uh the
original demo one i did the i did a thicker one and it worked fine they just sit up on top of
the grooves so just like with all projects you're going
to start take your hemp and you're going to tie it around the knob here
so if you joined us last week you'll see a very similar technique to our what we
did last week in order to create the buttonhole so i do two knots on the end there
and to fit the tile beads comfortably you have to skip three of the grooves
with each one and we're gonna do as you see three rows
so we need to do four warps
push it down into the grid a little helps
and then the big difference i think between the
two looms is the original you don't have to hold
the tension as much but i do wrap around twice around the knob
to help hold the tension for me yeah that's a very good trick there so i count over three
and go in the fourth notch just hold that tension as you're
going along count over three
and go in the fourth notch and as i did on the other end i wrapped around twice to help hold that tension
and i also if i need to let go you can put your finger on top of it
one two three and in the fourth notch
of course my hemp is getting tangled oh yes
right so hey we're really it's how it always goes right
um [Music] yeah same on this end
one two three nope i got one extra in there one
two three fourth notch wrap around twice
and then going up for our last warp one two three
and the fourth notch and one two three
in the fourth notch and i wrap it around a little bit more than twice and now this is where your handy dandy
nippers clippers come in handy cut your hemp
move it out of the way and then
i like to hold up here to try and hold the tension while i'm tying the knot
and slide it underneath grab it
you can always use your pliers to help pull it through too
cinch it down and then repeat perfect
hi rosalinda thanks for joining us tonight
should have four warps and we're doing three rows so if you just joined us here's the
bracelet we're making tonight now the big difference from other bracelets we made usually we make it
smaller than our wrist size so my wrist size is a seven so i normally make my bracelets
um six inches but in order to accommodate
for the buttonhole i actually made the tile part uh is seven inches long and as you can see i
have the button out a little further so you may need more than just three strands depending
on your wrist size so you want to make the bracelet your wrist size okay
and then the hemp or slightly longer and then the hemp as you can see i have
my buttons stretched out there in order to reach around
and go through our buttonhole that is too cool my friend
and you could actually if you wanted you know show off the button you could put that on top
so that show button is perfect for that yeah i was going for a beachy theme but
yeah i find when i'm making i don't know why having stuff on my wrist is harder
it catches i think the buttons catch and i've had the same experience i don't feel bad
i wear things like this so then that way it doesn't catch as much because i have like a clasp on it
my watch doesn't but yeah for reasons bracelets do um
so i'm gonna do about two of my wingspans for this since it's a little
longer than what i normally make
but it's fairly easy to add in if you're new
so if you don't have enough it's fairly easy to add in a new new thread
so grab having um needle nose pliers or something
is always handy because uh oh i didn't turn my light on there we go
much better uh a little needle trick is just to press
down the end of your wildfire or your beading thread
and it helps it go through
if you're like me i can't see it yeah without my magnifier
but it does help it go through but my magnifier is on the other side of the room that's not as easy
because of a task to move oh always on the lives you know
i can do this blind normally can you use butter in with the shank
a button okay that makes sense
sure sweetie i would i know so yeah yeah you should be able to do button
with a shank you would just tie it off differently that that would be the main difference
yeah so i am going to start
with the buttonhole um just because the rest of the bracelet is pretty
standard weaving um but i will show some rows of that but
make sure we get the the buttonhole in so you want to tie off whether on the
top of your loom or on the bottom of your loom whichever you're most comfortable doing
tie off your beading thread can you use waxed linen or cotton instead of that
very good question i don't i've not used either
recently paula i've used wax linen but i don't know how like the length of
how well it'll hold up or anything um yeah so i can't i hemp for me
um holds up really well so i found it really helpful to lay out my beads in
uh the pattern i wanted so then i can just because the
buttonhole as you can see we'll take out four of the beads from
there so uh the pattern i was just doing alt like
doing rows so i um black gold
silver so you do one row and then it would be
what i did to figure this out for me i just went ahead and filled in the whole thing
and then took the beads away once i think that's a great idea so it was just much easier than trying
to think too hard about it yeah so all i'm doing is i'm just moving each
bead down so once they reach here they come back to
the beginning so that's that's all the pat it's just a pretty simple pattern so gold moved over now silver will be in
the middle and black on the end so as you see it's just kind of creating these diagonals as
we go along here so black finished so that'll now be back
over here so i just shift over keep shifting over one
we get it eventually [Laughter] don't we
so whatever pattern you want to make if you just want to go you know plain just straight across you
can do that too you'll need three strands whatever pattern you decide however you want to
i'm excited to see what you guys will do with this you need it uh three strands
listen so you guys always come up she's here hi vicki
um she said oh goody i get to learn how to make a hole
you know oh vicky vicky vicky vicky is our our
she brings the the fun to the party in-house comedian basically
yeah she does we have a lot of ladies that bring fun in here that's for sure oh yeah very
blessed very blessed you guys are the best i really enjoy
working with all of you yes for sure
so yeah i know this is kind of boring but
it really helps whole bracelet i just lay out the whole bracelet yeah but it makes it go quick quicker once
it's okay uh yeah that works
but i will stop there so because i have a second one that i'll take off
so we'll just so you need to take four out if you're using jules's round buttons
four seem to be the the good with so
gotcha i don't know i'm just kind of doing mine
willy-nilly and that's just how to be you're doing willy nilly i'm doing well
and nearly oh my goodness you go girl
all right so if you're new make your bracelet uh you're gonna um
this is seven inches long that's the size of my bracelet so you wanna make it as long as your wrist
or a little bit longer um in order to for the buttonhole to work and of course i'm getting all
caught up in my headphones wire
hold the joist all right so we did four warps because we're gonna
have three rows and we do two wingspans we're gonna pick
up our first three now the thing with tile beads is um you
can either before you do your project go through and check them all or while you're
putting them on you just check both holes because if you have to ram one of them
in the middle once it's already through it's hard it's harder so
i have found it just to be sometimes when they make these just a little bit of dirt gets in there left
over from them making it and stuff so usually it's pretty good to easy to clean them out
so you need to have three now if you've chosen tile beads
with a design on them and you want the design up you want to make sure
that you go through the top hole first if you're going from top to bottom
you're going from bottom to top you do the bottom hole first
if your tile bead has a design if it doesn't then you don't have to worry about it
you want to do the first row completely the whole thing all three
so you go underneath first and then you come over top
and then you need to make sure that uh
you can see the needle on top of the hemp so i did dark colors tonight to try
and make it easier for you guys to see the project and that's how you would know
so underneath for the first pull through and then on top
for the second pull through and then you repeat in the second hole
sorry since i got so much wildfire takes a minute here
now we're going to go through the second hole so i find just pushing them down a little makes it easier to just pass through
so if you're new to looming you might not want to get two wingspans worth because it does nut up easier maybe do a
wingspan and a half or something and just add more thread in later
so once again go underneath and then
on top making sure you can see your needle that's a good way of knowing that you've made it through all three on
top otherwise you'll lose your beads so this locks the
vicky says willie nelly versus plan pattern depends on how
that arranges it on how you arrange it i guess yeah yes
you could do either or um it's funny usually i'm the willy nilly
and trish is the pattern so well i'm kind of it's kind of a pattern
i mean i can't say it's not i'm
sorry oh healthy a cat arranges it nice
okay now you're gonna only take up pick up one so just like we did last week
we're gonna pick up one and the needle is going to go underneath
the first two warps and come up in the middle
got caught on my shorts i have a button on my shorts
all right and then you're gonna go over the top so you're only taking in you're only
wrapping the bead around the first two warps only
and same thing go underneath in the second hole
and come up through the middle so just the first two warps are you going to wrap it around
joan says she said i need a cat to make my pattern for me [Laughter]
nice job so if you're just joining us
you want to do you need do one row and now we're going to make our
buttonholes so we're just going down four down the side here
just in the first opening
remember to check both holes of your beads so there's no surprises whether you do it before the project
yeah i have a bad habit of not doing that it's not good
we have experienced i've experienced yes i have to i should know better
but yes the best route is definitely check your hose
yes yes i'm not getting a reaction from joan on that i don't know
maybe she didn't hear you no
i mean because she's using my girl on those kind of comments we can see joan she is that's a bump
sorry i went underneath in the second hole and now i'm going on top so just locking it in in the first row only
sorry i got wrapped up and laughing at trish here sorry and my mic's right here so it's
hard to pull my wildfire through it's catching on your might do yeah
real life beating guys we're not to show you anything that
happens to everybody basically i'm gonna learn this sound just a smidge here
there we go this is reality for all of us
remember go underneath the first two and up through the middle and you can just pull the bead to the
end and then grab it and then come back over top just
the first two warps because you need that hole for your button
so very similar to last week's project just a shorter hole
so second second hole through underneath and through the middle
and then over top to lock it in okay now you said we go down four is
that correct yes i'm on three so i've got one more to go all right because if you're using the
joules round buttons so four seems to be the
five would be too many um
yeah so that's a good rule of thumb just take your button like amber did there and just stick it in the middle and kind
of will give you an idea on how many roads you need to make so that's a fit through yes so that's why laying it out is
helpful when you make the buttonhole yes makes sense
okay so i just went under and over and now
i'm going under again for the second hole
so you're not counting the row on the end correct as one no i'm counting just where it's down the
side okay that's what was because as i'm looking at it i'm thinking i have four
and it's not gonna fit yes five total all right gotcha
and then back through the top hey lisa glad you joined us
yes vicki we make the mistakes so you don't do as we say not as we do basically
so now we're gonna go into one one row of our pattern
did i really just snort on live i didn't hear you
let's talk about it let's edit that part out joe so you're gonna pick up three again after you've done your four
singles maybe that's a better way of putting it four singles
make sure you go under your warps with your three what's that honey oh i
don't worry about it i'm just saying going under your warps with your three and then the top hole
going back over top make sure you can see your needle so you know you're not going to drop any
beads so we're doing the three
so push them down so you can grab the bottom of all the beads
so i'm gonna go back through the top of all
the second holes with your tile beads and give it a
all right looking good there trish now we're going to go back through
the first hole to get over to the other side of our buttonhole
so you're gonna go through the first two and come out
and now go through your middle your open middle
just like it all you have is a one row bracelet right like just ignore all this
stuff right now and you're gonna pick up your
tile bead check the holes if you're doing a pattern and you're working up
now like me make sure you check your pattern that it's visible facing up
so you're going to want to go in the bottom hole now
so we're going to start at the bottom hole and then go over and go through the middle
so you'll already be through the middle on this and you can see for me it's opposite
because i work from the bottom up so i'm going from the top down not to confuse anyone in case you're
noticing that push your tile bead down so you remember to go under your warps make sure you're
coming through the middle so you don't have any of your beading thread in in the middle you only want to go around
and then back through the top and through the middle
pick up your next check the holes
and then go underneath vicky says can you do that again i are
confused yep so i picked up the next one
okay went through the bottom hole went underneath
only the last two warps so we're doing the same thing we did coming down we're just going up
so we just go through the bottom hole instead of the top hole so it's the same technique
so you go through the middle go underneath
pick up your tile bead and then come back over top so it's the
same weaving pattern that we have been using i'm just saying go through the middle right
away so you don't get confused about where you're at
and then you do the top hole same thing go under the warps first
so you just want to make sure you have no beading wire in the middle here because that's your buttonhole
and then back through the top of the bead
the transition from the three beads to the one sure
and if you can't do it again maybe just explain it you know so i i did the three beads normal
and then when i got over to this side so back to my starting point i just went
through the top two and came out the middle
and went underneath right there and picked up my first one
hopefully that made sense
and remember guys you can always always go back and watch the replay it's gonna live there and you can just
watch it as many times as you need did that help vicky or do you need me to
explain it again so i'm glad to
great awesome you are very welcome friend
so went through the top the bottom and the top now i'm going through the bottom of the top hole
always make sure you keep that middle open
now back through the top and down through the middle
i just forget where i am so if i go down through the middle i don't cross over by accident but
if it doesn't work for you that's fine too i'm picking up my last one
so underneath the first hole and then the second hole
welcome brenda and then remember to push your tile bead
down go underneath the two warps only the two warps to lock
your tile bead in and then back through the top
what did i do so uh-oh there we go i got it figured out
all right and make sure you go drop down through the middle um
if you want to tie a little knot here just to tie off that side it'll be kind
of hidden you can do just a simple little knot
along the inside of the warp
of the the beat the tile beads you just did and go through it doesn't matter if it's
top or bottom right now i went through the top just make sure you don't have any
extra yarn in your buttonhole here okay it'll be a little snug
but you want that and just move it around a little and
then we're going to go reinforce this the first row up here
so i'm going to go through the top here
the bottom hole you don't have to do and then
just because you're going to be putting a lot of pressure on these three beads with your button
so and then i'm going underneath
the top and now you can decide you can either
reinfor go back down either side it doesn't matter um
i'm just gonna go back down this side because it's right here but you can go back down the other side
and it doesn't matter if you go through the top or underneath the warps just don't put anything in your buttonhole
no so we're just taking the thread instead
of cutting it off we're reinforcing a little and heading back down to where we were
you could make the whole bracelet and then make the buttonhole if you wanted that's how i did the first demo and then
i was like well i know how to do the regular weaving it's really the buttonhole so that's why i joined the buttonhole
you could reinforce both sides if you wanted i don't know if it's necessary both wildfire and hemp are pretty
pretty strong products so um
so we're just working our way back down to here right just to finish off the bracelet yep that's all we're doing
and i'm just alternating whether i'm going through the top or the bottom
so then i'm back at my three i'm just gonna go through this this top bead right here
so i can get out to the outside and then
i am just gonna go back through the three down here
and start back to the beginning or back to just picking up three
so the next in my pattern would be black
so my pattern is just moving each bead over one slot when they get to the end
they just start over go underneath the warp with all three make sure you've checked both holes
vicky says we don't want to suture the whole shot no correct correct
you don't want anything in the middle of your buttonhole
that's right did you know you were going to open this can of worms oh my goodness [Laughter]
none of us are right on here that's why we all get along so well [Laughter]
and then bottom make sure you go underneath through all three
i like to point them down it makes it easier to just catch them and then i push them up a little makes it easier to
catch them on the other side then go through the tops
make sure you catch and lock them in
and then i have silver black and gold is my next row
remember to watch if you have pattern tiles but make sure whatever hole you are in
that when you pull them up you can see your pattern
no dangle do or crystals maybe
i'm usually the dangle do and the crystal lady oh we will do dangle do's at the the end right here vicky i don't
know the demo so we do have it here um because we're not using this for the
button so i was like let's put some dangle news on it so we do have our dangle dues
or dangle dangles or whatever we call them each week these were the dingle dangles i did on
the pearl bracelet same kind of concepts you know yeah it does
all right how are you guys feeling about the regular three three row like the three
bead rows do you feel like you need me to do another row or are you ready for the the finishing of
the bracelet i don't know if i said hi to claire hi
yes lisa said this loom looks great i did not know there were different kinds yeah so this is the small wisdom warrior
there is a second one like this that's larger that's great for
double wrap bracelets hat bands belts you name it this one's great for bracelets and
earrings projects it's the same size as the original and then jules also has
all right fran feels like she can do the finish okay uh the jewel loom shop also has the
goddess the sun is the sun got what's the name of sun guys i think let me look for sure though
um which is you can make bracelets and stuff on but is a really great fiber loom
so put this one to the side [Music]
all right so here we are wow look at how fast i am
you are my change the colors
see what i said about none of us being right no we're not
um just gonna burn down some of my threads here so i added in a thread right here
and just getting it out of the way is what that is oh yes
uh i don't have it super nearby or i'd show that one but they have um she has this
really cool um kit almost that comes with it it has a stand and a needle and a i wouldn't say
kit but i guess it comes with a a stand and a needle which is very very helpful with the um and it looks like it's
marked down to 39.99 right now yeah so it's a beautiful loom too and that is
the um the five inch wide and then there is also
um eight inch wide but that's a little longer as well
vicki said oh good it's just not an amber trish design without some dangles or bling
oh welcome sabrina so glad you could join us all right so now we're gonna take this bad boy off the
loom so this is also made with
beads i pushed it way down in there so it wouldn't move on me because this
is a slightly thicker hem
so as you can see i did use one this one has like a blue shimmery as you can see
underneath it's plain um so i had to focus making sure
that i had that pointing up and just like our other loom projects
you're just going to come in and [Music] tie your warps i'm going to burn down my
threads here you don't have a thread burner you can definitely use
like cutters beading thread cutters
which i love too but make sure you put some glue on the end
of your knots then all right so
let me take this and just take two of your
tie two knots this side will be where you have your dingle dangles
yeah so you just want to find some bigger hole beads for your dingle dangles
so i did this to tie don't pull too tight because you don't want to warp your
stuff here and then i just took them all
you don't have to and tied them together it might be too short this time
so i just did some knots to tie off the warps
and then not like and then a big knot at the end just to
hold all the threads together and then you want to get as i said some these are just some black
czech glass so jules has a several different czech glass collections i just slide it on
and tie a little knot i like hemp because it it can hold the
the knots really well and most of the time it's fairly easy to
knot so i'm having a simple it's a little shorter than i like but
that's okay and then you can make your dingle dangle as long as you want
and that's all you do is just slide it on the extra hemp and tie it off
so very cool we will move on to this other side
because same thing you want to tie off
your warps first i didn't cut that one
this is important this particular side where the button is is where you need to have it longer
so if this side is shorter that's fine the dingle dangles can have shorter ones
but make sure the butt inside has the just because um
you'll have to play with it a little just to figure out how much extra hemp you need to
make sure it'll fit on your wrist so then you take your hem you pick
pick your fun jewels button you can color it before take two of the pieces
and put it through one side
that's okay you can't spell today becky yes tweezer nose pliers are great
they're very handy with short threads yes very true vicky very true yes i do pull
mine pliers to help me do that
but you don't need to watch me make all these knots we just want to figure out how to use the buttonholes
so just start with one knot because you're going to want to slide it around a little until you find just
the right tension uh for your for you
so do one knot and then all i did was take it and then i just played around with it
until i found like it needs to be a little longer the right distance for my wrist that i'm
and the first couple times it's a little stiff is that's just
there we go it'll loosen up as it gets used to
and then you just go in and you tie the second knot and trim your strings you
can put some dangle dangles on this side too jeez we'd be all set up then
that's right and i'll pull back out and tie my second knot
so do you friends have any questions
just make sure you don't lose your distance there yes that's for sure
yeah and there we have it friends so virtually
you you will just keep going with with whatever pattern you choose chose choose listen to me speak
yeah that's a very very fun project amber thank you thank you
i'll flip around here yes thanks maria queens of bling we like our bling
yes for sure i have a bling disorder
i'm going to get flipped around if you want to just go oh yeah first i got my dear so don't make anybody sick
and then you can uh share who our winner is i will do that
thank you maria we have such good girls
yes good friends oh you're welcome bonnie i'm so glad you
love it all right there we go okay
oh that means i need to bring you back there we are
i'm tying my my check glass off here i'm gonna back my lights off here so they're not in
everybody's i know i had to turn
they're usually in the in with the camera so i don't wanna i move them in when i'm working on the tabletop you
know me too friend okay okay guys so just to go over everything again every
week we give away a jo loom kit which is a super fun
kit that jules gives away every week and it has the original the baby
it has hemp it has beads um button comes with the button
[Music] and jewelry needles i believe yeah and she gives this away every week guys so
for anyone that is a new subscriber um for everyone that's already been a
subscriber we do thank you we do love you and appreciate you but we want to give the new people coming in just as
you had the chance the chance to enter so for the new people what you
need to do is just head over to joeloom.com and sign up for the newsletter
you need to like the julian facebook page and subscribe to the youtube channel those are the
three things you need to do and you will be entered in to
win the awesome prize that george gives up so we do have last week's winner i don't
know if deborah's here but uh deborah pryor from chico
texas was the winner last week so congratulations debra uh reach out to
jules and uh you'll need to give her your information and she can get that out to
you so super fun super fun so make sure you do that guys
vicky did have a question she asked if we could do this with fire polish oh most certainly
you can do everything yeah i i would just lay it out like the big thing would
be just to make sure you have the right length uh so it's just the
mentality of remembering you need to make it extra long so you'll need to you know like probably
about an inch longer than what you normally make yeah that would work well i think i think
that would be beautiful we're gonna do it i just added my bling-a-bling here
very cute very cute can't beat some fire polish that's for sure
um and so next week guys you're gonna be stuck with just me
again and we're gonna do a uh wire bracelet on the original loom it's gonna
be completely made out of wire so if you are interested in something like that don't forget to stop back over next
thursday at 7 2 um learn some fun wire work on the loom
this is something that i'm really wanting to explore more because wire is one of my first loves so i do
love working with wire so this bracelet is going to be super fun we're going to make a cuff
and i can't i hope you enjoy it yeah it'll be fun it'll be fun if nothing else
yes thank you everybody thank you guys all your kind words and
yeah any more questions we we actually are just one time here
sure we don't well share with your friends like
oh that's fun vicki yeah share with your friends we'd love for them to join us and they have a chance
to win a loom yeah please do yeah yeah and nicole said have a great
weekend everyone yes yes you too nicole thank you yeah well if there's no more questions
uh we will see you well trish will see you next week and i will see you in the comments so
yes yes hopefully you're gonna numb to that two more treat two more chemo
treatments i've got lots all kinds of other treatments but two more chemo hopefully that's good it's good all right friends
get those knocked out girl you can do it you're a tough girl take care friends
and i gotta get us off ah bye guys thanks so much for stopping in
we'll see you next week bye