SAVE 15% OFF ON YOUR FIRST ORDER PLUS GET 3 FREE PATTERNS. SIGN UP BELOW!

0

Your Cart is Empty

Shop
  • Read our story

  • Each of our carefully researched, styled, tested and distributed collections reflects a particular aesthetic and ethos. We hope some of these speak to your own style, and help you refine and redefine your own look and style philosophy in the process.

  • The Easiest Method for Button Hole Side Square Stitch

    March 28, 2025

    The Easiest Method for Button Hole Side Square Stitch

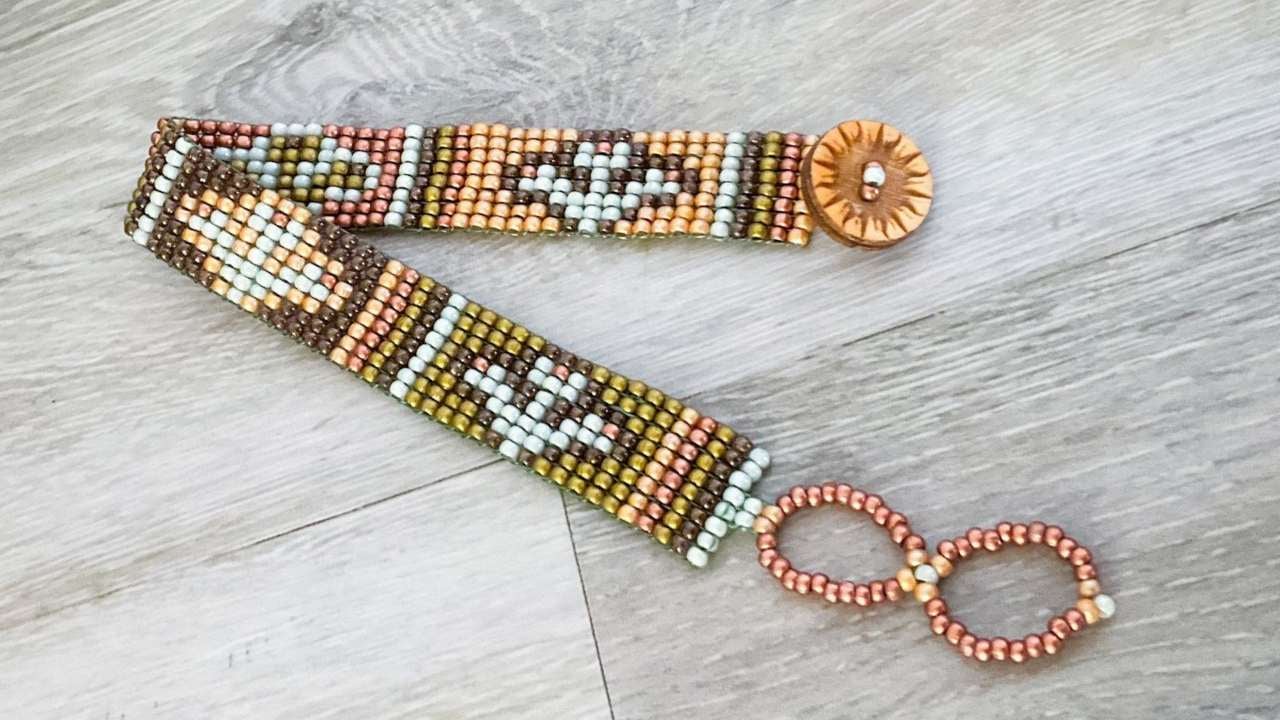
    Learn how to make a buttonhole on your seed bead loom projects, using the side square stitch. Danielle uses Jewel Loom’s March Creative Soul Kit to teach this project, but it can easily be used with any any seed bead project created on the loom, & even your beadweaving projects! And before Danielle gets to the button & buttonholes, she gives tips & tricks on warping, weaving, adding thread, plus removing the project from the loom and finishing the ends to prepare for the button area. Watch the tutorial below.

    Save 15% off your first order, plus Get 3 Free Patterns: https://jewelloom.com/pages/get-3-free-bead-patterns-and-save-15-percent-on-supplies 

    Buy your Jewel Looms here:  https://jewelloom.com/collections/jewel-loom-bead-looms-for-jewelry-making 

    Shop Looms and jewelry making supplies at https://www.jewelloom.com

    Did you know Jewels has a Book? It’s true! You can get a digital copy of the Jewel Loom Inspirations book here: https://juliannajewel--bellacraftspublishing.thrivecart.com/jewel-loom-inspirations-ebook/ 

    You can find Jewels here:

    Follow Danielle at the following: 


    Transcript:

    [Music]
    hey guys welcome to March creative Soul uh bracelet design this bracelet is it's
    cute it's a little thistle uh pattern that uses all the colors in your kit um
    in a new and unique way that's kind of got a retro Vibe I feel like it's got this kind of like just Indie Indie rot
    going on that um and it it's really cute when you wear it uh lots of different
    possibilities for how you can modify it to make it different lengths and things like that so um I was going to show you
    in this video how to do it you will need the beads from your March creative Soul which includes five colors of 11 o Che
    seed beads um there is also a pattern that shows you how to lay them out but
    in general here's the colors I've got them in some little jars but um wow look at those two that's like a mint green
    with this like saffron gold and then you've got this cool root beer a beautiful copper which just looks like a
    flower and Olive for that retro Vibe so let's get started with creating you'll
    also have a little button in your kit and you will have a spool of oneg thread
    in green um and then your other little check beads hang on to those we're going to do some additional projects like an
    earring project that maybe we can pull those in always fun to have those little extras but let's dive into our
    project all right so let's get started with warping our jewel loom first you're going to need the loom
    and then you'll need the bar that comes with your loom you'll want to insert that bar into
    the first Notch and then you'll want to gently insert the second Notch and so to do
    that just want to flex a little bit the loom
    and then you'll get this little smile shape and I'm going to raise up my camera just a little bit so you can get
    a little better view there of the full Loom and now we're going to put the warp
    threads on it so your March creative Soul pattern is worked with eight
    beads and so the eight bead configuration will re require nine warp
    threads so that you have a thread on every side of your bead start by tying a double
    knot onto one of the
    buttons so there's the first part of my double
    knot and here's the second half I'm just going to pull that through
    there you go you can even do one more if You' like just to make sure that knot is extra
    extra [Music] tight and then working directly from the
    spool you're going to want to pull your thread back behind the button
    at the back of your loom and then bring it up
    through one of the coils on the loom so here's the front
    side and then just follow that down to a roughly corresponding coil on the bottom it doesn't have to be directly across
    just kind of eyeball it and get it to look you know like it's making a direct path that
    way fold around the back and bring it through a coil so
    we're going to do this a total of nine times there's number two
    here's number
    three and four there we
    go here's number
    five there's number six
    and here's
    seven eight almost done and then here's number
    nine all right right so we should have 1 2 3 four five six seven eight nine
    threads on the loom and to make one more trip around
    the button here at the back and then I'm going to Loop my thread
    around this coil a few times this
    button and then I'm going to want to trim that from the spool leaving enough strand here that I can tie a knot
    oops sorry about that
    okay so I have trimmed it free from the spool and what I'm going to try to do now is tie this knot
    here I like to just kind of use my thumb to hold this Loop in place so that I can
    go around and up and through the loop and then just pull that tightly
    and repeat that a maybe TW a twice [Music]
    more there's one
    more and there we go so nice tight knot there and so we've got our nine Wars on
    the loom I just need to pop the bar from the loom so just jump press up it might
    launch like mine always launches I don't know why but once you've got that done
    then we're ready to start the next step so I'm going to go ahead and get my beads ready we're going to turn
    our turn our mat so that I can be working
    with the side I'm right-handed so I know a lot of you guys if you're left-handed
    you may prefer to have your loom on this side and your beads over here and you might be looming in that direction so um
    that is totally great if that's how you're um going to set up just uh go ahead and set it up with left to right or right to left for me I'm going to be
    working uh with it on the right side and let's get our beads lined up in order of
    how they appear on the legend so our first color uh is going to
    be this beautiful saffron yellow and I I put these in little jars guys yours will be in these U little baggies but I just
    kind of I got one of those little actually it's a sorder for art dots and and it came with all these
    little containers and that's what I used to put all of my beads into order the second color you're going to
    want to lay out is your copper and this copper is a really pretty light copper
    color and then we're going to be using olive green this is almost like a golden
    Olive and I'm just going to push these up a little higher here on my mat
    and then there's this gorgeous transparent root bear it's like a shiny shiny
    Brown and then last but not least our mint green a beautiful spring color that is
    look at that all right and let's head back over to our
    spool and unspool a wingspan
    and then I'm going to grab my beading needle and thread the needle
    here there we go it should pass right through so just folding over a little
    bit bring your needle underneath your warp threads so let's get down a little lower
    here and you know I didn't cut free from the spool yet [Music] I just kind of left it hanging here but
    normally I normally I do but I've just got it sitting here um and I'm going to
    work the so your pattern it depends how you'd like to loom you can Loom from the
    bottom to the top which is what I'm going to do or you can work from the top to the bottom um and in my case I'm
    starting it at the bottom which is the side closest to me but that's really
    completely up to you you can actually go with with either but in this case I'm going just go ahead and pick up eight color e since I am starting with the
    bottom all right so eight of these color e
    beads and bringing those underneath and just for this first row I
    really like doing a stabilizing way to start is to just bring the needle back through temporarily so that I can
    bring all of those beads underneath my warp threads and it makes it just a little
    easier to get them going take the needle out and then bring your needle back
    through all those beads making absolutely sure to stay over the warp
    threads so you're passing through the bead but staying over these and I use the eye side of my needles so that I
    won't puncture those threads because I'm going to pull them through
    later and they'll slide EAS easily as long as you haven't punctured anything and that's going to be uh essential for
    my weaving in method so they're moving the tail out of the
    way let's continue and let's work a few rows together and uh then we'll do a
    we'll do a jump ahead but so here's my row number two two three
    four five six seven and eight
    I thought this was going to be a cool like kind of stripy retro flower
    pattern a really neat style and we don't need to do the needle help assist for this this second row it
    should just pop right in place and again just bring that needle right back through all those beads
    passing over those warps there you
    [Music] go and you can see they're still really moving
    everything going really well
    there pass
    underneath there we
    [Music] go it's kind of easy to lose your needle as you're working there we go okay
    number c is the next one
    one got
    that and we'll just go ahead and go back through and these first few
    rows notice how mine kind of moved a little bit on the on the warps that's okay they're going to do that for those
    first few rows they'll start to stabilize after you get about five or six rows on but I kind of like that because it
    gets me it gets me warmed up with not hitting those warp threads
    and here's number four for row number
    four and there's eight beads there
    I like this pattern because it starts right off using all of the beautiful
    colors nice and easy pattern [Music]
    too it sounds like a little guitar all right last but not least is
    color a one two three three and
    four and we'll slide those
    down so you get to see all of the colors in action just right out the gate it's really
    fun so pretty all right so the pattern Carries
    On from here um introducing a little floral and the little floral is super
    cute kind of like a little this little pattern and I'm going to go ahead and carry on just like I've been doing here
    and I I probably will need to add thread at some point and so I'll stop the camera at that spot and show you adding
    thread all right so I got about halfway through my pattern before my thread started to run short so to show you how
    much I've got left it's about it's about 10 in or so I'm going to take the needle off of the Strand that is running short
    and just let it hang and then I will need to um get my spool I'm just trimming the tail here
    free and let's start another wingspan which is about how much that was got me
    pretty far and uh we'll go ahead and same way
    we started the last one you'll just want to bring your um
    needle onto your thread
    fold over enough that makes a manageable length bring your needle underneath the warps so
    underneath them and again working with about a
    wingspan pick up the next row in your pattern which for me is a all color e
    okay and just slide that down so it's ready same thing you're going to want to bring your
    needle back through those beads to stabilize them while we put them in
    position on the loom and then I'm going to go back through those beads staying above my
    warp threads so that's the same process we used to get
    started and it's the same way to add thread so what you'll have here is you'll have
    your the remainder of the old working thread and then you'll have the tail
    thread for the new working strand you just added and all that's going to be a little bit in the way but if you just
    kind of just kind of push it down toward the bottom of your loom
    sometimes if I've got a lot of these going if I'm working on like a really wide piece and so you end up with quite a few ads like that you can take the
    take the um extra strands you know of of the Tails like that and just bring them
    around the back of your loom you can even washi tape them to the back of the
    Loom to get them out of your way but it definitely helps as you as you work along um and so um I was going
    to show one more thing really quick I am halfway through the
    pattern and so um I can estimate for you how much thread to cut how much thread you'll need my first wingspan was 67 or
    so inches and the second one is about the same so that in total is going to get you through the whole
    pattern all right so let's go ahead and finish it up and then we'll take it off the Loom all right so I finished the whole
    pattern and it's so cool I love the Retro Vibe it's just it's just got such
    a cool little vibe to it so um I'm gonna measure it for you just to give you an idea of how long this pattern is and how
    you can customize it to be the length that you would like like So currently if you just do the
    four repeats you're going to get a pre clasp length of six and a half and so um when
    we put the clasp on it the button clasp it's going to add an inch at least um I'm going to measure it precisely once
    I've got it finished but in my mind it's about an inch and so six and a half that's going to put us out at seven and a half and so that's um you know a
    pretty average length and pretty good for bracelet but of course if you wanted to to make it a longer um you could
    repeat one of these little sections and you would have a pretty
    good length um for your bracelet so you can always just repeat your favorite one or just go back to the first one and
    repeat it on the other side and it would look really symmetrical placing this one in kind of the center it would also look
    really [Music]
    good and I forgot to mention also that um repeating one one section so that is
    one of the flower sections including its stripes gives you an inch and a half so
    if you would like for it to be um increased by less than that maybe just
    repeat the stripe section which will give you and a little under half an inch
    for every time you repeat the little repeat of five
    stripes and so that if that helps anyone deciding their length then um hopefully
    that is is good and then also you can can the the adjustable button Loop option is also available so um but let's
    go ahead and take this off the loom really quick so what I've been doing here off camera is just cleaning up my
    beads really quick so I'm just getting all of them back in the jars just so they won't be in our way when we do this
    next [Music]
    step all right so let's flip over the loom and the one spot we're going to trim is going to be just here on the
    side button where we had the knots we're going to want to trim
    free these spots right here so you just leave the little knotted part and there'll be two places where you're
    going to want to do that there and then at the
    beginning which actually could have been the end not sure and so you'll have
    those edges free and everything else is still going to be pretty much in place on your loom
    around those buttons but these two Edge warps are going to right now this one on this side and I
    believe um also this one right here so um to get the rest of the the uh warps
    off of the button what I usually like to do is just grab some chain noose pliers and here's some Square nose actually but
    it doesn't matter and I'm just going to help these come off of the back of the button
    here so just like that and you might need to just kind of press this side against you a little bit
    to stabilize it while you do that the other side should fall free and now you can set aside your loom for your next
    project and let's flatten out our piece so it's going to look a little bit wobbly they always are kind of like that
    when they first come off the loom and so what I like to do is just roll in my fingers so I'll start in the center just
    roll them
    out oop as you get to the edge they will roll out fast
    so you can just push them
    back there you go that side looks really nice and this side just needs a little
    bit [Music]
    more and then just help those go back
    all right how does everything look just lay the piece flat because after we do the next step it won't be adjustable
    anymore so just make sure you're happy with how it rolls out and then also grab
    your tape measure you'll know you've got it to back to the amount of flatness it have
    on the loom if you're still getting your six and a half measurement there or it should be um it could be
    longer it could be the um uh so I think that added seven and a half
    when we if we increased it by one you'll have an extra inch and a half or so they're right about
    there bring it out to about 8 inches I think so somewhere between there you should have and now we're going to go
    ahead and just pull the warps in I like doing this uh method because it's quick but you can always use the weaving in
    method that I'm going to show you right after this uh to weave the ball in if that's easier for you but turn your
    piece so that it is facing this direction make sure top and bottom that all your Loops are free they're not you
    know looped through each other right and then separate out your weft strands which are the ones here that are exiting
    the beads running on the side you'll you'll have four of them if you added thread once like I did so again here at
    the top you'll have these Loops free including your Edge warp Strand and then here at the bottom you're going to have
    these Loops all right and so um I'm going to start here at the top and I'm going to
    pull this um single warp strand first so I'm using my chaina PES just to
    get a grip on it and then holding the whole piece with my hand while I pull and then down here at the bottom of
    the piece do you see this Loop coming up that's what's happening as I pull the top Loop sorry pull the top
    strand is this little Loop down here is just going to bring itself right up to the bottom
    so it should look just a little little tiny bit visible just like
    that I could probably make that just a tiny tiny bit tighter let's go ahead and do
    that you don't want it to cinch up the work you just want it to just kind of sit right on the
    edge and so since we were pulling here at the top now we're going to move here
    to the bottom and start pulling from that side
    keep doing that and then what you'll see here happening at the top is this little Loop
    is going to come forward and it's going to sit right on top of that
    [Music] bead so just like that and then we'll grab the next one over here at the top
    begin pulling on it
    [Music]
    and it's going to get longer with each time and then here at the bottom I want
    to show that often they'll try to bring their friends along you just pull those free from the loop and then just carry
    on with pulling that strand through
    there you go middle ones often move the
    [Music]
    easiest and here's another example of bringing a friend I'm just G to free that one really
    quick all right so keep doing that each time you're going to switch pulling um
    directions just based on which one you pulled last and now at this point it's going to
    start getting pretty unwieldy there's not a whole lot um you
    can do to shorten it just yet the only other thing some folks work from the middle but um I think this piece only has nine warp
    strands so it's not going to get too out of control but if you had a really wide p i noticed that um some of them some of
    the um you know strands can get you know feet long so you would in those cases
    probably want to go with a center pole and then you would work from the center out and then from the center back the
    other direction you know uh in this case I think it's going to be just good as it
    is just going to take a in it the pliers really help um getting a
    grip on the thread here we
    [Music]
    go oops there we go okay last one so that
    one's free here on this side here at the top we have one Loop left to pull that is this Edge warp strand get a good grip
    on it and make sure everything up here is free and then we'll go ahead and pull that
    one
    down it's hugging the mat here there we [Music]
    go all right start to finish 100% we got all of that
    done okay so we've got to do some weaving in the following instructions work
    for um I'm going to show you warp strand first in case you're going to want to um
    do something different than what I just did just in case you're method is going to be to weave in one of these warp
    strands so let me show you a place where I have a free warp
    strand so the ones exiting from your beads um so in the case of of of this
    one the one exiting from my bead right here that's a weft thread so we'll do that one next but this one over here is
    a warp strand so let's weave that in it's actually the very first warp we
    pulled it's that edge warp and since it is the Strand that
    runs along here you don't want to weave it in by going right back through the bead or to loosen that last row what you
    want to do is jump over the edge bead and then go in into the
    beads and exit from one that's kind of toward the middle and that little Loop will sit on the side
    there and then go ahead and take your needle and go
    under some of the weft
    threads when you do that it'll makeing weaving in pretty
    quick go through a bead here and there and then go under I usually go
    under about three rows worth of the left threads see them three rows is
    plenty and I usually repeat it three
    times so just like that
    and then you're free to trim that thread in any way you like you can use scissors
    flesh Cutters thread burner okay so that is how to weave in a
    warp Strand and that's what you would do if you're not doing the Poland method you'd have to do that for all of them
    takes a bit but it's okay this is a again weft thread I'm going to leave it in place because it's going to be my
    button attachment down here I have another weft thread I can show you
    for weaving in WFT so let's put a needle on that [Music]
    one there we go and I'm going to jump over look at the edge really closely
    closely and you can see how the thread is exiting from that bead and you see
    it's on this side to the side toward me of the warp just jump over that warp
    thread and go through the bead and when you do that
    it'll bring that Loop to kind of hug that edge warp which is just what you're doing when you're
    looming and it disappears that strand into your work at which point you can use our same
    method to do your weaving in by going under a few of the Ws going through a
    few beads in a row and repeating that two more times so I'm going to do that for four the
    remaining left strands so I have this one to go and that one to go and down
    here at the bottom I'm going to have the super long warp strand leave that one for now we're going to use that to put on our button
    Loop all right so I'm just bringing down my camera so we can get a really good
    view of the next steps so I've got my super super long
    warp strand right here probably not going to need all of it but the good news is we have a lot of it so
    we're not going to run out and I'm going to thread a needle onto the
    end so we can get going with
    that and again it's a warp Strand and it's running along the side you can see it here so we're going to jump over an
    edge bead and then I'm going to needle through the
    row and I'm going to bring BR myself to the center so I've got one two three and
    then there's two here in the center and then there's one two three on that side you just want to be exiting from one of
    those Center ones and let's bring back some beads start with this
    color and actually yeah oh I'm exit yeah so we'll do that you could also just jump right into
    yellow if you wanted if we're doing the stripies but um I was going to try to imate a little bit of a stripe for this
    part that's going to jump out but start with one bead go back through the bead you're
    exiting from the other side and pull that and then go through
    the bead you just added so you're making a big circle essentially one more bead
    and for this bead go through the next one so like
    that go through this one all right so now you've got these two
    little jumpies that is a square stitch and then reinforce that by going
    back through the ones that are in the last row and then come up through
    those so you should have that we're going to do that one more time but let's switch color let's add
    the yellow
    and just repeat that one more time so you're picking up a new bead and you're just looping through the last one
    Whatever side your thread's exiting you want to go through the bead from the other side and it's going to switch directions uh every
    row but essentially what we've done is that see we've gone through like that
    and I'm going to hold everything tightly while I pull to tighten and
    then we will add one more bead
    and we'll go back through that bead and then just reinforce that as
    well okay all right so that's giving you a
    little jump out there and next thing you want to do is bring your button over and then we're
    going to just kind of place it like this we're going to make a loop that goes all the way around it and you feel free to
    use whatever color you'd like I'm going to just I'm following this convention here so I'm going to go right to the
    Copper you can also make a little pattern but I'm going to just keep
    stringing copper beads here's three four five six seven 8 9
    10 11 so there's 11
    and it's going to be enough to basically what you want to do is just kind of pinch it place the button there and look
    and see and so I do think 11 is a good number so let's look at that again 1 2 3
    four five six 7 8 nine 10 11 and then go ahead and pick up one two three you can
    do this color you can do other colors and now pick up 11 more two three four
    five six seven eight 9 10
    11 and you guessed it we're going to go back through
    here which makes a circle and let's reinforce the circle
    around
    and when you get here if you skip the green bead which is the center bead right
    there it'll make a little pop See it'll make it pop out from the other beads and
    it'll look like a little point which is cool and decorative and also
    optional and so right here I've reinforced it around one time and you can see how that little pop Works test
    your button before you go any further if you want you can just kind of like pinch this part in your hand so it's nice and
    tight and make sure your button is fitting nice and freely each time you reinforce it's going to get tighter so
    I'm going to go back and reinforce that two more times
    around so there it is and now that youve reinforced it around continue through those first
    two yellow in the square stitch it'll start getting pretty tight so just um
    I'm going to do is just kind of support it and press my bead press my needle up
    against the wall of the beads that's another way to get through without having a lot of thickness in that
    thread and if you wanted to make this adjustable meaning you wanted to add another button Loop all you would need
    to do is go back around here and exit from that green bead from there string a
    yellow then string 11 of your color in this case our color C
    and then you would string another yellow green yellow um and then another 11 of those
    main color beads or this color here uh and then you would just loop back through the green
    bead and you could add as many of those as you want and so that would add an extra
    little adjustable section and in fact I feel like I should show that so that you
    can see it and it also look really cute so um how that looks is you just go back
    through I would still recommend reinforcing it around at least twice before you do this um but this is
    actually going to end up adding extra reinforcement and the cool thing is we have the we have the Strand you know we
    have the extra thread length that we will need to accomplish this no
    problem so get through that one and here we are going to go through the green bead for the first time in a
    while so pick up the yellow bead right 11 of
    these so here's one two three four five six seven eight 9 10 11 here's the
    yellow and the green and the yellow and here's 11 more of these
    okay and then you would simply go back through the green
    bead so see now you've got an adjustable Loop and then when I go to reinforce it
    I'll skip the green bead again and um oh and it looks like I forgot to add the
    yellow bead do you see it yeah so that's a little that's a mistake so I want to come back through
    here and add that yellow bead that's definitely part of our symmetry
    there now you can see it looks really good so let's reinforce that around I'm
    going to go around it three times there it is all reinforced and see how it makes that little pop that point
    you could continue that out indefinitely you could keep going it's actually a cool design element for like if if you're doing a necklace or something I
    mean that would be really cute too so this is another way you could add length without having to add pattern length
    from here you'll find yourself needing to head back through your work to get to
    the main body of the piece where we can weave
    [Music] in and again remember when we get back
    here it's going to be a little thick but that's okay so we're just going to press our needle at the top of the
    bead so you're just kind of pressing on the wall of the bead here at the top getting through those yellow beads
    that's where you'll notice it most bring that through now make a turn
    through your green beads okay and then a turn into the
    [Music] row and if you want you can carry
    on into a few more beads in that row I I went just shy the last bead because I'm
    going to do my weaving in method now and so from here on you know what to do just go underneath some of these W threads
    on an edge it can be a little tricky to find them but um you can always you know just weave
    down one row by going out of bead and into the next row but I like to do it
    this way if I can just because it really hides the the
    turns but essentially there it is so we're going to need to weave in and then
    put our button here on the other side almost to the end here
    and just going to push these beads out of the way show you that we have our design almost done you can even do just
    one extra little button test everything should be just as it
    was you'll notice for reinforcing makes the um the button connection Tighter and
    so you'll notice that that first one got a little tighter if you want to make that 12 you can but 11 is a snug
    fit and it looks like it's working just fine so um over here at this
    side um we're dealing with a WFT thread so it's exiting from a bead so we're
    going to jump over and go through the row here and bring our needle to exit from one of
    those two Center and this time I'm going to go ahead
    and pick up one two three four of those
    [Music] beads and bring that down and I'm going
    to go through the button and then I'm going to pick
    up one two three
    beads and do the other side and then let's grab four
    more okay and then you can Circle back
    through so you can do that or if you want to have it be more
    pointy you can just go through the second bead so if you're exiting from
    you see that one right there you can go just through the
    one and in that case head back up through all these
    so you'll have something like that and then when you get through this
    side and back through all four of those beads on the other side of the button
    when you get there go through this bead here uh go through the opposite side of
    where that thread was coming out so you see how it's coming out on that side you want to go through this side
    there we go my needle just um my thread came out
    of my needle so I'm going to stay where I want to be and just bring that back
    through there we go so my reasoning for going through
    that bead in that direction see it tightens it and now we can just reinforce that so
    go ahead and do a reinforcement pass through and then you know as
    you're going through the um the second reinforcement pass just weave in your Strand and trim it and then let's try it
    [Music] on all right here it is it's our little
    Cactus bracelet it's so cute and so I'm going to just try it on really quick
    here
    and so I did 11 of these copper Rosy colored beads and it is a little bit of
    a tight fit with the button which I actually like but I just wanted to mention if you felt like you wanted to make it a little less like you know
    tight you could go with 12 beads instead of the 11 but this is what 11 looks like and it puts on nice and securely so 11
    works you'll just notice like when you're putting it on that you're um you're giving the button a little bit of pressure as you're putting it through
    but it's working out really nicely for me so there is my little Cactus thistle bracelet I
    can't decide if I feel like it's a cactus or a thistle what do you think I like the pattern it's very retro isn't
    it I like it so there it is our beautiful little
    design U be on the lookout for some earrings because I think we need some little Cactus
    earrings I think a little succulent earring would be uh in order so I'm going to design that next all right I
    want to wish you happy beating and I'll see you for the next one
    [Music]