Your Cart is Empty

You know, it's always it never fails when Joan's in the background. It's all
you just don't even know. Don't even know what's going to go on. Anyway, I am so so excited everyone. Thank you for
joining us. We're streaming to the Facebook page over on Jewel Loom and we're also streaming right here onto the
Jewel Loom YouTube channel. And there's this precious little this precious
little head right beside me. Danielle, it's been so long. I miss you. We used to talk a
little bit more often. We're both so busy and and it's just been kind of crazy over the last couple of months, but you've
been designing. I've been trying not to hurt the plumbers.
Yeah, man. Don't ever, you know. Anyway, God bless them. They they did a great job, but it just took a lot longer. So,
my studio has been in the garage, and now I'm back. Now, I'm back. So, it's all
Hey, this October box has been so much fun for me personally to play with. I
was so inspired. Yeah. With the wrap bracelets. And then last week, I did another one.
And I'm having fun with this kind of idea of taking the warp threads that are
at the end of the wrap and then stringing them with uh gemstones. And then I want I didn't want just like
loose warps. So I added one of the jewel moon butterfly buttons. But it's kind of cool because look at
the button sits. It's like a like a little button hole and then you just
Yeah, it's so cute. So, a lot of that is inspiration from you watching you do all
of these really cool closures. So, I was kind of like thinking about all the
different ways that you've taught us over the last Oh my gosh, Danielle, like I feel like it's been a good year
and a half since the Czech seedbead era and then we kind of went into our Czech
two-hole era. So, it's fun. It's really a lot of fun. Anyway, um welcome,
welcome, welcome. I want to tell you right now. Oh, did I do what I needed to do though? Okay, so the kits are all
sold out. But there's a butt. So, I want to go over this really quick. There's I was
able to put together one more, but it's going to it's okay. I'll just
tell you. It still has the four strands of the laser beads. Okay. And it has my
baggie of leftover laser beads. It has almost a bag and a
half of bugles. It's got a bag of the seed beads.
It has three of the coins. It's got the rose quartz. It's got the pink la uh
pink um two holes. They're not lasered. And here's kind of the difference.
I had already made these incredibly gorgeous earrings.
The original kits came with two of those, you know, these two pieces. So,
you're going to get my earrings. Take them apart. I don't care. But you're going to get them. You're going to get the ring that I made. Again, this is
just me trying to put together one more kit. So, if you want it, um, I've got to go.
And I just am sitting here thinking, did I put that one in inventory? Hold on for
one hot minute. One hot minute. I did not. So, here we go. One. And it's
special. It's very, very special. Okay. Special. Yeah.
You have lots of the checkup beads also loose in the store, right? I do. I have I have some. And then I was
How much is of the strand? I have like cranberry. I have lots of the cranberry. I've got um the cyam.
I've got a different red or two. There's like a handful of different um different
different two holes. Spit that out, Jules. So, yeah. So, just that's just an FYI. So, we've done the videos for the
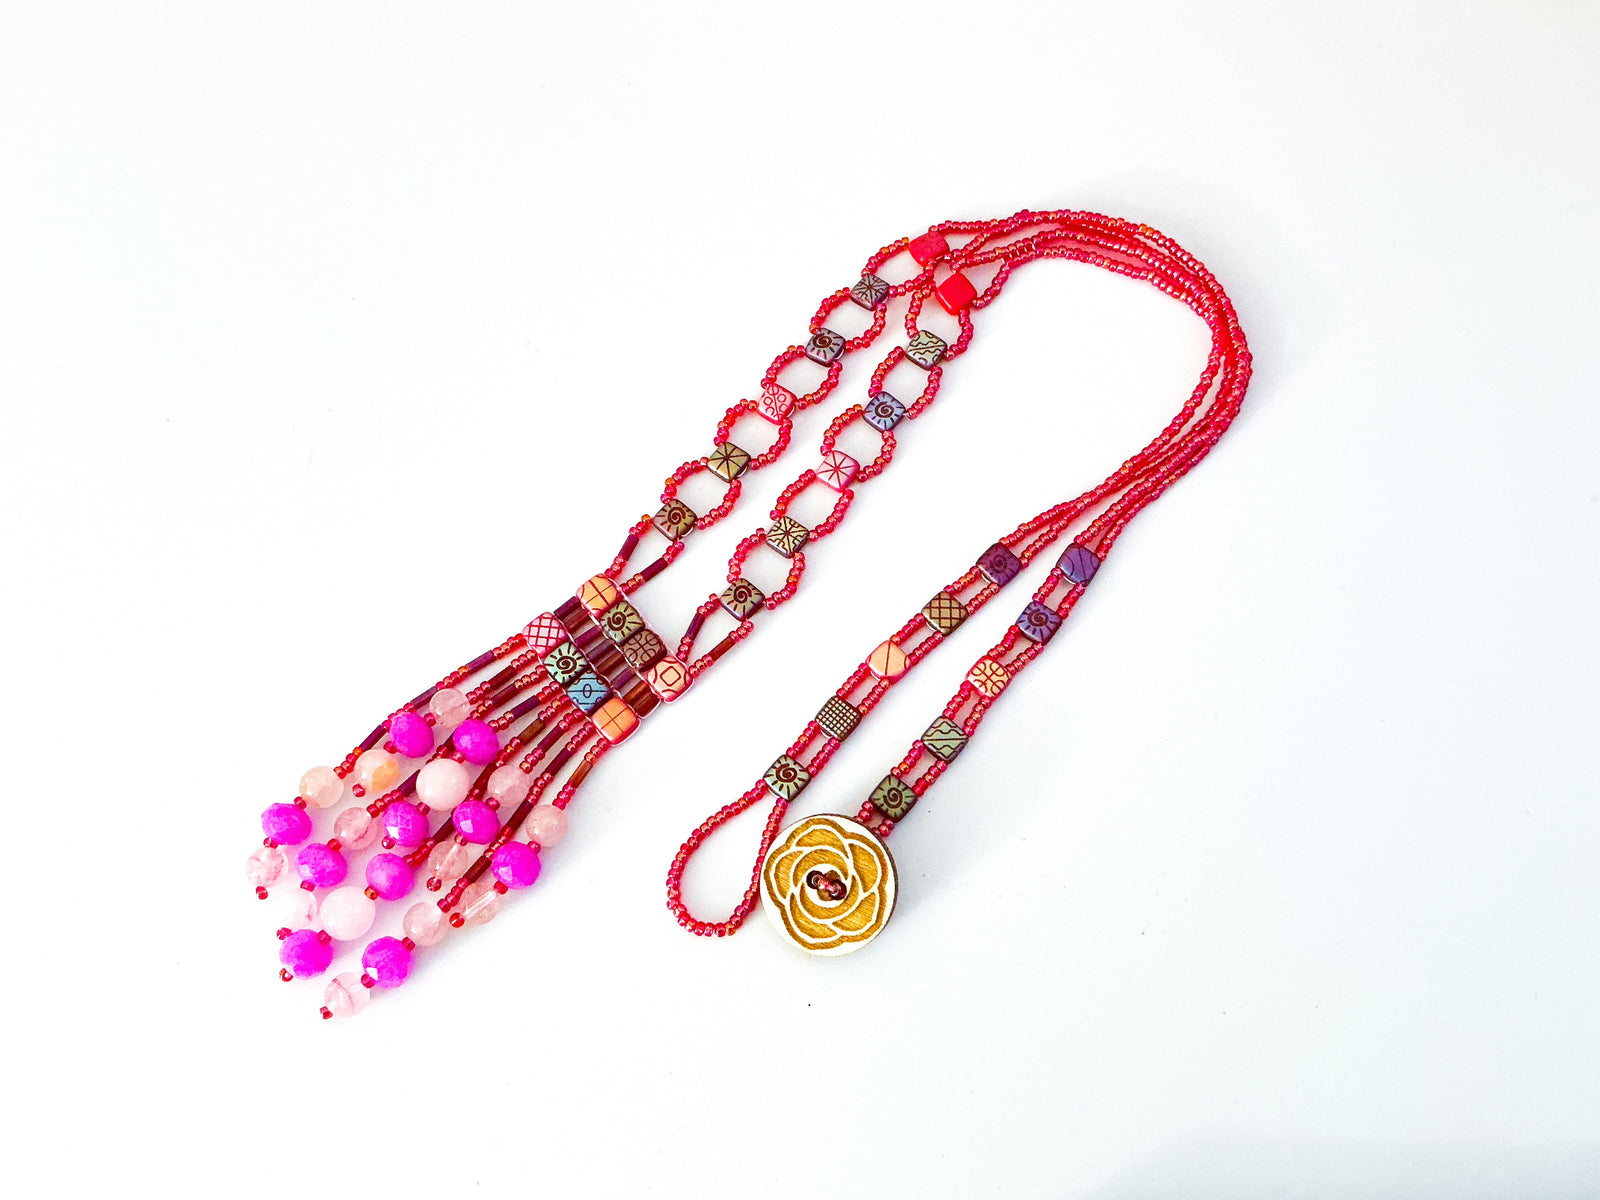
beaded ring. We did the video for the wrap bracelet. And today, I'm super
stoked. I can't wait to see how you made this gorgeous um necklace. And so you're
going to take us through that, Danny. Oh my. Are you kidding me right now? It's pretty. I I'm glad you suggested a
lariat because I was, you know, I've been in bracelet vibes lately. Oh my god,
these tiles tend to make me want to make bracelets. So, it's good to get out of that out of that
little like bracelet rut that I was in. So, I don't know. Like it's like a 1970s
hybrid. You know those cuz those chain thingies that you did, right? They just
remind me of like I don't know disco 70s. Not that I was out partying because I was five. But
had I had I been there, I'd have been there and I'd have been doing I would have been there.
I would I love you so so very much. So, um, people are dialing in
and Joan is in the background and, um, I've got this kit ready. We just got to put the tea and the cookie in there. And
now, take it away, Missy. Sure. Yeah. I had one more question before we jumped in the So, um, do you
have are these in other colors in the shop and in that size? Oh, you know what? I I they're not in
the shop, but they're in a box. Yeah, because I was gonna say um I
stretched my kit to go for this, you know, the improcess samples for today. And so I experimented by bringing in
beads from some of the previous kits that I had left over. So for example, like here's one of our improcess samples for
today that I used a mix of August and September beads. Yes. And that's going to match that's
going to match the um the wrap. See, I love that you pulled the blue out, too. That is so blue in those squares. And I
still have tons of squares left from one of the designs I didn't use as many in and I still have a lot of the blue left.
I love and even all these samples, I still have all those. I mixed up my pink ones.
That's That's why they're going to get my leftover beads from what I was playing with. And you're right, the
Whoops. Where's the November? There was a November kit here. Anyway, there was a ton of beads left
over from from November as well. lot. Yeah. The only thing I really went through was I really went through the
beads that were used in the fringe. So, this is what I'm down to from that. But that's why I wanted to show that beads
from other kits can absolutely be used for. I love that. And you know, Danielle, um,
so for the folks that are just joining and they may not know, we do a jewel loom jewel box kit every month. It's the
creative soul edition. It's been going on for almost five years now. And so we
um I curate all the beads. And to Danielle's point, there always seems to be leftovers. So um you know, that's
great when you just want to like whip out a pair of earrings or anything um small or just depends on how many how
many beos you have left. But yay. Yeah. Thanks, Jody.
Yeah. Yeah. It's super cool. I can't wait to see how you put it together. Now I do
want to say nor I would say nine times 9.99 nine times out of 10 we use the
original blue jewel loom to make projects for the monthly kit. Um
I'm just displaying who remembers this bracelet from the jewelry television uh
and it's in the book too but I'm I'm using this whole thing like as a display. Uh, last week I used the large
wisdom warrior to work on the wrap, but there are instructions on actually how
to use the original jewel loom to make a wrap bracelet. So, so that's
my spiel. I think that's all I got.
I did use the original jewel for this design. Oh, good. So, um, it's a small, uh, piece of
actual loom work that starts it all off. Okay. Very creatively uses every speck of
thread that's consumed. Uh, it's consumed in the fringe and in the chain. So, if you go by what, you know, in the
order that it's written up in the handout, it'll show you like what to do with the the leftover thread and where,
and it ends up being spot on for creating all the stuff that you add. Oh, that's awesome. That is so good. We
love your PDF instructions. Making it easy for me to do it twice as
well. Yeah. So, do you want to go down to the table because I'll go ahead and switch.
Yeah. Do you want to get rid of me, Joan?
As long as we can still hear you. Yeah, I think so. Can you still hear me? Yep, I can hear you. Okay, great. See,
it's just, you know, a close-up look of the design. And it's just some, you know, really cute. I don't know why I
keep calling it flapper fringe because that's the feeling it had with just the the way the beads look. Really gorgeous
rose quartz um with those really cool faceted rondell's. The laser tiles are
are epic. Um I used pink pink wildfire, but then uh earlier today I discovered
some I had some red. Oh, and that's in the 0.06. uh size. And so
I did it with red and really wish I did the original in red because look how cool red looks. Oh my gosh. Yeah, they're I love the
wildfire colors. I think they're gorgeous. Is that the lilac or what is that? This is white.
Oh, that's pink. Yeah, that's the pink one. And I actually just ran out of pink, which ended up being a blessing because I would have never searched for the red.
You would have never done the red. Yeah. No, the red is gorgeous. And the pink looks cute, too. It's just
that the red really really does something for it. It darkens up all of the connections and
just makes it look really really cool. I love that. I love that you use last month's beads with that. I was so drawn
to getting the blue to pop from the beads. Yeah, this this one I was like it's a
mix of August and September. I just used what I had. Oh, okay. Oh, so yeah, there's some
tiger's eye, right? Is that the tiger's eye from? It is.
One of them is from August and one is from September. And I can't remember which is which. But that's so cool. I love that you did that
because it really helps the subscribers to see how they can use all of their beads because there's a plethora of them
in there. There are. There's lots. Yeah. And with the red really nicely. There's lots of color in there. Those laser
tiles have so many hues to them. Yeah. So that part is really really easy to replicate and it has a little pattern
to it that is described here and then the rest of it um is written out here
that gives you kind of like a little chandelier look and you can really substitute a lot of different beads there and get get the
same. That's great. And the kits are going to be well, like I said, I just put one more kit up there, but usually the
following month I put I start adding the patterns so that the patterns are sold separately when the kits all sold out.
So awesome. Okay, cool. So folks, I'll be able to do that.
Yep. And um yeah, so I I could just dive in. Um I have a pre-warped Gulium going
here. Um, if we have time, I can show how to warp it, but I feel like
everyone's got a handle on that. We've got plenty of videos on warping, so if somebody needs help, we're always
here to help. But yeah. Yeah. Yeah. Same here. I'm happy to help. And it definitely um is is
probably kind of close to what we've been doing on some of the previous months, so I figured it would be easy to follow. The main thing is the spacing
here. So you've got your three coils and then in the center here it's two coils
and that's your bugle. Okay. And then three coils is another one of the check two hole tiles.
So the grooves you're skipping the grooves. Skipping three grooves. That's what you're Yes. Did I call it coils again? I did.
No. Did I call it coils? We changed we changed. I must have printed that
before. Sorry. Yeah. It's not the end of the world. It was the grooves.
Yeah. For the grooves. Get your groove on. Oh, yeah.
So, that's that's all you got to do for the warping. So, you want to get that going. And then for your beading thread, this
is going to seem a little bit crazy, but about 70 inches a wingspan. So, 65 to 70
in is going to be enough to create your chain on both sides and do the looming
part. Yeah. Okay. And then the rest of the warps end up being what you do the fringe with.
Oh, so it works out nice. Oh, thanks, Lena.
Oh, and I see you're dropping links. Joan is dropping links for the wildfire, so you guys can find it. I am using a
vintage spool. I I am surprised I had this for those. I know. I was like, where is that?
This is I purchased this brick and mortar in Seattle, I think. Oh, that's good. I always support the brick and mortars,
which means it was more than 10 years ago, right? Because that
Yeah. Oh my god. It might be more than 10. Honestly, I can't remember. I think it might be like
14 years ago. Wow. I can't remember. But it was long. It was long ago.
Time is moving too fast. Yeah, for sure. And so that is a wingspan for
me. I probably cut about 65 inches. And I'm going to use a hard beading
needle. These are the Beatelon beading needles. Uh they're the size 10 ones. Okay.
And they're pretty good for this design. But you could also use other needles that you've got. Like the twelves are going to work and all of those things.
Yeah, Stacy. Me too. Me too. We would have hung out there, Stacy, if they were still here.
I'm trying to think of the girl's name. She was such a sweetheart. Oh, I know who you're talking about,
too. Yeah, she was. really sweetheart. They're designers. Yeah,
she's really nice. Yeah. So, I went ahead and put that needle on
there again. I've got about 65 in. And now I'm just going to dump out some pretty bees. For now, you just need bugle and some of the two-hole checks,
the laser etched ones. I mixed up my pink ones, but um that's just cuz I was
short of baggies, so I'm really only going to be using the dark red and the light red,
okay, in this case. But I'll just leave those piled there. So, you're going to want to leave a 25 in tail. And again,
that's going to become depending on how long you want your chain, 20 to 25 in. That's going to make a trip up and back
down your chain. So, that helps you decide how long of a tail to leave. I found that for me, 20 in was great.
And so I'm going to string on a red tile and a bugle and another red tile
and just slide that down. My tail over here, I just measured it to be about
again 20 in. So I'm just going to pinch that spot where I measured it and go ahead and bring the beads to sit in
between those warps. You're going to get that bugle in the middle and each of those two whole check tiles on the sides. And then working above those
threads now bring your needle through the tile and the bugle
and the tile. Again, making sure to stay above those strands on the trip back. And pull that
through. So, you're going to get something that looks like that. They're going to just kind of hang.
And what you'll want to do is go under now under the warps and through
the second hole of just that first tile. So you should be able to get through the
first one. Pull that. You'll need another bugle.
Slide down that bugle. And then if you bring your thread back through this way, you can get your
needle through the second tile this time. And all this is happening under the warps.
And what you'll get is they'll pop right into place like that. Like a little basket weave. This would make a cute bracelet.
Super cute. And then going back through those beads again, staying over the warps.
Yeah. And don't worry about where you are on on the jewel loom because it's just
going to all slide later. I was just going to ask. Yeah, it can be it can be kind of
anywhere because we're just going to pull these through. And the way that I pulled it through earlier today making
the second sample, I ended up having a really longer warp on one side and that worked out even better. So, okay,
it works out pretty good. Um, and so for the next, let's see, the
next ones I went down to the darker red ones. So, we'll need another bugle and
then these uh two beautiful little swirly ones.
Brand snoring. Sorry.
He's got a good snore. He is so funny.
Getting through the beagles. Just be a little careful because they're really they'll make you hit the thread a little bit too easily. So just careful not to
hit that thread. And then again, I'm pushing them downward now so I can go under through
the first one bugle.
And then if you just slide that bugle down, bring your thread a little back so you
can get through the second bugle or sorry, get through the second hole of that tile.
Bugle should slide right in place for you.
So, I'm going to repeat that just two more times. And what I did is I did two two red in a
row, but there's two different strands of red. You got the ones with a little uh swirl and then some that look like that. So, those are the ones.
So fun. They're all cute. You can kind of go with whatever pattern you want to.
Just lifting that up
and through there. I'm looking for like the the quick hand way to do it. But really the easiest way
is just bringing that thread back under Brando.
Did you hear that? Yeah, I can hear him. He's snoring. MB.
I know. I know. Do you like her necklace, too?
I know. It's a hard life. It's a hard life. Oh my god, he's so funny.
He's really cute. Oh my god, my boys want a dog so bad. They want a dog and a cat and a hamster. He just he really
only started talking like the second part of his life. Like he wasn't really
a talker before. Um so it's just kind of funny like how
vocal he's gotten. He's so cute. Yeah,
he's lucky he's cute. Yeah. Right.
And there we go. So that's the only looming part at least for this. But you can see this
is a great idea for making a bracelet and you're going to have tons left that you could do a bracelet.
Wow. Wow. But for this one, we're going to want to use these threads to do a bunch of fun like extra extra stuff. So
yeah, super cool. Okay. So I'm just going to flip it over here and find the side where I've got my
knots. Okay. And let's go ahead and trim just the knot part. Okay.
So that will essentially mean you're trimming two of those warp strands and then they'll be free after that and
you'll just have this one left. Okay. And so just remove that from the button.
And you don't want to bend it. Just very gently. It's just one strand. It comes off pretty easy. Okay. Yeah. Because you've loosened the
tension by cutting the knot. So Exactly. And then this other side's just going to fall free.
Yeah. That's awesome. So now we have that. You can adjust, line it all up. make sure it looks
really good. And then here's where um I have a little illustration for you. I
illustrated it such that the two of the we threads starting and
ending are on one side and you've got the strands coming down here
and the strands up here. And what I ended up doing is pulling the middle first. When you do that, it'll make this
this part here will get short and then you'll pull this way and then this side.
Gotcha. And so just if you work the middle first,
you'll end up at the same spot as me. And oh, sorry. I have it flipped.
You'll know because the two pointy ones should be one side versus the other. It actually I don't think it actually
matters. I think it's going to work regardless of which ones you pull first to be totally honest. But so I started
with this middle one pulling upward.
And see this little loop down here. You can probably just do this with your fingers. Oh, very. Yeah. Nice. Love that
technique. And then just the good old easy. Yeah. Pull those warps down.
So, you're going to have a lot of thread. Yeah. And then on this side, we still have
this loop. So, I'll just pull this one. Let me make sure that one's tight enough there.
There we go. So, what we have are our two weft threads. We're going to ignore those for the moment because those are
going to become our chain later. We've got a shorter warp and a longer warp.
And so, the longer warp I'm going to take over here and flatten the end so I can get a needle on it
with some ease there. Let's bring my needle back.
And so currently both of these warps, they're running the sides here on this side and that side. So just go around
the check tile and through.
And then that'll just pop right on the side of the bead like that.
And then with this side, this is the shorter warp. You can get get away with not even putting a needle on it. Just
like bring it through. Yeah, that's awesome. And this is just getting it so that it's
locked in on the edges. And for now, we won't need either of those or this one. We're just going to
work with this one to make some pretty fringe. Okay. And the fringe, I'm going to need to
bring out some seed beads from the little kit. These are like a cool flame color.
Those are so gorgeous.
So bright the colors are coming across, but I really love them. Yeah, those were Tohos, right?
No, these are Miyuki. Those are my That's right. That's right. Yeah, these are a Miyuki color called
I wrote down uh Flame Reds silverlined 80. Okay. I couldn't remember what uh
because they're smoking hot. Yeah, they're super smoking hot.
So, here's what I have left of our beautiful collection. And then I went way back in time and found it was
labeled July Creative Soul. Oh my gosh. I don't know what July that was, but it must have been Oh, that was a old July. I don't think
that was a this July. Well, I only have one of the beautiful rose quartzes left, so I thought
funny. This will work, right? No, that's awesome. Demo with that. So, I've got something
to show there. And so, let me just free those really quick. Okay. So, you'll need your beads,
your rose quartz, the rondell's, uh the seed beads, and you still need the bugle beads. So, the strand one was
three, a bugle, and three. Okay.
And then I went with a 6 millm. Yeah. And an 11 o rondelle. 11 O 6 mm.
Okay. One 11 O. And that's the short fringe strand. Yeah.
String that down. And you want to skip the last V. Yeah.
And head all the way up through those beads. Try not to skip the 11 O's. It's really easy to miss them.
Yeah. And then a little tip, not required, but kind of cool. You notice how your thread
is exiting from one side of the warp there? Yeah. In my case, it's toward me.
When you head back up with the fringe train, you can go on the other side of it and it'll
just kind of lock everything in place for you. Gotcha.
It just makes them stay right at the bottom of the bead. And then when you're pulling your fringe through, if you pinch that last seedbead in your fingers
while you pull the long strand, it gives you really good fringe tension.
Yeah, that's nice. This works for earrings, too. It's a really good technique.
Yeah, those Oh, boy. I just made a turn to head down through
the second hole of that same check tile. Very cool.
And the next one's a little bit longer. So it's 4 11 O a bugle
and then four 11 O and a bugle. Do that again.
Okay. And then four more 11 O H. Then you just need let's go for one of
these rondelle
six millimeter bead and then seed bead. So that's the repeat there. That's so pretty.
It because it'll hang your next set of the larger gems will hang just below the first ones.
So pretty. Thanks.
And the trick to doing that with any beads is you just line up Mhm. the part that's meant to be the spacing
with the end of whatever you created. Well, that's a good tip.
And I'm just going to bring those beads through. And again, I'm just going to take a peek. What side am I on here? I'm on that side. So when I bring my needle
through this check tile, I'll head through on the other side of that warp strand.
And let's find my end.
There it is. It's hiding from me. There we go.
And then we'll just pull that strand.
And with the with the fringe, I'm going a little bit delicate on the tension, not going really tight.
And that's so that's really all there is to it with fringe. Um, when you go to the next tile, all you got to do is just
jump over. And this actually locks it in really nice. So good, too.
So that's giving it lots of strength. And then you just keep going. So the whole fringe pattern is written out for
you here. The first two strands get repeated a few times. The center two are different.
I swap the large beads in that case. Um and it's again it's written here. Four
and five are the ones that are different. And then you you go to repeats. Good. But four and five look like Let me bring
it back. They look like this little See how we're
going small bead, large bead, small bead. This one, the small bead is the big bead from the formers. And then you
go with one of the 8 mm. And you only have to do that for two,
one long and one short. And the rest of them are all repeats of strand one and two.
That's it. That's all there is for the fringe. By the time you get to the end of creating your fring, you'll be um
you'll be over here. So, let's say you made all these strands, right? You went up and down, up
and down, up and down. When you finish the last French strand, carry on through
the bugle and the next one. And you'll end up with a little bit of leftover
tail on each of these sides. So, a long and a long and a
two short. So, that's going to be great because you can tie off to it right at the end. So, let me switch to that sample so you don't have to watch me
string fringe for a long time. I think we got the idea.
Yeah, you guys get the idea for that. So, but let me know. We can always bring it back over if someone wants to see that at the end. Again,
um I'm going to just untangle my cards really quick. This was the the option I went with for
for sure not having a messy tangled mess when I
And there's the next one. These are little like u embroidery floss cards they have them at craft stores. Yeah, that's a good idea
work in process. It's a great way to especially if you're working with a lot of thread.
All right. So, here's where you'd be at the very end. You'd have the strand that made
this piece of fringe here, which was the one we were working with, ends up coming right up here and joining this other
one. So, it can be something that we can tie off to when we made our chain and we're
done making the chain. And then again, here's the warp from this side and the leftover weft thread to become our chain
on that side. Chain's the same on both sides. So, you can pick a side, any
side, and demo on it. And let's see. So, for the chain, I'm
going to need to bring back some of the tiles, but I don't need any of the bigger beads
anymore. So, we need bugles, seed beads,
and the little squares.
Let me find the long end of my thread.
And is that a warp from the original warp? One of the originals. Um, in this case, no. This was when we
did our looming and we cut our really long we strand. That strand. Oh, that's a we Okay.
Yeah. On one side, the starting part we left 20 to 25 inches. That will become one side of your chain. And then when we
finished the looming, we had a bunch left. Okay. On purpose so that we could have chain
for each end. And then the the warp on this side is also up here. And the warp that made the fringe is also here.
Okay. So, you end up with put these here, but I I would have woven them in and trimmed them except for it was really nice to have something to tie off
to when you come back down from your chain if you want to reinforce your chain, which um you can actually get
away with not doing if you don't want to. I mean, wildfire is pretty strong. I'll show when you see how it's made,
you'll be like, "Oh, yeah, that makes sense." Okay, so which end did I just put my
needle on? Oh, I didn't yet. Hang on.
just sounded like a horse. Oh, Marlin Brando. So, his sounds are so funny. He's either a
little piggy or I wonder what he's dreaming about. Oh my gosh.
Four o'clock does seem to be his nap time. He Yeah, he is definitely
He's on a little schedule. He's got to be by his mama.
He's very cute. So the chain super easy and the same
thing on both sides. You're going to start with some seed beads and bugles. And we're just going to join using the
edge top tile. So that's basically the thread path there.
So it's got three. Here's our bugle.
Three more. And a check tile. Any color you want.
And then three more a bugle and three more.
Um Melanie from Canada was in the chat and I just want if
you're still here I just want to let you know I just saw your piece on I think
the small wisdom warrior and it's gorgeous. Great work.
Oh I think I might have seen that one too. Yeah, I think you I think you liked it. Yeah,
I know. I was liking something today. And I can't tell if it's a large warrior or a small warrior. I think it's a small
warrior. Anyway, Mel, great job. Great job on that piece, honey. I just saw it on your Instagram.
Oh, that's so cool. Yeah.
And so, yep, this part you just, you know, you string the seed beads and that's the pattern basically right there. And then go ahead and head
through the other hole. So this is the second hole in that tile. Oh,
and you're going to get that little pop. That's crazy. And head through the the first hole that
you were out of at the first start here. And for now, I'm just ignoring the tail.
It's just kind of I'm tucking it back here. I'll use that at the end if I need it. Or you can always just weave it in
at the end, too. So head back through the first set of three bugle three. Continue through the
tile through the same hole, which is the one your thread's already going through. Okay.
So like that. From here, just make a turn. Make a turn through the second hole of the checkile.
That'll put you like that. Then repeat what we did before. So you want to pick up three
and a bugle. Here's three more. and a tile.
Any color you want. Three more
in a bugle. And then three more.
Oh yeah, Melanie H. That is whose work I saw. It looked like a northern. Yeah, it was pretty
loop through the second hole there. So, you see how that's made? Really easy. I'll do one more and then we'll
switch to the next type of So crazy. I love that. I thought I would just do a little abbreviated chain so you can see the
whole thing. Yeah. Uh oh. So, one thing I I would I would mention is
if you're getting a little gap like that, a couple things you can do. One is you can tighten it now and plan to come back later
or you can go around one more time. So either way, if you go around one more time, you don't need to reinforce your
chain at all because you'll have done it in the in process. But um and then here's that turn to the top hole.
Yeah. And then I'm just going to do that little repeat one more time. You can just kind of see it coming together.
Yeah. That's really neat. You could do this the whole chain if you wanted to.
Well, I just love that there's all these always these little bits and pieces to take with you and use for other things,
you know, like that's just such a great little trick. Great technique.
Thanks. Yeah, it's really fun. It's pretty designed. Yeah, I like it. Ends up being pretty symmetrical, too.
It holds its shape really well. Yeah. And I I like that actually once you get your rhythm down, it doesn't look like it'll take too long.
No, it can be done pretty quickly. Depends how long you'd like your chain to be. Mine took me a hot minute, but I made a pretty long chain because I
thought this necklace looked nice a little longer. But I'll show you a way you can trick some length coming up here. So, what
we've done essentially is we've been creating this part of the chain.
And so, you can do that to your heart's content. And um Oh, I apologize, guys. I might have done a little slight
variation in how how that was done. Oh, I see what I did.
So, um on this one, I started it, but then I just started using six and skipping the bugle.
So, here's how that looks. I apologize. I just made a little error as I was demoing. I just started repeating. I don't I don't think that it
Well, now you get to see two versions. Yeah. Yeah. Let me hold them up side by side. Maybe you like this other one more.
I don't think I did do um a little mistake there. Oh well, I don't see a mistake. I see
opportunity. I see opportunity. I think I wanted to do that at first, but was worried I wouldn't have enough bugles, but I end
up having tons of bugles. So, I think that I just went back to what I originally
was dreaming when I first started doing that stitch. Ended up having loads left. So, it was
totally a win. But, so that's that's that part of the stitch. And then once you get once you get done with that,
let's say you want to switch to something new. String six more seed beads.
And then I'm going to show a little way to bring strands together. Let me show you on the finished sample really quick.
And this is totally optional. It's just if you like it, but I used a tiny little bit of lading. So I started by just
stringing the six beads. And then I laded two together. That's cool. So that I could go back down.
Yeah. Then I started doing herring bone, single column herring bone. So, just adding and adding and I'll show you that. From there, I just strung. And
there I strung all the way up here till I got to this. Wow. Made a turn. Strung the copy of that
back down. That can be any length you want. Yeah. Made a turn through the ladder to bead there. Headed back up this one. And then
I started doing square stitch. So, this like that. And that's all illustrated for you in
this. It's real real um real um repetitive, right? Like it just
Yeah. And it it feels like you could take some different stitches and incorporate them.
Yeah. And if you like one and you don't like the other, you can always just not use that one in your design. But here's how here's how I did it. So I started
with one, two, three, four, five, and six. So there's six beads.
Height. Um Lena, hold on one sec. Go ahead, Danielle.
Go keep going. Okay. Um, and so then when you've got those six, the first six here, you want to pick up two more beads
and then let those slide down. And what you can do is string six more. Three,
four, five, six, and bring that through the tile. So, we
did The reason I highlighted six and six is we're going to use those top two for something different. But really, you
could just do eight and eight or a total of 16. And these counts are totally arbitrary
as well. So, I'm going through the first one 2 3 4 5 6. Okay. So, let's go
through the next one, the seventh bead, and go through the eighth bead.
You see, I'm already kind of teasing this kind of turn here.
Just get through the eighth one by itself. Yeah, Lena, I don't know why it's there,
honey. It's um And then just make a turn. So, you see how we're coming down through the eighth
bead and then going back through the seventh. This is starting herring bone.
Nice. See what it See what it did there, guys? It brought you It brought you this little connection that looks like that.
You can always just string, though. If you don't like this, skip this and just go ahead and go right to the string in part. Um, but if you want to do some
herring bone with me, I'm going to pick up two more and then you go down through
and get up through the adjacent. Your tension's tight like mine, you might have to kind of wiggle your needle to get through.
Get through those two. So, this is just some bead weaver's
delight. For those who are so inclined, it's optional. Yeah, feel free to just leave this part out if
you don't like it. And feel free to shorten or lengthen this part of the design. So I I did this
in the sample a total of I believe I did
six uh stitches like this. I'm going to just do four for now so you get the idea.
But this is just single column herring bone.
Beautiful stitch with any bead and you can do it with bugles. It does work with a bugle bead.
So there you go. So you see what that's doing? It's creating a little joined chain. From
here, just string any length you want. Let's just do 10 for demo purposes. Four, five, six, seven, eight, nine, 10.
If you don't want to count beads, which um let me tell you on this one, I did not count. I measured with a ruler.
Ah, smart. You don't have to sit there and count. string to a length that you feel is good and then match what you did on the way
back home. Um, so from here we're going to do something a smidge different. We're going to flip the the tiles. So
here we are working with the tiles holes going this way. After we did our stringing part, we're going to use the
tiles going that way. So here's a tile. Let's string it.
Turn and head through. And now match match what you did here.
So let's do 10,
eight, nine, and 10. Head through the bead there.
See how it's going to kind of join them there. Make sure I got the right number. Did I do 10?
Let's see. Three, four, five, six, seven, eight, nine, 10. One, two, three.
Yeah, that's 10. I always double check my counts. This is
not a Motel 6. I don't know what's going on over there, but it sounds fun.
He wants in. He wants out. He wants in. What do you want?
We're in a live. Yeah, we're in a live. You had half your
dinner. Three cookies. Yeah, I know. You'll be next.
So that's pretty much the transition to the I love that. Yeah. And it's it's pretty easy to do it
and it's illustrated for you in the handout and and also written out. So from there I started using a count of
five. Uh no reason. It just was ended up being what I did, but you can use any count
you want. So five beads tiled. And now you make a turn.
Head down through the tile. do five beads. So, this is the one, two,
three, four, five. So, what I named this chain, you're gonna love the name. I did not write it in the actual description,
but my secret name for this chain is the boredom sampler because
if you keep doing the same kind of chain for a length of nine inches, you get really
you get bored. Yeah. So this one, you get bored with one version, you switch to another one,
and then when you're like, I cannot do any more herring bone because this is boring, you switch to stringing. When you can't string anymore and you're
like, I cannot string anymore, then you switch to square stitch. Wow. So right angle weave, stringing, bone,
stringing, square stitch. I love that though. That's what I I loved. As soon as I saw this project, I
was like, "Oh, there's like all these bits and pieces to it, you know, like a lot of different technique." And I love
that. And it saves you from it saves you from quitting, right? Yeah. Yeah. No. And you get that long
break right there. You know, it's like you you do all those stitches. Are you ready to come up or I'm sorry.
So, this is all you got to do, guys. That's all you got to do. And then, uh, button loop versus button hole.
Yeah. Thought I would just show um a few things. I do have a button I can show. I let my thread get a little short on that
side, but I think I might have worked with my weft tail. Um, the loop is easy.
You just use your tile as a turning place. Okay, string. This actually does is so easy to
do. And then here I did something really similar except for I brought half of those beads together as a single strand.
So that might be what I show over here. Very cool. So string any number of beads. Two,
three, for example. Let me get a button really quick. I didn't have a second one of these beautiful roses, but I do have
some of these plain ones. I think these are for painting.
So, we'll do any number here. I think Yeah, you could definitely stain those, color them with pencils, paint them.
Yeah. Hi, I've been thinking about you.
Oh, hey, Linda. So, there's I did a total of 10, guys. And then in the button, there's one,
two, and three. And then I went back through the five and strung another five. Gotcha. So I'm going to do it in
sets of three here just to make it faster. So 1, two, three, four, five,
and six. Here's my button. And for my button, I'm going to need three seed beads. So we'll
go through. Oh, and this button actually doesn't the beads don't fit through it.
They did on my rose one. Uh the rose has smaller holes.
Right. Yeah, they the beads fit through it on that one. But on this one, I might be able to get
through. Yeah, just on this one that just random from my stash here. Okay, gotcha.
Which both ways is Okay. They both work. And then we'll do three more. Oh, no.
Actually, here on this side, we're going to go through the first three. So, let's make sure I got that right. One, two,
and three. Then we'll go through three or five if you did 10, right?
ever number and then string the rest of that the rest of the way.
Go through the the tile. So essentially what you've got here is it matched a
number going from the tile through the button. Then I
did a loop of three seed beads just to get me through the button and back like that.
This is really optional. You can do this any way you'd like. You can put different beads on top of your button.
Like sometimes I think it'd be cool to put a larger bead up there. Yeah.
And then I thought it's really short, but you'd reinforce that around. I left a little too short.
I like those big old buttons. Me too. Me too. So yeah, we got we did pretty good. We
got through that in um under an hour. So questions for me or
anything else I could show? Yeah, let's bring your um beautiful face back up and
and then Joan can
do her magic.
Oh my good light. There we go. Awesome. Yes. I hope that does that make sense? I
know that was a lot to throw every like all at once. Usually I throw one of my monster videos at you.
Yeah. No, I think that that was that's really good. It's like again I just I love that you use all
these different techniques that people can use on the loom. So you're taking like off loom
off loom tech and doing an on piece and like really marrying it
all together. It's very very cool. Yeah. Super fun. And and like I was saying it's it's a sampler so you can
take the bits and pieces that you like and leave the others and create something all your own. You just have all these
little tidbits of ideas that you can assemble in whichever way you like. Yeah, I want to make one.
I want to try my hand at those off loom uh stitches.
They're just they're a nice like stretcher, you know? Oh, they stretch me. All right.
Well, I mean like they give you distance and like the design like you can Well, yeah. Yeah, but they stretch my brain.
Quick, too. Yeah. Yeah. Well, thanks Jody. Thanks, Sandra. Yeah, thank you everyone. And Danielle,
just another amazing project. So grateful for all of the beautiful work that you've done with the the Creative
Soul Boxes. They're just Thanks. so much fun. And I'm I'm excited. I never answered you about next month
because I was like, "Oh, I don't think I can I don't know." Like, we can figure it out. I just If you had
your heart set on something, you already had a plan. on the K. I just so um I know in the last video I
mentioned that next month when I was at Tucson earlier this year, I bought like
a bunch of fresh freshwater pearls. Freshwater pearls. Yeah, they're beautiful.
Gorgeous. And I I don't know what I was thinking. Like I was just like, "Oh,
you're so I liked them. They were pretty. They were really expensive." and I thought I
would do kits with them, but then I was like, "Oh, I want to share this with the Creative Soul community." So, we
separated all the freshwater pearls. And so, in November, these gorgeous
these gorgeousness are in the kit. And so, I sketched out
a drawing of what I was thinking. And Danielle was so cute. She was like, "You want to make that?" And I'm like,
I froze. I froze. I can't answer you. I don't.
So, muse on it. We'll figure it out together, but um I
don't know that I'm the one that's gonna I don't know. I don't know why that Yeah, it was funny. Maybe because they're just like so precious.
They're really beautiful and I I wasn't sure what you had in mind for the connections like so how you were going to do those links. So, I'm fascinated to
see your vision on that come together. It's like it's really cool and and I can
see myself coming up with something like with all the leftover beads you don't use and doing something with those, too. So,
I'm I'm sure that that you're going to have to uh we're gonna have to have
another call. Yeah, we'll figure out all that.
This is one of the kits you guys are going to want to make sure you get. Yeah, it's really beautiful. It's really beautiful. I mean, kind of had
you at freshwater pools in my case, but Yeah. Yeah. I just was like, "Oh, the teal
ones and the terracotta and the They're all just so yummy. They're so yummy."
But I love the colors, too. I don't want to spoil the colors, but the colors are quite good. It's an interesting combo.
They are pretty. They're perfect for the holidays. So, anyway, Jones Jones back there. Joan,
did you want to say anything? Do you have any anything? Um, eagle,
any wi words of wisdom? No, I just want to say hi to everybody for Yeah. So, um, no babies are being
hatched right now, are they? Any eagle babies? Um, they usually start hatching the
major. I mean, they'll start like um J uh December in Florida, maybe
January or February where you're at. Okay. So we do
speaking of which speaking of spend time with two of the eagles that were the original ones to
populate the Channel Islands. No way. Yeah, they're they're where I volunteer.
Most of them have passed away so far. There's two left. But how did they get from that Channel Islands in California
when they were done? They weren't. They were at San Francisco Zoo. When they were done with the breeding program to
repopulate Channel Islands, they sent them to us and they started repopulating East
Tennessee. So, you mean like capture them and then they somehow
Well, they were they were ones that um you know they were like injured or something. They could not live out in
the wild. So, San Francisco Zoo used them for a pre breeding program to repopulate the Channel Islands. Oh my
god, that's so You have a piece of me laugh
said hi next time I go out there and see someone said hi. A that is so special.
I really love this whole eagle thing for you because like you're very passionate about it. So
I think it's really cool. I really do. I really do. It's really cool. And if you ever watch
a Philadelphia Eagle game, that's one of our eagles that flies during the national anthem.
Lincoln, he's one of ours. They drive them up there for every home game.
They drive him from Florida to Philly. No, Tennessee.
Tennessee. Why don't Yeah. Where are Why do I have you in Florida right now?
That is so weird. I was in Florida last week for vacation. Okay. Well, I'm not far off then. Thank
you. Wait, were you with Candy Cooper?
Oh, was she in Florida last week, too? In Florida. She's just now leaving today back home, I think.
Oh, I left Saturday morning.
And then I got and Danielle was kind enough to take over for me on a show Saturday and I I could have done it. I
got ready. We were missed. We missed you. I'm too tired. Oh my god.
I'm I'm really slow with the link. I know. Like trust me. Like I was like so slow with the link.
Very happy. I I know how you do it. You're like like that. And then I was like trying to join them and
Well, it takes practice. Look how many mistakes I made in the very beginning.
Oh, I don't think you ever made any mistakes. Yeah, I wasn't there, I guess. I mean, you've been doing Julu for a
good Is it four? Is it? Yeah, because it started
beginning. Was it beginning of 2021? I couldn't remember. Was the beginning of Yeah, it was the beginning of 2021, was
it? Or was it 2020? I think it was 2020, wasn't it? When did you start when did you start
the U creative soul box? 2020. Late 2020 the creative soul box started. So, it's been five years.
December will be I think five years because I know I helped you with the show January 2021 then.
Oh, so you bet. God, five years. Yeah, man. We're like married.
We're almost a common law marriage. I did that because that the very first I
I think January was the first kit, wasn't it? You guys were designing it and then January was the first kit. I
feel like January is the first kit that I knew of. Yeah, I feel like it was late December
and so it could have been that we were pre-launching and taking orders and then shipping in January probably something
like that. Oh wow. Time flies. Time flies. It does.
And the projects just keep coming. I'm always like, what what am I gonna do now? So you're ready for your fifth
anniversary for this kit. I So yeah, December. Well, really, I should look at
it because January is gonna we're gonna be doing something totally different.
And so that could be called anniversary box. And since it's totally different.
Yeah, it'll be the anniversary anniversary box. The fifth anniversary edition of
Creative Soul. Yeah. Gosh, that'd be cool since it's so different. You're saying?
Yep. Yeah, I still can't master what she say.
Master the original. The original jewel loom.
I'm not sure what that is. Oh, yeah. The original jewel takes it takes practice, but you get it and once you get it, it's your favorite thing on
the planet. On the planet. Yeah. On the planet. It just takes a few tries. And I remember
when I first got mine, it was the one that I could take with me on trips. So, I was like, "Oh, I know. I know. much.
Yeah. I'll never forget the time I was at JTV and I was like done for the day.
I had to catch flight and I stuffed my carry-on with like I don't know 20 jewel
looms that were in various stages of metal rods in warped needles
everything. Oh wow. and they took my carry-on and I thought,
but I got it and all the looms were like nothing broke at all. Oh, that's good.
Yeah. You're holding your breath the whole time. Well, and if I'm not mistaken, that
might also be the trip where I accidentally left my iPad. Oh, no.
And Yeah. And it was fine, too. So, I don't know. I just looked out. That's good.
That's cool. Oh, you didn't leave it behind. Just forgot about No, I put I left it in the suitcase and
it went underneath underneath, but you know, it was a smaller, so it was like Tennessee to Philly is usually a smaller
plane, so it's not too big. Sandre says she has five of them. You're my kind of girl.
Yeah, I don't know how many I have. I think I have a lot of
You have to have a lot. Yeah. Well, yeah, because I had my personal ones that I had, but then you sent me some for the for the work stuff and then I
found my personal ones again and so now I have them all. Oh my gosh. I have display ones.
Well, I probably right now have the least of anybody because I shipped
everything to Robert because I in the month of August I was
like four days from Anyway, whole other story. So, I shipped everything to
Robert. Robert's shipping all the looms. Oh. has all the looms.
Even Even the blue ones. Yes, even the blue. Even the blue ones. So, I have like a few and I'm I'm like
coveting them because Oh, this is all I have. How do I only have this many jewel looms and I'm the
mom? I can send you bucks and I've got I've got a pretty good You can say I have a
plethora of them. Well, if I need a I mean, if I need anything, Robert will
I'll be like, "Now, send it back to me." Drive him crazy. Keep sending them back and forth. And I
There's also these beautiful um beautiful wooden looms that I've got. I didn't even count those.
I Yes. And so, I don't know if everybody saw that post because we were talking about you, Danielle, um last video
because I thought that I did Yeah. a video on the round looms, which
it turns out that I did, but Facebook removed it because remember when we were
supposed to remove Facebook was doing that? Yeah. And I didn't. It didn't even dawn on me
that that was something I So anyway, we lost that. But I did do it, but now we
need to do something again. So everybody was like, "Get Danielle. Send her send her some round." I never how to use I've
never used a round one for um it'd be kumiimo or macro may happen in there.
It's actually very easy. Like I just I just need to do it again and show everybody.
So cool. But anyway, all right. We could talk forever. You guys, thank you everyone
for watching and tuning in. And Danielle, thank you for that lovely necklace. Um, again, there's
one special October kit left where um I'll go back
in and kind of type out the details, but uh so only one left. And what else? And
I'm going to u make sure that all of the videos are for what I did, the beaded ring and the
wrap bracelets, that they're a part of what you could go and watch next. I just got around one. It was delivered today.
Oh my god. Let me see what you do with that. I know. Are you Yeah, please. Oh my
gosh. I Yeah. Inspiration needed. Well, I just love having babies and then
I'm like, "Oh, I gotta take care of them all. I got to show others how to take care of
them. Show everybody else how to take care of them." Which I love doing, don't get me wrong, please. But it's just like
I felt so bad because a lot of people bought the round loom and then but I did I did show it just disappeared. It was
too long ago and then it disappeared from when Facebook cleaned up, you know, for whatever reason. Why did they do
that? Why? Because their servers got to like I think they need the data centers for
AI. So they're clear. I don't understand how all the other
platforms are are keeping they're all fighting for it. They're all at the White House lobbying for it. They
want They want the They want the power to keep the power for those things.
Yeah. Oh, yeah. Don't get me going. Oh, well, okay. So, because you said
that, I am gonna tell you that I went down the Bitcoin rabbit hole the other day. No, no, no. Don't do it.
I was on the inter I was on the YouTubes like all night learning words, learning
words. And then I call my son and I'm like, "Okay, I just I just need you to follow me and tell me tell me if I got
it kind of right." So there's this guy. He's anonymous and he like did this thing called crypto or whatever. Nobody
knows who he really is and whether he's dead or he's alive. And then you know the nodes and the blockchain and the
bitcoins and the XRP. I mean I'm just like spewing all this is no
what I don't understand about this. Isn't it fake money that you're buying? That's why I I never can understand that
somebody just created it. So where's that with a dollar or two? It's so weird. I don't know. Um, that's
why I won't get into it because I it just doesn't make sense to me where I mean, where is the value of it? You're
buying it and the only value I can see is other people bidding to have more or something.
Well, I see it as like Roblox. Like my kids want these NFTts on Roblox.
Yes. It's like that. Okay. So, you know, you know, my son does NFTTS.
He does. My goodness. Like my son has a monkey.
He has one of the apes. He has one of the apes, but he's in that whole world. So, he's like very intelligent about all
of that stuff. So, I'm like I'm like, "Okay." So, is it like when somebody
buys a duplex and then and then somebody has to like maintain the duplex because
there's miners? There's mining. Yeah. I could go on forever. What did you did
you say? Roblox. I didn't. Yeah. It's like that's one of those games where they trade items. Some of
these games have real market value like with real money in real life on you know platforms like
so crazy. It is really crazy because mommy doesn't have the real life money for the Roblox and not real money.
Some of those NFTTS are like ridiculous expensive. Yeah, I think
it's it is it's so mindboggling but I'm trying to consume long Okay. I'm trying
to consume more long form content. I don't have a television. I don't watch
TV. Okay. And and I'm tired of this crap. I'm sorry.
Like there's a time for it. Like, okay. But then I'm just like I don't I want to consume and learn something. So, I've
been spending a lot of time on the YouTubes and I'm like, okay, well, which rabbit hole can I go down?
That's good and bad. Television for is to watch YouTube anymore. Yeah, I I just, you know, I love I love
YouTube because of the long form content. Like even though we're live, this is ultimately going to be like long
form content where people learn something hopefully and format for sure. Yeah. I mean, I I don't
enjoy the short format stuff like the reals and the shorts. Um although that's my bread and butter for what clients
want from me usually, but I prefer to produce long format content because I'm just not that quick.
Yeah. And me when I when I'm looking for content, I'm not looking for that short stuff. I want the No. If I do the thingy, it's because I'm
just trying to like not think. But I've been forcing myself every night to watch
long form content on YouTube. So yeah, give me a winded professor any day
over any of that screaming Tik Tocker high-pitched stuff that's going on. Oh my goodness. It's
like Yeah. Yeah. the constant um scrolling of the video is like I could feel my brain
starting to like hurt. So shorten attention span I think makes
us unable to process information in the same way after a while like you start to think differently.
What is it guys at my work bought a $400,000 home? Oh because of it.
Bitcoin. Oh because of Wow. Yeah. It's a longterm strategy. I mean,
but then I think some people in it, they did make they did make money. I'm more fascinated
by what is it like I I want to know these things. I don't want to go into
this next season of my life like not understanding things.
Yeah. Like I I guess that'd be good trying to figure out how did it ever get valued at begin with.
Yeah. Like why? Well, and it's just like node in OD.
This woman says, "Oh, I think everybody should have one in their house." And so I tell I tell my son, "This woman said
everybody should have one in their house." And he's like, "Well, she's not wrong, but the electricity and I'm like
the electricity, you know." So it's like it'd be like having this. Are you talking about farming it?
Well, those are the miners, right? But the not those people use they like rent apartments and run up the power bill in
those apartments just to like Yeah, it's insane. See how very it's all very interesting and I
don't I I like to know things. Well, your conversation keep talking. I
I know. That's why we'll have you buying Bitcoin. Don't worry. I'll see you guys later. Take care.
Just kidding. Love you. Love you. Love you. Okay. All right.
Anyway, thank you guys. We're sorry. I went down the rabbit hole. I'm sorry. It's okay. It's always fun.
You know, I just I I Yeah. Anyway. Okay. All right. So,
my everything ready to go for shipping to Joan and to you.
Okay. Joan's getting my getting my samples to finish them. A good Okay, good. Yeah, because I had
sent her the box. So, I hope she has everything. She'll I guess now she has everything and and all of my
in process. So now, okay, and then somebody's gonna get all my goodies, whoever gets that last box. So,
yeah, sounds good. We will regroup and chat about November. Yeah, we'll we'll get back together.
Thanks everyone for um hanging out and listening to our silliness, but we're just learning. We're learning about the
world, right? NFTTS and all that stuff. I find it all
fascinating. So, anyway, beating and crypto.
That's a random combo. That's a random combo, but why not? Why not? All right,
Danielle, thank you so much. Thank you. Okay, I'll talk to you soon. Have a good night. Bye, guys.
Bye, everybody. Thank you. Thank you for being here.