SAVE 15% OFF ON YOUR FIRST ORDER PLUS GET 3 FREE PATTERNS. SIGN UP BELOW!

0

Your Cart is Empty

Shop
  • Read our story

  • Each of our carefully researched, styled, tested and distributed collections reflects a particular aesthetic and ethos. We hope some of these speak to your own style, and help you refine and redefine your own look and style philosophy in the process.

  • How To Make a Stunning Beaded Bracelet With Jewel Loom!

    July 11, 2025

    How To Make a Stunning Beaded Bracelet With Jewel Loom!

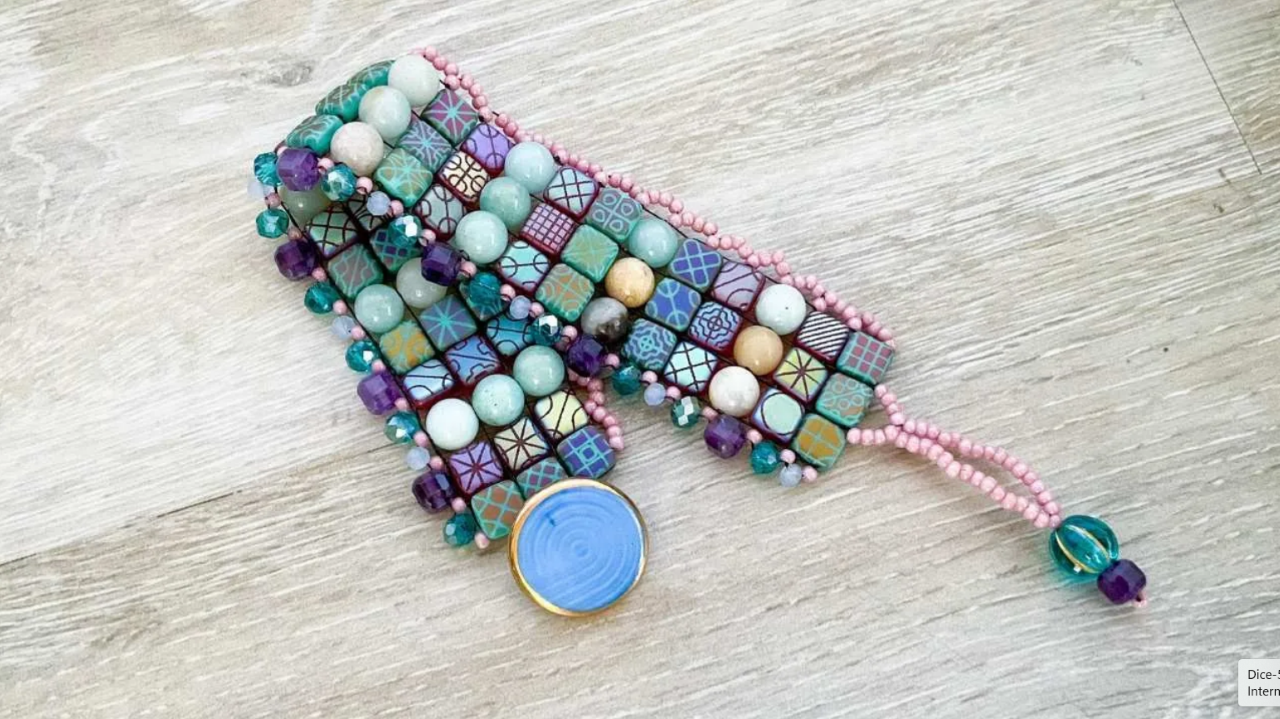
    Learn how to create this stunning bracelet, using two hole tile beads, round beads, and more. Danielle Wickes shows you how, from warping, beadweaving, adding beaded embellishments, removing the project from the loom, and finishing your bracelet with a button closure. Though Danielle is using the June Creative Soul Kit in this tutorial, you can use any 6mm two hole tile beads and match up the rest of the beads to suit your taste. You can even use 5mm tila beads, but will have to adjust the spacing between warps and use smaller beads to go with your design. Danielle shows many great techniques to learn to increase your loom creativity. Watch the tutorial below. 

    Quick Reference Warp Tip: For 6mm tile beads and 6mm round beads, skip 3 grooves between warps. You will need 4 warps for this bracelet. 

    Buy a Jewel Loom as part of a Ultimate Bracelet Starter Kit, which also includes the Baby Loom, Jewel Loom stand (to use your loom as an upright loom or can lay it down on the stand to keep it from moving around), plus beads, hemp, beading thread, and a wood button to create a beautiful bracelet:  https://jewelloom.com/collections/jewel-loom-bead-looms-for-jewelry-making/products/jewel-loom%C2%AE-beaded-bracelet-starter-kit-with-bonus-baby-jewel-loom-and-needles 

    Save 15% off your first order, plus Get 3 Free Patterns: https://jewelloom.com/pages/get-3-free-bead-patterns-and-save-15-percent-on-supplies

    Did you know Jewels has a Book? It’s true! You can get a digital copy of the Jewel Loom Inspirations book here:  https://bellacraftspublishing.com/jewel-loom-by-julianna/ 

    You can find Jewels here:

    Find Danielle Wickes:


    Transcript:

    hi everyone i'm going to show you how to create a really beautiful design with your Jewel Loom using your June kit
    here's the finished design that we're going to work it has a really beautiful button loop and a cute embellishment um
    the one on the top is called a long pico and the one on the bottom is a gemstone pico and then it has the beautiful
    button here on the end um that is really really nicely attached with a little button loop here
    and it's all done on the loom uh at the end we do the little embellishment kind of together um you know along the side
    and then we do the uh the loops and the attachments off loom as well so um let
    me show you how to get started you only need a warp strand for each of the rows
    and so this technically is only a three row design because of the wonders of
    these little tiles i keep calling them cubes um but they're they're I think they're called a check two-hole tile and
    um you're going to put them on in between a set of four warps so it'll be
    a warp here here here and here so all we need to do is warp the jewel with four
    warps but they do need to be spaced and I found the spacing that works really well is if you skip three grooves in
    between each one so we'll pop our bar in and bring this side
    up here okay tie a double knot to any of these
    buttons on the side does not matter which side you choose you just want to pop a double knot onto one of these
    sides
    that's one side of my double knot and there's the second side
    and then just go ahead and tighten that as best you can and bring that down behind the back
    button and I'm still working from my spool oh and I'm using wildfire 06 i'm using
    black but as I was working my design I kind of wished I was using greens if you have green you might find that to be an
    even better choice um but I want you to be able to see my tutorial so I've been using black
    and so there's my first strong side and then here at the bottom just kind of eyeball getting it to be roughly
    across from the other side bring this up and here's where you want to count over to skip three
    so what I mean by that is you want to make sure that you can stick your fingernail into
    one two three empty grooves in between each one
    so we're going to loop behind here making sure I can skip one two and three
    same thing down here make sure on this side we're skipping
    three last but not least
    skipping three there and bring that up skipping three here
    make one last trip around the button here we go
    and then I'm going to tie a double knot to my tail but before I do that I want to make one trip around the button just to make sure
    that's extra extra tight sorry about that my scoop is making noise there
    all right and I'm going to go ahead and just tie a double knot right here with
    with this tail thread
    there's one and let me trim this free from the spool now that I've got it secure
    and here's number two brilliant okay so there's our four
    strands make sure those are nice and tight so there's those and then next
    thing I'm going to do is bring the bar out
    and I'm going try the other side really quick
    there we go got it sometimes it's a little little poppy okay so there's our
    four warp strands and popping that bar out will really tighten them up really nicely cut a new strand so we're going
    to end up adding thread um and you know adding threads the same way you start it so what I'm about to show you for starting this row is exactly how you add
    thread and adding thread actually kind of hangs hangs out here kind of toward the end and it works perfectly because
    you end up with this really long leftover working strand that will enable you to do the side embellishments without having to add again so um start
    with just a comfortable wingspan to go and we will add thread when we run out
    all right then if you're working with wildfire like I am other threads are going to
    work i wanted to make sure I mentioned that but Wildfire is also really nice um fire line great use that you know all
    those threads are going to work uh it's really nice though on one of these wildfire/fire line type of threads you
    can flatten the end makes it so easy to thread your needle just like that it's like butter okay so bring that needle
    to be underneath those warps and leaving about a seven inch tail that you can weave in later we want to get
    ready our cubes and forgive me I keep calling them cubes
    i know they are two whole tiles but my brain has decided cube is the word of
    the day and I keep calling them cubes so um
    they're beautiful regardless of what we call them so a bunch of them here now I did a
    pattern in the in the design that goes from turquoisey color to the red color
    and then to the emazinite and then red turquoise emazinite turquoise red so you
    see it's kind of just like whichever one it's two rows and then amazonite two rows ofinite and it ends up flipping the
    color next to the amazite every other time and but it really doesn't matter you
    could you could choose either either way and for this first row it
    doesn't even matter which side you pick up so I went with red this time
    here's my tail and as a stabilizer just to start I'm putting my needle back through it so I
    can bring them up bring those to sit in between your warps and then pull your needle out so they'll
    they'll hover like that just with you holding them there you bring that needle back through
    and pull that tightly
    and what you'll end up with is these kind of hang like that right
    so what you want to do is take your needle through the other hole and I think the easiest way to do
    that throughout the design is just to hold it in your hand like this
    and just bring that needle through and you want to stay under the warps
    and you'll want to catch each one of those tiles again staying under the warp threads so it'll it'll be doing this on
    you moving around a little bit but once you've got the needle through you can hold everything in place pull your
    thread through
    and it'll sit like that and so now that I've made it through all of those
    I can go through go back through those beads bringing me to the other side
    there we go all right and so underneath the warps
    again this time I'm going to pick up three of the turquoise color
    slide that down and again just kind of help those sit
    they're going to go a little flop they're either going to flop up or down from where you are in the warps but just
    get yourself right back through that bead make sure that I don't go under any
    of my warp threads and pull that tightly
    and then you'll just have to help them point a little bit downward so you can
    get through the second hole of the tiles staying under those warp strands
    and you'll know you've got them when you can kind of move them like this right but they're still underneath pull that through
    and then bring your needle to pass through the hole again oops sorry about that i pulled
    that out by accident here we go pass through the three tiles
    above the horse again so you'll have these on there and next thing you'll want to do is they this should still
    slide for you too if you want to slide it you can if you feel like you need to move it again
    but it does tend to get tight especially on this side the side that we're pulling on this side is making this side tight
    you'll notice when we do the the warp weaving in sometimes I opt to weave this one in because it does get really tight
    here on the side so just note that um we're going to need some amazite gemstone so grab those from your kit
    and string on three of those beautiful beads
    needle uh through the beads passing above the warps now
    there you go and let's head back to doing tiles so
    because I have ended here the row before was turquoise and I picked up turquoise
    again and that was just the pattern I liked honestly you really could do it with pattern you like
    so there's those
    and then through those holes and kind of push them down
    make sure they in a way you could kind of even just line them up like that if that's helpful
    and then just use your finger to kind of just nudge them up just a smidge so you can get them lined up
    and get your needle through at the three holes
    pull tightly and you want to pass back through all of
    them staying above that warp strand under those again
    here's the three red
    get through those three push those down
    there we go just want to kind of line those up a little bit
    and just making sure to stay under those warps you want to get through all those beads
    and then pass through same holes stay above the warp that time
    and three more of the emassinite so just carry on like this this is your pattern if you like it
    other patterns will still work if you want to change up the pattern the embellishment is actually quite
    independent of the number of rows you create it's going to be done as a brick stitch design along each of the edge
    warps or treat those like a thread bridge so feel confident to change it if you would like to if you would would
    like to do a different pattern here go for it these embellishments are created
    in a way that is independent of the number of rows all right so finish that and then um let's meet back here to take
    it off the loom
    all right so here's my finished loom design and I just stuck with the pattern of keeping each row in the different
    color and then I would go to the emazinite and then switch that order so you can kind of go with whatever style
    you'd like but um that's what I ended up doing and I did end up adding thread so I just brought it underneath starting a
    new strand and just left the old one hanging out where it was in place let's go ahead and remove it from the loom
    you're going to want to get some flush cutters some scissors and um cut it free from the place where we knotted here
    there we go so that'll free up two of those ends there
    and the uh center one here is all you'll have to worry about getting off of the loom and so I usually just pretty easy
    when it's just one just take my fingers and just remove that here at the other side
    it'll just fall free not a lot of warps to deal with so you're welcome to weave them in if you
    would like to if you'd like to um pull them in that's great too um I think pulling them in is just a little tiny
    tiny bit faster so I do enjoy doing it that way um and then uh after that we'll
    put a little embellishment on it but so let's see i'm going to start
    going to start with this side here okay and with a design like this I'm going to want to really hold everything in place
    really good okay and then start to pull
    Just taking a look at my camera i might want to raise up just a bit so you can really see what I'm doing sorry about that it seems like it's just not really
    catching everything in the screen um and why don't I turn it a little bit so you can see all the all the details this way
    is a little easier a little tougher to pull it in this direction but I think I can do it okay
    so pull this side here and again I'm holding everything steady
    and see watch this loop here it's gonna come in and when we do that
    it's just going to hug that edge there so we'll pull from this side now
    actually I just might even flip the board around
    will make it easier for me to do that oops sorry didn't mean to hit the camera there there's lots going on here
    all right
    okay just let that loop hang out there
    and we've got one more to do let's clip it one more time
    here we go
    all right and just getting that loop this side's definitely a little tighter
    so you're going to want to pull very carefully and you're still going to want to kind of hold your work steady
    as you do that so here now we'll only have just a few
    things on the edge here so we'll have these two here and then the rest of our weft of course
    is still here so I'm gonna go ahead and weave in my weft threads
    the starting tail and these two and it doesn't matter which one you pick to work with first uh
    let me grab a needle really quick just going to borrow the one on this uh strand here
    i'm going to go ahead and thread those
    i'm just going to make sure I've got everything kind of stretched out as I like it looks good
    all right so just bring the needle onto one of those left
    and I'm going to go ahead and just look at the side and here on the side actually let me zoom in again see we'll
    come back down um take a look at your warp thread on the side make sure that it is in fact
    being jumped over when you go back through the bead
    then head through the first two beads
    and this is a little different because we don't have as much um you know normally I would I would pick up the
    little W threads right and I would go under and go under but when you do that with something that's got this much
    space it's a little bit trickier but just go and gently see how that looks
    so just like that it's going under those WS and then you can go through some of those cubes
    and if you want to repeat this turn here where you jump over the edge warp and head back through the beads
    any extra little turns are helpful you could always knot if you'd like i'm
    not a knotter but some people like to do a little half inch knot that's totally okay if you want to do that
    there we go i'm just going to burn that end all right and so repeat that with this
    other one
    okay and so we just now have
    the starting tail i'm going to repeat that same thing with the starting tail
    all right and so so far so good got all of those woven in so we're just going to have a blank end on one side and then
    when you get up here to the side you're going to see there's two warps left
    and a really long because I added thread so mine is pretty long remaining left
    thread i'm going to use that to do my side embellishment and then here at the top I'm going to use these to create a
    button closure this will be the button loops on this side and I'll add the button as I come
    down this side with my embellishing thread so that's my plan so let's start
    with the embellishing on the side so start by dumping out your seed beads
    there'll be some pink seed beads in your kit and then there'll be some crystals and some amethyst cubes and so I'm going
    to just kind of intersperse these along the edge in a way that looks really cute so starting with my left over weft
    thread making sure that I'm passing under the warp just keep in mind as we
    were doing all this stuff it might have shifted a little bit on you so just make sure that here your thread coming out of
    the bead is underneath the thread that's running along the side so that you can jump over it and go right back into the
    bead go ahead and continue through the bead and then again here when you get to the side exit from underneath
    um underneath meaning in this direction the other warp so here's my we thread coming out of that bead and it's staying
    underneath underneath this strand here
    and there we go so now you should have a nice clean edge and so from here ignore these two warps for now just leave those
    guys over here and then starting with the weft thread exiting from this side we'll start our embellishment so pick up
    a seedbead and then pick up one of the crystals i'm
    going to do a kind of a graduation of small to the next size to the big one and then one more seed bead so you'll
    have something that looks like that slide that down
    and then we're just going to treat the warp that runs this side just going to treat it like a thread bridge and we're
    not going to worry about it being one for one with the rows because it's going to be different every time so just lay
    it down and kind of pick up the next thread bridge that looks like it's the right distance for what you just strung
    so in my case I kind of picked up the thread bridge that straddles these two cubes
    and then I've got this little embellishment now
    so just like that so we've got a seed bead there we're going to just go right to the crystal and then a seed bead so
    this is kind of like one of those brick stitch patterns where you borrow the seed bead from before so apologies and
    then just next thread bridge with that one see because now it's going to look like that
    so each one will share the seedbead from before
    so now see how it's popping along like this really cute let me just bring this down a smidge it's going to be really low but hopefully you can see really
    good okay and now this is a cube so
    what I am going to do for the cube is it's a little bit tall
    let's just take a look and see yep that's going to work so I'm going to go through the cube and pick up one more
    seedbead and go under the thread ridge
    which just so happens to be our warp here you might need to feel this out a little bit this is a little bit larger
    bead so I'm assuming so here's a good example it's if it's going wonky like that sideways you may need to go one
    more thread bridge over
    so I'm going to go back through that and I'm going to needle back underneath
    and what I'm going to do is I'm just going to get it to be flat and I think I'm going to pick up right here
    so just the next one you'll know if it's if it's right because it won't tip on you
    it's a little tougher when they're squares instead of rounds because you want them really to There we go okay so
    he's going to sit kind of sideways like that one other thought I had is we could
    try to place cubes only on rows with the squares but I think this is going to work so we'll grab a crystal
    and a seed bead we'll pick up the next thread bridge here
    small crystal seed bead in the next thread bridge there
    so it's just going to go on like that
    all right so I've got one side done all the way to this edge and what I'm going to do here is I'm just going to pick up
    the next crystal I need or the next bead whichever the one that is for you a seed bead and then I'm going to go ahead and
    go through the beads so instead of going under the thread bridge I'm just going to go through the beads and if you want
    to you can go through all of them
    and you'll get just a little edge that looks like that with whichever bead you're ending with it could be different for you um we're just going to create a
    um connection now for um the button
    so I've got my button here and what I'm going to do here on the side is I'm just going to go ahead and
    take a look at that edge warp strand and I'm going to take the opportunity to jump over it and that's just another
    motion for locking in this little edge one right come through you want to go through just the next two and exit from
    that second one
    all right and then bring your button to sit just kind of like that um so I have my my
    thread exiting from one of the center cubes here at an edge and I'm just going to string seed beads i'm guessing think
    I think four is going to be the number I like but you'll have to play with it to see what you like
    and then four so here's one two three and four
    and then just loop through that top hole of the cube bead
    there we go
    so it's going to put your button on like that and go ahead and reinforce that one time
    so go back through all those beads
    and there you go
    and I'm just trying to get through the cube one more time
    if possible I'll try to get that to exit just the cube
    if you end up on the other side I ended up on the other side it was just a little tight to try to get through to and that's okay i'm going to make that
    my path but you could go either way you if you're in this cube just make the turn here or make the turn here we're
    heading to be over on this side now
    there we go
    and I'm just going to use the we thread here in between these two beads
    so just like that just using those to bring me up here so I want to exit from the top hole of
    this edge cube here all right and so on this side as we head
    back down um we're going to just do a very gentle embellishment that has just seed beads
    so that when you're wearing it you'll have kind of like a little skirt look one side will have the beautiful embellishment and this side is just
    going to have some seed beads to embellish the edge so um you could do a lot of different things but what I
    thought I would do was a little a long pico so I'm going to pick up
    five beads and we'll do a cute little long pico bead so with that we'll go underneath
    a thread in some spot that'll kind of kind of position it like that so in this case I went above the thread bridge
    that's for me at the next cube and then I'll come up through just one of those seed beads
    and then I'll pick up four
    and do the same thing again trying to decide which thread bridge is the right one probably right here
    actually no i'm going to go in front of the emazinite here play with it so that
    it doesn't look stretched you want it to look like a little pop so let me show you it's going to look like a ruffle
    and I I totally made up the long pico name so it's just going to look like a little ruffle like that you could also just do
    a one for one down the side if you wanted to meaning
    just brick stitch a single bead but um this is a little faster you might enjoy
    it more
    so it's going to just ruffle like that let's do one more together
    three and four so each time you're picking up four and
    you're just going under the next spot under the thread that looks like the right spot to go to
    and then just bringing it down so you'll get this little little edge of beads here
    all right so here's my long pico finished on that side and it looks really cool from the sides it just makes it look like you have a whole line of
    beads running the entire side of your bracelet and then on the other side you've got this beautiful gemstone pop it's really
    pretty um and then here at the end when you get to the very very last bead uh and you're getting ready to put on that
    last long pico you still pick up four you should have about about this much room and if you don't you can always
    just adjust it a little bit these slide really nicely but here's my four and I'm going to do the same thing here where I
    just go through the bead and I'm going to exit from one of the center from the center cube sorry
    and so that's going to put me right here so depending on how much thread you have left you may or may not need to weave in
    at this point and use these threads to do the next steps but I actually have quite a bit of working thread left so um
    I'm going to use my working thread but if you have extra more here that you want to use otherwise most likely I'm just going to weave
    these in they're just here in case I need them but I've so I've got so much and I'm already where I want to be
    exiting from that center cube i'm going to create a button loop for my button
    so let's bring our seed beads over here and let's Oops making a bit of a seed
    bead i need a little bit more need a little more
    seed beading goodness mess here so let's make a pretty little uh button
    loop going to string out a certain number of beads just to start
    and then you don't even really have to count just come over and measure it you want to have
    a length that covers your button with two beads on each edge so see two here
    two here and then this one covers the button that usually accounts for the dome
    so in this case my count is four five there's five there 6 7 8 9 10 11 12 13
    14 so for me 14 and you know you're going to want to times that by two
    to make it around the button but I'm going to do one extra thing so
    now I know my button loop count the circle that needs to go over the button is going to be 14* 2 so I need you know
    28 beads um but what I'd like to do is have an additional four here at the
    start so I'm going to string four more to account for that here
    and I'm just showing you this way so you can figure out for many buttons whatever buttons you're doing
    um so there's my four extra here's my 14 i want to do a little embellishment at
    the edge of my design so what I was thinking is I have this
    really pretty melon and I'm just going to grab another
    emazinite and I thought I would use that you can use anything to decorate your end but
    I'm going to go ahead and string out one more of these
    these two one more of those okay so so we've got
    that going string that down
    and then skipping that 11 O go back through the emazinite cube the
    melon and the seed bead
    and pull that to tighten so you're going to get that now string 14
    there's four one two
    three four five and one two three
    there's three four and five this should be about 14
    and I'm going to go four more two three four
    and with those four I'm going to go through the button
    i'm sorry i'm going to go through the cube here or the tile
    and before we do anything else it springs over and it should be really roomy right it's going to be too big
    right yeah so what we're going to do is we're going to join those four in a way
    that brings the button out a little bit makes it really cute really cute little connection so let's bring
    this thread back up through
    the first four here so 1 2 3 four and we'll reinforce all of this through additionally
    so but for now just through those first four and make a turn and come down through
    the other four on this side
    so just like that and see what it's going to do it's going to bring it like this so that's going to
    be your button loop and then this is just going to cinch together
    and you can go through this again
    there we go
    so that brings it together if you want you can go through this one more time like that
    make our turn here through the cube
    and this time I'm going to head through all the beads
    there we go right up to the top through this bead here
    here at the top through that one
    and back down through all those beads pass through this side now
    and through here there it is all you have left to do is
    weave in So I'm going to weave in this strand and I didn't end up even needing these two
    warps if I had maybe I need them to reinforce you know so they're here in case I need them but in this case I'm just going to go ahead and weave them in
    and then let's try on our bracelet
    there you go so it ended up being a very perfect fit when I did the 14 seed beads
    around the button so you'll end up with this really pretty button loop and you know these just first four just to kind
    of jump you out from that cube give you a tight fit and so here's my bracelet
    little embellishment always ends up being so cute and I think I'd like to try it on
    so let's get that on there we go very very cool
    it has a really nice look doesn't it and so the I usually like to put the little the long pico toward the top of my wrist
    and then I'll put the little gems kind of hanging off the bottom like a little skirt for my arm so cute so that's the
    happy moment when you finish a long design like this is always feels really good so there it is i hope you enjoyed
    this and I will catch you for the next one