SIGN UP FOR MY NEWSLETTER AND RECEIVE 3 FREE SEED BEAD PATTERNS PLUS 15% OFF

0

Your Cart is Empty

Shop
  • Read our story

  • Each of our carefully researched, styled, tested and distributed collections reflects a particular aesthetic and ethos. We hope some of these speak to your own style, and help you refine and redefine your own look and style philosophy in the process.

  • How to Create Multi Size/Shape Czech Glass Bracelet with Button Hole Closure

    July 23, 2024

    How to Create Multi Size/Shape Czech Glass Bracelet with Button Hole Closure

    Learn to make a beautiful bracelet, using different size/shape beads, plus a professional buttonhole closure, while using the Original Jewel Loom! You can also shorten this bracelet to use as a bail, when the button closure is closed, forming a loop & hanging on a necklace, so the button can be a beautiful centerpiece of a pendant. The techniques Julianna C Avelar teaches in these tutorials are broken down, so you can quickly look up the techniques you want when designing your own different designs. Some different suggestions to use these techniques are given throughout the blog. This blog contains the videos you need, close ups of the bracelet as a pattern guide, & additional information.  

    First, you will need to warp your loom. If you have never warped a Jewel Loom before or need a refresher course, use the video directly below on how to do so. But, you will want to warp 4 warps, skipping 4 grooves between the warps, instead of what this video says. You can start watching at the 5:32 mark to save you time.

    Jewels is using beads from the Havasu themed Jewel Loom July 2024 Creative Soul Box. From the box, she is using the blue Czech Glass button, larger round beads in different colors, the square top-drilled beads, pinch beads (3 sided beads), & smaller round beads. She also uses 8/0 seed beads for around the button & buttonhole. And she uses 11/0 as fillers between beads, so the beads fit between the warps & don't leave space. 

    Supplies Used:

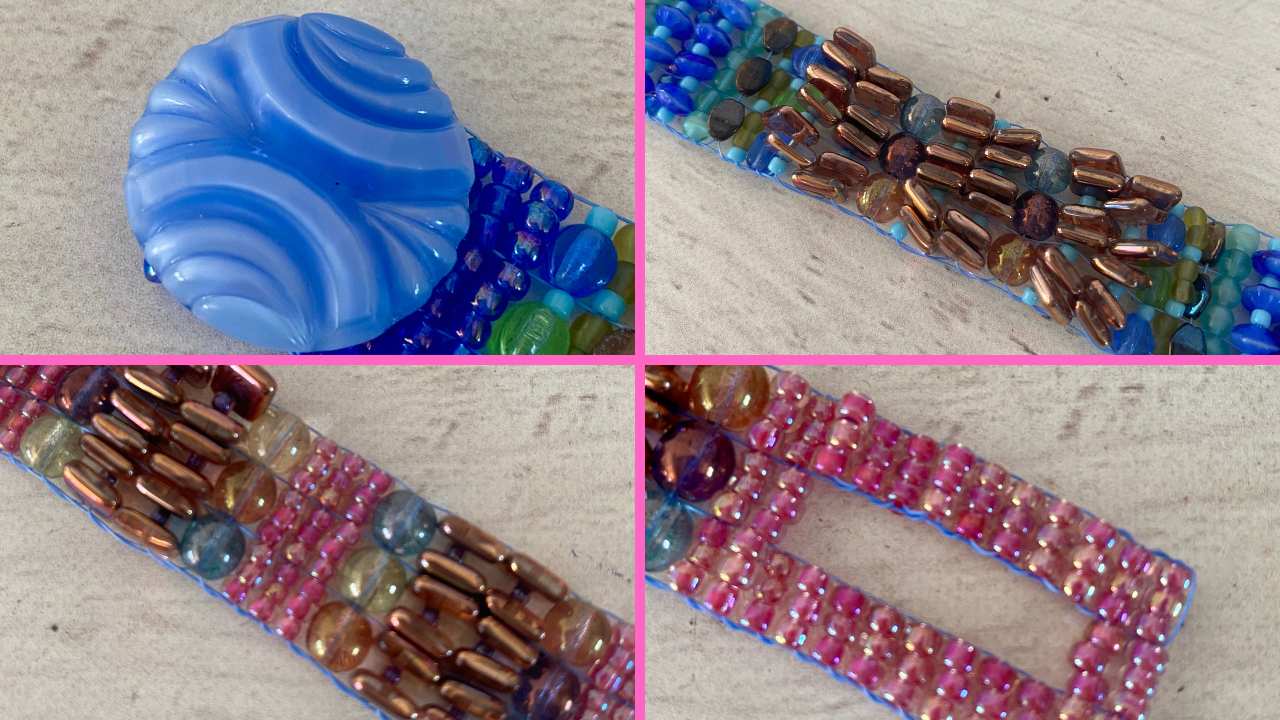
    When you are ready to weave, Jewels starts with the button area. Below is the video, in which Jewels shows how to do this section. A closeup photo of the button area is included directly below this video, so you can check it out more closely. You will want to use your 8/0 seed beads in this area.


    You can also use this tecnique to use a button as the centerpiece of a bracelet or pendant, by weaving it into the center area. 

    Below are photos of the beadwork, showing the patterns Jewels chose to use. These are 2 different style bracelets, with these bead weaving between the solid 8/0 seed beads between the button & the buttonhole. Please keep in mind, Jewels has a 6 inch wrist, so you may need a longer or shorter bracelet to go around your wrist. For a larger bracelet, make some sections of beading longer. For a shorter bracelet, cut out some rows. Please remember, the button hole area will overlap the bracelet, so the button can rest through the hole. You may want to make the bracelet slightly longer (the length of the bracelet minus the buttonhole area) to ensure it closes, plus for those humid days when your body swells up. Better to be able to close it, then not be able to wear it! 

    Once you get the center woven to the length you want, start weaving the buttonhole area. This technique can also be used as a design technique, such as making "peak-a-boo" bracelets & earrings. Or you can use it at the top of a pendant to attach beaded or woven chains through the hole to create a necklace. 


    Now you will want to finish the bracelet, giving it a professional look. And be sure to take Jewels' suggestions by weaving back through the buttonhole area & maybe the button area. Personally, I try to weave through this area 3 times, since the hole in the center does weaken the area more than if the area had beads all the way across. It does make a big difference on the strength of the bracelet, closing it, & how it lays.

    These techniques used to create this bracelet can be used individually or mixed & matched with other techniques you have learned, to make beautiful jewely designs. Happy Bead Looming!!!

    Subscribe to the Jewel Loom YouTube channel to access past & current tutorials: https://www.youtube.com/c/JewelLoom   

    Sign up for the Jewel Loom newsletter & get 15% off your first order, plus three new patterns for first time email subscribers:  https://jewelloom.com/pages/save-15-and-get-free-friendship-bracelet-instructions 

    Join the Birthday club at www.jewelloom.com and receive Free Shipping on your order placed on Birthday. 

    Check out the Jewel Loom Blog for past & current tutorials, plus read details on project:  https://jewelloom.com/blogs/craft-hangover     

    Follow Jewel Loom on Instagram:  

    Jewel Loom Facebook page:  https://www.facebook.com/Jewelloom     

    We have a free group on Facebook full of inspiration, tips and techniques. It's a great community! You can join the Jewelry Making with Jewel Loom community page at the following link: https://www.facebook.com/groups/jewelloom/ 

    Please contact Jewels with any questions you have about her looms:  email - hello@jewelloom.com


    Transcript:

    well hello
    so I wanted to get a a jump jump start
    ahead of it all of those words
    um on the live that I'm doing on
    September what is today September the
    7th
    um
    2023 and so I wanted to get step one
    part one dialed in and um so that I
    could really focus on the technique so
    here we go
    um I'm going to be working with the
    beige wildfire
    and I'm also going to be working on the
    original let's see original Jewel bloom
    and I'm using of course
    a jewel loom needle
    and I'm going to be working with the New
    Bright Lights Vega night so Vega Texas
    has a print on my heart forever and a
    day and if you haven't heard the story
    you know I broke down
    um in Vega and the dispatcher was
    amazing and the deputy that sat
    um with us until the tow truck came was
    just seriously an angel you know totally
    a God God sent angel of protection I
    believe so I put together this um kid
    it's a modification of a kit I had put
    together for a memory pouch and so I
    thought well we've done the pouch let's
    do a bracelet so this is a gorgeous 8-0
    Rosaline luster color and it's just so
    so beautiful and then I've got a
    terracotta
    11-0 that I'm going to be using for the
    loops this is going to be the base and
    then if I need 80s for sewing on the
    clasp later then I can pull from here as
    well
    typically a tube of eight o's with these
    bracelets let me show you the bracelet
    by the way so you know what the heck I'm
    talking about so this is the bracelet
    it's called Ocean's desire this
    particular one this was in my book
    and
    um we're going to be doing this so the
    first step is to build your base so
    we'll be doing one two three four five
    six we're gonna go six across with the
    eight O's and for my wrist I have a six
    inch wrist
    so I'm going to build the base I think
    it's like about five and a half long and
    then the clasp now this is a this is not
    the clasp that comes in the kit because
    this is a reel
    this is a real silver
    um expensive oh my heck I think I paid
    like 30 bucks or something
    for that class but um yeah so we're
    gonna do that and then
    um just as a separate idea if you only
    wanted to be the middle of your bracelet
    we did this in the past this is this was
    the Earth Tone kit one of my most
    favorites we warped with um hemp and I
    love love love love love this and it's
    such a fun fun design so you could
    always just do the looping in the middle
    of your bracelet if you chose to but
    with this particular demo
    um project I am going to be warping and
    using the Wildfire for both the warps
    and the wefts so
    um
    I don't know you could still just do the
    metal totally well we'll cross that
    bridge when we get to it all right um
    let me show you the kit that I put
    together for you there are
    um gosh at this taping I think there
    were we were down to 15. so this is a
    combination of Czech glass that you're
    going to get in the kit and it's a
    variety nothing is the same
    um you'll probably have a big one or two
    focal beads in there that you can or
    cannot use in this project and then I
    also put together
    a bag full of gemstones now I'm just
    going to put those in my hand I'm going
    to take out the three buttonhole clasps
    that you're going to have in your kit
    because we're going to sew our clasp
    onto this project so I'll just put that
    to the side and then there's some aqua
    Jasper every little baggie is a little
    bit different the main
    gemstone which is man-made is the aqua
    Jasper but then in some of the kits I
    sprinkled in little chips of
    um like a topaz quartz and I don't know
    there's come a couple other it looks
    like some lapis got in this one so just
    a fun fun assortment I'm going to keep
    this to the side just so as I'm building
    my projects I know where to pull from
    and so yeah so this is our new kit and
    it's all right here if you want to take
    a lookie and um like I said I think at
    this point we were down to about 15 of
    these and so yeah all right I'm gonna
    push I'm going to put all of this to the
    side because for this part one we are
    just going to focus on building the base
    which again is just going to be this
    area right here so let's go ahead and
    clear the area
    should have some backup uh backup noise
    right beep beep
    and oh I'm also have my scissors and my
    Flats on hand
    they kind of act as a
    third third hand there
    um let me bring in the jewel loom so I'm
    going to put the rod in the bottom hole
    and let me just kind of give you a
    visual too so you know where my body's
    at
    I um this is my left hand this is my
    right hand and this is my body so if you
    look at the bottom of the jewel loom the
    bottom of the jewel loom is closest to
    my torso
    and what I'm going to do is take the rod
    and I'm going to put that in the bottom
    hole
    and then remember your jewel loom
    not going to force it oh
    let me pull back out hold on see when
    that happens that's such a I love it
    when that happens
    turn the loom and just kind of
    reposition the tension don't ever force
    it because the jewel loom is made
    from a flexible plastic not a bendable
    plastic so do you see what happened just
    right there when I first tried to put
    the rod into that top hole it was like
    yeah I'm not going to have it I'm not in
    and so
    um and so yeah so I just turned the loom
    and and repositioned it and and it
    worked so all all good but definitely
    something to remember about the loom is
    that it is you know it is a flexible
    plastic not a bendable plastic so I'm
    working from this big old ginormous
    spool of
    wildfire
    I'm going to turn the loom over and this
    button right here is closest to my body
    all right and I'm going to just make
    a loop and we're going to put that oh
    and I tell when you're when you're
    working with the slider color
    uh wildfire
    you got to pay attention because it's
    very light
    so
    I guess I could have pulled some black
    out but I really just for my project I
    haven't made a full bracelet in a while
    so this is going to be really fun for me
    and um and I want Brown
    and so let me just get a little bit of
    this loose here so we're going to be
    going six across which means we want
    seven
    warps and I'm working from the spool
    and so let me just bring it up here I'm
    going to lay this down because I'm just
    working with a section of the Loom I'm
    not worried where I really start I just
    kind of typically start off to the side
    here from what I would refer to as the
    middle lining up with that back button
    so I'm going to lay
    the Wildfire into one of the grooves
    and then I turn my loom over and I help
    to guide the Wildfire all the way down
    to the bottom
    and I'm just eyeballing it okay if you
    want to get technical and count you can
    but really just kind of eyeball it I
    think you'll be fine and then I'm going
    to turn it over again
    and now I'm going
    around that back button now I'm working
    with the Ado so I want to skip one
    Groove
    flip it over again bring it all the way
    up to the top
    skipping a Groove
    flip it over wrap it around
    and we're just going to continue to do
    the same motion same process here
    skipping a Groove
    oh it looks like my
    Groove down my
    did you pop back in I'm going to fix
    that later I'm not worried about it
    so my my thread bounced over one
    but it's on the bottom so I'm not gonna
    have
    no kitten
    and we're just gonna let me come up to
    the camera here
    so what do I got four so I need seven so
    I gotta do this a few more times
    this is my last my last one
    if you ever feel like you need to get a
    grip just do see how I I grabbed it with
    my pointer because you don't want to
    lose your tension so if you ever need to
    readjust your hands so what do we got
    one two three four
    five six so I need one more I need seven
    warps because I'm doing uh six beads so
    it's always one more Warp than it is
    the beads you were doing across
    Ed so there's my seven and so now what
    I'm gonna do and let me just give myself
    a little
    extra
    space with that
    um so now I'm just gonna grab the warp
    and I'm going around the button make
    sure you don't grab the metal rod
    because then your warps are going to get
    loose so just go around that back button
    a handful or you know a few times
    and then I'm going to put pressure with
    my thumb
    and then I'm going to come over here and
    a waste so I'm just going to clip it
    I don't know I have
    several lunches I guess you could say
    and then what I'm going to do is I'm
    going to find the end
    ah it's so light colored
    and then I'm just coming under all the
    warps
    so the goal here is to get a knot and
    really however you get to that
    um you may be like oh well Jules I I do
    it this way and that's fine whatever way
    you do it the goal is to just get your
    first knot so that you don't lose your
    tension Okay so
    so that's how I did that and then again
    so I'm just going to come under all the
    warps
    and grab that little Wiggly towel
    through the loop
    and pull it up
    so probably okay with just those two
    knots so I'm going to go ahead and trim
    and wonderful okay
    so where was that area
    you know what it's so far down I'm not
    going to worry about it I might try to
    fix it but I think it's fine so what I'm
    going to do now is I'm going to remove
    the rod and I don't want to confuse you
    so let me tell you what happened down
    here my my warp my thread went over too
    instead of one at the very bottom
    it's not a deal breaker because I'm
    making a bracelet I'm working up in this
    area it's not going to like ruin my
    project I I'm just not going to go back
    and worry about it so give yourself some
    leeway to make a little boo-boo like
    that and
    call it a day it's not going to distort
    anything it's all good so what we want
    to do now is I'm going to take my
    pointer
    and
    um in and listen if we weren't recording
    this would I have stopped and gone back
    and corrected it probably I mean but
    again people are so hard on themselves
    and if it's not a deal breaker for the
    project then then just
    don't worry about it okay so I'm going
    to take my pointer I'm putting it over
    the grooves just to hold it now for this
    I may need to let me see if I could get
    it without putting it on my body I think
    I'm gonna have to push this end up
    against my chest here
    oh and once again it doesn't want to
    come out that direction so I turn the
    loom around transfer that tension and
    then again
    pop hey hey
    all right awesome oh my gosh
    [Music]
    okay and then typically the distance
    that you want to see between the bottom
    of the Warped jewel loom and the top bed
    of the warps it's a good it's about two
    inches maybe a little bit hair more but
    I've seen people wear man they have
    really
    they've just done it a little too much I
    would you know you got to be careful
    because again the plastic is flexible
    it's not bendable and also when it's too
    tight you're losing the base you're
    losing the length of of the warps for
    your project so I would say again that
    from the bottom dip here of your jewel
    loom all right where it's warping two
    the top bed here to the top of the warps
    you want about a two inch it's about a
    two inch spread nothing too much far
    over that okay
    so listen we are already into this for
    uh just about 15 minutes and what I'm
    gonna go ahead and do is I'm gonna come
    back I'm going to upload part one and uh
    we're actually going to have a part two
    and then tonight when we go live that
    will be uh part three because it just um
    you know you I just like to keep things
    in chunks
    simple chunks so that you can um you can
    learn better uh with with what technique
    you need to versus sitting and watching
    something for so long all right listen
    that's that's a good warp that's a
    really good warp all right I'm gonna
    upload this and then we'll get started
    with building the base