SIGN UP FOR MY NEWSLETTER AND RECEIVE 3 FREE SEED BEAD PATTERNS PLUS 15% OFF

0

Your Cart is Empty

Shop
  • Read our story

  • Each of our carefully researched, styled, tested and distributed collections reflects a particular aesthetic and ethos. We hope some of these speak to your own style, and help you refine and redefine your own look and style philosophy in the process.

  • DIY Jewelry Tutorial: How to end a beaded hat band

    August 07, 2024

    DIY Jewelry Tutorial: How to end a beaded hat band

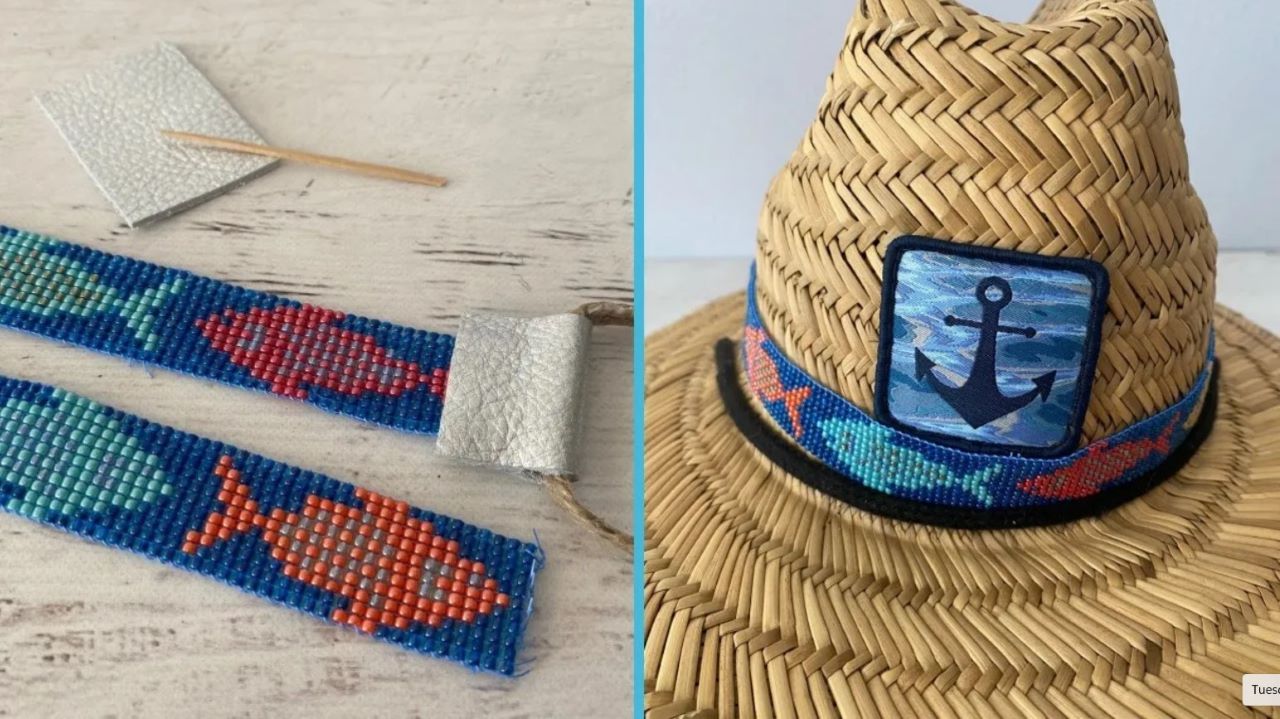
    Join me, Julianna Avelar, as I show how to finish the ends of a beaded hat band made on a bead loom by creating an adjustable hatband using leather & twine. I used a hat band pattern to create this beadwork tutorial. In addition to teaching you how to finish with leather ends, I also share some other closure ideas that I have used. Timestamps are added to this video to help you get to what you need to learn. 

    If you need a Bead Loom you can buy one here:  https://jewelloom.com

    I used the Large Wisdom Warrior Bead Loom, Jewel Loom Beading Needles, Wildfire beading thread and the exclusive beading pattern Papa Joe Hatband Kit.

    You can sign up to hear from me via email when I release new tutorials, am having a special product sale in the shop, tips and tricks for creating on a bead loom along with more! As a Thank you I am offering you 3 Free Patterns for signing up!  https://jewelloom.com/pages/get-3-free-bead-patterns-and-save-15-percent-on-supplies

    Did you know I have a Book? Its true! You can get a digital copy here https://juliannajewel--bellacraftspublishing.thrivecart.com/jewel-loom-inspirations-ebook/

    You can find me here:

    Timestamps

    • 0:00 Intro
    • 0:10 Materials Used
    • 1:00 Cutting Pieces of Leather to fit
    • 1:21 Adhesive I used
    • 1:55 Adding glue to beads and leather
    • 2:47 Laying beaded piece into glue on leather
    • 2:50 You can use Faux Leather
    • 2:53 Find Faux Leather at JoAnn Craft Store
    • 3:06 Adding glue to Top part of leather and front of beaded piece
    • 3:58 Folding top piece over to the Bottom
    • 4:37 Adding Cloths Pins as Clamps
    • 5:33 Opposite end finished
    • 6:57 Showing other ideas on how to close your hatband ends
    • 9:37 Reviewing the project, drying time, glue used and how I used twine
    • 10:00 Overview
    • 11:00 Like Subscribe and Share


    Transcript:

    okay so I'm super excited to share with
    you how I finish the ends of my
    hatbands and so this one was actually a
    pattern called Papa Joe and I'm going to
    be adding this to my fishing hat and I
    used a large Loom specifically the large
    wisdom Warrior and Loom that I designed
    and the pattern as I mentioned is the
    Papa Joe
    pattern I'm going to be using a leather
    this is a real leather It Is by Silver
    Creek leather company and when I saw
    this silver I thought oh my lands I
    totally want to use this for my hatband
    for my fish hatband cuz I just I loved
    it and what I did was I cut out first I
    cut out this piece and I thought oh well
    that's that's perfect but then I
    realized it really wasn't going to
    secure the
    sides of my hatband and so I really
    needed something a little bit thicker so
    I went ahead and I cut this piece right
    here now when it comes to adhesives a
    lot of people like to
    use um gorilla glue or E6000 or
    something that might be really strong I
    totally am still and forever a fan of
    the alen brand um of glues and this one
    happens to be the fast grab tacky glue
    and let me tell you it works really
    really well it adheres uh very quickly
    and it dries clear which is definitely
    what we want for our hatbands so what
    I'm going to do is I'm going to take the
    toothpick and I've already got some glue
    on my
    paper plate
    here my my sustainable paper plate I
    always try to always try when I can to
    find things that are
    clean all right and so I'm just putting
    like a layer down here and then I'm
    going to turn the hatband towards me and
    I'm just putting like a layer of glue on
    those first few rows like
    three three good rows
    and I'm just kind of oops make sure
    we're in the screen here get excited I
    want to see up and close and then I've
    got to make sure you do too so we'll go
    ahead and we're going to lay that down
    and I'm just going to center it onto
    that piece of leather and by the way if
    you don't want to use leather you can
    totally use like a faux leather I bought
    a ton of it once at um at
    Joann's and so you know like I totally
    get it if you don't want to use leather
    and and you could do that all right so
    then what I'm going to do is I'm going
    to come in here with some more glue and
    I'm just once
    again getting those first rows like
    three to four
    rows okay and just a
    nice coating and then we're going to
    come over here to the opposite
    end and you want you want a lot but then
    you also don't want it to like squish
    out
    everywhere okay so I'm just going to
    give like a little bit more
    here I'm telling you the stuff is really
    awesome it it really does adhere quite
    quickly all right and so I've got my two
    um my two pens here my two clamps some
    people will like totally use real clamps
    and that's fine as well and so then I'm
    just going to sandwich
    this and it's it's really incredible I
    can already feel it like really securing
    itself and I just very carefully I'll
    take my pointer
    finger okay and I'm just I'm making sure
    that it stays aligned and I'm going to
    pull in a clean toothpick
    here because I can see that I've got
    some you know seepage and I just want to
    clean that up even though it's going to
    dry clear I don't want to have like a
    mess so so I just like get that really
    nice and secure and then I'm going to
    peek at the back just to make sure
    everything's good and it is and then I'm
    going to bring these um cloes pins in
    whoops I just want to make sure I keep
    everything nice and even make sure that
    nothing is
    slipping and then basically like a bit
    you know most people would recommend
    keeping that close together for like 24
    hours and I'm not opposed to that but
    really with the fast
    um with the um fast grab it really works
    rather quickly and so you know glue glue
    can be fickle because depending on what
    part of the country you're in if it's
    like really humid or what have you like
    you might have to um give it a little
    more time or if it's super hot it could
    like really adhere very quickly but
    there it does seem to be like a little
    bit of forgiveness of time and so you
    could see how like nice and clean all of
    that is and so I want to show you the
    other end because I went ahead and did
    that um beforehand so that you can see
    so we'll scooch that out of the camera
    and we'll bring the bottom in here and
    so you can see this is all nice and and
    smooshed and it just it gives kind of
    like this really cool almost like bougie
    I don't know um you know like you have
    these different textures going on you
    have the twine you have this really
    sparkly silver leather and then you have
    these fit
    F it's like its own its own little movie
    happening but there are some um really
    neat beads metallic like beads in here
    that also have that shine and so that's
    why I thought it would look really cool
    so when this is all done this other side
    we would take the twine and then we
    would feed that through um but I will
    step up I will I will go back one step
    and just tell you that I I did end up
    trimming so you can see that I did end
    up trimming a little bit off of each
    side like you know maybe like a
    fingernail um just so that it wasn't so
    overlapping but I do like the
    overlapping in the beginning because it
    gives the clamp something to hold on
    to so that's pretty much it in a
    nutshell it um you know let me bring in
    let me bring in my this hatband right
    here to give you an an even better
    visual
    so this uh the leather cord in this case
    is what I used and then I've got like a
    barrel bead to keep it all nice and
    secured this is leather this is real
    leather you know you can get leather
    from uh Tandy Tandy Corporation has um
    actual retail shops throughout the
    country you just have to go to uh Tandy
    Leather and look up to see you know if
    you have a um a ret Outlet in your area
    I'm lucky I have one and it's kind of
    cool it's always been in my town like
    forever in a day but here's like the
    traditional way I would say that you
    would normally see uh perhaps a hatband
    being closed so your two leather pieces
    your leather cting this could be suede
    as well and then your Barrel bead to
    like keep it into place but I also cuz I
    love to do things different um let's see
    with this one one with this one I
    literally did a row a fire polish I just
    did a bunch of fire polish and some seed
    beads and then I closed it off with a
    cute little um fish button so what I
    would do is I could do both of these on
    one hat at the same time in fact I'll
    have to do that because that looks
    really cool now I've got like my f my
    fish are do fish
    mate wait here we go all right let me
    get that out of the way here's another
    one which just a beautiful um row of I
    believe these are 4 mm fire polish and
    then again I just did um a button I
    added a cute little charm so that's a
    different way that you could close and
    then this is really cool so I love using
    the slide connectors these are slide
    connectors and then I use some gorgeous
    check chain isn't that
    beautiful so there are different ways
    that you could end your hatband I think
    it just really depends on on the look
    that you're going for um again if you
    want something probably traditional
    you're going to go with the leather like
    I just showed you and um glue of choice
    really but I do think that the elen fast
    grab is just fine that's what I used on
    these and I have been oh gosh this is
    probably a year old and I've had it on
    one of my hats for quite some time if
    you do choose to go with a more heavy
    you know glue just please make sure that
    um that you are in a well ventilated
    area with the tacky glue it it doesn't
    smell so I'm not I don't have any of
    those issues I hope this showed you how
    easy it is to end your hat band I mean
    it really is um and look at this one I
    just actually I just did this one um I'm
    going to say oh heck maybe 2 hours ago
    and look at how nice and secure the glue
    is so this glue is pretty much the bomb
    I'm loving it and this is just twine by
    the way I just kind of wanted to keep
    the fish theme going and um and so when
    this is all all done let's see let's
    turn this
    over this will just go down into
    here and then I will just get one of the
    barrel beads and slide it on and that's
    how I will keep my closure I'll
    definitely take a picture so that you
    can see that and I'll put it in a post
    um but I'm super excited I love love
    love love this I hope it helped you hope
    it inspired you and making hatbands is
    like probably one of the most empowering
    projects that I do like it just makes me
    really feel great so I hope you enjoyed
    this please like the video um share it
    that always helps us helps me to um you
    know get the word out there so subscribe
    share give it some jewel loom love and
    and comment cuz I actually
    reply so yeah all right y'all um I hope
    you love this and again let me know what
    you think and always here to help you
    have a great day