Your Cart is Empty
Wire Princess Earrings in Rose Gold - Jewel Loom School Live with Tricia

Learn to make some fun & feminine Wire Princess Earrings from Tricia Giazzon on the Original Jewel Loom. You will learn how to use A wire base and wire wrap Fire Polish to create a beautiful pair of Earrings. (Editiorial Suggestion: 6mm Pearls would also be beautiful as a substitute for the 6mm Fire Polish.)
Items used:
- 6 mm Fire Polish
- 8mm Fire Polish
- Czech Glass Mix
- 20 G Wire
- 26 G Wire
- Head Pins
- Round nose, Chain nose Pliers as well as Flush cutters
Get the items used at the following links:
- 6 mm fire polish: https://jewelloom.com/collections/beads/6mm-fire-polish?sort_by=?aff=6 OR 6 mm Pearls: https://jewelloom.com/collections/beads/6mm-round-pearls?aff=6
- 8 mm fire polish: https://jewelloom.com/search?type=product&q=8mm*&aff=6
- Czech Glass Mix: https://jewelloom.com/search?type=product&q=mix*&aff=6
Original Jewel Loom: https://jewelloom.com/products/beadalon-jewel-loom-flexible-bead-loom-jewel-loom-by-beadalon-bead-loom-julianna-c-avelar-portable-beading-loom-bead-weaving-easy-to-use?aff=6
You can purchase the different Jewel Looms and materials at the Jewel Loom website. You can also support Tricia and Amber by using our affiliate links. This week's links are geared toward Trish. Trish’s link: https://jewelloom.com?aff=6
Subscribe to the Jewel Loom YouTube channel to access past & current tutorials: https://www.youtube.com/c/JewelLoom
You can subscribe to the monthly workshop with kit (Creative Soul Box) here: https://jewelloom.com/collections/subscriptions?aff=6
Sign up for the Jewel Loom newsletter & get 15% off your first order, plus a free pattern: https://jewelloom.com/pages/save-15-on-your-first-order-get-a-free-pattern?aff=6
Receive text notifications for Jewel Loom shows & special deals by texting "Sign Up" to 1-805-768-0568
You can find Amber and Tricia online through our link trees:
Check out the Jewel Loom Blog: https://jewelloom.com/blogs/craft-hangover
Transcript:
hi guys here we are again for another live with a jewel loom school live with me
tonight um i am on my own again tonight we do have miss joan in the background
helping out with the comments that's for sure but um tonight we're going to be working
with some wire which is going to be super fun uh sabrina hello you were here early
kelly hello you were here early too my girls and maria hi maria how are you doing
sweetie you're frida kahlo bracelet oh my goodness what a job you did on that
i'm loving it honey so beautiful so beautiful that will not be anything i'll attempt anytime soon i mean i'm sure i
could do it but it would probably take me forever because when i have these long like i'm working on a rose bracelet
right now it has 24 row like 24 crossed wildfire
and i'm working on it slowly because it's tedious work as i'm sure that frida bracel was but super gorgeous came out
perfect so glad to see everybody tonight um
we're gonna have a fun time using the original jewel loom tonight
um we're gonna be making these earrings and it's hard to see i know with the
lighting in the camera but that gives you an idea you'll be able to see them much better once i get them
down on the get the camera down on the surface but we are going to be using some 20 gauge
wire and some 26 gauge wire this is going to be a pretty basic design but
what i'm hoping is that um you will use this and run with it as you
do guys you always do a fantastic job of creating your styles and posting them
in the group and uh we really enjoy that we really enjoy that
hi becky welcome in oh i got somebody joining me
i didn't shut the door the whole way so i kaylee was in here earlier with me and miss john and we were talking and
kaylee was making sure that i knew she was there for me if i needed her you know and now irwin's in here
um miss amber has just came into the chat um i did kind of want to give you
guys an update i did speak with her before doing this um amber did have her
surgery on tuesday everything went well thank thank heavens
um who is this okay everything went well thank heavens um she is home now she's
healing um she's tired and she has some pain but um from what she told me this morning it
was manageable so as always guys let's lift her up in prayer and send her some love
as she heals and we're hoping we can't wait till we can get her back and be a regular with us again on our
show so yes continuing for amber high nicole
carmen vicky so you guys ready to get started let's get some wire earrings made
i'm gonna turn this camera down now guys hi danielle so nice to see you sweetie
um i'm gonna turn the camera down i'll close the lens so i don't make anybody see sick and then we'll get started
see here bright light sorry that does that every time doesn't it and
i'm just going to turn this light down just a smidge so that'll help hopefully the lighting's
good my glasses seem very smudgy um so as i said guys we're going to be
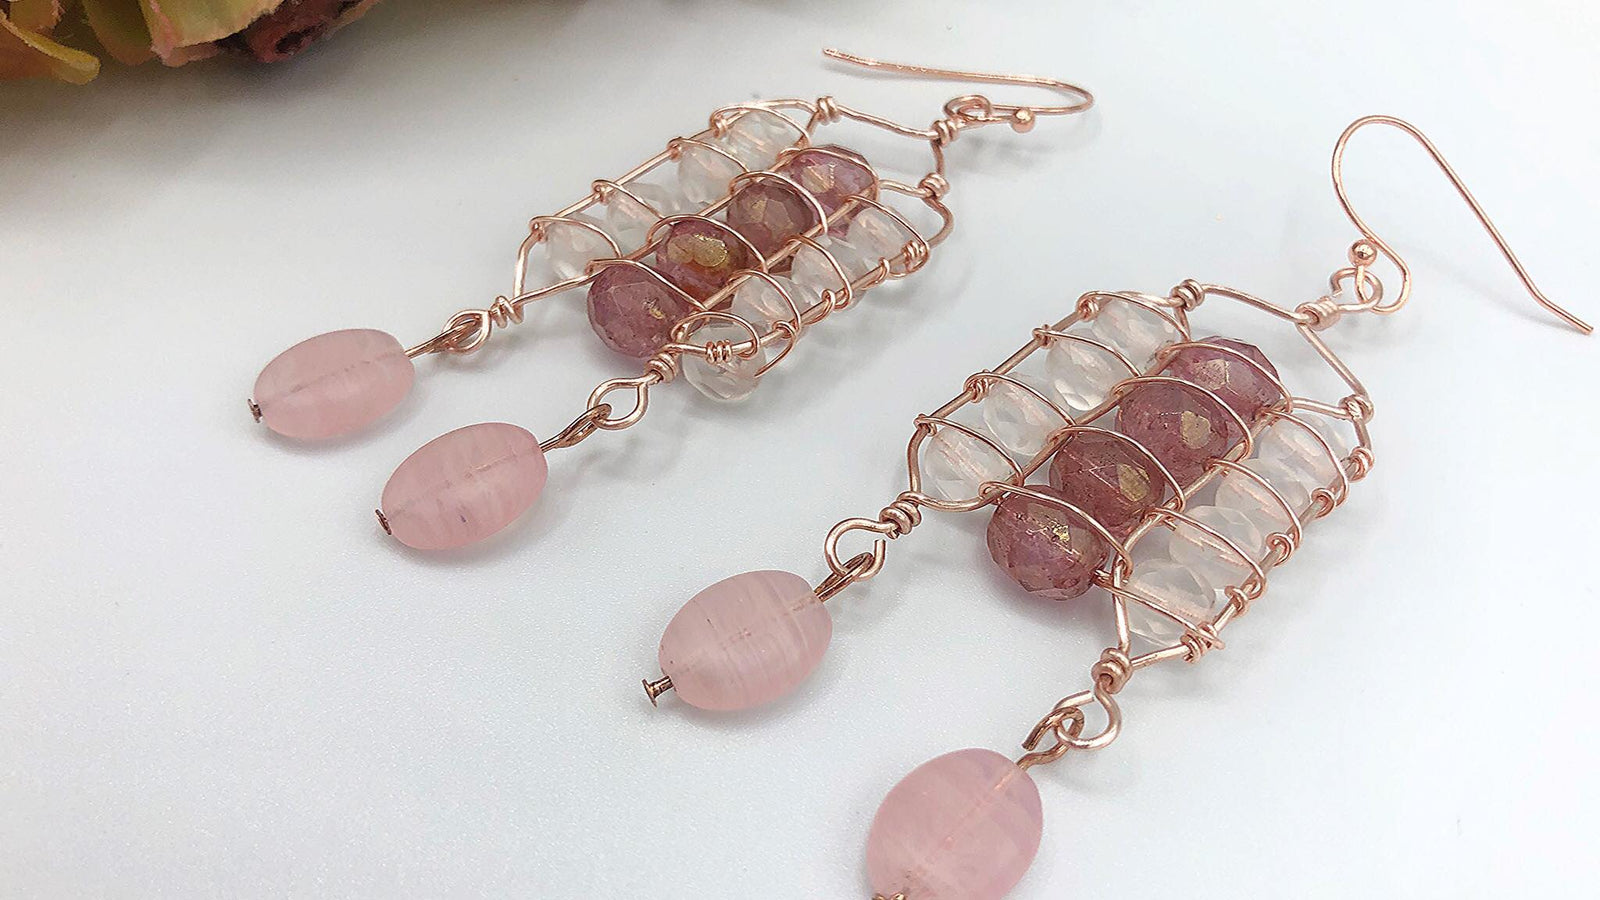
making these earrings i'm calling these my princess earrings only because of the colors with the rose gold
and the pink and the fire polish just in both the pink fire
polish and the clear fire polish which make it really cute
so we're going to be making those like i said it's a basic design and um
i'll give you some ideas on some other stuff you can do with them as we go here i'm cleaning my glasses so please
forgive me all right so what we're going to do now guys i hope
you got a good look at our earrings the basics um we're going to do
four warps across with 20 gauge wire and then we're going to use our 26 got
excuse me our 26 gauge wire as the thread basically we aren't going to be using a needle
none of that we're just going to be using strictly wire and beads for this project okay
so first we'll get our um loom
warped of course i'm using the original because you always want to make sure and use the original when you're using
wire because you don't want on your other looms your wood looms the
wire will dig into it and mark them and you don't want that you don't want this you this is definitely a good go-to so
what i'm going to do i'm going to start by putting the bar in here guys and my tummy is this way as i always tell
you um and i'm just gonna push it into my belly and just sort of flex it a little bit
i'm gonna put my bar in the bottom hole and flex it just
slightly flex not bend and put that in there's our bar okay
then i'm going to take my 20 gauge wire i'm using rose gold you could use any colors you want to use in this
um it works just as well so i'm going to turn this over and here's our knob
that we like to use to hook everything to to start so i'm going to lay my wire against that knob and i'm going to use
some pressure here and i'm going to wrap this around twice because i want to make sure that's on
there well okay and then i'm going to [Music]
turn excuse me one moment turn our
uh loom over and then i'm gonna take my 20 gauge wire and lay it in
to one of the grooves just like so okay and we're we're basically we're warping
this how we would warp anything except that it's wire
so i'm pulling that across and i'm going to put that in approximately the same area
across my loom this is our first one so it isn't imperative that they are exactly the same okay in the exact same
spots but pretty close i'm going to take this around and i'm keeping tension on our wire just like we
do with our hemp and i'm going to push that around i'm going to wind that around twice every one that i'm doing
i'm winding around twice that's going to give you a nicer tauter wire a tauter
taut er i don't know is that a word more taut how about that
wire so then we're gonna do we're gonna count three across one two three grooves
and place our wire into
that fourth groove again across keeping taut don't pull too hard guys
because your wire is strong okay and we don't want to have any casualties so we're going to go three across here
one two and three put that in the fourth groove turning it over
wrapping around twice coming back up over the top and now we're gonna leave five spaces because we
have an eight millimeter fire polish and a six millimeter fire polish we're using so the six will fit within three grooves
and the eight will fit within five so let me just make sure here one
two three four let's scooch over one more
with our wire good get that back over there
and then again we're pulling across not aggressively just taught
and then we got one two three four five and six we'll put it in
the sixth one two three four five all right so there's our
space for eight millimeter again around the back of the button twice and now we're gonna do three more so we
have three rows so that means we have four warps right
so that's that's always the case you're gonna have one more warp then you will have
rows okay so there's three on that side
and i know it looks wonky there in the middle looks like oh my gosh it's overlapped this is going to mess us up
but i'll show you here in a second and i'm going to bring it around the back and again i'm going to wrap this
rounder knob a couple times as long as that doesn't pop out of there there we go
and then i'm just going to take my flush cutter guys and just cut that wire off because we're pretty well set now you're
looking at these wires and you're thinking how am i supposed to loom anything in that mess the way those wires are all wonky what i like to do
guys is i just take my um
i always forget what these are called wire straighteners i'll call them today um
and just run the straighteners down the wire quickly before i take the bar out and
then we're going to do it again once we take the bar out okay so i'm just again just kind of
getting that kind of where i want it to start going make sure these two are
apart then again i'm just going to sit that slightly into my tummy give it a little
flex again and pull that bar up so now we're going to be more taught and then we can go back in again we can
just take our little wire straighteners and just make things very nice and neat
it doesn't have to be crazy straight because this is wire and we can manipulate it at any point
how we want to so keep that in mind so but that's pretty good that's a pretty good reward
so now i'm going to switch over to this one that i had done because i wanted to
put an earring on here already because when i cut it off i don't want there to be
too much waste i want to be able to have a pair so this is the one that i started here as you can see i left the wires sticking
out of it i'm going to cut this one up here just a little shorter so it's not our way too
much but we're going to start down here on the bottom and my toes too close there
and we're going to start down here on the bottom and we're going to take our 26 gauge wire
okay and i can caution you guys do not take too much wire off this bowl
when you are making this i do maybe half a wingspan that might even be too much
um you don't want to have to mess with too much of it and remember it's a short earring yes it uses wire across the
front of it but to me i would rather put wire on than mess with a great big
long strand of it because it just makes a mess so i'm going to take half a wingspan
right now and i'm just going to trim that and if you think about it i mean 26
gauge wire it's kind of like thin like thread is and flexible
so we're just gonna use it to weave so i'm gonna take this 26 gauge wire and
i'm going to let me pop these back over they've moved a little bit
um and we're going to hook that on to the left side as we always do
i can get my little wire to pop back in where we want it
there we go okay so we're going to hook that on the left side just like we do
when we tie on to loom with say hemp and wildfire get
that out there so i'm holding my wire underneath that leftmost
warp and i'm going to proceed to wrap around
the wire and then i'm going to come up between the first and the second
and i know that i've explained this before guys but you want to make sure most of the time when you're using wire
that you're pushing from the middle especially on a project like this if you would take the end and you push it up
through it's going to give you more of a chance to get a kink in your wire so i'm going
to do that one more time just to make sure that i have things nice and snug on
there where i want it and as we're doing this guys we're going to put we're going to use our tweezer
nose or chain nose to kind of keep everything snug around the warps as we go
get it so we can straighten it out because as i said you know
the wire is easier to work with we can put it where we want it and i'm just going to give this a little squeeze with
my tweezers just put that more of a vicinity of where i want it
make sure it's snug on there and then i'm just going to take my tweezer plier and just give that a
little squeeze if you can see that just kind of squeeze it on there
give it a nice make sure it's attached well so it's not bobbling around too much
okay so that's all i did i just snugged it down with this so now as our wire's coming down here
we're going to take it across underneath now this is how i like to do it because it gets my wire underneath
before i even put my beads on get my tools out of the way here
and i scooch our beads over here so as i said i'm using eight millimeters
and six millimeter fire polish and we can't ever go wrong with fire polish right guys
so we're gonna take one of our sixes and i'm going to kind of straighten this end out because i want to kind of use this
as a needle so i'm going to put on one of my
six eight and a six
all right and i have that on the tip of my wire and i'm just gonna let that fall
all right and i'm gonna let go of that wire there and i'm gonna readjust and get these beads
underneath just like we do when we're when we're warping or when
we're wefting so here we go our beads are pushed up between i'm holding the exact same way i
would normally do it now this is where things get a little different what we're going to do is we're going to
take this wire we're going to hold it down closer and we're going to push that around the
furthest warp and down through the last warp and the one next to it and you can
see i'm pushing the middle down i'm not taking this end and pushing it down in i'm pulling that
so that gives us one wrap around there and i'm going to do the same thing
one more time okay and then
that's hooked on there i'm going to take my tweezers just to make sure because this first row can be tricky on any project especially
with wire so we're just making sure everything's snug where i want it it's nice okay
now i do have to have the camera up higher today guys because the wire because i would be banging the wire off
of it but i'll try to bring the project up to you as we're working so this is what we have
so far and you can see the these are not hooked into your warps yet so what we're
going to do not only to add like some decoration to make it look really pretty
bring it up a notch but to make sure everything's in there snug now we're going to take this wire and we're going
to cross it across that last bead and over
this inside wire so not the furthest right but the next end this would be your third from the left okay and i'm
gonna go down through that wire between the second and the third wire again i'm
counting from the left one two three four okay and i'm gonna pull that snug
see how we have the wire crossing over in front of our fire polish
and then i'm gonna bring it up between the third and the fourth
and down between the second and the third again and as i'm doing this i'm making sure that i'm bringing you know keeping
this taut on this wire and then up between the third and the fourth again
how's that closer please i think he says okay this is i know probably hard to see
but so now i'm i did that last wrap through
between the third and the fourth and i'm pulling that up through here okay
so let me get that pulled up and i'll show you where we are okay
so we wrapped on the outside we came across
with the wire and then wrapped on between the third the second and the third so this is the
fourth over here that we we hooked on to for the first row to go across
then that's going to cross over so now we're there in the center it's coming up between
the third and the fourth wire okay is everyone understanding so far
let me know we're gonna do some more here so i'm just squeezing that to get it
nice and lined up the way i want it and just give it a little again because the first row can be
a little um looser all right so now what i'm going to do
i'm going to take this wire that we have coming up through here i hope you can see joan is the lighting
okay on here that is it seemed clear
um so i'm gonna take this wire and i'm gonna take it across
i want this to go over my pink bead like so okay yes i can see clear okay good
and then we're gonna go between the first and the second
wire from the left one two three four okay guys and we're gonna put that push that down
through like so grab it underneath
pull and this is all done nice and snugly we want to make sure it's where we want
it over our bead and again we can kind of adjust as we go because wire is very forgiving you can
make it do what you want to do basically in most instances so then i'm coming up
between the second and the third and we're going to do the same thing we're going to wrap around
the second work okay
and i just want to get that straight where i want it and then up between the second and the
third i'm going to clear my hands out here in just a second guys
okay so this is where we are now we're between we're on number two and we're
gonna go over to number one next so as i'm going i see my wires like above my my bead there i kind of want
that adjusted i want this kind of to make sure i might want more of an angle so i'm just going to kind of give it a
little uh with my tweezer pliers
so this is where we are now now we're between the second bead and the first bead on
the second wire here okay and then the same thing guys we're gonna go
across and i'm gonna pull this up i want my wires more snug in the middle here and i want it to be
hooked on there well just as you go
and then we're going to cross over the first bead here
okay and go down and go up between the first and the
second ward okay is this making sense let me know what you think
all right so now we're on wrapping around that first word
trying not to get our wire all knotted up so i'm just going to kind of take take a minute and get that
straightened the way i want it and then pull the wire through
and i still have this little tail sticking out here and if i didn't mention it guys it is easier to leave a
little towel when you're first casting on so instead of going through the bead you
go over the bead with a wire wrap on the work yes yes vicky you got it honey
yes that's exactly right we're going over top of it and then i'm around there once i'm gonna
wrap one more time pushing up between the first and the second
and then coming out this side we're back over across
we worked our way over by wrapping each bead onto the wart okay like vicky said
all right so i'm just gonna kind of again just make sure i'm good here my first row seems pretty solid
just i went down a little hair there pretty good so now we're back
we're going to go through this make the second row yes it's definitely a decorative thing
yes okay so again i'm gonna pick up a six
an eight and a six once you get the hang of this guys you can whip through this i mean you can
make a bracelet with this technique that would be gorgeous and you know you can't go wrong
with that so i have it on my wire now when i go in to do my next row
what i want you to do guys is give yourself a little bit of breathing room on this wire
okay on the outside of your first bead because you if you get it too tight in
there your wire is going to set crack up or your bead is going to sit crooked so we just want to give it a little bit
of breathing room can you see how i'm just kind of my tools are getting in the way there
i'm kind of just giving myself some air on this side a little bit doesn't have to be too massive but just
enough so we can make sure our bead is sitting straight okay and we're going to do the same thing
we're crossed and we're going to wrap it around
the fourth warp one
two and i'm gonna just get these tight
together here before i do my third and as i'm coming across for the third
i'm going to use that wire and again go between the
uh third onto right onto the third warp okay if
that makes it more simple okay now this is going to be tighter in here now as you build your rose it's
going to be a little tighter in there so you're going to have to kind of finagle to get your middle of your wire pushed
down in between there but you can do it all right so there's
one and then up through between the third and fourth because we're wrapping around that third warp
sometimes i even have taken just my pliers if i can get a little bit of that wire up through there and just kind of
pulled it through with my pliers a little bit and then it makes it easier for me to go
ahead and pull it the rest of the way and you can move them while you're working on them you just want to make
sure that when you get the row done and you tighten everything down they're nice and close and
look nice you know so here is that and we did one time around so we're going to do one more
time again down through
and around us so we're not going back through with the wire we wrap
the sides you do not go back through the beads with the wire no you go underneath you
know string them on for to take them underneath and push them up and then you're going to wrap them on to the warps
you're going to cross in front of them and wrap them on to the warps yes i hope that
that helps so again i've got to pull this up between here i'm just
gonna grab and pull that up a little bit and get that the rest of the way
yeah because you'll find i mean if you unless you use large hole beads uh you could probably get the wire
through there twice um and you could certainly try that that's certainly something that you could do
um i just felt like not only i didn't want to force the wire through but i thought it looked nice with the
wired decoration across the front of the bead i like to do that a lot of my earrings when i'm making earrings i like
to swirl down the earrings with the wire and i think it really adds to it
okay so now we're on to our next one
i'm just going to push that down between there just as i pulled it up from the front you can push it down between
with your pliers to get a good grasp okay
there you go in there buddy sometimes you have to flip it around a little bit to make sure you're getting
it where you need it
there we go it's coming down through
oh maria does i don't think so i don't think anything you could make would look terrible
well honey you know i'm always there for you guys um afterward of course you can reach out to
me or um and i'll be glad to help you with everything
all right so then we went across that second bead and we're
going up through now you work your wire does work harden a little bit as you go
so you'll notice that it gets stiffer each row that you do and you have to be careful because with the 26 gauge it's
very fine so it can get brittle very quickly so just try not to handle it
uh manhandle it too much so you can get a nice
okay so there's our second one going across
and i'm going to squeeze that get that kind of where i want it
good things wearing one of them here and like if my wire got bent a little
bit there in the middle i just took my pliers and just gave it a nice little squeeze and it made it
look much nicer
there okay go that's where i want it
okay so now we're going across that third one and up through the first and the second
the end ones aren't too bad they're pretty easy because you have room to groove on the outside but that middle
one can be a little tricky two
and then the third is gonna be our
stringing on all right just
neatening this all up the way i want it
and you can wait till the end guys if you want to go back through and kind of tweak everything before you take it off
you can certainly do that i just kind of like to do it as i go
again i'm going to make sure this first row is still snug on there okay so now we're ready for our third
row if you don't want us to manhandle the wire does that mean
we loom with our feet instead oh girl you're silly you're silly
oh my goodness vicky keep me on my toes there we go okay so i'm going to push
these beads down underneath i'm giving myself a little bit of breathing room on this outside
so my bead sets correctly just give myself a little
push i push out slightly and that gives me just that little bit of space right there that i want
push these up through and back to it
oh thank you amber she said she um likes the design she
never thought of going outside the bead this way well you know me i'm always coming up
with stuff about some weird stuff you know always
outside the box because that's pretty much where i live most of the time in my brain
but thank you i appreciate that yeah it's just another use for your loom
another way to use your wire on your loom
okay back up through are you keeping up guys you got this got
this all figured out
i'm gonna go down through
now i'm moving faster now because i'm sure yes outside the box outside the beads
for sure that's just where i find my happiness
i like to do things that are different and
unusual i guess okay so i'm pushing that down
this is so intriguing robin says is it well i'm glad i like to intrigue
you so i'm pulling this down we're wrapping for that second bead now
i can get my wire to go down through and cooperate with me without breaking there we go
and i'll turn on the side sometimes guys and you know i've done this with other projects and just kind of work
my plier in there and slowly get my wire to come down through
well good robin thank you
okay up and through and i can really feel my wire stiffening up by this point okay
so just be careful
this it kind of is reminiscent to me of like bead weaving um or beat my bead weaving um wire
weaving where um you go between and you wrap around each
wire and make a design with just the wire that is something that is on my to-do
list eventually here for us but this is kind of like a stepping stone for us right
here maybe do some kind of pattern and wire okay
so we're just gonna straighten that out that one's looking kind of curvy and odd and
i'm just gonna work with him a little bit all right so then on to the outside one
we only have one more row please stay outside of the box maria says that's not a problem honey
not a problem okay and then
around twice now we're getting ready to put our next row on
so you can see there what we have so far okay and again you
can go in and tweak you know move your wires around a little bit on the top you don't want to go too
crazy but just so you can get it you know the way you want it to look if you want
them to be more wavy or if you want them straight across or just whatever makes you you makes you
happy all right so we're gonna pick up our last three beads here
a six an eight and a six okay
and i have a little tiny little pickup on my wire right there so my
beads don't want to go on so i'm just going to take my pliers just ever so slightly straighten that don't go too
crazy but just give it a nice little straighten so i'm going to put my beads back on
there and now it went right over for me okay
lightning bolt zigzag hey yeah that works too definitely
so as i get my beads in here
like i said i'm going to push over ever so slightly just to kind of give myself that breathing room on the side
you'll notice if you don't do that guys you're going to have um your beads are going to angle
in a weird direction so just make sure you do that
or if you get too aggressive and you're wrapping everything too tight it'll warp it a
little bit so you just have to keep a consistent tension when you're wrapping
okay again through
i want to make sure i have that where i wanted here okay
give it one more time around just to make sure everything is nice and stuck
okay pull that down through
could you put a few wraps on each row to space them apart
i'm trying to think about what that means what are we spacing apart
the warps the beads if you could just kind of clarify that a little bit for me
okay
and we'll get into our middle bead here again i just want to make sure
everything where i want it
and then we'll go across our second bead
come on where you can do just a little bit more without breaking on me i know you can't
okay good
a few wraps on the ends of each row of beads
as you add the next row sure you could you could make some space by doing that yep most certainly
most certainly
all right so we just have one more need to go
finish this wrap around here
are you talking about doing a row without the beads vicky i i think she's just meaning you could
do um more wraps on the the sides to give yourself more space between each row i
think that's what she means
okay move this up
but i could be wrong
all right so we're going to do three wraps on this side we're on our second and then this is our third
okay so now we're ready to take our creation off of the loom once
you tweak it once you make sure you have everything nice and snug and where you want it
it makes you happy the way it looks
and i'm just kind of judging this around a little bit okay
and i'm just going to cut this wire you know a little shorter for now because we're going to cut it cut this
off the loop okay so now to cut your project off the loom
it's as simple as getting a pair of flush cutters wire cutters and flipping
your loom over i like to keep my fingers right here on the back and a finger on the front no
matter what what i'm cutting off of the loom and then i just start snipping the wires
okay and that's it now we're gonna straighten this
on this side and i'm gonna do the exact same thing i could probably undo all of this but i'm not messing
with it right now i'm just going to snip it down and where you position your earrings if
you're going to do two in the original is very important you know you can um
make sure that you have space between the middle and space on the ends so you
can then cut this in half and you'll have enough room to make the wire wraps and things like that okay
so that's the next thing i'm going to do i'm just going to cut this in half
so i know i have about the same amount of wire on either earring and i'll set that one to the side
because we're just gonna work on one for now so
what i'm going to do here i'm just kind of straightening my wires and we have our wraps here
so guys keep in mind these wires can still be pulled out of here easily at
this point you know you have them snug in there but they could still come out so just be
careful and be aware as you're doing this so the first thing i'm going to do is
i'm going to take these little wires and i'm going to snip them toward the back of the project
and then i'm going to press down the ends of the 26 gauge
so it's nice and snug and that wire is hidden so it doesn't get caught on anyone
anyone's anything so same thing here
just gonna bring those around to the back
and then snip
and then push that one down okay
just straightening my wires out a little bit giving me a feel so you see how
i have the top of this sorry guys um we're going to do
a wrap around we're going to bring them up together and wrap and then we're going to bring the next two wires up and wrap so we can
get a loop on the top for your wire now on the bottom i just did both wires on either side so we could
just dangle some beautiful czech glass from it
so the first thing we're going to do is we're going to take our wires
and crisscross them like so on the top okay
it's like the first thing i do just kind of crisscross them a little bit
crisscross them a little bit here so you can see that there's some space above the
the fire polish there you don't want to get too tight and then i'm going to take my pliers and
i'm going to go in and i'm going to bend this wire horizontally like so and this wire vertically like so
okay everybody have that and then i'm just going to take my chain news pliers in and i'm going to grab
that nice and snug and i want it to be at that intersection i made so i'm going to just come in here with my chain nose
make sure i have a good grip and i have it where i want it and then i'm i like to use my fingers to
wrap wire but you can certainly use your pliers this is i'm not going to tell you this isn't tricky because these wires will
spin on you so you got to kind of just make sure you have everything
hold on to which i did not right there so we're going to put this back in here like so make sure you have everything
held onto with your uh chain nose all right so i'm bringing that one
across okay
and if your wires like this is moving up that's not a problem because we can pull these down and adjust them
okay i have that first one around
and i'm just pulling that nice and snug and then giving that one more wrap around i'm just gonna do two wraps okay
like so so we have our wires now we can go back in
and you can see this kind of got a little bit messed up when i did this but that's okay
because i can go back in with my pliers and make that wire behave the way i want it to
and i can push this one down because i see that one needs to go in more and adjust
and adjust and then we have it right back to where we wanted it
okay so don't get you know too upset if your wires are scooching all around just
make sure they stay in there okay but if they move around you can always
just put them right back so i'm just going to flush cut that one right off the back here
and press that down
okay so this is what we have so far
we're gonna do the same thing on the other side like a top drill bead yes my dear yes
vicky um just like so we're gonna crisscross them
and i'm gonna bend one horizontal make sure one's vertical
again go in with my pliers
and hold it snug and give a wrap
okay and again it looks like oh we made a mistake
but we're okay we're still okay
i'm just pushing that right back down where i want it and adjusting it so it's at the point i
want it now keep in mind when you're working on the bottom they're going to scooch around too but when you make your
final wrap loop you on the bottom you have to make sure the top and the bottom will line up i'll show you that
so i'm just again just kind of tweaking everything i'm gonna cut that wire off the back
and flatten that down all right so now we're going to move on
to the top part it's basically the same idea guys i just
crossed the wires like so i leave myself enough space that
my my uh top loops aren't bending in too much because i don't like the way that looks
when these uh loop these wraps start to bend in i don't think it looks very nice
so that's just me personally so i try to keep that pretty straight
and we're just gonna do the exact same thing guys we're just gonna make a horizontal bend make a vertical
bend hold on to your wire
and this one we have to kind of be careful because we want all that to be even at the top
so we're going in and holding and wrapping these are just basically
um what wrapped loops will be would be okay because that's what we're going to do up
top here we just did the beginning part of a wrap loop without putting the loop on the second
ones okay i can see this is kind of where i want it i'm just kind of
adjusting it things and you're you're you know your first one may not be perfect guys and that's
fine i mean they don't have nothing has to be perfect as long as it's beautiful in your eye
that's all that matters okay so i just cut that off
and now we're going to make a loop at the top and then i'll go back and i'll adjust some of this a little bit
so regular wrap loop i'm just going to take my tweezer pliers in
and bend a vertical bend into our wire then take our round nose
and go up and over just like so
and then across uh some clear seed beads on
on there would look cool and keep it straight too that's true honey that would be a great adaption
so hold the you want to make sure and hold your loop and then wrap around
and our top is done okay
just like so i'm going to trim that off
and we're doing it again we're pushing our wire in to make sure no one gets any scratches
all right so this kind of gives you an idea again mine's not perfect here
tonight guys but you get the idea these are not perfect either but they're much better because i took my time with
them but that gives you the idea right there okay so on the bottom
we're going to do the same thing but we're not going to come up with this this third
uh set of loop and our third set of wraps excuse me
some reason i'm searching for words tonight i'm gonna take a drink here quick guys
okay so i'm just gonna do the same thing i'm
gonna crisscross our wires and as vicki said you could put seed beads on here at any point that would be pretty you could
put seed beads on you know i want you just to make it your own guys
so i'm doing the exact same thing here gonna hold now i did on my other ones
when i was wrapping one i would push the wires down the other wires so
they didn't get in my way as much when i was wrapping so i can tell you that's an a good tip
to do because i would always get um the other wires would get in my way okay
so we're gonna do that and i make sure my top is where i want it
make sure everything is wrapped nicely get everything kind of straightened
around yeah there we go and then
trim those wires off and same thing here
we're gonna do
and i'm just making sure i have the top where i want it as best as we can have that centered
and then doing the same thing
okay and then i double check it again before i wrap
okay
i'm just going to move that wire out of the way just give myself two wraps around there
okay now on the bottom all i did is i took my one step looper
and put loops on the bottom of these i didn't want wrap loops on the bottom
because it was just going to add to the length and they're already pretty long with that extra extension at the top
okay so all i do is i just take my one step looper i come in
and put it through the tool there and come up to where i have the wraps and just give a squeeze
it cuts it off and everything for you whoops cuts it off and everything for you
okay so there's that and we'll do the same thing with this one
words words words word here's some extra words yeah
i don't think there's enough words in the world for me dear sometimes okay same thing
one step looper to the rescue all right so that is basically finished
except for the dangles and the same thing guys for the dangles this is like my best friend i have to
tell you you know when i'm making dangles i don't do
most of the time i don't do wrap loops because it's just to me it adds length
it depends on what you're going for but what i did we're going to do the dangles now i took
one of jules's check mixes that she has not checks mixed but
check mixes and this is the pink one one of the pink ones there
and it's absolutely stunning i hope you can see how beautiful that is and so that's where i pulled out
the the two the four dangles that i had on the bottom of these earrings okay
so i've already done three of the dangles i just picked out enough beads so i could do
uh two earrings and i'm going to do one for you here i'm just gonna take a head pin
i'm using copper i don't have rose gold so that's a good thing to use and place a rose gold if
you don't have i could have made head pins with the rose gold wire but we're not going there right now so i'm
just stringing on the beads i want from my dangle
and again i'm going to come in here with my one step looper
go across take a squeeze and make sure when you're close to beads like that you
you can crack beats so just be careful and i can see i got pretty close there
so i'm just really watching i don't want to crunch my beads so i'm just going to snip this myself
just back off just a fingernail hair on that when you're using it for some reason i didn't this time but
so we're basically just going to take our little dangles get everything nice and straight on them
open those up and put them on the bottom of
our earrings that we created okay
make sure you're always closed when you're adding your dangles
always open front to back not side to side when you're opening loops these are just
little tips for maybe some newbies that are out there
do what come in different sizes lizzy
the the loopers the uh one step loopers do come in three different sizes this is the largest one
here if that's what you're asking so again we can go back and we can tweak
somehow where's my wire oh there it is my wire got underneath my bead so i'm
just going to take it put it back in the position i want it as we were making our loops
straight everything out just tweak
and then you're just going to add your ear wire on do the same thing with your other one
and add your ear wire on
i'm just seeing if it's how i want it
not a million times thrilled with this but it gives you a good idea
on what we're gonna make guys or what we're gonna have when we're done so here's the one that we made tonight
and then these are the ones that i already had made you can see the same
kind of technique and with the dangles
okay any questions guys i'm gonna flip the camera back around and then we'll see if
anyone has any questions and go from there
[Music]
bright lights again guys move my light back just a smidge
there we go you're the instigator there we go
they match your bracelet wonderful yeah i'm pretty thrilled with them let's put them on let's see how they look guys
there's one
this out oh you're very welcome guys as always
as always i enjoy doing it for you so here are our finished products
so i hope you guys enjoyed and i hope you give this design a try
i'll be anxious to see what you come up with as always oh and vicki says you didn't mention
band-aids as necessary as a necessary tool tonight i usually do a dna sample on my water
yes i mean you can certainly do that but try to be careful guys and please don't
do that please don't do that maria honey if you have any questions you know
you can reach out on me reach out to me on messenger and i'm happy to help you through with anything that you're having
trouble with i'm glad you guys like the project and next week we're going to be starting
to get into some fun halloween projects we're going to be doing a nightmare
necklace the other earrings i wear i was wearing these are ones that i also made i know that shocked you because you know
not a jewelry maker or anything but these were what i was wearing
this is one of them okay and they go with my
necklace as well oh thank you so much thank you so much everybody i'm so glad you enjoyed it
and thank you to you for being here with me and i'll see you guys next week take care guys