JULIANNA CHRISTINE AVELAR

0

Your Cart is Empty

Shop
  • We are a brand born of a love for the beauty of restraint in design, the inherent grace of feminine strength, and the necessity to treat our environment and each other with love and respect.

    Read our story

  • Each of our carefully researched, styled, tested and distributed collections reflects a particular aesthetic and ethos. We hope some of these speak to your own style, and help you refine and redefine your own look and style philosophy in the process.

  • SilverSilk Cuff With Beading Wire - Jewel Loom School with Joan

    August 19, 2022
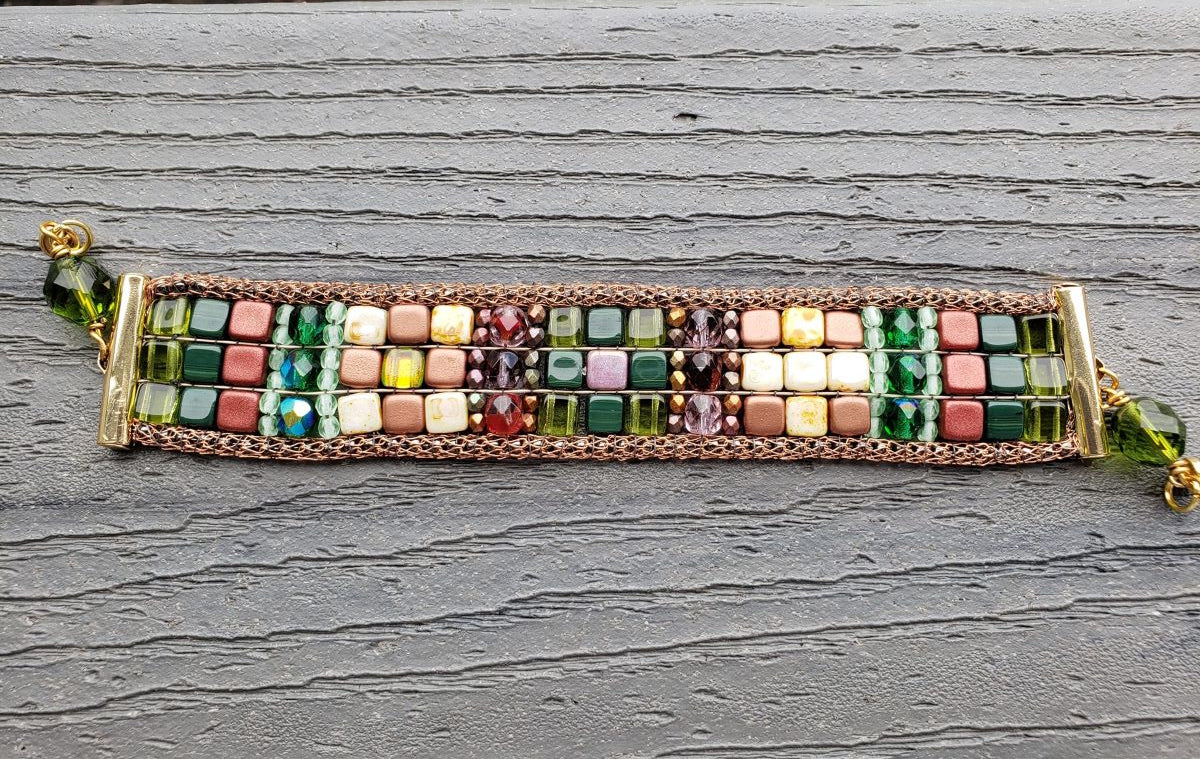
    Beading tutorial with 2-hole tile beads and SilverSilk Chain

    Let’s mix things up a bit! Joan is using SilverSilk Capture Chain & beading wire as warps. She weaves some 2 hole & fire polish beads to make this beautiful cuff, besides showing how to use a slide connector. Plus she shows a different way to add more thread when weaving. 


    Items Used:

    • Beading Wire 
    • SilverSilk Capture Chain (can use Pearlesque Chain also)
    • Wildfire
    • 6mm Tile Beads
    • 6mm Fire Polish Beads
    • 3mm Fire Polish Beads
    • Slide Connectors
    • 11/0 seed beads
    • SilverSilk Jewel Loom

    Links to Supplies:

      Shop the Jewel Loom store: https://jewelloom.com/?aff=11 

      Subscribe to the Jewel Loom YouTube channel to access past & current tutorials: https://www.youtube.com/c/JewelLoom 

      You can subscribe to the monthly workshop with kit (Creative Soul Box) here:  https://jewelloom.com/collections/subscriptions?aff=11   

      Sign up for the Jewel Loom newsletter & get 15% off your first order, plus a free pattern:  https://jewelloom.com/pages/save-15-on-your-first-order-get-a-free-pattern?aff=11     

      Receive text notifications for Jewel Loom shows & special deals by texting "Sign Up" to  1-805-768-0568

      Jewel Loom Facebook pages:  https://www.facebook.com/Jewelloom   & https://www.facebook.com/JuliannaJewelsAvelar  

      Jewel Making with Jewel Loom community page:  https://www.facebook.com/groups/228056324285807  

      Please contact Jewels with any questions you have about her looms:

      • email - hello@jewelloom.com  
      • text - 1-805-768-0568


      Transcript:


      hi i'm jung dice and i'm the jewel loom school concierge besides being um like a
      background assistant social media um um for jules juliana jules avalar and also
      for um the silver silk so um social media ambassador
      so this is so i just found this so cool when um this came out because it's kind
      of like um you know emerge between my two um favorite people
      and um so um julie um jules came out with this um to use silver silk on and
      the grooves in it is bigger to hold the silver silk and then also you can even use thicker
      cords on the back side so i imagine like you can also put in um
      leather into um hollow mesh and also
      you can maybe even fill some beads with holo mesh and put it on the loom here with the thicker side so if you want to
      straight string some more beads between them so it's pretty good and you can even make a longer bracelet
      or even a necklace by wrapping all the way around so i just wanted to show you um
      a necklace that i got inspired by this one it's one we made in
      the jewel loom school monthly workshop
      and i was really inspired by it so i tried it by putting a similar version between
      silver silk so that's what i'm going to show you today now last um
      recently trish did a project with soft flex and i got
      really excited for about it so instead of using s-lon for the warps where i did in this
      one i'm gonna use soft flex and the soft flex i'm using is the
      champagne extreme flex wire i was gonna use um
      some of the blue i got a trio of blues um about a week and a half ago in the mail
      right before i got went on vacation and i misplaced it
      and so i arranged all this and that's when i found found it because i was gonna make it in blues so um i'm hoping
      that this will show up as looking like grout between the tiles
      um you know that's how um the original design for this one jules put
      um used um hemp in between to make it look like grout
      but i changed it to s on something just kept telling me to try that because she teaches us to make it our own she shows
      us the techniques and her designs but then we change it up to make it our own
      and the other thing i'm going to be using is [Music] oh i lost a little bag for it
      it's some capture chain i think i believe it's called is it shimmering copper i had the bag
      right here and um well actually it's a copper that has
      some dark chain in it so since i couldn't find my tan wildfire
      i'm using some black because it'll blend in with the chain and you know the ball chain in the um
      in the capture chain so then i'll show you my design which is
      really similar to um this design you know just different colors
      and so let me go down to my workstation now hold on okay the beads i'm using are laid out
      here i mean it's kind of sloppy because of me moving it around but i'm using
      six millimeter tile beads three millimeter fire polished beads
      and six millimeter fire polished beads i like the fire polished beads because they are usually pretty uniform with the
      tile beads and um i like mixing them up because it gives you a lot of texture
      you can find most of these beads on jewelry.com
      i do have some extras in that was left over from previous workshops so too
      and just some of the there are some three miller meter fire polish i got from my own stash too that's been in
      there forever so and then i did find it it is shimmering
      copper for the um for the silver silk
      i don't know if i can put that under the name but shimmering copper i have all the links in the um
      in the video under description
      and just to let you know i like using
      the big eye needle because when i make mistakes i just find it easier to thread an end thread since
      the you know the needle is still white wider than the project
      okay so there's a couple things i want to do first
      and sorry i forgot that
      um i like using the the um
      bead stopper for the ends of the silver so i mean for the um
      soft flex because when i tied it i couldn't get it tight enough on here only because i was afraid of breaking
      the wood so i found if i use the bead stopper at the end it worked out really well because i'm
      only using two strands of the soft flex
      so this is so to show you how to string it
      i take an end of the silver silk it doesn't matter which groove you put it in we're only going to be using four
      grooves but i place one
      trying to find the video sorry i'm not used to doing this but i place one at one of the end
      grooves and put it in the groove under above it
      and then i go across to that groove that's directly across them and put it in the next one and i
      skip i skip the next two grooves because that's what i'm going to use for the
      soft flex because these grooves are about six millimeters apart too and so that's
      perfect for my beads that i'm using today
      okay
      so
      oh i turned off my silver sock i have enough hair left for a bracelet
      or even part of a necklace and now i'm going to use my soft flex
      i hope they still carry this color wire i i found it in my stash
      you know looking at all the um different soft flexes i have in my stash to see what would go good with this
      collar and i really like this so i did the same for the soft flex
      you'll see it'll sit a little bit lower
      let me show you the end what i'm going to do now now for the ends just to make it tight
      i'm just using the bead stopper there and pushing it again up against it
      show you what i did
      okay and so it's it's let me tighten it a little more
      okay now just to let you know that the soft flex does sit a little bit lower than the um
      beading wire but um
      the but you know we'll correct that when we take it off it might be a little bit longer now i have a seven and
      three fourths inch wrist and i measured trying to figure out what i'm gonna use for the ends and things
      and i think i came out to six and a quarter to make the beaded section
      so um this is eight and a half so i'm going to take
      start about one inch from the end for beading
      so just a little bit under oh since i have this backwards let me do
      it this way
      so about a quarter inch under the jewelry name
      oops i forgot to trim my soft flex
      okay now i usually take about two yards of the um
      wildfire or fireline whichever you choose to use
      so that's like stretching my arms way out while pulling that
      just for the front of it
      i got these special scissors at my local bead store that it's great for um
      wildfire or fireline so i use it only for those
      okay now if you're using a jewelry needle
      just um do it as you normally would thread it as
      you normally would
      sorry
      so i'm gonna string my tie my um thread
      to the sock to the silver silk
      i like leaving some so when i'm done i can kind of thread the ends into the beads too just so you know it just
      protects my knot a little bit more
      sorry about that
      i may have to turn my board around so you can see
      better
      this is our first time i'm doing a beating video on my own so please be patient with me
      and i gotta tangle this
      now if you run you know if you're worried about running out of thread i'm going to teach you a trick
      about adding on thread that i've learned you know when i run out of thread i'll teach it to you
      um then i learned from gail deluca who owns the local bead shop
      white fox beads here and she taught it during bead weaving and i use it in looming also
      because that's what we should do figure out ways we can use some techniques in with
      others it makes our lives a lot easier and you might come up with some interesting
      creations too that way
      okay i got tied
      and i'm gonna push this thread out of the way
      so in this one i i start with three i mean
      six throughout three millimeter fire polish
      so it's really interesting um using different size beads
      when you're using them on the loom you want to make sure that they all equal going between the warps
      in this case we're using the six millimeter fire polish in this um six
      millimeter tiles um do uh work together
      but um i had when i went to the smaller beads i had to use three millimeter tiles um fire polish sorry about that
      so i could so it they would um i could fit two between each warp so it would
      equal you know one of the other beads so when you're mixing beads keep that in mind when you you know you when you're
      putting between warps look at what i did i got one too many
      i'm always told this is a no-no when doing it in bead weaving but
      i don't always follow the rules
      okay and the first row is usually harder and to be honest with you i like locking
      it in place so i go through i go i do the um under and over
      twice so i went under with the beads and fit them in between the warps
      now i'm going over the warps with while going through the beads so my
      needle is going over the warps
      because of the thickness of the wildfire we're going to be playing with this but we'll smooth it out when we take it off the um
      off the um loom too so it might look a little wonky so now i'm going just for the first row
      i'm going back through again but you know but most people don't do that it's just for me it just makes my life easier
      so you go with the techniques that you is easier for you
      yeah so when i'm learning things i usually like watching two or three artists how to do things and then i adjust and take pieces of each one
      and come up with a technique that's best for me
      okay
      okay now i'm not gonna make i'm gonna i'm gonna put in on
      three six millimeter fire polish like i said lay out your design and do what you think is best for you this is more about
      technique than anything
      i love this some soft flex because i think it's really going to make the bracelet even stronger
      because i'm not like when i've been bead weaving before
      i've had you know after i've been wearing a bracelet for about a year i've had it break in a certain place
      usually around the clasp i think it was but i'm going uh i don't want to redo all that or try to fix it and this um
      soft flex will give you a lot more strength so you know it shouldn't happen
      then i'm going to put in um six more
      three millimeter
      okay
      and if you haven't checked out the um monthly workshop for um jewel loom
      you want to check that out it you know you pay for the workshop and you also get the kit
      and we get a lot of surprises in the kit but jules always gives us
      um extra beads you know especially when they're colorful like this one
      so i should say always almost always and so um
      we could um make it our own and change it up and then also it's usually a lot more to
      make two or three more items like this month we're making two pair of earrings
      or last month we made two pair of earrings this month we actually got another loom
      the um baby i'm calling it the baby wisdom warrior
      so it's about the same size as the um baby jewel loom it has that beautiful
      wisdom warrior on it and so we can make like pendants or earrings on it without um wasting a lot
      of our threads
      and wires now i know jewel says oh
      let me go get back to this part now we're going to go for the two hole beads
      i do have a case where one of them is two-sided it's not the same on both sides so um
      i'll show you that but otherwise just throw it on the um
      beads you know if you do have it works two different size you want to make sure they're facing the same way let's see if
      i can show you this
      okay see i put my needle underneath
      so
      you can thread it
      oh i see some of that you want to make sure that your thread is pulled tight enough but not so
      it warps the everything and i had some extra that i just pulled out there
      so i went back through now i'm going back underneath
      i was thinking of something pretty cool last night too like if you had this and you wanted to edge it say maybe
      um it'd be hard to edge it in um six millimeter you know like if you wanted to put extra rows on the sides it'd be
      hard to do it with six millimeters because the holes wouldn't match up right um so like if you want to edge it three
      millimeters so you can line them up with the holes the two holes so you see what i did there i i just
      went underneath i went through all three holes now i'm going to go back you know on the bottom of those beads
      oops
      so yeah you gotta keep up the um keep in mind the alignment of the holes and whether they'll align too if you want to
      mix up beads that way and i love these beads they remind me of
      malachite see the darker green a lighter green i don't know if you could tell that but it's got lighter
      green let me see if you can see it
      i guess my camera is not wanting to focus but it's got lighter green lines in between them and i love finding um
      beads like that that um you know for bead weaving or looming
      that look like um that remind me of gemstones
      because i love gemstones [Laughter]
      okay you see that loop sticking out so i'm gonna pull on my thread to tighten that part
      up
      i have to keep an eye on that because i'm pretty bad about that i think i tighten it up and i didn't now
      see we're going underneath and i find if you just let them swing under like that and go find the bottom hole
      try to line them up so you can just go right through
      so now they're not stringing anymore not to get under my silver silk
      um oh i just want to congratulate um both jules and
      nilay on being chosen like jules was chosen in um
      as one of the top five innovators for um by
      um interweave and uh and jewelry making
      and nelay was chosen as top five trendsetters
      you know both are really big honors um so i want to congratulate them and i'm really proud of both of them
      because they both work so hard
      and they both have wonderful custom companies with great customer service
      and they're both one-man shows
      as far as their business goes locally
      i'm not going to make you sit through all this i just want to show you that two-sided bead
      and then you know i'll come back on when um
      i get to adding the thread and then also come back on when um
      i get done so i can show you how to take it off i have a couple ideas for this i
      want to try
      okay
      neely's coming out with a making his silver silk stronger you know coming up with better
      ways and so you know he's been updating his
      um inventory so if you haven't tried silver stuff in a while you really need to try out some
      of the new things i know he updated um the flat mesh
      and he's coming out with new um capture chain well it's probably all of them
      plus i was really want to use the blue on here like i said i misplaced my um
      my soft flex but maybe it would have been too much glue by the time i got done because i am such
      a blue freak lose teals and turquoise
      give me those and i'm in love with the project
      so and i always thought um green and copper look great together so that's why i went ahead and went to this
      okay
      i have to get stuck back up on my soft flex it's getting pretty low and the blues i actually bought it to do
      some um braiding and other beautiful bracelets i saw um sarah makin
      a couple weeks ago two or three weeks ago
      okay
      that soft flex is so flexible too so i made i knew this that would make this bracelet so yummy using that you know
      just all easy to put on because i did have some of the seven strand and i thought uh
      in green i thought about using it but then i again i thought i don't know because i've made seven strand bracelets
      before and they're harder to put on but i like using them like maybe
      if you're just using like a little center piece in between some wires you know so it gives a little a tiny drape
      that would you know good for that okay now see what i'm saying
      messed up because i one of my ends was um
      i need to strengthen my i move my hands down
      on the um or move my needle down on the wire
      you know one time i tried making it because i i just hate okay i have to figure out this design
      just a minute
      okay i see what i did okay
      no i'm sorry about this this is part of the design got all mixed
      up i think i did it that way okay
      so see that's my double-sided bead so that's why i wanted to make sure i had it fixed that way
      so put my needle back underneath
      sorry i keep going off screen
      okay so i'm going back over the top
      and now i have to go underneath the silver
      silk and underneath the um warps for the bottom
      you know i like this bracelet because it's full of texture with the silver silk and the um
      you know the like the six millimeter raise it raises up higher than the
      others six millimeter fire polish does
      okay let's see what we did here
      okay now to go under
      we're getting close to halfway down with this bracelet
      so you may have been freaking out when i used my scissors to cut the silver silk
      and my orange scissors the silver silk and the um
      the soft flex but the scissors are guaranteed to cut anything so and since i forgot my
      cutters i just went and grabbed those instead of making you wait for me to run into the other room to get my cutters
      okay now this is the one where see that this bead
      is double-sided it's green on one side and that really shiny um
      dark copper coppery color on the other side so i want to make sure that coppery color shows up
      so when i'm laying out the beads let me make the holes
      i want to lay them out in the direction i'm going
      and then you want to make sure you go through the top row once you lay out what how you want it looking on the
      on the
      loom and when you go to put on your class you also want to be mindful of that so your class is facing the right
      way you're not showing the bottom of the of that bead or beads because i did that on another bracelet so luckily
      it's the plain side of the clasp showing up but because i didn't really want to remove it that's what i did on that
      black one i showed you earlier oops i see that little black loop again
      let me tighten it
      and then all you have to do is go um back through the bottom then
      again where they're swinging so they don't have to swing
      okay so i'm going to stop here and get caught up until i'm starting to run out of thread so i could show you
      how to add thread without having to feed through a bunch of beads and tie knots and things
      i'm gonna and the thread burner's gonna help me quite a bit on that so it will return when i get to that point
      okay i'm gonna show you how to add um more thread to your um
      thread on the loom i'm um and let me feed this
      right back through here i like to try to make the thread that's
      already on the limit as short as possible so i don't have to fight with it a little bit later
      okay so what you do first is you get some more thread that you're
      using to weave you know guess about how much you need i'm just going to be on the safe side
      and get about another yard
      then you tie it to the other thread
      i just kind of make a square knot or whatever tie it down
      and then you need your thread burner so
      and my thread burner
      here i'm sorry i forgot to get it okay
      what you want to do is make little balls at the ends of the threads that you tied
      this might be harder to do with size 15 beads but i have done this before getting them through
      you just take some more tugging
      so once you get the balls on the end
      um grab the threads not the ends and just tug and see you got that little
      ball there let me see if i can shave a little ball
      so but you know it's where the threads met there's a little ball
      so then just thread the extra thread now on the needle
      on a bracelet i made yesterday i was able to hide that little ball into the silver silk
      which made it lucky okay and then just go ahead with your stringing
      like normal
      i got like a little sunbeam bead there only had one left so i'd make it at the center piece of
      of the bracelet so now when you get down to that ball
      it's gonna have to tug a little bit that one was easier to go through oh what did i do i forgot to go
      underneath
      so until you get the ball you know past the ball you're just gonna have to do a little bit more tugging
      but it's not really hard and i've never broken a string yet doing it now i have
      made the strings come apart because i didn't make the balls big enough
      at the ends of the threads
      okay oh i was lucky i got that hidden inside i think that last bead
      and you just go on from there and then i'll come back when i'm done
      with the um weaving okay i'm almost done with the beading
      i forgot that i am planning on using um slide connectors i only have silver
      and gold so i'm going to use the gold um in which case i need seed beads 11
      size 11 or size um eights for these to go over
      and actually i had some it and it doesn't matter what color the those seed beads are because they're going to be
      hidden by the slide connector they're going to be inside it and i had some ugly
      black wonky ones that i bought years ago
      when i was just grabbing things up from my stash so and they're size 12 so just
      slightly smaller which i'm hoping to make some more room for the crimps when i crimp together the um beading wire
      so i'm going to add it down here and as you can see it's kind of because the silver silk is wider and i got too close
      to the end it's got a little wonky here but it'll smooth out when i take it off the loom
      and um you know what they say you know i said i'd start a quarter inch below the
      jewel loom named up here where i'm really bad about estimating sizes i mean somebody could tell me
      four inches is six inches and i probably believe them so okay so let's get started just
      finishing up this last row
      so um at the top you know when it was where it's smoother i added um 12 seed
      beads so even though it's a little tight here once it smooths out i'm um it should be about the same
      amount of room so i'm going to add 12 down to the bottom two 1 2 3 4 5 6 7
      8 9 10
      11 12.
      sorry about this it's almost as bad as some doing a the first row
      because it's kind of tight they're all just kind of wanting to go all over the place
      so i'm putting four in between each warp set of warps
      and if you didn't know it the length going down up and down like this are called warps
      and the other ones that go across right now i can't think of it beginning
      to the w-2 so i just call it weaving
      knows that might be the name of it i just don't remember okay
      okay i'm going to do the cheaters way
      get that back here
      okay i'm just pulling all the thread from the other side from when i went underneath
      and
      now i'm trying to hit the very last bead before i go over the silver silk
      now i want to do this actually what i'm going to do now because i want to strengthen it to
      make sure that you know when the um the slider clasp doesn't come out i want
      to make sure that strong in between so i'm going to go through the second
      row again and by the way i did add thread like i
      showed you so i can no i didn't add thread i left enough but you can add thread if you don't have enough thread
      at the beginning to um do this i just want to make sure that
      it's really strong in between the rows that it's still not going to pull out
      i'd rather be safe than sorry after all this work i don't want it falling apart [Music]
      okay
      it doesn't help that my needle's slightly bent i should get my um
      um my nylon jaw pliers and smooth them out
      see this could have been done at the beginning sorry about this or no i guess this is my ending row but
      that could have been done as the first row at the other end if i would have thought about it you know like joel says
      always think about how you're going to finish it i sized it for the the um
      um it's like um connector but i didn't think it through for some
      reason i was thinking of um using something else
      i'm just going to slide it through the silver silk i'm going to slide it underneath then and then i can tie it off
      okay now we're going to remove it from the loom and we want to do this carefully it shouldn't be too hard to do
      um i'm removing the one end you know i took took off the bead clip
      and the silver silk and the other end should be able to
      slide off pretty easily then
      okay
      now what i want to do is i want to make sure it's spread um
      you know because it was all wonky down here i just want to make sure it's smoothed out
      that um you know it's not gapping or anything we're trying to be on top of each other
      okay now
      i want two clipboard no no one there that one has a wire cutter on it
      okay i'm going to show you how to finish this off with the slide clasp
      just to let you know that i did this once before and i made a big mistake i said to cut
      it too short and so that meant that it wasn't working
      right so i unraveled some of the ends and put on some um
      plain black nicer size 11 so i could um
      work through this and get it through the line and bleed me it's a lot easier to do it on the limb than to do it laying
      out weaving those things so now i found the easiest way
      to um
      and these is i'm going to just put a seed
      bead on each silver silk now i did tie them in the one that i um
      scrapped in that tutorial because um and i glued it the ends and it seemed to be
      really strong you know this is a couple of days later but um
      you know so you could tie them but mine now are cut too short to do that
      so if you tie them i suggest putting glue on the ends because the ties will go through the um you know if you tie
      them enough tight enough to the um seed beads they will go into the clasp
      and this like connector now since i did this too short once we
      we get done with it i'll measure and see what risk risk size is for but you know if you do make yours too
      short you can also have the option of maybe um attaching you know wire wrapping some
      um beads to the end or even attaching some
      you know to these take removing the clasp and um
      wire wrapping some beads or um attaching some chain there
      okay so i'm just gonna let's see i got the black seed bead and there's my crimp it
      doesn't matter what color crimp you use too i'm using a size one just
      i mean if you only have size two just put another strand of um soft flex in it
      i tried that and it just wasn't working so you know i was i mean i was having a hard time and i wanted to get this done
      so i just switched over to these size ones i don't know how neely doesn't
      okay so i'm just putting in the back and making a little noodle out of it and
      putting in the front slot so i'm just using a traditional crimper and i just broke my seed bead underneath but i'm
      not going to worry about that crimson still stay in place
      okay now the part where i i said wrong
      is i had you just cut right above the seed beads before but don't go up to
      they will fit in if you know two above the um your row of seed beads it's going to go
      in the connector that way all your strings won't start
      falling off oops
      sorry one of my connect one of my crimpers has a cutter at the end
      and i should still get another cutter there
      and i'm going to cut these right above the cramps
      down
      so i put that first ball in there i don't want to wrap that make sure the wire the
      silver silk is kind of wrapped around there
      now you want to make sure these this slot is open enough it's not
      i found if i found something flat like i ran these um so there's a third to open it up more
      because you can always kind of crimp it close you know with chain nose pliers or something
      afterwards
      now the size i'm using here are size 25.4
      so that'll give enough room for these you know to move those around
      i'm going to open that up a little bit more in the end my other end went through really
      smoothly
      make sure that wire ends are in there
      let me turn the other and make the other end work better
      there's room in there since i'm using size 11s and these cl these
      slide connectors can use up to size eight so see i'm just sliding it right through
      and i know there's room in this because my first bracelet i used a size um
      18 i mean it was old silver silk you know 18 millimeter slide connector it
      was old silver silk so it wasn't as thick as the really nice quality silver silk i mean by saying old it was pre
      kneeling so i mean i just pushed the last in and now we're going to just close this down
      and then i'll just kind of tighten these ends
      okay so let's see do i have a
      measuring thing
      from connector to connector
      this measures six inches but you know i had taken off one section
      of these fire you know like that on each end of the red ones
      so um and my class is going to add another inch so you know if
      if you have a six inch wrist and then your clasp for six and a half that's going to work beautifully
      but you can also find like um a a bigger clasp put on this
      or a wire wrap like i said before that's it for our tutorial thank you for
      joining me just wanted to show you the bracelet on my wrist um as you could see it was a little too
      short so i um wire wrapped a couple beads the back you know i might have liked to have bigger beads to make a
      little bit wider here or you could even use like links and wire up some um some
      of the fire polished beads and the links and then i just use the magnetic clasp
      you know there's even some clasps like i used one in a project that was like one and a half inches long and that might
      you know as a toggle clasp and that would fit in here and look like the decoration so you know there's a lot of options for
      when you make the um bracelet too short but like i said there's a lot of people that could still
      wear it when it says size i just couldn't um so thanks again and um please read
      the description for any um links or um you know you may want to have and
      i'm in chat posted links too we decided right before i started recording this that
      the links that we would treat this like the jewel school video
      joe loom school video this week since jules and trish are at
      bead fest so um and also remember to check out our blog um which you'll find a lot of um
      the past tutorials besides the current ones in there um and just by looking at the picture
      you'll find quickly what you want to look for so i hope you all have an evening a great evening and thank you for joining
      me take care