We are a brand born of a love for the beauty of restraint in design, the inherent grace of feminine strength, and the necessity to treat our environment and each other with love and respect.
Each of our carefully researched, styled, tested and distributed collections reflects a particular aesthetic and ethos. We hope some of these speak to your own style, and help you refine and redefine your own look and style philosophy in the process.
Red Queen Earrings - Jewel Loom School Live with Tricia Giazzon
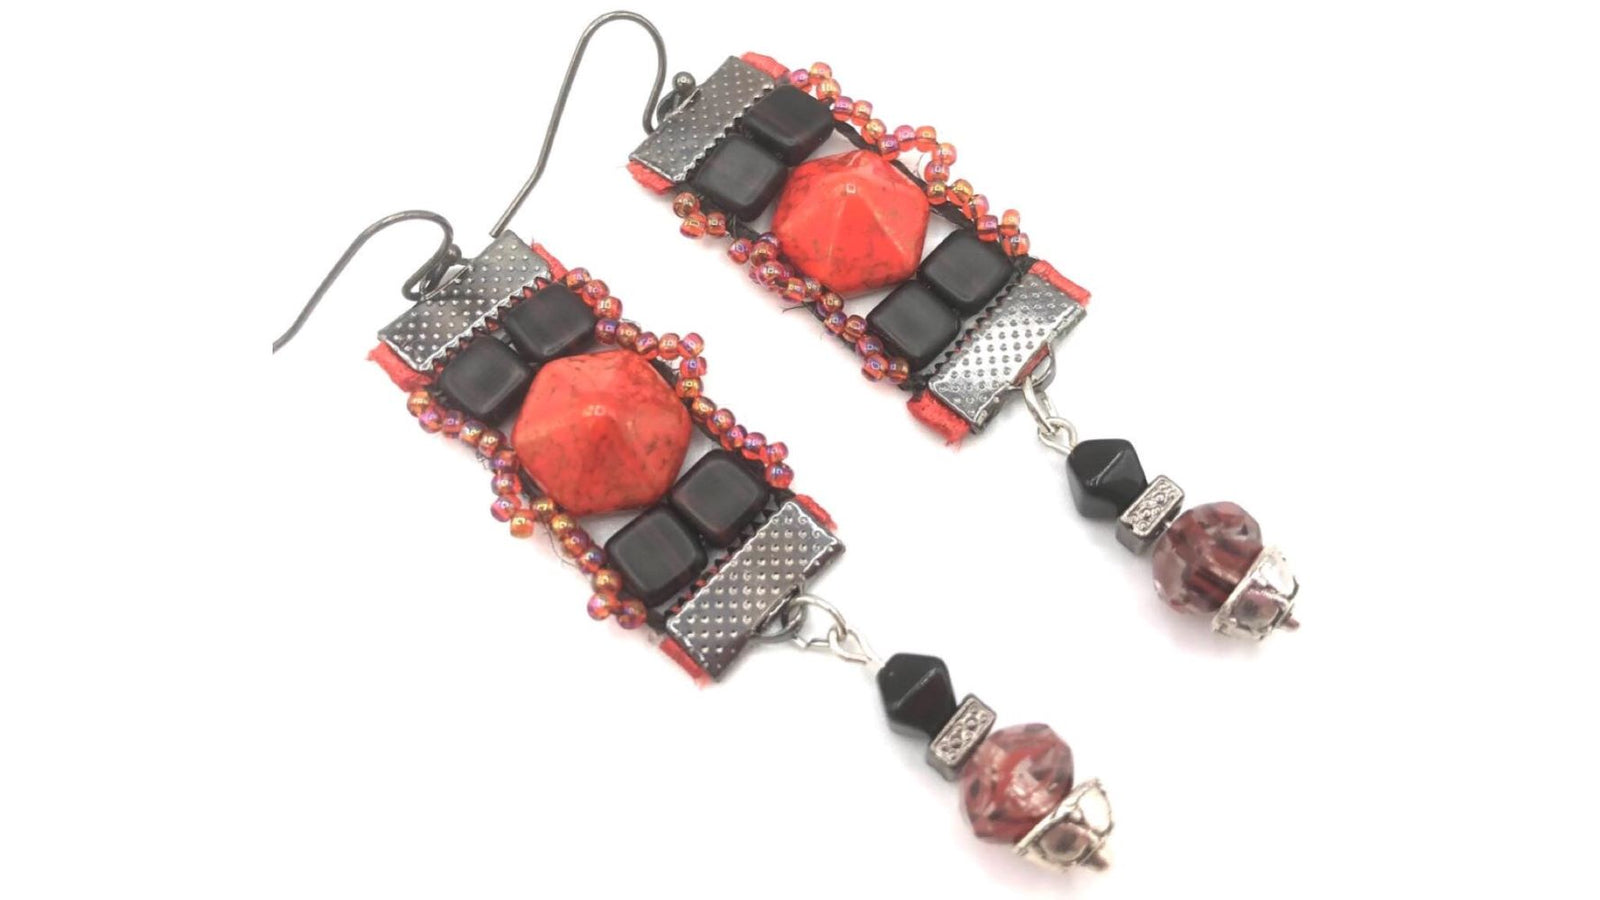
Learn how to make some Royal Red Queen Earrings Using Hexagons and Tiles with designer Tricia Giazzon. Trish also shows how to picot stitch the edges & to finish off the earrings, using a ribbon crimp & drops. This is a quick & easy, yet gorgeous, project for both beginners & knowledgeable loomers. Julianna Jewels Avelar also joins in to explain how to enter a drawing for a Jewel Loom beginners kit, including 2 looms & enough materials to make a bracelet! Drawing will be Wednesday morning, May 4th, so don't miss it!
[Laughter] what do i look like now i was still a little pixelated oh wait i gotta suck at
0:13
it does that work
0:19
it does lean back suck it in then this comes up
0:29
so um trisha and i are um trisha is wondering if i'm pixelated
0:35
or grainy i don't know so tell me if i am i don't know as long as i sound okay
0:42
yes you sound great yeah and i don't have any lipstick on my lips i know
0:48
i don't know the people that begin using this hi rose hi linda i know hi linda
0:54
linda i sent you an email so i hope you got that
1:01
and bonnie from kawasaki a bunny
1:07
yeah we're gonna be singing fun earrings today guys i know look at so these are
1:12
not these are not the ones that trisha made but the concept is similar well and not because you you pulled a good one
1:21
i can't wait to see i pulled a good one yeah with the hexagon i love those beads
1:26
i love them yeah i love the hexagons they're gorgeous yeah those are those these are the matching for the spanish
1:32
um spanish brushes i was gonna put finish cuff whatever i don't know i don't know
1:37
what i'm doing hi kelly blurry picked jules so she's blurry too roses
1:43
that i'm blurry you're whatever stupid logitech just sucks i'm sorry but i said
1:49
it it's a worse 200 and flipping odd dollars i've ever spent in my life
1:56
i got a logitech but it wasn't even that much yeah that's because i spent i bought the
2:04
one that's supposed to be like no-brainer perfect and
2:09
it's not happening oh i hate when that happens
2:14
yeah hi melanie and i'm not on the wi-fi's i'm on the uh
2:21
i'm plugged directly in so yeah granulated i don't know it may clear itself out because sometimes it does and
2:28
this time of night i know at least here it's a lot busier yeah
2:34
the internet the interwebs are tired the interwebs are really tired from everybody all day
2:39
well i'll let me just do my um let me do my spiel you just do it and uh
2:47
and then i'll let you do it you're so fabulous so i'm crashing the party amber um amber is off today and we love her
2:56
and we love her and we love her and we're sending her oodles and oodles of yummy delicious love and she'll probably
3:02
maybe she'll oh
3:08
there we go yeah it feels weird it does the word so it works out sorry i
3:14
interrupted you totally no it's okay it's fine but anyway so i'm i'm here with trisha
3:21
and trisha's gonna show us how she did this i'm super super stoked to learn how myself because i love the hexagon
3:28
um beads and before i show you show you what we did this no we're still in april
3:35
what we did in april i want to talk really quick about the um spanish cuff so this was the spanish
3:43
cuff we did in march and this was the workshop there is one kit left
3:51
okay and so that's on the home page at jewelroom.com there's one of these kits
3:57
left the video tutorials come with it so they're already taped
4:04
they're on the jewel loom school site and so once you buy the kit then i
4:10
will put you into that course easy peasy pumpkin squeezy you probably will have
4:15
some beads left over um to make at least
4:20
i don't know what did we say but i don't know it depends on the size of your wrist there's quite a bit of beads left over and there's you use a lot but
4:27
there's still a bunch definitely you always are very generous with that
4:32
i try i definitely try uh and for april there are two kits left
4:38
uh for the april project and this is using the hexagon beads and the czech pearls
4:47
yeah they're super gorgeous and so you get a bazillion so here's the box yeah
4:54
and of course i'm very grateful and um there's always tea
5:02
and a cookie which i might eat [Laughter] and oodles of beads look at all the
5:08
beads that come in yeah this is the april kitchen let me tell you something those hexagon beads are not cheap all right and what
5:16
is there three or four strands of those in there and the czech glass b uh pearls are not this is a heavy duty
5:22
yeah this one was like is full of value and instruction and all kinds of
5:28
yumminess so two of those remain you can either um subscribe at 45
5:34
or you can do a one-time pay of 55 dollars and um
5:39
yeah i think that's pretty pretty easy peasy i want to give a major shout out to trisha
5:46
because trish tree is
5:55
yes my my italian friends call me g because
6:00
philly jersey juliana is like with gu right
6:06
so just saying just saying i feel you on all of that i keep freezing is it just i don't are
6:12
we freezing i don't know uh i think it might just be you kelly but i
6:18
don't know and let us know guys and shari likes the cookies too anyway i
6:24
just want to give you a big shout out because thank you you are all that and
6:30
a bag of cheerios like thank you okay we're talking i appreciate it jesse james jesse james uh
6:38
ambassador dress it up and um julian
6:44
very happy yeah and i know that i know that nilay over at silver silk just like loves you and adores you
6:51
i want to tell you all this girl is like approaching 5 000 followers on the tick tocks
6:57
and that is not easy okay like it's
7:03
it's really actually an organic following over there because
7:08
i know like i've been on the tick tocks for i don't know what a year or so i don't even know
7:13
um and it's not easy so it's very flattering i hope you know like people
7:19
are choosing yeah over on the tick tock where i would say
7:25
traditionally our creatives don't normally live
7:30
so it's super impressive it's fun really yeah you should be really proud of yourself well thank you
7:36
thank you that's what you're dishing out they you know they're liking and so if you are on the tic tocs and i'm blurry
7:43
so i'm going to go back to this position am i still blurry or just
7:49
yeah this is my this is you're just blurry but far away now what about now is that better yeah i
7:59
okay watch this watch this stuff they want to know the name of your tic tocs don't watch this i'm going to tell
8:06
you right now i'm going to march my butt right back into best buy
8:12
um the name of my tick tock is um pink poopy studio
8:17
to me that looks worse yes it's very dark yes it's very dark you look like you're
8:24
mysterious person now i'm looking like i do when i get my
8:30
spray tan okay
8:37
is that better [Music]
8:42
maybe maybe it's still blurry i mean you're beautiful but you're still worried what
8:48
is wrong why can't i get any love on this crap [Laughter]
8:57
okay i'm going to tape it into the comments girls thank you so much for asking yes really um yeah if you're on the tick
9:05
tocks go and follow um go follow trish and i don't know why i'm blurry so i'm gonna make that
9:10
channel too yes you do pink well everything's pink it's trisha's
9:16
pink poodle jewelry studio on on youtube yeah so if you look up pink poodle jewelry studio
9:22
you'll find me on pretty much all aspects of social media
9:27
smart branding smart branding i there is another pink poodle
9:34
pink poodle crafts or something on um on
9:39
youtube but you'll still know it's very different content oh okay i'm gonna say one more thing and
9:46
then i'm gonna get i'm gonna go behind the scenes so i'm not like disrupting everything okay
9:51
so i put together a new jewel loom starter kit which is like beyond awesome
9:57
um it is the jewel loom original jewel room it's uh
10:03
the julian needles okay and you get a hundred different assorted
10:09
beads each package will be different so don't look at this one and and so pretty good they're assorted
10:16
three yards a hemp um and whether it's a sun butterfly or daisy
10:21
not sure at this point whatever okay it's going to be in there everything you need and i decided to
10:27
give you a couple of yards of wildfire um color may be very you know
10:33
different but it'll always match so don't get your panties in a pinch if it's not
10:39
exactly this okay i'm giving it to you okay it doesn't be
10:45
harsh and as a bonus you're gonna get the baby loom too because you can't have the mama without the baby right
10:51
so here's the super cool part about it um you definitely should be able to make a bracelet i mean i love this bracelet
10:57
so stinking beautiful it is gorgeous so beautiful one of my favorites
11:03
yeah you could do a couple different things you can make rings you could do an anklet you have the beads um the tutorial a
11:10
couple of them live here on the youtube channel if you follow the awareness cuff
11:16
instructions you'll be getting to the same point but you don't get those beads
11:22
okay it's not making that bracelet it's making that technique okay so easy peasy
11:29
um we're gonna do something fun with this if you sign up so you gotta like the
11:35
youtube channel the julia loom youtube channel yes uh subscribe subscribe to the youtube
11:40
channel um like this video and um i don't know what else is there you
11:47
could share it gosh we would love that but the others okay
11:52
yeah but the other thing is so if you sign up for the email which you're also going to
11:59
see that you have the choice now to sign up for sms traditional
12:04
sms which is like an email but it comes to you in text it is not the same
12:11
as the community phone number that we've been giving to you in the past that is for
12:17
community for education for customer service all right
12:23
so the sms is literally like an email but it comes on your phone
12:30
you can opt into that that would be awesome if you're not into that then you don't have to be
12:36
but we need you to sign up for the email between right now if you haven't already done
12:41
that and next wednesday which is is that the fourth
12:48
i believe so at midnight okay so everyone that signs up between
12:56
yes this this moment which is april 28th 2022
13:03
to may 4th at midnight okay
13:08
we're going to thursday morning may 5th pick a winner and that winner is gonna get a starter
13:14
kit that's awesome okay and the crowd
13:21
i was like wow when she told me that it's like crazy yeah right and of course you could still
13:27
buy it it's 24.99 plus shipping which is ridiculously fabulous i just want to get
13:33
you beating and now like i said i've added a couple yards of beading thread it'll be
13:39
different colors it will match don't get all crazy on me if it's not
13:44
pretty blue it could be pretty pink jewels i have to just step out for one second if you could take over just for a
13:50
moment and it'll be just all granulated i'll granule i'll be right back okay step out maybe i won't be granulated
13:57
let's see oh am i still granulated
14:02
oh now i don't have anyone to talk to i feel weird [Laughter] hi amber
14:08
hi amber and bonnie and carmen and sandy and melanie and paula and
14:14
oh got all kinds of sandies and um paula and sally and sandy and kelly and
14:22
rosalinda i'm so bummed i'm not gonna see you girl sherry rose
14:28
everyone's here linda linda make sure linda browning make sure you check your email let me know yvonne
14:35
oh my gosh it's like a full house fantastic all right so um trisha stepped out for a second but
14:41
she is going to be doing a demonstration on how to make those amazing earrings
14:46
and in the meantime um let's see let's take a look again at the um
14:53
at the april project it was so cool so there are two kits for that so listen
14:58
what's really cool about the course is that when you there's all kinds of perks first of all
15:05
so like when you join the subscription program it's like you become an automatic vip member so for the rest of
15:12
the year you literally save 20 off of all of your purchases that does not
15:17
include the course because that's already priced at a really fabulous um deal
15:22
but that is on all of your other jewel loom products and so um yeah so there's two of those
15:29
left and i have literally videotaped all the step
15:34
outs they're in the super cool course they live on the jewel loom school platform and once you buy that then i
15:41
put you into the course so but okay trish is back yes i'm back everything good
15:48
everything is good the world is all all well good i appreciate it yeah
15:53
yeah i just i just resolved all that well i know you will you always do
16:01
i'm just going to take madison to my own hands but um all right i love you and you're gonna
16:08
are you good yes i'm good you're good okay she's perfect she's always perfect
16:14
but um yes and thank you okay all right so i'm gonna let you get
16:19
to demoing because we've obviously talked way more than we should have
16:24
it happens okay i am i'm removing myself i love you all i will be right here in the background monitoring the situation okay
16:32
sounds great thanks george bye paula i saw your question out there
16:38
earlier how did you come up with pink poodle well i don't know if you can hear the little toenails behind me right now
16:45
i actually have uh two standard poodles they're the big ones one's 70 pounds and
16:50
one's 55 pounds arwen and kaylee and yup you can hear it now um so
16:58
my name came from that as well as pink's my favorite color so it wasn't too brilliant but it's it
17:04
works it works so okay guys i'm gonna turn my camera around real quick here i don't want to make you too seasick but
17:10
you know we gotta do it i'm gonna close my lens clap cap real quick so i don't want to make anybody sick
17:20
okay let's get this to refocus go up a little bit we go
17:28
go looking pretty good um so what we're going to be making today
17:34
guys if you saw the picture for it we're actually going to be making what i'm calling the wood the red queen earrings
17:41
and we're using these gorgeous hexagon hexagon beads that jules has in her shop
17:46
right now and these gorgeous towel beads and i don't know if you can make it out guys but those
17:53
black beads have the gorgeous red striations in them
17:58
and it just fits so well with this whole design so and we're going to be using some 11-0
18:04
seed beads so it's really uh basic and we're going to use some complementary beautiful glass on the
18:11
bottom we'll get to that but it's a pretty easy project but i did try something new this time
18:19
and i actually ran beads straight down the i did didn't put them on ahead of time
18:25
but i read seed beads right down the hem on it and it seems like it's staying on there
18:31
pretty good and i just felt like i wanted the whole thing trimmed out and not have like pieces missing that didn't
18:37
have trim so i'm going to teach you how to do that so hopefully you won't enjoy it but
18:43
let's get work worked up here so
18:49
i'm down here here's my belly down this way guys and i'm gonna put my rod in
18:55
to my original and i'm going to give it justice push it into my tummy and just give it a slight flex
19:01
and pop my rod in there okay you can see how that is
19:06
and this is a simple um warp you only have put you only use two
19:15
excuse me you don't only have two warps and they're going to be eight pieces of
19:20
a part okay so you're going to put it in your first um
19:27
lane one of these um i can never think of this word amber always gives it to me but um
19:34
one of these um oh joan where are you in amber one of these
19:40
grooves that's the word groove guys and then you leave eight spaces and then
19:45
we'll put the other warp into the ninth okay so it's as simple as this we're just
19:50
gonna put it into one of the grooves and i'm going to eyeball it as i go down
19:57
here and just kind of keep it in the vicinity of where i put the other one okay
20:03
then i'm going to turn it over and i'm gonna wrap around the knob
20:08
that's on the back and then come up top here and i'm gonna count i want to leave eight so there's one two
20:15
three four five six seven eight and we're gonna put it in
20:21
the ninth one so i'm gonna leave my finger there because
20:27
i'm old and i need to have guidance it's nothing else so
20:32
so as you can see we're leaving eight spaces there and we're gonna come up here to the top and we're gonna do the same thing one two three four
20:41
six seven eight and put it in the ninth okay and same thing i'm gonna turn it over
20:47
and don't grab onto that bar guys because that'll mess your tension up big time when you're going to take your rod out
20:52
and i just usually wrap around two or three times and i keep my finger on top of that
20:59
on top of the hem can still stay nice and taut as i run
21:06
the end of the hemp underneath and i bring it around
21:12
and tie a loop once i push this up underneath
21:17
i have so much better luck doing this with hemp than i do wildfire but wildfire does look so pretty when you
21:23
use it on projects it just really there's nothing there
21:29
basically except the beads sorry guys i'm going off the
21:34
the uh out of the camera range there okay so we put one knot in and i'm gonna go ahead and put one more just for
21:42
good measure and i have my knot on this side guys okay so you don't want to put
21:47
it back behind here because if it slips down or something like that it'll give you a
21:53
slack in your warps and that's one thing you do not want to have
22:00
okay so i'm just going to tie that and there we go nice and snug in there
22:08
so that is our our warps and now what we're going to do is i'm basically going to work backwards
22:15
from when i put my rod in i'm going to push the bottom of this into my tummy
22:20
just slightly and i'm going to flex this just slightly you don't want to flex it too much
22:26
and just pop your rod out now if you have problems getting your rod in
22:33
and out there's two things that you can do um once you
22:40
put your rod in and you want to get it out you're going to want to flip it around before you do anything too
22:46
drastic so say if i'm trying to pull up here and i can't get that out i will flip the loom around
22:53
and try out the other side and nine times out of ten you're going to be able to get it out that way now if you're
22:58
trying to put it in and it's not working well for you you just can't seem to get
23:03
it to hook in there you'll just take your pliers onto the end just like so
23:10
and just give it a slight little adjustment don't do anything major just do it by increments guys and that's
23:16
going to give you the best results okay so we have our warps i need probably
23:23
about a wingspan if that for this earring of wildfire i'm
23:29
using black wildfire and .06 that's my favorite so i'm just going to give myself a
23:35
wingspan and what a wingspan is it's from arm tip of arm tip of fingers
23:43
tip of fingers if you spread your arms straight out almost like in a cross position
23:48
okay now let me find my cutters there we go
23:54
so i'll just trim that off and put our little guard back on so i don't
23:59
get that messed up so i'm gonna first off i'm gonna take
24:04
and put my uh wildfire on the left side and what i'm
24:10
gonna do is i'm just gonna take this up and i'm gonna leave myself space because i'm gonna need room because i want to put time tie a
24:17
knot and put my ribbon crimps on okay so i'm just going to do usually what i do is like two loose knots
24:25
just like so and then i have enough there where i'm
24:30
leaving maybe about three four inches there three four inches next to me enough just to weave
24:37
it back in and disguise it if i want to okay so i'm gonna get up to the other end of
24:44
my wildfire here and i'm just going to take my pliers this is something i find myself doing every time
24:50
and i'm just going to squeeze the end of that and it makes it so much easier to
24:56
put the end of your wildfire through the head of your needle to the eye of your
25:02
needle i guess not head i'm using all kinds of fun terms tonight aren't i guys
25:10
can't think of a lot of things but that's what happens when you get up there so i'm just going to try to get this to
25:17
go right into the head of my and this is a seed beading needle i'm using this time guys you don't have to you can use
25:25
a jewelry needle they're wonderful i use them most of the time but since we're doing 11 0's and we're
25:31
doing doing the uh pico stitch i just went ahead and just used the seed
25:38
bead noodle from the beginning and i believe this is a yeah that's a number 10. so that's why
25:45
the eye is so small on it so we're gonna get that put through there hopefully
25:56
it's a job isn't it i'm going to pull it over here guys because i think if i have left less
26:02
pressure i'll be able to do it so what's everybody talking about here
26:08
email the one okay and you'll just laugh at me because i need laughs
26:15
it's pressure that's pressure
26:26
all right we got it through now guys just pull it the rest of the way before i get too excited there we go okay we've
26:33
got it see i told you too much pressure so what we're going to start out with guys is we're going to start out with
26:39
two of our gorgeous uh black tile beads
26:45
and i'm just going to put two of those onto my needle
26:51
and the way i have them guys is because then when i put the needle up underneath i want them to be able to
26:58
put the needle through the back end and we're going to leave the front end is going to be open so then that way when
27:03
we go to we go back through to attach the second part
27:09
it'll be both sides will be the ones that we have available not two opposite sides so always make sure you're going
27:15
through those back holes there and so i just fed my needle under there and i push my tile beads down
27:24
and then i just push them up between
27:30
and then glide my needle across the warps okay
27:37
through the beads all right so i have this set you might say a little bit wide but
27:43
that's just how i found that i liked it because when i did it just slightly thinner i didn't like the way that my
27:50
towel beads sat okay with another only doing like eight wide total
27:56
so now we're gonna go back through and we're gonna go through those top holes and i'm just going to take my needle
28:02
and i'm going to put it through the first hole here and then in through the second one
28:08
and keep in mind guys when you're doing your rows your first row is always it jiggles around a little bit at least
28:14
that's been my experience um but it will walk in it'll get sturdy
28:19
once you kind of get everything where it needs to be so see now that's our first row and that's nice and
28:26
snug in there it's not moving around it's not flip-flopping so we're going to go up over the top and
28:33
it's going to be even more secure we're going to go over the right hand warp there and we're
28:40
going to run our needle through the beads and over the other work
28:46
and a crust and that's what locks it in for you guys you have to have that sandwich
28:52
shall i say where you're sandwiching your beads in between those threads because it's not going to lock in nicely
28:58
for you if you don't okay so our next bead is one of our
29:04
beautiful hexagon beads and these these i believe jules has on the site right has uh on the site right now and she has
29:12
them in uh multiple colors they're just gorgeous guys just love them so we're
29:17
just going to take again we're doing that bottom set of holes
29:22
so when i push that down i'm going to pull this underneath it's going to be laying exactly where i
29:28
want it to be okay my i didn't clean my bead sticky mat
29:34
before i started so it's not quite as sticky as it usually is but so i've got that i've pushed that up
29:41
underneath you can see how that's coming up through and i'm going to go over that warp
29:46
through that bead and over the other one and we're going to make our little
29:52
bead sandwich basically okay
29:58
so you can see now same thing the front of that's kind of dipping down and that's what we want so we can get
30:05
go through the next holes with ease so i'm going to go underneath again
30:11
go through those holes oops and pull
30:17
through
30:24
and then back up over the top and through
30:30
and we're basically like i said this is a very simple technique it's only using a few
30:35
different beads which is nice but it gives you a nice impact all right so there are
30:42
our two tiles and our hexagon and we're going to do two more tiles
30:49
same thing going in on those bottom holes
30:58
how's everybody doing i would be all thumbs too if i had to do this one
31:04
well i'm supposed to be at least a semi-pro at this point but who knows
31:09
i do what i can you know thank you i appreciate that bonnie
31:15
so i've pushed those up through and i'm going to take my needle across the top and you can see the metal right
31:22
there between those beads that's what you want to be able to see is the middle of that needle
31:28
and pull it across and lock it in
31:38
yes it it's it it is the black over the red yeah i actually have that listed in the
31:44
description i believe jules the ones that that um i'm using tonight they are
31:50
absolutely gorgeous and i'm not usually a big fan of like black beads but
31:55
i i saw these and i'm like they are screaming to be with those hexagon beads so
32:01
and we're just going to go underneath again here
32:07
pull through could you do this with one millimeter
32:12
leather i'm sure you could paula i'm sure you could that wouldn't be a problem at all
32:24
okay so there we go there's the main frame of our earrings
32:31
just that simple okay so now what we're going to do we're going to start doing our
32:37
picot stitch so what i'm gonna do here guys i like to
32:42
just be able to keep going some people will tie off and then go back in and tie on again and then do the picot i'm not
32:49
about that i'm about keep going keep plugging away so
32:54
i'm gonna go back underneath this top or the the left warp and go through
33:02
those top holes again okay to get across because i'm going to be able to
33:07
do my picot stitch without having it come out easily okay
33:14
so i'm going to go over here and this is coming in underneath as well guys
33:21
all right i actually truthfully i want that to be on top because i want it to look
33:27
really pretty up on top of those warps so we're coming up through the top there and i'm just going to add three 11-0
33:34
seed beads scoochies over so you can see them this color here is gorgeous as well guys
33:40
these seed beads are i believe they're called transparent rainbows i am ruby these are some of my
33:47
favorites they're just gorgeous so i find myself using these a lot
33:53
so we're going to pick up three seed beads and we're going to go into the bottom hole
33:59
of the tila bead and then across
34:07
and pull and that's going to give us our little picot stitch on that side and you give it a little pull and you can see how the
34:14
two beads go on either side and then you have that little a little bump in the middle with the
34:21
three beads absorbs this is actually the 0.5 hemp
34:28
it the yeah it's the 0.5 hem because um with this i wanted to be a little bit
34:34
more delicate and i wasn't all about using the wildfire for the base but you certainly
34:39
could you could use leather you could use the one millimeter as well i'm sure
34:46
but so i put on three more of those seed beads and i'm going in now i'm coming
34:52
out the bottom of the towel bead and i'm gonna go straight across
34:58
on the top hole okay so basically we're wanting to trim
35:04
the edges of the tiva so to do that we have to utilize both of those holes okay
35:09
to get it to balance out right and look nice okay so once you do that you're going to get
35:16
your pico stitch on that side all right and this is the part that i'm going to
35:23
move this in just a little bit more for you guys so you can see this is the part that i was like okay is this going to
35:28
work is this gonna look right because i didn't want just the hem showing which is fine you
35:34
could certainly let the hem show but i thought i'm gonna pick up some 11 0s here
35:41
and see if i can't trim the edge of this um hemp
35:48
so i hooked on three of them actually you know what let me go through
35:54
that bottom hole before i do that guys because it'll it'll set much nicer for us so we want to be able to come out the
36:00
bottom hole of those tila beads before we do the the edging
36:08
so i'm going to cross over to the other side to get over there okay
36:14
then it just flows much nicer that way you don't want it coming up past your picot stitch underneath your
36:21
picot stitch okay so i'm going to pick up three seed beads and i'm always trying to figure out
36:27
something different something unique to do with projects and sometimes it works and sometimes it
36:34
doesn't so you'll always see different things for me
36:39
because i like to like i said i like to have some different items
36:44
so i've got my three on there and you can see how i just guided with my finger as i went through the top hole of that
36:50
hexagon and they're laying on there they're not perfectly
36:56
straight they're just kind of almost look like a little bit of the pico stitch themselves
37:03
so you can see how it pokes out just like the pico stitch does don't ask me how that works but it
37:09
worked so i'm happy with that so we're going to put three more because
37:14
we're on the other side now of that hexagon i'm going to put three more on
37:22
and pull those down and we're just working on top of the project now guys we're not passing our needle underneath
37:28
back and forth or anything like that everything's on top of the project as i'm stitching this trim on okay
37:35
so i put those beads on i pulled them up there i'm going to go through the bottom holes of those tila beads again and now
37:41
you can see why i once wanted to use the seed bead
37:46
needle not only because for the 11's but you're going through and through and
37:52
through your tila beads quite a few times so there's the trim on that side
38:00
so now what we can do and i i'm going to drop down
38:05
just like so i'm just going to go straight down like this now the cord matches
38:11
the hem the wildfire mentions the hem so it doesn't bother me okay if that bothers you you could feed your
38:17
needle down through these seed beads you know if you can manage that and just
38:22
go down through those and tunnel sorry as a frame there you could just tunnel right down through those guys
38:28
and then you would come right back into that hole but i'm fine with um
38:34
the way that i have it with the black wildfire on the black hemp okay
38:41
so now we're gonna do the sides of the hexagon with a um pico stitch and i'm going to put five
38:47
beads on because we have a larger bead here to work with so
38:53
i um you always have to make sure that when you're doing that guy it's like when you're doing a picot stitch you
38:58
have to have an odd amount or it's not going to lay right for you they're not going to pop up with that
39:04
one you know in the middle like so you're going to have to have an odd amount for that so we have four
39:11
there's five
39:16
and i'm just gonna go across into that bottom hole
39:22
and we're just working our way down so you can see that that sticks out a little bit further but i like the way
39:28
that looks if you didn't want it to stick out that far you could certainly just do the
39:34
three but that was my preference so i'm going to pick up five more
39:41
if you can see me over here doing that four and five
39:48
and i came out on the left hand side on the bottom hole of that hexagon view okay and now i'm gonna go back through
39:54
the top
40:01
okay
40:07
so there you go there's your other loop so we need to drop down into that bottom
40:14
hole again because we want to run our seed beads along the length of the hemp again
40:21
so i'm going to zip across drop down into that bottom hole
40:28
and go across and was walking me there for a second
40:33
and then add three more beads and i'm still i'm tightening that up because i want that to be nice and secure
40:39
or thing to look in order okay so we'll pick up
40:44
three more beads 11
40:50
0's and i'm going to push those down
40:57
and then i'm going to go across through the next set of tila beads so i'm going to go across
41:05
the top hole of these two weeds and again we're still running along this the top of the piece
41:13
i really wish i would have got my sticky man to cooperate tonight
41:18
so there you go there's the second set all right
41:25
and now i'm coming out the top i'm going to grab three more because we're going to go back through that hexagon bead
41:33
so we have that edging there okay and i'm dropping those down
41:40
and then through your hexagon bead
41:47
just like so
41:54
all right so that gives you the basic of it and now we need to get down below again we need to get
42:01
down to our tila beads so again you could run your needle through the seed beads that are there or you could just
42:07
let the thread run behind i'm going to let the thread there and
42:12
i'm going to go across the top again and i'm going to finish off by putting my pico stitch onto
42:20
these tile beads
42:26
so we're going to pick up three
42:33
and then go in through the bottom set of holes like so
42:46
and then pick up three more
42:54
and we're going to go through the top set of holes
43:01
you want to make sure when you're going through the tila beads that you don't poke through your um seed beads that are on
43:07
the side because that'll kind of warp the look of your um your pico stitch
43:19
okay so as i pulled that one i'm just giving it a nice little snug snug-a-dew pool
43:24
there so we can get and another thing guys i noticed myself today these kind of went flat on me as i
43:31
was working i just would take my fingers in and just give them a little judge just kind of a little pinch and it
43:38
would put them right back into shape for you okay so there we go
43:44
so now if we do all we have to do is tie off and add our ends
43:51
so what i'm going to do here is i'm going to go back through
43:57
i'm just kind of getting that on the other side for now to the middle of these tile beads okay
44:05
so i see i'm above the warp so i'm gonna go around that warp
44:10
and back through the top of that tila okay and it's getting snug in there no
44:16
kidding there is there's it's getting snug but i'm gonna come through out and through them at the middle there
44:23
okay and you can pull it and pray that you don't break a bunch of
44:29
beads that's usually it is a good trick to use your um
44:34
pliers step for that but i it has come back to bite me before
44:40
so now i'm just going to bring my needle around the strands that are in the center there because i want this to i want to hide
44:46
this knot you know i don't want it just sticking out now the one on the bottom it's not
44:51
really going to bother me because we're going to put ribbon crimps on i'm going to put ribbon over it
44:56
and you really aren't going to see it anyway but i'm trying to get my needle to
45:02
cooperate at this point guys let's see come up through there
45:08
i'm gonna come up through the bottom i believe it's gonna be the easiest way for me to find angle my needle in
45:13
between there there we go
45:21
and then i'm just going to make a little knot no i'm not because i'm over the edge
45:28
there you don't want to do that guys we're gonna pull this so this whole
45:34
it isn't gonna wrap around this edge out here because that's not gonna look nice okay
45:40
here we go
45:46
drop my needle underneath and come up this way and that should work much better
45:53
yes so i'm just going to run my needle back through that loop there and tie that off
46:01
it's rocking like crazy i guess huh here we go
46:07
and just tie that off snugly okay and we'll do one more time i'm just
46:13
going to feed that underneath that seemed to work well like that through
46:26
and then through the loop and snug that knot now when you put your knot in
46:33
a lot of times i'll drop my needle down through once i get my second knot on there and pull it snugly
46:40
to pull it toward the bottom okay because then you're you're not gonna have to worry about seeing it from the
46:47
front it'll set nicer for you okay
46:52
so there's that so i can snip this off now i'm going to turn it over
46:59
if you can see in there guys and i'm going to take my little snippers and just snip that thread as close as i
47:06
can get without snipping anything important let me just do it a little bit tighter
47:12
here my clippers i need to get some new
47:19
trimmers to get these sharpened one to the other and i keep saying that just don't do it so what i'm going to do here
47:25
guys is that the original knot that i tied here i'm going to because it's loose i'm going to pull it out and i'm
47:30
going to tighten that up nicely before i cut it off so we can put our ribbon crimp ends on
47:37
i wanted to kind of sit in there well and be nice and snug
47:44
all right so there's our thread we started with and i'm going to do the same thing i'm just going to wrap it around
47:50
and tie two knots and i'm gonna pull as i'm pulling that i'm pulling it up toward
47:56
those tila beads so it kind of gets disguised in there even though our ribbon's gonna be there
48:02
and all that i still like to disguise them as much as possible okay
48:08
so there we go on through there up and through
48:22
and pull down so now i can sip that one
48:27
so believe it or not guys that's one earring done and we're gonna put or i'm gonna show you how to do your ribbon crimp and how
48:33
to make your dangle from this one um so i will we're
48:38
getting close on time so we're going to go ahead and move forward with that so i'm going to cut off my
48:45
project from the loom and what i like to do guys is when i hold it i hold it with my two
48:51
fingers in the front i'll turn this better so you can see it like so and then i just push in just
48:57
slightly on the loom flex it a little bit and then trim
49:03
so then i don't have like a whiplash effect and it doesn't i don't have to worry
49:08
about it hurting my project or scaring the daylights out of me it just seems to work well for me
49:15
okay so we're just gonna tie these two ends together very simply
49:29
just with two knots don't tighten it up too much because you don't want to warp your
49:35
design you just want it to be snug so you have something to put your
49:40
your ribbon on okay i'm gonna take this little head pin in here and i'm gonna move that knot down
49:47
just a little bit because i wanted to be as snug down there as i can get and just kind of pull
49:55
on that
50:00
i know some weird ways of doing things but it always gets me from point a to point b so
50:06
so here's our little knot on that end and you can put a little bit of glue in it if you would like
50:13
a little gs hypo never hurt anyone and then i'm going to do the same thing
50:20
on this end i'm just going to snip these shorter okay
50:25
maybe give us about four inches or so
50:32
more is better as far as i'm concerned because it's just easier um
50:37
with dexterity for me to have a little bit more um thread to work with the hem or whatever
50:45
all right so i am going to tie that one off as well two knots
50:58
okay and i don't want to work my design here so i'm being very careful how i'm tying it
51:10
okay
51:15
so now i'm just going to put my ribbon on i'm going to move my mat here and i'm going to do it the easy way
51:20
today guys we're going to use the hot glue gun but you can use any kind of glue you can use super glue e6000 gs
51:26
hypo cement whatever is your glue preference i'm just going to take some quarter inch
51:33
ribbon here and cut a small piece it doesn't really matter on the size of
51:38
your room because like i usually cut mine in half anyway and so you don't really see too much of it
51:47
so i'm going to take these two ends and i'm gonna kind of hold them down pull them down straight because that's
51:54
how i want them to lie and i'm gonna take my ribbon and lay it up
52:00
so it's gonna be underneath my piece i'm just going to take my glue gun see if it's hot yet it might not be
52:07
it's not so we'll use gs height see i was all excited to use my hot glue
52:12
and that's how it goes so we'll use the gs hypo we just have to wait for that to come on up for us
52:19
warm it in your hand that seems to work the very best
52:25
and i'm getting you can see i'm getting that little dab of glue on the end of it
52:33
all right so we'll put some of that down there if you squeeze it too much guys you're
52:39
gonna have a really really hard time getting the cap back on it because it's just how it's made
52:46
it's really not made to be squeezed it's too much all right
52:52
that is potent stuff though okay and i'm just holding that down i put the glue underneath and i'm pushing
52:59
the knot sort of into the glue there just to kind of get it secure
53:04
and then i'm going to take a little bit more over top
53:11
i like the hot glue only because it dries quick and i can at least get the ribbon
53:17
secured onto it and then i can add in other glues if i want to it takes the gs hypo and the super glues
53:25
a little bit longer to cure so
53:30
i always like to just put a little dab of this just to kind of hold everything
53:37
in place for me and then i can take my
53:43
ribbon and this is never graceful for me doing these ribbon crimps but the job gets done
53:49
so i just hold on to the piece and i wrap my ribbon and the base and i always like to use a
53:56
coordinating ribbon because if some of it does stick out then it looks nice with the project you
54:02
know okay so just push that down on there
54:09
and what i like to do is fold my ribbon back
54:15
so it's like halfway across because then you're not going to have any raw edges that you've cut
54:21
if you know what i mean what i'm saying here guys is put your glue like halfway across the top here not the
54:27
whole way so you can cut it in the middle and it'll
54:32
be finished edges for you okay there we go
54:39
and i like to pull it in just slightly smaller than the actual base of the piece
54:45
just to kind of hold things and that way then it seems to fit nicely within the um
54:53
crimps then all right so let's get that a little
54:58
trimmy poo in the middle and then what i'm going to do here guys is
55:05
just trim this ribbon i'm going to trim it in half because i don't want a whole lot of it showing
55:12
so i'm just going to go in here i want to make sure i have enough of a secure hold in there
55:22
all right and then just go back and cut that
55:27
ribbon in half
55:34
there we go and i like to get it straight sometimes it takes a couple snips but
55:39
the straighter you can get it the nicer that your ribbon curve will sit on the end for you
55:44
okay and that's i have doll scissors of course
55:49
there we go okay so now make sure that's still on there good the glues holding it are not
55:55
still good and i'm gonna take my favorite pliers these are my favorite that i like to use
56:01
to put my ribbon crimp ends on and i just put them in the jaws of my
56:08
plier like so and then feed the ribbon
56:13
through i want to make sure this is all even before i go any further see a little bit of string
56:19
still sticking from the ribbon and i don't lock it
56:27
so there we go we'll put that in the jaws of our pliers and fit that over top of our ribbon
56:34
center it the best you can there because if there's going to be a little bit showing we want it to be even
56:40
as even as possible anyway okay
56:49
and i'm just squeezing back and forth on that you could use if you used wildfire guys
56:54
you could just sew some 80c beads on the end and do one of the slide um
57:00
ends on it if you wanted to um i wanted to use the hemp though so i
57:07
decided to just go with this route so let's cut another little piece and do the top and then i'll show you how to do
57:14
the little head pin for the bottom
57:19
same thing
57:26
how we doing you could also do the selvage technique while the earrings are still on the loom
57:32
and then wrap it with the ribbon yeah you could certainly do that it would probably be easier jules
57:37
honestly but you know me i like to go the hard way around
57:45
that's my fave that's my poor husband he says i complicated q-tip
57:53
so he always says that oh gosh don't want
57:58
that we're gonna put in a little bit on that
58:04
losing it guys there we go
58:10
boy you're fighting me today i need you here we go that's only because jules is on here
58:20
it's gonna cause me troubles while jewels is on you know
58:30
yeah that would be a definitely an easier way to do it if you wanted to do it right when you were on the loom but
58:36
i've always just done it like this it's however whatever gets you there guys
58:50
almost there yeah it does give a nice clean look i do
58:56
have to agree to you on that rosalinda um the slide class give a nice clean look it's just all on what you you know
59:03
what you prefer like
59:09
i've done both projects you know it just depends
59:16
on what mood i'm in i guess basically okay so i'm going to do the same thing here
59:21
i'm just going to cut this and find our other ribbon from bend
59:30
here
59:36
slide that over
59:41
i am a person that really likes fibers and materials and
59:47
ribbons and sorry silks so if a little bit of it's showing that doesn't bother me at all
59:53
you know i kind of like the the look of that
59:58
but everyone has their preferences so there we go so now we just have to make our little
1:00:06
um headpin for the bottom and very simply guys and if you haven't seen these
1:00:11
you've got to run over and get some of these these are i think um
1:00:16
jules is calling them gem are they gem cut is that what you're calling them jewels
1:00:22
you were honestly in a sassy sexy mood when you designed these
1:00:27
these are absolutely stunning guys and she has them nine by six gem cut beads look at that
1:00:34
and they she has some in such beautiful colors they're gorgeous so i just took a head pin here and has a
1:00:40
decorative item on the end of it i just put one of those gorgeous gem cut
1:00:46
beads a spacer and then i pulled out um a
1:00:52
couple bicones from the czech glass mix this is the black czech glass mix that jules has
1:00:59
and i just put that on the top like so
1:01:06
okay and then i'm just going to use my one step loop over here keep things simple
1:01:19
okay and then i'm just going to close this loop down because i'm going to
1:01:26
put this on with a um a small jump ring because i want it to
1:01:31
be able to move around and with this just this loop it's not
1:01:37
going to move around as freely i like a lot of movement with the earrings i i
1:01:43
make so i'm just going to use a little um
1:01:48
um oblong jump ring here and just open that up
1:01:58
oval is a better word for it on most days and just hook that on
1:02:12
like so make sure my jump ring is closed there we go
1:02:19
and just putting your wire on guys and that's it that's all there is to her
1:02:32
so this is the one we just made here and then here's our other ones
1:02:38
so it's kind of like i said it's a really simple concept but i like the edges of it because it kind of gives you
1:02:44
that lacy feeling you know just kind of fun
1:02:50
so let's bring jules back in here come on back in girlfriend
1:02:55
oh thank you am i still grinning no you look pretty good now actually oh
1:03:01
it only took an hour you look pretty good let me get this
1:03:07
turned around so i don't yeah that was awesome oh my gosh
1:03:12
heck yeah man i'm in okay i'm in so these here let me show
1:03:17
everybody so this earring has the slight whoa yeah the
1:03:23
slide clasp and i do like the way those look but yeah um but they're also
1:03:29
more money right so like if you're making if you're making a lot you know what you could do to fancy up those um
1:03:36
those ribbon crimps is put some flatbacks
1:03:42
why have i not thought of this before i don't know who are you pink poodle i know
1:03:47
what's wrong with you get some rhinestones girl some flatbacks and yeah that would be
1:03:54
really hot and it'll it'll take those like totally up a notch oh yes
1:04:00
yeah yeah totally i know it's so funny you should say that because my um one of
1:04:05
my good friends here in town she has two little twin girls and they their nickname for me is bling bling ah
1:04:14
yeah well i totally yeah i totally want to see that i don't know sadly i guess
1:04:21
the best um because i'm not a fan of the smell but i'm assuming e6000 might
1:04:27
yeah probably yeah that was just kind of like my quick just to show an example guys but oh my god are you kidding me
1:04:33
that's so brilliant how you like because i on this project that we were doing that
1:04:39
we did do in april i was i was uh you know struggling with that
1:04:46
whole idea of wrapping it around those side you
1:04:52
know in between the pearls and everything so it's such a great idea to take the 11 o's and it's just like
1:04:57
you're lacing it and it's free for all doesn't need to be perfect no i mean you know in fact you could have just like
1:05:04
even done snaking around the cord it would have been awesome you could go around them you could go down through
1:05:10
them again there's a lot you could do with it i just you know that's the basic
1:05:15
and just fly oh fly with it guys no they're so sexy and cool that hexagon is like
1:05:22
amazing i can't even stand up so i was so impressed and then when i pulled those tile beads out that had those
1:05:28
little striations yeah so now it's a very inspiring products that
1:05:36
we get to work with here so i'm gonna put this up one more time i had it running while you were doing some
1:05:41
demos but this is the sign up for the jewel loom uh newsletter at julian.com between today and next wednesday at
1:05:49
midnight to be entered in to win the new jewel loom starter kit okay but
1:05:54
you're going to sign up for the newsletter for sure if you want to sign up for sms while you're there
1:06:00
awesome um and like the youtube channel
1:06:05
and of course not like it subscribe to it this is youtube's not the facebook um
1:06:12
the youtubes yes the youtubes make sure you follow trisha on the tick tocks oh yeah
1:06:19
yeah for sure and i'm not gonna i'm not gonna be mad if you follow me on my youtube channel either yes and in the
1:06:25
notes you'll see trisha's affiliate link and so um that totally helps her out and
1:06:31
that's one of the ways that i support both her and amber
1:06:36
and joan um but tonight it's trisha's link and so
1:06:42
all you have to do is start with that link and then if you do place an order trisha um
1:06:48
get such a cheating fruit i do appreciate that very much so more than you can know it's called an
1:06:54
affiliate program i'd like to be afraid i mean i may not be amazon
1:07:02
but we're trying we're trying much happier with you than amazon jewels thank you
1:07:07
i appreciate that very very very much and don't forget there are still some uh two april kits i haven't checked to see
1:07:14
if they sold out yet and one okay this is what i'm going to do on mars now we can see it
1:07:20
okay yeah oh yeah so here's march oh so okay that's like
1:07:25
the middle of yours too there that's really pretty super sexy and the earrings um
1:07:31
if you want to try out the program okay i'm going to let you do march's kit for
1:07:38
45 with no obligation 45 plus shipping you're not going to see that on the
1:07:44
website you're going to text me here first text out you're going to text me hold on let's
1:07:51
please hold just please hold for one second here we go
1:07:56
okay you're gonna text me and you're gonna say i want march's kit and whoever does it first i'm gonna i'm
1:08:02
gonna um let you do it for the 45 which you normally have to do
1:08:07
you only can for subscription i'm gonna let you try the course out for 45.
1:08:14
and that's a good deal yes i think it's beyond good because you have a special obligation oh my gosh we will both march
1:08:21
and april guys i mean we're always loaded up with goods but it just seems like these past two months have been
1:08:27
you know yeah yes it's been great yes so thank you girls thank you for your encouragement
1:08:33
there i appreciate that okay so all right and i think we got all the
1:08:39
comments trisha thank you you are absolutely precious and beautiful and delightful and such a great designer and
1:08:46
i'm so impressed with everything that you have going on every single one of us that does business with you is very very
1:08:52
lucky oh thank you and i feel i feel lucky to be doing business with all of you folks
1:08:58
as well yeah well we're i'm i know i can speak for julian i'm very honored and thank
1:09:03
you yes and
1:09:13
i know that's what we should call her from now on finger fingers [Laughter]
1:09:20
oh my heck all right we're going on uh an hour and ten minutes
1:09:26
yes we said it thank you you're so beautiful don't forget to sign up for the newsletter for
1:09:32
your chance to win um the new jewelry starter kit because it rocks
1:09:38
oh you're welcome girls thanks for stopping by and hanging out with us yeah i'm gonna make i'm gonna make your
1:09:43
earrings between some point and some point oh yes i want to see what you come up with
1:09:49
because yeah who knows you might just take them up a notch even what a little wild
1:09:59
all right guys i guess we will see you next week don't forget to um stop over at jewel store
1:10:06
and check everything out all the gorgeousness and those kits don't miss that opportunity and we'll see you next week