We are a brand born of a love for the beauty of restraint in design, the inherent grace of feminine strength, and the necessity to treat our environment and each other with love and respect.
Each of our carefully researched, styled, tested and distributed collections reflects a particular aesthetic and ethos. We hope some of these speak to your own style, and help you refine and redefine your own look and style philosophy in the process.
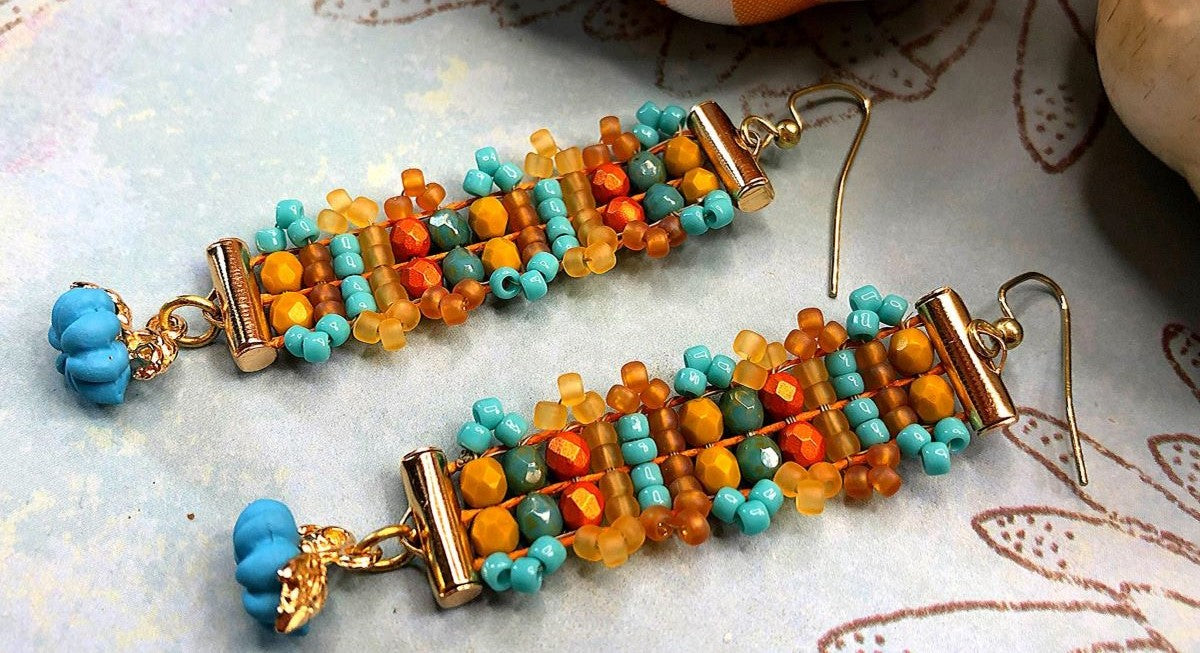
Pumpkin Patch Earrings - Jewel Loom School Live with Tricia
Designer Tricia Giazzon teaches how to make some fun Pumpkin Patch Earrings. They are a long slender style with some unconventional colors. This will be a fun and eclectic Earring set. Tricia also shows how to make picot edging & use slide connectors to finish the earrings.
You can purchase the different Jewel Looms and materials at the Jewel Loom website. You can also support Tricia and Amber by using our affiliate links. This week's links are geared toward Trish: https://jewelloom.com?aff=6
Please contact Jewels with any questions you have about her looms: email -hello@jewelloom.com or text - 1-805-768-0568
Transcript:
0:01
hi everybody welcome to jewel loom School live my name is Trisha gaizon
0:07
and today we're going to be making a super fun project we're going to be making some pumpkin patch earrings
0:15
we're going to be using some four millimeter fire polish some eight uh 80
0:20
seed beads and some 11 O's for the ends as well these are the project that we're
0:27
going to be working on today super fun
0:33
just some unconventional colors used for these earrings here
0:40
I see that we are getting lots of folks coming in already let's see Marie is
0:46
here hi Maria now I've been calling you Eileena is it
0:52
Ileana I mean I feel super embarrassed if it is but you know and Miss Danielle is here oh my goodness
1:00
everybody's here so yeah it's been super comfortable here
1:06
in PA we've been having some pretty good weather nice and cool my kind of weather Fall is my time
1:14
I really enjoy it let me know what you've been dealing with um any of our folks that are in Florida
1:21
are of course our prayers are with you as always
1:27
hi Robin hi Alicia I see everyone is coming in everything is seems to be
1:34
operating Well everybody's getting us loud and clear and Miss Vicky
1:41
everybody okay great so like I said guys um we're using some uh unconventional
1:48
colors this week but when I saw these colors together they really spoke to me
1:53
now I'm sure this will probably get washed out on the screen here the picture a little bit but I'm going to
2:00
show you my inspiration picture that I found that I kind of went off of for
2:06
these earrings and as I said I know with the lights and everything it's hard to even see all of the dimensions of colors
2:12
it really looks like all orange in there but it's not let me see if I can get anything cuter any cuter any closer no
2:19
but I can describe it to you it has some
2:25
um like a mint green here a light pink
2:30
these are all pumpkins white pumpkins like um turquoisey blue white
2:38
um creams different things like that it just looks like a bunch of orange I guess right there I wonder if I turn it
2:44
that way but that is my inspiration inspiration picture this project is really
2:51
um to help you guys all think outside the color box think outside of fall colors
2:59
Christmas colors spring colors you know add in something to give your colors a
3:05
pop um when it comes to color theory as
3:11
designers I think we all kind of get stuck in a rut sometimes
3:19
um and I just want to encourage you here today to use some colors to give yourself a pop in all of your pieces
3:27
so we are going to get started here guys I'm gonna turn to my other camera let me just get my
3:36
items pulled up here and I made a new sign today
4:00
okay here we are here is our surface I have everything
4:05
out here that we're going to need and if you just need a I know everyone probably saw the photo if you did not here is
4:12
another quick look at the earring now on these pumpkins
4:17
we'll talk about it later this is just something I had in my stash but we'll talk about later
4:23
um some options some things you can use if you do not have those particular
4:29
um pumpkins okay this is going to be an easy breezy project today guys we're
4:35
gonna just do something simple that you can get done within a half hour or two an hour
4:41
and just have some fun so we're going to take our original I'm using our original today and as always I'm going to warp
4:49
this for you this is the closest part to me this is my tummy down here as always
4:55
and I have my bar anchored in the bottom hole of my original uh Jewel long hair
5:01
I'm going to push the bottom of my loom into my tummy just slightly and give it
5:07
a slight Flex and pop my bar into the top and that
5:13
gives us a nice u-shape that's going to be this is called the tension bar guys and this
5:19
is going to give you when you release this it's going to give you all kinds of goodness as far as tension goes
5:25
now I use the I'm going to use the 0.5 hemp for this project
5:32
and the reason I'm doing that is because I'm using slide ends and I want the
5:37
knots to be as small as Tiny as they can be so my slide ends will go over the 11
5:44
0's and the little knots as easy as possible you could certainly use if you weren't
5:49
going to use the slide ends um you could certainly use any size hemp
5:55
that you have on hand and I'm just going to get this and I chose this really pretty
6:01
um earthy um pumpkin color I think is what I would
6:07
refer to it as and I just think it goes perfectly with all the beads that I have
6:12
chosen before we warp I'm gonna go over here what I have I have
6:18
11 0's because that's what we're going to use on the ends as I said for our
6:24
side clasps I have three colors of eight O's here and your choice Diller's Choice
6:31
there on what you want to use these are four millimeter fire polish and I just have three different colors of those
6:39
that I am that I had picked out and I just thought they really popped together I really like that
6:46
so before we can do anything we need to warp our
6:52
Loom so I'm going to take my 0.5 hemp and I'm going to wrap it around the back knob here a couple times
6:59
I'm going to tie that off twice to get a good anchor
7:06
on to the knob on the back of our original Loom here
7:13
okay nice and tight I'm going to turn this over and as I'm turning this over I'm going to bring my
7:20
hemp move that down just a smidge there's our head and I'm going to bring it down and put it into one of the
7:27
grooves on our Loom I'm going to pull that across and as I'm pulling across I'm continually keeping
7:34
my tension as always then I'm going to find approximately the same spot on the other side and go into
7:41
that Groove I'm going to slightly turn my loom and I'm going to put this so you can see it
7:48
here guys and I'm going to grab the knob with my hemp
7:53
bring it back up over the top and we're gonna skip two here
7:59
this is probably the easiest work you have done or will do for a long time if
8:04
you've been um Jewel looming for any period of time so we're going to pull that across here
8:13
and skip two on the other side here as well and what I mean is grooves guys if
8:19
you're a newbie those are grooves in the top of the Loom there then I'm going to grab the knob that's
8:28
underneath again just like so bring it up and over and skip two more
8:38
keeping that tension down to the bottom skip two grooves and now we're going to
8:45
wrap around the knob two or three times because now we're going to tie off so I wrapped it around
8:51
the knob three times and I'm keeping that tension there on that string because I want to be able to trim this
8:59
off excuse me off the roll of hemp that I
9:05
have all right let me put this this way so you can see it better all right and my finger they're holding
9:11
on to that hemp and keeping that tension on there so I'm going to put my thumb there and
9:16
I'm going to take the end of the hemp and I'm going to run it underneath our existing warps
9:23
I'm going to bring it around and I'm just going to do I'm not I'm going to take the end put it up through the
9:28
middle of the loop
9:36
and grab it and then we're going to give it a good
9:43
pull and we're not going to want to get caught on this Rod while we're doing it just
9:48
um for information for you guys because that is not going to be pretty you won't have a nice type warp if you do that and
9:56
we've got our one knot in there so we're good now to let our thumb up off of the hemp so we're not
10:03
um needing to hold all that tension there right now because our knot our first knot is doing that for us and then
10:10
again I'm just going to tie it one more time okay I'm going to cut these ends because I
10:17
don't like them to get in our way there is our Warp
10:24
simple simple just nice thin long earrings then all you're going to
10:30
do at that point guys you're going to take your hand I have my end of my Loom
10:37
here up against my tummy again and I'm just going to give a little Flex and pull up on my rod and pop that out
10:45
and there we go we are ready to roll at this point okay I said this is a very simple project so
10:53
enjoy you can make and make them and make them and make them so I'm going to bring this one in this
10:58
one I actually have one earring done on already but what I have done here
11:05
I threaded my needle and you're only going to need about a wingspan's worth of wildfire for this project
11:13
excuse me and I have threaded My Jewel needle
11:18
and then I tied my thread on to the furthest left
11:26
work okay so the first thing we want to do is we want to put on our 11 nose so then that
11:33
way I'm going to move this so I can scooch this up so you can see what I'm doing here guys
11:38
um so then that way our little slide clasp holders or whatever I call them side
11:45
clasps um we'll be able to go over the beads easily so we're going to pick up six
11:50
eleven O's thank you
11:58
six and I am in love with these colors guys they're just
12:05
just enjoy them thoroughly just a beautiful mix
12:14
and I'm gonna pop three up in each work so we've left two spaces two
12:23
grooves open and we're gonna pop three 11 0's into
12:29
each one of those rows okay so I've gone through those three and then I'm going to pop my next three
12:36
up and then I am going to go through those
12:41
as well those are not going to be seen so you can use any color of
12:48
um bead that you have handy there they're going to be underneath but I did choose a coordinating one
12:55
so I'm just pulling this thread through and sometimes you have to just kind of
13:01
maneuver the first row just to get everything to kind of settle down
13:08
and pop in to your warps okay I'm just giving that
13:14
another tug tightening everything up pop this other bead inside there
13:20
just like so and there we go
13:26
we have three and three okay simple enough
13:32
so the first word we're going to do is fire polish I'm going to pick up two fire polish in our mustard color here
13:43
and I'm going to push those beads down to the bottom of my thread there I'm
13:50
going to shuttle my needle in underneath and I'm going to pull the thread through
13:56
my fingers okay I work from the bottom up lots of folks work from the top down
14:02
do what you're comfortable with and you enjoy and as I'm coming underneath I'm pushing
14:10
the beads up between the warps I'm then going to take my needle on my right hand and I'm going to go over top
14:16
of this outside Warp through the first bead over the middle
14:21
warp through the second bead and finally over the last Warp and when you look
14:27
down you should be able to see that metal needle glistening in between those beads you have to be on top of your
14:34
warps okay so our first row is to four millimeter
14:41
fire polish simple simple
14:48
just getting snugged in there nice and tight so everything sets nicely for us
14:55
so our next row is I'm going to do
15:00
four AOC beads and I've chosen this beautiful pumpkin colors as one of mine
15:07
and it's actually transparent rainbow frosted dark topaz say that three times
15:13
fast guys this is a gorgeous color it has a lot of
15:18
Hues in it that would complement a lot of bead colors okay so I put my four eight O's on and
15:27
I'm going to do the same thing I'm going to pop those up between here go over the top of the warps and through
15:33
the beads and on the other side
15:40
okay so we have two rows in already three
15:47
technically if you count for one we're going to put our um
15:52
Psy clasp over so the next color we're going to do is
15:58
our gorgeous turquoise and we're going to do four of those
16:03
and this is I think the color that really is the one that pops on it and
16:11
gives it a new fill because I think if we would have just stuck with all the
16:16
colors without the turquoise you would have really just had a real uh basic fall look which you could do
16:23
which you could do but I'm loving the turquoise pop in this
16:30
just okay so next we're just gonna do the
16:36
same thing as we work our way up we're gonna do four of the yellow
16:49
okay and over the top
16:56
foreign so now we have three rows of our seed
17:04
beads in and then we're going to do three rows of
17:09
our um fire polish I'm going to see which one here
17:15
I want to pull up yeah let's do this one and I'll just leave this here guys so you can kind of see it and you can see
17:22
this one I know but also the finished ones you can kind of follow along and get a better idea because this is going
17:28
to bounce around to be in and out of the frame so so the next that we're going to go to is
17:35
our fire polish and I'm going to go with this gorgeous Orange
17:41
and just two of those
17:47
okay
17:55
and I'm holding as I'm doing this guys I try to hold a finger onto the loom so it
18:02
doesn't bounce around as much I'm kind of retraining myself with teaching because when I do my uh looming at home
18:12
or when I'm doing practice or whatever I'm usually holding my loom up like this
18:18
so I can see everything that's going on and it's just much easier for me so if you see me
18:25
doing that you'll know why so we're just going to put in our next row here of fire polish
18:36
okay and our turquoise
18:44
okay
18:53
can everyone see okay everything nice and clear for everyone
19:02
okay so as I'm doing this you can see here guys
19:07
when you loom you're gonna have a different stitch on each side I don't
19:12
think we talk about that too much but we're going to have this straight
19:18
stitch on this side as we come up around and through and then always on the left side we're going to have our threads
19:26
angling as they go up okay that is absolutely correct and
19:32
absolutely normal for looming these are always going to be angled up and these are always going to be straight you're
19:38
doing nothing wrong it's 100 correct okay
19:43
so here we are we're in our turquoise which is right here on our example piece we're moving along quite quickly already
19:52
um this really like I said comes together quite quickly what's up
20:05
okay
20:11
I'm just going to push that up through and over the top
20:23
now we're back to our seed beads I wanted to make sure when I did this
20:30
project that I ended it with the same color of bead on either end so you can see here we're ending with a set of
20:37
three and here we're just starting with one of our fire polish but I wanted to make
20:43
sure that they ended on the same colors okay so our next
20:49
color is our Orange topaz beautiful topaz in our eight O's
20:58
okay that through
21:03
oops there we go bouncing again
21:11
another thing that is also nice guys to keep your um Loom from bouncing around a lot is uh
21:19
the beetle on sticky mats they make it so nice but you have to have a harder
21:26
surface like a non-porous service to put it on
21:31
and I like to have a mat underneath me when I'm working so so next we have our
21:40
so we have these this set of three we went to our orange now we're in our turquoise
21:54
you hold your loom up when you're working a lot okay yeah that's the same with me
22:02
it just seems like I can see it better but if I do that then you won't be able
22:07
to see it very good so we don't want to do it okay so we're just going to keep
22:14
working our way up here
22:22
to our beautiful yellow
22:36
okay
22:44
just working our way through
22:56
okay and now we are at the set where we are right here
23:02
and we have three more rows of fire polish to put in and then that part of
23:07
the earring is done so you can see how quickly these really do come together
23:15
just need a break and we just need a simple project you know
23:27
and I think even if you have a simple project if you use the right colors it gives you a nice impact
23:40
okay and two more rows
23:53
[Music]
24:09
okay okay
24:19
thanks and the last row
24:24
before we put our 11s on I should say the last row before we put our
24:29
11's on okay
24:36
so that is the base of the earring in essence that's how long did that take
24:43
maybe 10 minutes to put together 15 maybe tops so super fun that way
24:51
so now I'm going to do the same thing to end this earring as I did to start it where I'm going to pick up
24:57
six of the 11 0's
25:06
okay and I'm just moving those down
25:18
and then underneath and put those up through there
25:35
okay
25:41
and sometimes you have to rock your needle back and forth there guys to get everything through your
25:48
seed beads the way you need to and see this is fighting me so another trick you can do
25:54
is just take your pliers and I know that the needle fits through all of them because all of them went on there
26:02
so I just give it a little bit of a pull with my plier and then it gets it onto
26:09
the other side for you and you can continue to pull
26:15
and then get that line in there okay so the next thing we're going to do here guys is we're going to put a trim on it
26:24
just a picot stitch trim something so very very simple I'm going to pour
26:30
myself out a little bit more of the transparent rainbow topaz
26:36
and we're just going to work our way down with a very simple picot Stitch
26:41
so I've stopped here on this end where I'm coming out of the row with the 11s
26:47
okay so I'm going to take my needle now and I'm going to drop down into the next row
26:53
okay so that way then we can start our picot Stitch exactly where we want to
26:59
so I put that across that row I'm just dropping directly down and going across
27:07
I'm pulling my string the whole way through and I'm going to start by doing
27:14
the turquoise at the top so we're going to pick up three eight O's
27:20
and then we're going to take that needle and drop into the next row put that on
27:26
and then push that across all right
27:35
and then we're just going to pick up three more
27:42
and then go up once we push these down on our our strand on our Wildfire we're
27:48
going to go up we're going to jump up a row and put our needle across through the
27:54
beads and out the other side be careful when you are doing your picot Stitch
28:00
especially with the bigger beads it's easy to put your needle in through the hole of the seed bead that is closest to
28:06
the bead you're coming out of and it'll kind of give it a little bit of a warped look if you're not careful
28:14
so you just want to be careful and that gives you just a pretty little trim a little bit larger than using the 11s
28:22
it's more bold I think which d11s make it very pretty uh Pico
28:28
Stitch too I'm going to drop my needle back down into this turquoise row right
28:34
here and I'm going to shuttle my needle across
28:40
just like so as I'm pulling it across
28:46
I'm making sure that nothing's getting tangled and that my stitches are all
28:52
tightening up for me up here at the top okay and I want these to sit like little
28:57
bricks on the side how they'll sit kind of on top of each
29:03
other I can get that and that'll give you a good look at that
29:10
they're just like little bricks they fit in there just nicely
29:17
so as I'm coming out of that turquoise row I'm gonna go and get three of our
29:24
beautiful topaz Beados
29:30
and then drop down into the next row which is these the gorgeous Orange
29:37
okay and sometimes you have to rock your needle back and forth to get it through
29:43
those beads because keep in mind we have gone through them already a couple times and we will
29:50
you know add a few more strands in there so sometimes it gets a little snug but you can get them through
30:04
okay so there is our Orange for tote pads three more
30:19
roll that across there
30:25
and you're just going to continue this pull way down
30:30
I'm going to drop that back into that orange row
30:45
and now we're going to pick up our yellow
30:54
and put that through the following row down below there you can see we're going into
31:00
a yellow 8-0 row
31:09
and I'm just going to kind of play with these a little bit with my fingers because when I first pulled it they were
31:14
kind of getting a little weird for lack of a better term on me so I kind of just play with them
31:20
and then it just gets them to settle into the spot that I want them okay
31:27
so we're gonna pick up three more
31:32
and just continue our way down do we have any questions so far
31:44
okay
31:50
but I think thinks they've got it huh it's a pretty simple one I think it
31:56
would be a very good um project for a beginner as well
32:07
I know you guys are Pros you pick it up quick all right so now to on to the next
32:17
so we're gonna go to our turquoise foreign
32:36
are there any new loomers here
32:43
let us know if it's your first time with us tonight
32:49
okay three more
33:05
okay and again I'm just taking my fingers and kind of pulling them out a little bit and kind of rolling my
33:11
fingers just to get that into the shape that I want right
33:24
foreign
33:30
and I'm just going to continue and I'm going to do the rest of the rows just like this all
33:38
right so now we're going to jump down to the
33:43
next row with our next color which is our topaz again
34:07
just a pretty little Lacy term on the sides I love trim I love to trim out almost all my
34:15
projects that might get into I like them to have a lacy appearance on
34:23
the edges
34:29
oh Nancy you're new well wonderful welcome welcome and if you have any questions as we're
34:36
going along here please don't hesitate to ask and Joan will put it up on the
34:41
screen and we will get that answered for you
34:48
and I just I was so excited and
34:53
distracted a little bit there that I went dropped down to the wrong row and
34:59
I'm doing the blue to the yellow so if you happen to do that guys an easy fix you're just gonna pull your strand back
35:07
through your wildfire and then just push your needle backwards
35:13
through the beads that you went through and you usually don't have to unthread your needle
35:21
but what I should have done is instead of dropping down a row I should have went up back up the room okay
35:34
Debbie you've not made anything yet I know I've seen you in here um we'll have to get you on this would
35:41
be a good starter project right here that's an easy simple little project so
35:49
onward and upward here guys so I think you get the idea on my trim here I get the you know
35:57
we're going to do just this little Lacy trim the whole way down to the bottom so I'm going to show you how to cut this
36:05
project off of your loom and how to put the ends onto them okay
36:12
I'm just going to flip this over just like so and you can see these are
36:19
strands that we have coming back and tied to our little knob on the back what
36:24
I usually do is I'll take my two fingers and just open them up and go between
36:30
put my work between those fingers I'm supporting it then I'll take my pointy
36:35
finger on the back just like so and my thumb on the top once you start you
36:41
won't be able to stop yes this is true my friend this is true
36:46
and I'm just going to hold on to this nice and snug and I'm going to put a little bit pressure down with my hand
36:52
just to kind of hold everything secure where I have it and I'm going to start trimming our
36:59
cords all right that bounced up I usually don't like it when it does that but it
37:06
seems fine it didn't do anything to our work um we had a really really good warp on
37:12
there that's what to say that was nice and tight okay
37:20
so this is easy peasy Debbie you can do it Vicky says and that is absolutely 100
37:26
true this is an easy laid-back project that anyone can do so what I'm going to
37:32
do is I made two of your rings on my Loot on my loom here and I'm going to go in between and I'm just going to snip
37:40
my threads okay and I'll just set this one to the side so I can finish it later
37:45
and like I said we have our little um 11o's here
37:52
so what I did guys and this is kind of unconventional as well I think
37:57
I'm just going to tie each individual string all right and I'm just going to tie a
38:05
knot simply I'm going to put a couple knots here or one knot at the
38:11
top because again we're trying to keep this as small as possible for our
38:18
slide you could use Wildfire as your base as well if you wanted to
38:23
but I do like the pop of the hemp okay I'm just gonna
38:30
put that down there and I'm just tying a nice knot there we're going to go back and we're going to glue everything
38:36
so don't worry too much we're going to get um nice
38:43
solid knots and I'm just going to tie I'm going to use my pliers here to help
38:49
me get this through and we're just going to tie the knots the whole way across on both ends
39:02
okay and I'm just working that knot down with my fingers right
39:09
and same thing on this one
39:16
and then while I'm gonna go to tying the bottom of this I'm just going to get my glue out and have the top not drying
39:25
as I'm tying off the bottom this is does this is not 100 necessary
39:31
for you to do it that way I just tend to do it so then that way I can keep moving
39:37
along and I'm just going to use GS hypo cement and always make sure
39:42
if you're going to use GS hypo this is the product um have a paper towel handy this is my
39:49
experience and you're just going to hold the glue in your hand and just let the warmth of
39:55
your hand form in the glue warm the glue words
40:02
so it will blow up on the end of your glue end of your glue applicator here
40:08
and I'm just going to cover these knots with a little bit of glue because we want those nice and solid
40:16
when we go to put our ends on and then I'm just going to put this back
40:22
in because again I keep my tip toward the paper towel so as it comes out the
40:27
paper towel can catch it and then I can just slide that needle right back into it okay
40:37
Nancy you can um watch it here on Facebook again but they also live over on the jewel loom
40:43
YouTube channel as well and all of the past videos that we've done
40:48
are live there as well and you can also go
40:53
um to jewelloom.com and they are listed on our blog so there's lots of places
40:59
you can find us okay and I'm just doing the same exact
41:07
thing
41:18
okay we're just working those knots down
41:30
it's hard to see when it's such tiny work I know my fingers are in the way a bit but I hope you're still getting the
41:35
idea okay and just working that down there
41:43
and then same thing over here
41:50
oh thank you Robin thank you I appreciate that
42:04
okay we have these knots in place and we're going to do the same thing
42:13
come on out I'm going to squeeze that down just a little bit more because I want it as Tiny as possible
42:23
okay
42:36
okay
42:44
and the fun part is oh he's doing this right there we go
42:52
so once those are dry I'm going to go up here to the top and I'm going to trim these as close as I can to these knots
43:08
and then we're going to put our ends on and these ends are so nice these slide
43:15
on ends and they make such a nice finish on your pieces so you just want to take them there too with a slit down the back
43:22
of them for anyone that does not know and they are open on one end and closed
43:27
on the other end so you're going to take this open end and you're going to slide them
43:33
Slide the clasp over top of the 11 0's and you're just going to
43:39
kind of push it and rock it back and forth and you're just pushing those knots and pushing those 11 O's in there
43:46
not too aggressively though because you do not want to um end up having any problems with your
43:54
beads coming loose and I'm just going to take this knot here because it's a little bigger I'm just going to give it a little help through with my pliers
44:03
crossed kind of maneuvering it
44:08
little bits by little bits so this is a good trick so you know that you can use
44:14
hemp with slide class because I think a lot of people think that you can't
44:20
um because it's hard to get everything inside of it but as you can see we just did that
44:27
so I'm just going to push that end closed just like so
44:34
all right and same thing here
44:50
I have to say my girls have been very good this this um evening
44:57
they're usually at least getting some sort of noise in the background for you guys huh
45:03
so same thing we're just gonna move this across let the warps slide through the opening
45:12
on the bottom and if you need your pliers just to push those little knots in there a little bit
45:19
just work it across okay
45:31
there we have it yeah the 11 0's are the trick certainly
45:38
with getting um getting the ends on so there we go we
45:43
have this is ready to roll so all we have to do now is just put our ear wire
45:49
and our little pumpkins on now these little pumpkin guy these little pumpkins
45:54
guys I got online a long time ago and I don't remember I know they're super cute and I'm sorry for even showing you
46:00
without being able to tell you where you can go and get them but I'm sure you
46:06
have some adorable pumpkin charms or anything like that um
46:12
you can put on the bottom you could just be dangles anything like that would work
46:18
but I'm just going to take a jump ring here this is just a small four millimeter oval jump ring
46:25
okay
46:35
and then I'm just going to grab an ear wire here
46:42
actually let's see yeah
46:48
thanks Nancy
46:53
okay and I'm just gonna open up our little jump ring
47:01
grab my other chain nose pliers and just open front to back
47:08
put our little pumpkin through our little hole in our pumpkin and hook it onto the bottom I just want to see
47:15
what ends I'm doing up here okay we're doing the three which is what
47:20
I have here this will go on to the bottom
47:26
just like so and then our little
47:35
air wire
47:40
does anyone have any questions or comments or anything for us for this
47:47
project before we wrap things up foreign
47:54
and there we go guys just like that it does not take long to put this
48:00
project together they are super fun and festive really really
48:08
enjoy this project I'm going to turn our camera around here for you
48:15
so we can
48:21
see here
48:27
foreign ER back so I hope you guys enjoyed that project
48:33
I know it was a super quick one tonight but sometimes hey that's what we need easy peasy beautiful thank you Vicky I
48:40
appreciate that as always guys so glad to see you all here and again
48:47
um any questions as always you know reach out to me I'm happy to help
48:52
um to find as we mentioned earlier um you can go to jewelloom.com and visit
48:58
the blog and you can find the videos there Joan is kind enough to put those
49:03
up there for us and we also can be found on the jewel loom YouTube channel and
49:09
the jewel loom Facebook page of course you can always visit
49:15
jewelloom.com for all kinds of fun goodies as always guys
49:20
so thank you so much guys I hope you enjoyed this project thank you thank you thank you for being
49:26
here as always and we'll see you next week guys bye