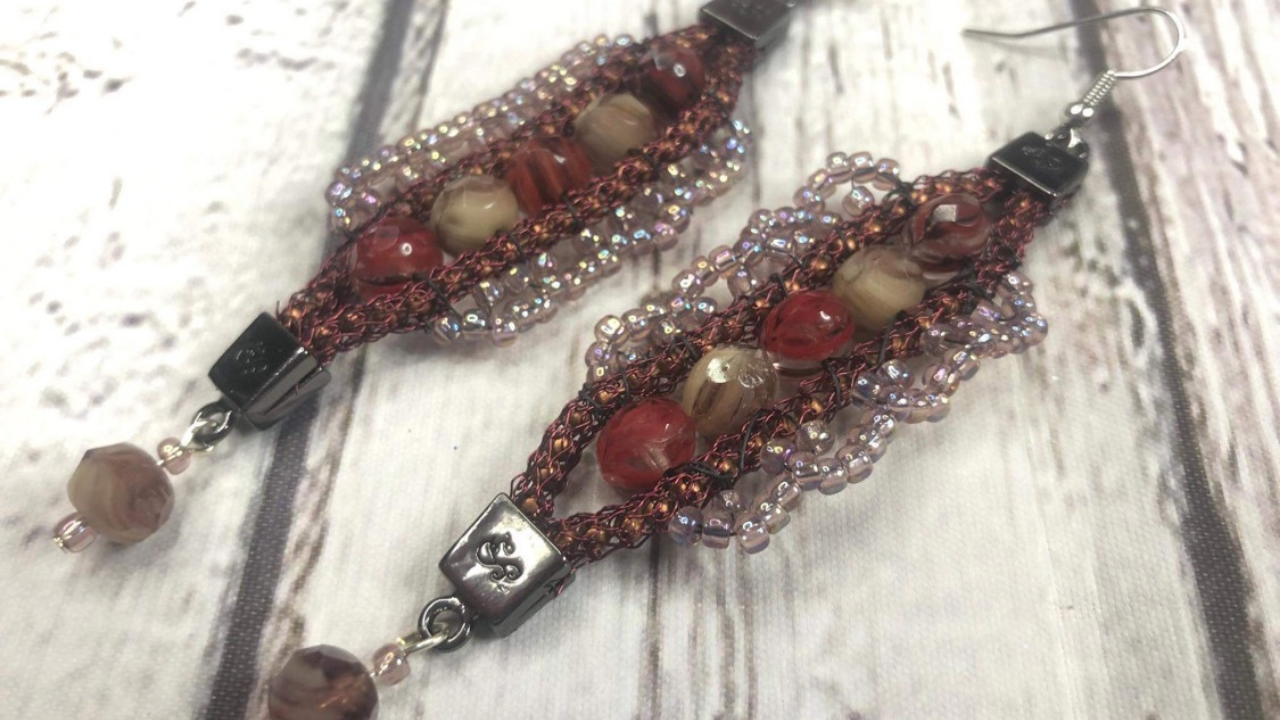
Join Tricia Giazzon, as she uses the SilverSilk Jewel Loom to create an amazing Pair of Lacey Earrings using SilverSilk Capture Chain and beads from the Jewel Loom store. She uses Wildfire to Loom the beautiful Gem cut beads and Seed Beads onto SilverSilk capture chain.
VIDEO
Items used:
SilverSilk Capture Chain
Wildfire
Gem cut Beads (from jewelloom.com)
8/0 seed Beads (from jewelloom.com)
SilverSilk Double Strand End Caps
Get the items used at the following links:
You can support Tricia and Amber by using our affiliate links. This week's links are geared toward Trish. Trish’s link: https://jewelloom.com?aff=6
Subscribe to the Jewel Loom YouTube channel to access past & current tutorials: https://www.youtube.com/c/JewelLoom
You can subscribe to the monthly workshop with kit (Creative Soul Box) here: https://jewelloom.com/collections/subscriptions?aff=6
Sign up for the Jewel Loom newsletter & get 15% off your first order, plus a free pattern: https://jewelloom.com/pages/save-15-on-your-first-order-get-a-free-pattern
Receive text notifications for Jewel Loom shows & special deals by texting "Sign Up" to 1-805-768-0568
You can find Amber and Tricia online through our link trees:
Tricia: https://linktr.ee/pinkpoodlecraftstudio
Amber: https://linktr.ee/mtnittanycreations
Please contact Jewels with any questions you have about her looms:
Transcript:
and we are live welcome in everybody welcome into another jewel loom school
live we have miss joan with us tonight which is awesome miss amber is taking a
night off oh there we go we're celebrating jones birthday this
week which is super fun super exciting happy birthday joan
thank you yeah say happy birthday to jo and she sure deserves it she's awesome hi
suzanne it's joan's birthday so i've got on my unicorn ears and she's got on her crown
we've got to celebrate tonight we'll give everybody a little bit of
time to come in here hi sandy oh sandy says happy birthday to joan
thanks sandy thank you thank you
joan's our girl boy we don't know what we would do without her she sure helps us a lot and we feel very blessed to
have her and happy birthday my friend thank you very much yeah but at the same
time what would stop malta multitasking
that's okay melanie says happy birthday happy birthday queen jules says oh
miss you ever happy birthday joan look at all our girls coming in here they're showing up
and they're showing out it's fun to be with everybody tonight
yes it's my favorite type of people lots of ladies
are telling you happy birthday hi suzanne
we're gonna have a fun show tonight guys and let alone do we have a birthday that we're celebrating but we're going to do
a super fun project that i made up here uh lovely lace earrings i had to grill
it up oh sandy's asking do you have cake um the closest thing i have cake is
hostas cupcakes sorry that works and i'd have to steal this from my
husband yeah yeah well i was very lucky for my birthday my
my husband made me a chocolate cake and then my mama and my dad made me homemade peanut butter icing for on top of it no
it's so delicious and you have ice cream that works too that definitely works yes
right so miss joan i'm gonna minimize you and i think we're gonna talk to the girls here about the project again happy
birthday my friend thank you nice seeing everybody you too joan
okay guys so getting to the project i am going to take my ears off because they do push on the side of my head
and today we're going to do a really fun project i made up these lovely lace
earrings with using silver silk and what i did just
i'm sorry and what i did was um created this lace effect and i'm
going to teach you today how to do that lace effect and it's easier than you might think and
i kind of think out the box on kind of this kind of thing because i'm a very girly girl
and silver silk is absolutely elegant and gorgeous but it felt a little almost
masculine masculine to me this earring until i put the lace on once i put the lace on i felt like okay this is me this
is me so we're gonna learn how to do this pretty lace today so let me get my camera turned around and
we will get started on this fun project i'm just going to shut the lens for just a moment so i get turned around okay
hello and i'm for the light apparently we're almost there
okay so let me put my other light back on here that will help
when they get this far enough back i'm sorry if i'm making anybody sick this is unfortunately how i have to do it but so
here's our gorgeous silver silk loom if you haven't seen it guys it is a work
of art it is just absolutely gorgeous it's a very solid
made just a beautiful piece just even just to to to display in your studio
just absolutely gorgeous but you will want to use it to leave me so what we're going to do here guys
i'm going to show you here on this loom how to um warp your silver silk and this is
incredibly easy to use your silver silk it really just
um is super simple and i'm going to show you this here again guys
and you can see we're just using two strands of silver silk okay across here so super simple
all right so to get started you're gonna want to take your um silver silk let's see i've got about
28 inches here i've been kind of working on mine using it and using it so
what you're going to want to do guys is you first want to put it in between one of the teeth i like to leave just a
little bit of slack here and i just put it down through one of
the teeth and i'm pushing it down but i'm not pushing it down too hard because you do not want that um silver soap to
get bent and gnarled which it won't normally unless you get too aggressive
which i tend to do but and then we're going to go across here guys and we're just going to put
into the second set of teeth on this side so they're exactly across from each other
and we're not going to skip a row in this because our gem cuts fit beautifully just between
you know without skipping a row so i'm coming around here guys i'm just gonna take it around the corner
and push that down so it's nice and snug and then bring the other one across
and it is as simple as that okay and i'm just gonna cut off my
excess here because i know well i won't do it on this one but i would normally cut my excess off
um because i know i'll have enough room in here to do my two earrings and have enough excess okay
so this is actually the one that i've started let me just set this one up out of the way
this is our project loom for tonight see i'm sorry i'm laughing at joel's
face um i just was absolutely thrilled with the way this one came out it just is
gorgeous with the gem cuts and the seed beads the silver silk i mean over the top
so this is our one that's done you can kind of look at that but we're gonna i'm
gonna show you how to put this together super fun too guys
i like things that are easy and look hard that's my favorite
because you can trick people then so no um so what we're gonna do here guys is
just like when you're going to start with your original your wisdom wear anything like
that if you have hemp hair if you have leather i'm going to take i've already thread threaded my needle because i don't
want you to have to go through that part um because some days my eyes cross but i'm
just going to take this end here guys and i'm going to put it down through here and i'm just going to make two knots here
okay and i'm leaving enough room make sure you leave enough room you know to be able to hook your silver
silk into your ends okay because we have to put them into these double ends
we don't have to but that's what we're doing tonight and you can see here guys i did leave a little bit of extra on the
end just in case i needed it so i'm just going to tie this on i'm
just going to tie it on two knots here just to kind of get it secured you don't have to make it
terribly tight just so it's there and it's not floating around on you as you're trying to secure
your beads okay so the first thing we're going to do
we're just going to put our gem cuts on okay i'm gonna pull these beads over
here so you can kind of get a look at what i'm using i'm sorry this camera just throws me on like is it forward is it backward um
so we're using the gem cuts i'm using some 8 0 seed beads
and then just the silver silk and ends and some ear wire that's all you're
going to need guys you're just going to need those few simple things so i'm going to pick up one of my gem cuts which are absolutely
gorgeous with my needle and i'm just going to drop that down
like i would normally when i'm
looming and i'm just gonna put my needle up underneath and i always for me personally i just kind of keep this
between my fingers as i go that's what i feel like i have the most control over
it and then i just slide my hand underneath there and push my bead up through
and then what you're going to do there guys i'm not going through the silver silk i'm going over top of it i'm just
doing our normal looming that we would do because that's going to lock it in and i always think of like a sandwich
because you have the thread on the bottom the bead in the middle and then the thread on the top
okay and then i'm just gonna put it through our bead and we only are using five gem
cuts per earring but they make you don't have to have um a lot because
they make such a statement they're just so super gorgeous um
you could make these longer you could make them shorter depending on the amount of the gem cuts that you use so the same
thing guys i'm just taking one of those beads and i'm bringing it down and get that thread out of the way
my needle underneath like so and just pulling that
and then pushing it up between and i'm kind of using i have some of these beads that have like more beige in them and
some just are more green i'm kind of trying to make those like every other the ones
with the green and then putting one with the beige but just because it gives it some interest
okay a little bit of depth you know and we only have to do this a few more
times and we will have our base done
all right do we have any questions yet
from anybody hi becky i just saw you came in how are you
okay and we're just going over the top again and locking that bead in
so i'm just going to bring this up so you can see if you've never done this before
you're going to go underneath the warps and then back around on the other side and over top and through the bead okay
and that's where we're setting right now and we're gonna do
our fourth bead same thing dropping it down
and running the thread underneath and pushing up
the bead and going over top it gets it's like a little dance to me it's just
and i think that's what's so relaxing and comforting to me about
doing um lumi i'm just gonna take these down just a hair because i
am moving up and i'm gonna need that space between those two um it's just a very relaxing meditative
and then this is our last bead this is our fifth bead okay
and i also find guys that working in odd numbers is more attractive to the eye i like to
decorate my house and you know which a lot of women do they like to put cute
little things up and in doing that i've learned that i like to do like three five seven
and it just gives it a much more aesthetic eye pleasing look and i
try to do the same thing in my jewelry because i feel like it also does the same thing okay guys so we're out of the top bead
here where this thread is laying over top of the silver silk
what i'm going to do we're going to start doing our picot stitch because that's the base of our lace okay
i'm going to take this needle about approximately where the hole of the bead is it doesn't have to be exact but about
in the middle of the silver soap between two if this is a ball chain okay so between two of
the ball chains about right in the middle i'm going to take my needle and pull
that through okay and it looks like a mess right now but
all second so now we're through that silver silk
i'm going to trim this down just a hair because it is
in my way okay so we're through that silver silk on this side and what we're
going to do we're going to do our typical pico stitch but normally at least i've noticed a lot of times people
use 11's to do the picot but you can do it in absolutely any size seed bead and i'm going to use the eights here and
we're just going to take three of these on our needle
and then what i do guys is between so i'm coming out at the top of
this ball in the ball chain and i know it's really hard to see but i'm
above that that is going to be the center this ball that's um
here in the center it's almost lined up with the hold the bead that's going to be the center of my picot stitch so you
come out between two and the one if you can almost think about it like you're wrapping around
the ball chain that is that they um sorry guys
the round of the ball chain that is in there we're just wrapping around the one okay and just keep in mind this doesn't
have to be exactly lined up because we're gonna put the lace on and it's just gonna be sort of free form anyway
so i'm going between the next set
of balls in the ball chain and i'm coming through the silver silk again okay
so i'm gonna pull that snug so i can get that cute little picot look
like we always do and then i'm going to take my needle and
i'm going to do the same thing so i'm going to come out i'm inside now guys
now i'm going to feed my needle back through the silver silk between the next set of balls
in the ball chain um and then add three more beads okay
all right and then same thing back in that's going to be the center
the one we came out the side of up here is going to be our center and then we're going to go down between the next set
all right and we're just going to do this the whole way around keep my finger on this because i keep
trying to make it dance for you guys um and we're just gonna do this picot stitch this is gonna be our first
go-round we're gonna have a couple um a couple times that we're going around
so we can add our lace so we're just going to continue with that going from the inside out
and then we're just pulling that snug this doesn't have to be super super tight guys either because to give it
like this this lacy look you kind of want it to be sort of flexible okay we
don't want to pull too tight and i'll show you here on this one if you can see the difference this is the first one i
made and i left it like this because i wanted to be able to show you on this side i pulled too tight
and you can see it's just like a straight line basically there's a couple little parts to it but
this one i kind of left it a little looser on this side and it gives you more of that lace appearance okay
so we're just going to continue doing this
and then back through the next step
and i say through you're not literally of course going through the chain you're going through the the weave that is
around the chain which i know you're all very smart and you've figured that out by now
okay so let me just i like to fluff up my picots a little bit just pull that bead
up and kind of get it so it's lined up the way i want it to be
okay and then i'm gonna go on that one's not
really piling up the way i wanted to
so if that happens to you go back through
and redo it and make it closer together the second time through because then you'll
get that pucker more so in the middle i have it but it's not
the best one i've ever done if you get the idea on that guys so i'm going back through the next set
okay and then add on three more seed beads
and if you do like i'm saying where you just center one of the ball chain
the one beside it you should be okay and going back through the one beside it but when you start like spreading out
your stitches that's when you'll get less of the picot look to it
yeah this works much better keeping your hand on the loom imagine
keeps it from bouncing around okay so just a couple more we've got one more
set on this side okay and then we'll go across to the other
side so we've got three more here actually you need to come through the
silver soap from the inside out first and then put your seed beads on
all right we got our three
you got some of those beads and you'd love them the gem cut i imagine that's what you're talking about because they are
absolutely fabulous and then back through now it looks like
i'm getting close to this bead and it almost looks like i'm going through gonna go through the center of it and
you can certainly do that now you can wait until you get your picot made to do it but i'm gonna go right through the
center and out through the other side okay because we're going to go down this side
now okay hi sherry welcome in
okay so now we're on the other side we've done our picot up this side we're going to do the same thing
all right i put my beads on i just dropped them down and we're not
doing any kind of uh weaving as far as
above the silver circle below the silver soap we're actually using the silver soap to kind of lock everything in by
going through it okay and again we're gonna go out
beside those two in between those two balls in the ball chain
okay and then we're gonna put on three more
thank you amber you're miss dear
as always and then go back through between
the next set and it's just that the whole way
up one side and down the other until you get your pico stitch on
and you're just using the silver soap to your advantage it's holding your thread there in between
as far as i push my pliers out guys it never fails that i catch them somehow
i don't know how but i try to clear my surface off and think oh that's far enough out you know
and then i'm just taking my needle and just putting it down beside that bead and putting it through
that's never good no puppies barking tonight so that's an
okay and then back through
now you can see guys on this side it's a little closer and again you could do an extra one here
and you won't even notice because it's going to be like this it's just going to look like a
solid piece of lace of you know beads so
if you happen to get them too close which i did on this one just add another one and hook everything up
if you're anal retentive then you may have to take it back out but i know that it's still gonna look
pretty much the same if i would do one one more or one less
okay let's just do one more put this through
let's add three more beads
okay all right so now that we have
the final picot here we're gonna go now back
through this top bead okay and then back out through the silver silk
and through this bottom bead on the picot stitch let me move you down just a
hair guys do you see where i'm coming out there between
in through that bottom bead on that picot okay
and i'm gonna pull that through and then once you get that
through okay you're gonna go sideways through the top bead in the
you're gonna run your thread through first
okay and then you're gonna add three beads three seed beads
and then you're just gonna go the trick to this guys is using these
bottom beads here that's how you're going to get more of a lacy flow
so what i'm going to do here actually i'm going to go down through this bottom
loop here or this bottom bead come back out through the silver silk
my three beads going up this way so i can get my
lacey appearance okay so we'll do three
as everyone following or am i confusing the daylights out of you
okay so i put my three beads on and i'm going to go
and there you have your first little bit of lace okay
so again we're gonna go back in through the silver silk and up
through the bottom bead of the pico so back through
sorry if your hand's in the way guys i'll move it in just a okay
because we want to be coming up through that bottom picot bead
to give it that give it that lace look okay so we're there now we're going to grab
the furthest one up here of the picot stitch that we did let me pull this up more
okay and we're going to go up through there
all right and then through our
top bead which this was the one that kind of was a bummer but we're going to link into it anyway
okay and then we're just going to add three beads
push those down and then we're going to go up through this top
okay we're getting that lacy look we're getting the ends and the outs this one here i could added a few more beads here
um but i'll show you on this side not how not to do that
so we're going to come down through the silver silk again
and then up through the bottom bead
and across the top come back up
all right and then add your three beads
it's odd not having anybody to talk to i'm so used to chattering with my buddy
all right so there you go there's the lace on that side and then we're just going to go through
the silver silk and through the gem cut again and out the other side
and we're going to do the same thing
so we're going to go up through this bead closest to the silver silk
and through this top one and you're basically just connecting your tops
that's kind of like the basis of it your top beads in essence
and that's your loop right there okay so then we're going to go
down through this bead through the silver silk
and up through the next bead in the picot stitch
here okay you can see this side is nice and flowy
and full and because i didn't pull it in like i did here
i should have added three more beads here but you can see on this side it's giving you a lot more of a lacy
appearance so one two and three
okay and then back through the summer silk
i just love the way that it looks so lazy that just throws my heart
i'm kind of out of the picture there guys you gotta tell me these things
it's just giving you that really pretty lacy feminine look
there we go all right and then we're going to go down through this bead and we are done
with our lace and we are done with our earring now we
can take them off of the glue i'm going to eat this through this last
seed bead through the silver soap and i'm going to tie it off
okay once that comes through and i'm going to tie this off on the inside so you really
can't see it as much to get a nice secure
locked in piece you don't want your little frills coming loose on you
joan you're confused about what i was doing now i just saw that
um was it the what what do you need explain better
the the process of coming out through the summer so or what
was it honey let me know so i can help you okay so that's tied off this one don't
look at that side guys we'll get that fixed but and i'll cut that
i can't hi carmen we figured it out on the second row okay good
yeah this one we could just take that part out so i'm just lifting this off of the
silver silk loom now guys and we'll go with this first earring and
we're going to snip you want to make sure you have enough space between them so that you can get your ends on from
your silver silk so i'm just kind of eyeballing this and i know i can go right about here and they're going to
have about even amount of space on each one of them okay so i just snip that
and then i'm gonna do approximately the same length on the top that i did on the bottom
to give it the same kind of look on both ends
okay and you can also guys if you want to glue um your ends that you've tied off there
you certainly can and that will give you a better hold as
well so i'm sure you've seen me lay put these on and off numerous times but
what i have found the easiest way to do it is i just take a pair of chain nose pliers have kind of
a small nose and i just spread i'm pushing here inside plier
to spread that open just a little bit because it makes it a little easier to get everything inside okay
so you just put it in like so and just your your opening out like that guys to
kind of spread it open when you're in there okay just use your finger just i'm kind of
pushing right there okay so once i do that i have done one of my
um flat nose pliers with tool magic
and i definitely recommend that
to put your silver silk ends on it just works so much better and you don't have to worry about marring your ends how are
we doing on time oh we got plenty of time so we're going to slip in
both ends here into the silver silk
and and you can see how i have those inside once i know they're lined up they're the
way i want them which i want to make sure
i'm just gonna give a squeeze and that's my first squeeze and then
i'll go back and i'll squeeze a little bit on this side and you don't have to you know squeeze these like it's going
on style guys just kind of give it a nice squeeze without
you know doing too much and there's your first end on
that's the easiest way i found because when i first got them i was struggling like crazy and
i just kind of figured you know what i need some more space in there and i need something
that's good to hold on to them because as beautiful as these ends are
we certainly do not want to mess them up okay so we'll put that in there
and this end as well and that's okay if it's just the ball there make sure they double check they're even
now i'm going to cut one more off well for a moment it does and then it
doesn't i think we'll take one more off here so they're the same and they can go in
okay and i'm just making sure again i have that straight i have it where i want it
and just give them that squeeze and then
a little bit over here and a little bit over on this side
just giving it a good squeeze just making sure everything's up in there
this one seems to be loose so i'm going to give it a little bit more of a squeeze on this side
yeah so see that guys i didn't really catch it that well i the
chains up in there and it's hooked but the actual silver silk part isn't so you
can go back in and just open that back up with your pliers
it's a little harder than the first time but you can do it and then just push your
better you know let me open that up a little bit more
i just don't like the look of it when this comes out it doesn't look
well made but you get the idea on it you can open them back up and this put that the metal
mesh back up in there and then you have your earring so what i did guys i just took a head pin which of
course i don't have laying here right now but i just took a head pin and i put one of our gem cuts and a few seed beads
on it and that made our little dangle on the bottom
and then just put on an ear wire and that's all there is to it
let's see do you guys have any questions well i'm gonna turn my camera around and then we can answer any
questions that are coming through okay
okay so does anyone have any questions or did
i confuse you completely and utterly
yeah carmen i love tool magic too really really
makes it nice to put on ends like that even your ribbon crimps you like them i'm glad and i hope i hope that was
clear enough we're basically just connecting our pico stitch
and we're just making sure that we're going down through the beads in the middle because if we don't
you're just going to get a straight edge so as you're doing the arc you go down through the bead then up through the
next bead put your beat put your three beads on and connect
thanks guys thank you i'm glad you like them i hope to see you guys make some of them
i want to see them posted on the jewel group jules loves them good found full magic
on clearance at michael's about a month ago that's where i found mine too i grabbed mine it was five bucks and i
got amber one too so we're both set oh you guys are so welcome i'm glad you
enjoyed it good i'm glad i'm glad
okay guys well we're done early tonight what's the odds of that that never happens
especially when amber and i are gabbin so as always guys please keep amber in
your prayers she's fighting she's fighting strong um just keep her in your prayers is much
appreciated if you could do that for we miss her when she's not here that's for sure so
thanks guys if you have any questions don't hesitate to reach out to me i'm glad to help you with anything
um you know just here for you i don't want you to think you're on your own with these if you have questions or anything
so okay guys well thanks everybody for hanging out and it was super fun as
always you know me and my antics so we'll see in the next one guys have a good evening