Your Cart is Empty
How to Decorate Baltic Birch Earrings

Learn to decorate & design baltic birch earrings (& baltic birch buttons, too), using paint, stains, & beads. Designer Tricia Giazzon will show you how easy it is to do & how beautiful your designs will be.
Supplies Used:
- Designer Series Baltic Birch Earrings Collection (9 pairs): https://jewelloom.com/collections/accessories/products/designer-series-baltic-birch-earring-collection-18-pieces-9-pairs?aff=6
- Designer Series Baltic Birch Buttons Collection (20 pc): https://jewelloom.com/collections/accessories/products/value-pac-wooden-decorative-buttons?aff=6
- Czech Glass Bead Mixes: https://jewelloom.com/collections/bead-mixes?aff=6
- Fire Polish & other Czech Glass Beads: https://jewelloom.com/collections/beads?aff=6
You can purchase the different materials at the Jewel Loom website. You can also support Tricia by using her affiliate link: https://jewelloom.com?aff=6
Subscribe to the Jewel Loom YouTube channel to access past & current tutorials: https://www.youtube.com/c/JewelLoom
You can subscribe to the Jewel Loom Jewel Box with course here: https://jewelloom.com/collections/subscriptions?aff=6
Sign up for the Jewel Loom newsletter & get 15% off your first order, plus a free pattern: https://jewelloom.com/pages/save-15-on-your-first-order-get-a-free-pattern?aff=6
Receive text notifications for Jewel Loom shows & special deals by texting "Sign Up" to 1-805-768-0568
You can find Tricia online through her link tree: https://linktr.ee/pinkpoodlecraftstudio
Join the Jewel Loom School Community (off Facebook) to share your loom creations, be inspired by others, & a place to ask & answer questions: https://www.juliannaavelar.com/offers/5ss8HfCp/checkout
Jewel Loom Facebook pages: https://www.facebook.com/Jewelloom & https://www.facebook.com/JuliannaJewelsAvelar
Jewelry Making with Jewel Loom community page: https://www.facebook.com/groups/228056324285807
Please contact Jewels with any questions you have about her looms: email - hello@jewelloom.com or text - 1-805-768-0568
Transcript:
hey everybody it's Trish hope everyone's well uh today I'm gonna do a video for
you and it's going to consist of me showing you three different techniques on how to color your wooden charms that
you'll use for your earrings after that I'm gonna show you how to
make one and what kind of beads I use and techniques I'm also going to discuss in this video
what kind of sealers to use on your wooden pieces so all that being said
this is going to be a super fun video so let's get started so we're going to start out here with me
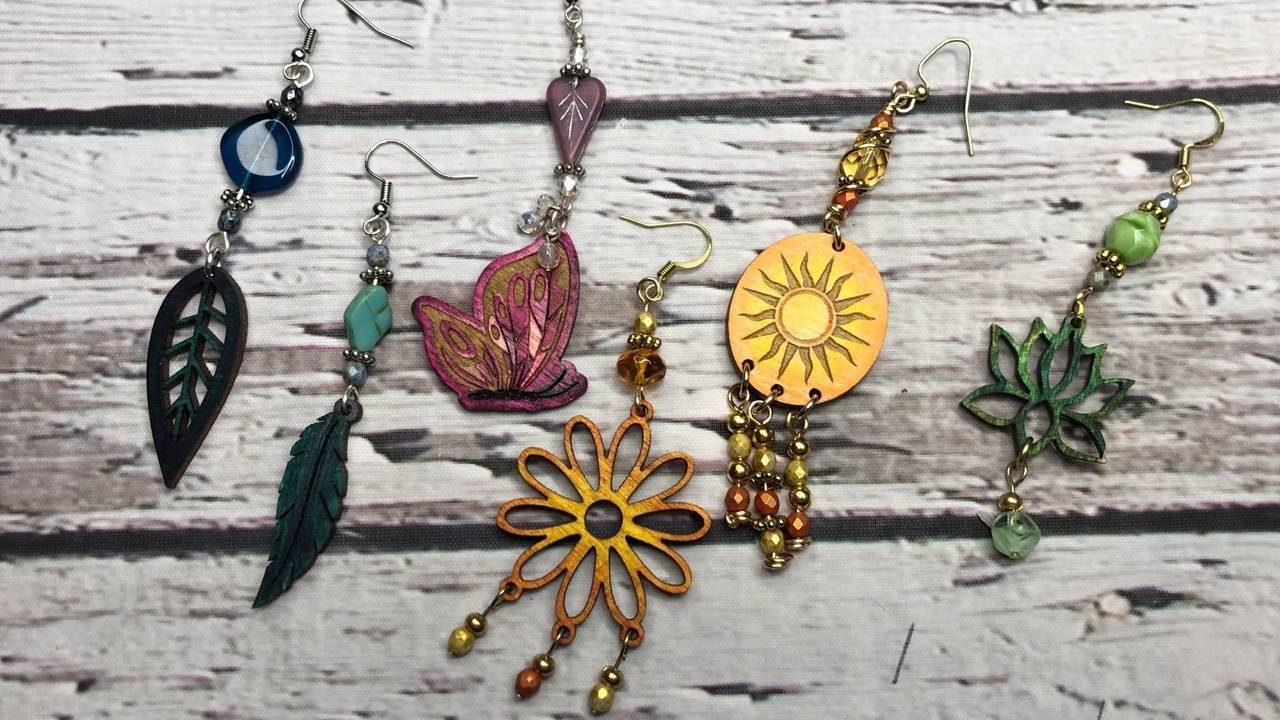
showing you some of these beautiful charms that you can get now at jeweloon.com
um this one is the daisy you can see how she put um holes at this a hole at the top and
then three holes at the bottom you certainly could dangle things off there or also utilize the open leaves to do
some unique things with it I've also got a leaf
super fun a lotus flower
a feather of sunshine and that was cool too
because it has the three holes at the bottom and my favorite the beautiful butterfly and you can see this has a lot
of detail to it okay and I'm going to show you how to color that detail it makes it nice to really
give it a lot of depth so we're gonna get started I have three
techniques here I'm going to show you as far as coloring goes and then I'm going to show you how to put some of the earrings together and just
simply you know so it's as easy as possible so what we're going to start
with here is our sunshine okay so we'll get our colored pencils
out these are the color pencils that I use okay
and so what I want to do here is I want to pick two colors that are closed in the color family
so I'm going to pick yellow and orange
and I'm going to start with the lighter color in the middle okay and it's just a simple
as starting to color it in I use the side of the pencil and the light touch
because I don't want it to get too dark just yet I want to see kind of where everything goes and I'm gonna work
out here just a little bit between these sun the sun rays
just like so and you know
um the sky's the limit on this guys you could use as many colors as you want
um and just really make them sing we're gonna do kind of simple today so
that way then beginners and advanced can do this
okay you can see how that's kind of looks like it's working its way out from the center
all right I'm just going to go between those rays now don't go down inside to the cutout
spots I don't recommend that I think that um the color doesn't do as nice down in
those those are much prettier if you just leave them the way they are so now I'm going to pick up my orange
and I think I'm going to go in here and I'm going to do orange in this ring
going around the Sun kind of give it a little bit of a pop
all right and then I'm going to start out from where uh we ended our yellow just
slightly inside that and I'm going to start slowly working my way out with the orange okay
so we're just kind of blending I'm going to work out to the edge
all right and I like how this gives it depth
you forgot a little yellow in here it gives a depth really guys by using multiple colors
and it gives it a really cool look in my opinion
we're just working out to the edge blend blend blend that's the name of the game here
this is super relaxing to do in therapeutic which is a big part of what jewel loom
is about okay
working that out and you can see we're getting a pretty good start there it's coming along pretty cute
so now I'm going to take my lighter pencil and I'm going to go back in here and I'm just going to kind of blend
out again with the yellow and just kind of connect those colors
where they kind of meet in the middle and kind of blend if you know what I mean
okay
so once you do that again and you're blending out into that orange just trying to avoid a harsh line
see how that's coming along for us and I'm going to go in with my orange and I'm just going to go around the edge
here and I'm trying to apply more pressure just to get like a darker look right around the edge
so it really gives the piece will pop okay but it just
really makes the pieces safe and I may even
just go in here a little bit on this side and just lightly color in a little bit of orange to give that Center a
little bit of depth okay so it's a simple as that with colored pencils now you can color the
back don't hesitate to do that as far as sealing colored pencil or any
of these techniques for that matter you can use a clear coat spray
you can use resin and with the patina paints that actually have a glaze that
you can purchase the zip right here that you could use as well okay so let's
get on to our next technique which is the potato paints
and for that what we're going to use we're going to use this little feather
okay and what you need is your patina paints
a little bit of water some brushes and I use a little paint
palette it just makes things a little easier now I use the Vintage patina paints their packaging has been updated
and I believe they change their recipe a little bit but they do the same exact thing so grab yourself some patina
paints and you're going to want to this is one of my favorite colors Verdigris
and then this is one of my new found favorite colors blue fluoride so you want to make sure when you get these
you're shaking and shaking and shaking because that way you're getting all that
paint distributed mixed through and you hear that little metal ball bouncing in there
that's what's mixed in for you so we'll just mix this for a second
[Music] okay so that probably wasn't long enough but
it'll keep us going now you see how I'm squeezing that and it's not coming out usually what I'll do then is just take a
little piece of wire and I don't have a spare piece here but I'm just going to trim a piece off of
my wire roll here and a little trick is just take a little
piece of wire in there this size should work and just kind of move it back and forth
and up and down to clear that out and then you can put some of it on your
paint palette it's still kind of slow but that'll work you don't need very much that's way way
way more than what we actually need but that's okay
so I'm going to put a little bit of fluoride color in there and I can see that's not quite mixed the way I want it
so I'll just take a popsicle stick and just kind of blend what I have in my palette here a little
bit that off I'm gonna do the same over here it's a little cheap you can do
all right so I'm just going to take a simple paint brush I have a variety here I can choose from but and we're gonna do
the same concept you're gonna start in the middle and what I'd like to do with this is I kind of will wipe my paint off
a little bit just kind of wipe it off on my my sheet here and just kind of work out from the
center the same way that we did with light Strokes because I just want to kind of see
how things are going to move along here all right so you're just going to take a
paper towel if you want to stay lighter in the middle and when you put it on just kind
of rub it and you can see how it pushes it down into the wood
as well as lightening it a little bit so again I'm just going to take a little
bit off of here because I don't want a lot okay I'm just kind of playing with it
here and seeing again I'm wiping that off
working it down a little bit just lightly Feathering it to those edges okay so we're going to
get a color blend
a little bit more in this morning because I do want that just just darker
okay and if you make a boo-boo no big deal you can always paint over it or just take your little paper towel and
kind of blend it out look at that guys that's cool already right
so then what you want to do is you want to make sure and clean your brushes off don't let them dry with this because
that that will ruin your brush quickly but you also want to make sure that you're cleaning it off in between and
it's just simply with water okay
clean that off and I'm just drying it with my paper towel and now I'm going to take the fluorite
color and I'm going to work with it around the edge a little bit here a little bit up in this Loop
and just kind of feather the edges with that and you can see that's already
given us depth by having those two colors there
okay you could add a third color if that appeals to you
another shade you could do a really light blue in the very center that would
be pretty I just keep working this I'm like okay well I want a little bit more turquoise in the middle
and that's a pop out just a little bit more and you can just keep layering until you get the exact look
that you want okay and I'll even take the other colors and kind of mash them
together a little bit both of them just to kind of get that middle color
to blend better see how that goes and same thing for this you can also
paint the back of this really make it look finished but that's the basic concept for that guys see how
you have the depth and I'm going to take a little bit more of these blue on the edge
and that's what I do I just keep layering it until I'm happy
with the way it looked and again you can seal it like we said it's always that you can sell these wood
pieces so there that is our feather all right so I'm gonna put this in water
my brush and we're going to move on to the alcohol inks
all of these are very simple techniques and anyone can do it's just a fun way to
play around with these gorgeous little pieces so I'm going to move this off and
on the way put it with our sun okay and I'm just going to wipe this up
because I don't want to get it on my arms as I'm using my alcohol inks just to make sure that
there because this is just a piece of paper I'm working on a spare piece of paper just to make a mess on because I
don't want my top of my desk okay you can certainly do that a piece of paper some paper towels some newspaper works
as well okay so here we go our butterfly
beautiful beautiful now this one's a little bit more intricate if you want to get intricate okay that's your choice
but I use alcohol ink so I'm gonna intricate pieces and these are ones that I just got off Amazon okay
and I'm just gonna pick a couple pink colors here what's nice about this is
you can you get this little paper here and you can write show the colors
besides the number so you can actually see what they look like on paper okay so
I'm looking at this and I'm pretty sure I want to do Maybe
pastel pink and Vivid Pink So that would be 6 and 17. okay so we'll play with
those there's six and seventeen that's two colors you could do three if
you wanted to add in the rose pink that's number eight we'll grab that too just for fun okay let's put these over
here I'm gonna want my black too for the body so I'm gonna grab my black
okay so we'll just start out by doing
some of the colors around the edges all right so let's start
with our darker color and I just want to use the fine tip with this okay if you had a bigger piece your coloring say for
instance the sun you could use the Chisel tab all right so I'm just going to start
around this Edge and I'm just going to kind of go a little bit with that one
[Music] 17.
I'm gonna take that off there and we're gonna work our way down some
and then we'll take our third one it's the rose pink move that out of the
way and grab that and continue it around now look as I'm coloring that that's not even going to show up so this is pretty
much not going to work on this piece so we will just stick with the two colors
we originally picked so we'll do this just around the corner grab some more dark pink and we're just
trying to give it a little bit of depth a little bit of interest you can do this if you want if not keep it simple do one
color totally your baby here
right I'm just gonna color around these little antenna
and I'm just going to take that light pink down in here between those antennas so it looks kind of finished
and then again grab my darker pink
and just start pulling that through bringing it around
and then finish it off with our lighter color this is just kind of a variegated
way to do it and what's nice guys with these alcohol inks I can grab into where I just colored that darker color and
kind of pull it into my light color if I want just to kind of make sure everything Blends and there's not a
sudden stop of color the other thing you can do is use the blender pen that comes with it
and it makes it nice that it's just like a white clear pen it's usually number zero in
the package okay so it's the same concept we're just gonna grab this we're gonna blend this
down kind of make this look like you know it was all connected it's not
going to have any sudden stops or starts and that just works perfectly and just
really gives you a pretty look okay so that's another concept I always write
after I'm done with it because I don't want that color Stained on there I just kind of rub it off
so here we go we're gonna go in with our pinks
maybe I'll grab a little bit of purple to put in the middle too so here I picked up this color and I'm just gonna
start coloring in areas okay I'm gonna do a little purple there I
think I'm gonna do a little purple up here maybe some on this
and just play with it and have fun okay there's our purple
there he is to him out here do some toward the center here
and you can see how these are kind of divided in little pieces that makes it really cool looking and gives you an
opportunity to really add depth to the pieces you know
and then we're gonna put some purple in the center here and again you can go in you can
blend you can you know just the sky's the limit and where's my
light one there we go put a little bit of light here
kind of spread it out a little bit so you get a little bit of purple there you get a little pink here you know
just to kind of give it that depth
and I'm sorry if I'm moving my piece around a lot that's just how I kind of color and go here
but that gives you the idea you can obviously use different colors a
teal would be gorgeous on here I think I'm going to take this little bit of pink that I put down here I think
I'm going to take my purple and just color over that one you can do
that with the darker colors and it means a little bit lighter over purple but still looks super super cute so I just
grabbed some fire polish a couple pieces out of the Czech glass
bags that Jewel sells here's one I've used a lot of these but
she has a variety of colors there are awesome pieces of Czech glass in here that you could use
to make earrings for days and then this is uh one of my favorites right here that one
in the turquoise so and I just have a little bit of fire polish guys too so
I'm gonna take wire okay and we'll start with our sunshine how about that this is for our our
feather and I'm going to grab some gold tone
uh beadalon German style wire and I'm just going to cut off maybe I don't know
eight inches that's way more than we're gonna need but hey what it's better to have more than less and I keep missing
that here we go so once you do that you're just going to
warm up the wire with your fingers that's strange
okay and we're going to make the little
um charms from the bottom here you don't have to use head pins I'm going to show
you how to not use head pins so if you just have some spare wire hanging around you can certainly do that
I'm just grabbing my tools here I need my wire working tools now
so I'm going to start out Simply by making a loop on the end of The Wire
actually let me flush cut that a little bit first okay and then
take that in the very tip of my round nose pliers move this out so you can see and I'm just gonna roll it
around on top of itself twice until I come back to the part that I
started okay right here and then I'm going to take
my chain nose or my tweezinger pliers and I'm going to bend this
just like so almost looks like a golf club at this point and then I'm just going to take this
wire I'm going to cut this end off here because that's not going to work
that off and I'm just going to take that wire and I'm going to take it down and I'm going to gently bend it
and put the end back through the loops on the bottom okay
and then I'm just going to take my chain nose pliers
and my wire straighteners just so everything stays really nice
and just give that a pull and I'm giving it a good tug because I'm going to move in closer give it just a
little bit more oops I want to go too crazy on it but you want that to kind of knot up at the
bottom just like so and then I usually will come in and I'll just kind of straighten it out a little
bit get it level with the wire and there is your own head pin you just created
this wire straightener just go over this again so we're going to make we're going to
want to make three of these but I can tell you my technique that I I just make them as I go it's just that simple so
I'm just gonna pick out some of I don't know why that is in there that needs to
go in the other Bowl um the fire polish and I'm just going to
Simply add a piece of fire polish onto the bottom look how cool that looks and then just a little spacer round bead
okay you can add as much as you want as long as angles as
you like so I'm just gonna do let's see I didn't orange so let's grab a yellow
all right so there's two and then we'll put one more ball on top
how about that that'll give us really pretty dangle there okay so
simply for me I'll show you um what I do to make my life easier I
use this little tool here it's a one step Looper and you just put the end of the wire
through that feed it through up to where your beads are and I always back
off just even a fingernail length so I don't crack my crystals and then just squeeze
and that is your first angle right there okay so we're going to continue with
that we're going to make two more head pins two more dangles again we're gonna
grab the end we're gonna wrap around twice
and we're going to end into a golf club shape
and then take the end of the wire and put that through those circles of wire at the bottom
just like so and then we're going to grab the wire
and
there we go there's one more so we're going to do for the one in the middle we're going to make it slightly longer
we're going to start with the yellow and the bottom okay
I'm going to need to trim that end off it has a little bit of a indent and the beads don't want to go over it
so there we go just take your fire polish you can even put some
Daisy spacers on if you like
oh so we're going to take that and then a piece of our Orange
we're gonna do three layers here with Daisy spacers okay because we did two beads with the rounds
on the other one this is the center so and then grab another yellow
and let's put one of those ball spacers on top
just that simple guys what a little bit of fire polish will do for you right so again
I'm gonna take this one step Looper in here and I'm going to put my wire through the
one side of it back off just like a fingernail length and squeeze
all right so I'm going to make one more of these guys and I'll be right back so we're back I have all three of my
dangles made they are super cute ready to go now
we're gonna make the top part I like to make it you can just go ahead and put a jump ring and an earring hook in here if
you want to but I like to um make it put a bead up here as well
so I'm just going to show you how to do a simple Loop since we were using the uh one step Looper for the other just to
kind of give you a bit of info so I just cut that in flush I'm going to move this stuff out of the way
and we're just going to grab the end of our wire with the tip of our pliers and
it depends on the size of loop that you want so I'm going to move mine down just a hair and I'm going to make sure I'm right at that end and I'm just going to
give that I'm going to do a twist of the wrist and I'm going to bring that around just
like so okay and then I'm going to go in the center of that with my pliers and
then push my wire back and you can see how you get a little lollipop look there
and that gives you that centered Circle okay so it's the centered Loop
so what I'm going to end up doing here is I'm going to attach this into
my piece I'm going to put a jump ring and then hook this in so it's going to go this direction side to side so
looking at this I want to build a top for this and I don't want it to be too high only because it'll already be a bit
of a long earring but it's up to you for the sizes you desire of course so
I'm just going to put a fire polish can't go wrong with fire polish a daisy spacer and these are just things
you have in your stash and like I said for the Czech glass those mixes are golden stuff right there
so there you go and and then another I'm gonna put a big piece of iron polish on
the top another Daisy spacer and another orange okay
just as simple as that
okay there we go so what you can do at the top of this you can make a wrap Loop if you like the
look of that I'm going to go ahead and do that I'm just going to take my pliers bend it over to the side bend the wire
over to the side grab my round nose pliers put those in and this is how I do it
everyone does them different of course but this is a good way that I found you go up and over
rotate your pliers I don't take mine out I just rotate them it's one less step for me
and hold on to that and then I'm going to cross it and I'm just going to adjust that so
that's sitting in the center there now I'm going to take my pliers out and I'm going to grab it with my tweezer or my
chain nose plier and I'm going to firmly hold that Loop while I do a wire wrap
okay and that's a wrap Loop right there if we'd stop right there that's a wrap Loop
you would just trim that and go but if I have all this wire left sometimes I like to play so I will bring the wire across
the front and just kind of go in between the beads and you can see I'm just kind of wrapping that
bring it around the back like so and then I'm going to go down the front of this bead
just like so and I'm going to take my pliers out I like to hold it at this point wrap it around that piece of fire polish
back through and that on to the bottom
get that adjusted because I want there to be some wire across the front of that as we go okay so you can see how I'm
adjusting that I'm going to hold that there with my fingers and just go around the bottom a couple times
and there you go we're just gonna travel that we have that top piece done this is
actually going to be the top the lemon throw up Loop and we're just going to connect that now with jump Rings it's
just that simple we're going to connect all these pieces and we're going to get our wire up as well and I have some five
millimeter jump Rings here just use whatever you have in your stash
and I'm going to connect to the bottom of the top that we made there
and I'm going to put this through the hole on my sun
with my pliers grab the other side with my chain nose and we're going to go front and back and
close that jump ring up right there and you want to make sure that you're doing this front to back always guys
don't go side to side or you'll have a mess on your hands so there's our top
piece we can go ahead at this point then and add on our ear wire
as you saw that flip that's playing on the back color it to your heart's desired if you like
so I'm just going to open up my ear hook in there
close that up front to back and now we're going to add on our dangles and I know I want the longer one
in the middle this is quite the earring so if you don't like long earrings scale back you know you know that you can just
make it your own but I like long earrings so I'm just gonna open my jump ring and
start by attaching our charms simple as that
okay let's work it back and forth until we get right where we want it
again through the center because that's our longest one
I know you guys will come up with some gorgeous designs and gorgeous ideas you always do
okay and our last one
I'm sure I have a hold of that there before I go to close it and again I'm working this back to four
back and forth back and forth there's a little bit of pressure toward the middle but not much
there we go so there is our finished earring I love
it oh my gosh that is certainly a statement piece so I'm going to show you here a few other ones that I've made
this is a leaf or a feather excuse me that I did prior to the video here and
here's our butterfly and our leaf
more Lotus and of course our beautiful Daisy
beautiful so guys that is it for me today I hope
you enjoyed this video and I hope you have a wonderful day and I'll see you in the next one guys