Your Cart is Empty
Finishing Bracelet with Button, Using Barrel or Overhand Knots
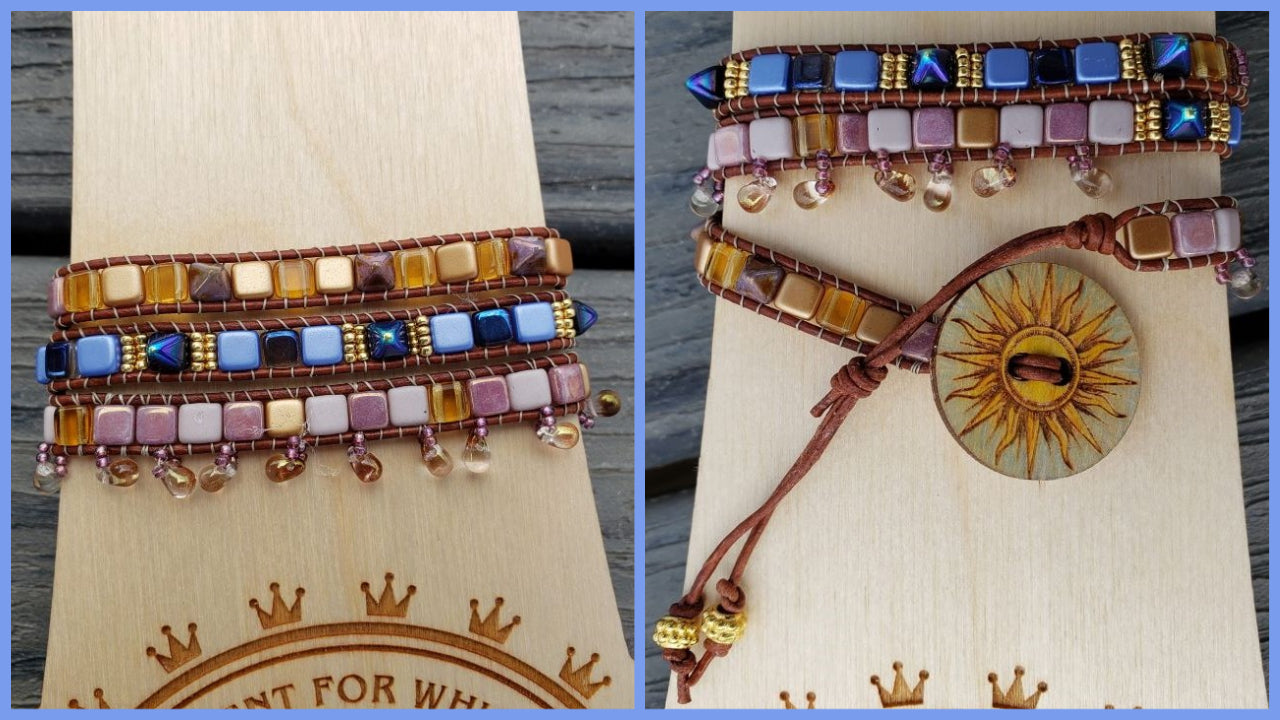

Learn how to finish a single strand bracelet, using either a shank or 2 hole button & either barrel or overhand knots. Joan shows these techniques on how she could or did finish her wrap bracelet she was working on during the Jewel Loom School chat. During the chat, she showed how to make dangles with small, top drilled beads. Below the finishing tutorial is a link to the chat, if you are interested in seeing how Joan weaved the bracelet.
Link to chat where Joan shows how she made the 2 hole bracelet & teaches how she makes the dangles: https://www.youtube.com/live/erFJxVIzV8w?feature=share
How to Warp Your Large Wisdom Warrior: https://youtu.be/oLTntH5U1AM
Supplies used to make this bracelet:
- Large Wisdom Warrior Loom, which comes with a kit to make a hatband, a crown bead board, Wildfire, & needles: https://jewelloom.com/collections/weaving-goddess%E2%84%A2/products/wisdom-warrior-large-loom-kit?aff=11
- 6mm Pyramid Beads: https://jewelloom.com/collections/beads/6mm-pyramid?aff=11
- 6mm Tile Beads: https://jewelloom.com/collections/beads/6mm-2-hole-tile?aff=11
- 11/0 Seed Beads: https://jewelloom.com/collections/beads/size-11-0?aff=11
- Wildfire: https://jewelloom.com/collections/accessories/beading-thread?aff=11
- Small top hole drilled beads
- 1.5mm leather cord
- Wood Buttons: https://jewelloom.com/collections/accessories/products/value-pac-wooden-decorative-buttons?aff=11
Subscribe to the Jewel Loom YouTube channel to access past & current tutorials: https://www.youtube.com/c/JewelLoom
Sign up for the Jewel Loom newsletter & get 15% off your first order, plus a free pattern: https://jewelloom.com/pages/save-15-on-your-first-order-get-a-free-pattern
Receive text notifications for Jewel Loom shows & special deals by texting "Sign Up" to 1-805-768-0568
Check out the Jewel Loom Blog for past & current tutorials, plus read details on project: https://jewelloom.com/blogs/craft-hangover
Join the Jewel Loom School Community (off Facebook) to share your loom creations, be inspired by others, & a place to ask & answer questions: https://www.juliannaavelar.com/offers/5ss8HfCp/checkout
Jewel Loom Facebook pages: https://www.facebook.com/Jewelloom & https://www.facebook.com/JuliannaJewelsAvelar
Jewelry Making with Jewel Loom community page: https://www.facebook.com/groups/228056324285807
Please contact Jewels with any questions you have about her looms: email - hello@jewelloom.com or text - 1-805-768-0568
Transcript:
about a week and a half ago when I did
my tutorial on the large wisdom Warrior
to make a bracelet I said I would do a
tutorial quickly on how to do these um
how to finish off a wrap bracelet you
met with a button you know for a clean
finish and using some
uh bear Lots
so this is an example one I've done
before and notice that there's two
different ways I mean like the buttons
I'm going to use is this one my mom was
I'm also going to demonstrate with one
with the shank button really quick you
know and then remove it but as you
notice on this shank button
um you can get both
through the shank
but there's also way you can do it you
know if you can only get one
um
cord through the shank so these are four
cords you know it's not going to work
with fire polish it should work with
most cords that you use even hemp
leather
um
repeat
um not in cord okay so then um so let's
get started
okay straighten up making sure that your
bracelet is facing up the right way nice
one
you can use a straw which make it easier
for you but I can't find my smaller
straws and this one like a milkshake
straw is too big I couldn't tighten up
the knots so you can use something like
a peg or a stick or something but like
um I I do usually use like coffee straws
or
um
you know thinner straws
when editing I didn't like the way I
showed you how to do the barrel knot so
I'm going to show you in a different way
and edit this back in So pretend like
this is
the end of the bracelet
now you know the bracelets attached and
there's two you know there's a few
different ways you can do it we want to
Anchor it down you could even use a
board like this
and Anchor It Down
by taking one cord and wrapping it so
you can have a little bit of a work
space and they will not will move the
knot down
so you know if you have one of these
boards you know how to use it
um but I'm going to do it this way
to show you you probably have something
like this at home I even before I got a
clipboard I've been known to use a pad
of paper you know just you know stiff
pad of paper or something and using
binder clips or if you have some kind of
clamp
so what we're going to do is clamp one
end
and then I'm only going to clamp
the other end
you know with one of the strings because
I'm going to work with one so this is um
if you want one way to finish up the
cord
off the bracelet right next to the bead
okay so to do the barrel knot
need a rod if you have a straw I had a
straw but it's a little bit too big
the inside and I couldn't tighten it up
but if you have a coffee straw or
something a little bit bigger that would
make it easier life easier but I don't
so I'm just going to use like a rod in
this case it's a reamer
and what we want to do is wrap
this around lift it up a little bit so
you can do some wrapping and we want to
wrap it around the cord and the rod and
the purpose of the rod is to give you
some space to feed it up
now
once I get it wrapped we want to wrap
around
where the rod the the cord where it
comes up on the other cord in the rod so
now we got like three things to wrap
around so you can see where
your cord
wrapped around the other cord and then
I'm going to do three
try to keep my hands out of the way as
much as I can I'm going to do three
loops around
one
two
three
now if you have a naughty do it all or
like one of those lights that has two um
to like alligator clips you can clip
this in between two and make it a lot
easier for you
so now what I'm going to do is I'm going
to go up
follow the rod up and feed that cord
that I was using for wrapping up on the
rod I'll take the rod out
now I'm going to unclip these so I want
to feed it down next to my bracelet
like I said pretend like that's the end
of my bracelet
so I just keep kind of wiggling
I want to get it centered
then I want to pull on the string that
did the wrapping
tighten it up
and so that's one way you can put next
to your beads or
or you could um this next knot that I'm
going to show you you could also just do
the wrapping around here and that's what
I did on this bracelet because I wanted
my loose knots to or my sorry Barrel
knots to look like beads also so I
actually did separate knots
foreign
so now to do the um the next knot
I'm going to tighten it on here I'm
going to clamp down both of them because
we're going to be stringing along both
strings
now get the bigger one
these binder Cuts come in handy I've
even used them as bead Stoppers before
too especially these little tiny ones
okay
so now
I'm going to take a cord and I'll use a
different color
once again I need my um
Rod to wrap around we're going to wrap
around both of them so what we're going
to do this is a little bit easier
you're gonna
feed your string
along the underneath the rod in the two
cords
and then you're going to wrap around
three or four times
one
so you can see it I'm wrapping around
trying to make it look neat but I'm also
keeping it
loose and making sure they stay in order
to
three
four
now on this we're going to feed um
one
one and
up through the center
and we're going to feed the other end
the opposite way up through the center
we want to keep those wraps like a corn
oil
and you know wrap around as many times
as you want you know whatever effect you
want this time it was four times for me
I'm going to take the rod out
unclip it because I want to
straighten these out so they lay nicely
and then I'm going to tighten it up
and that's how you
make the barrel knot that's probably the
easiest way to do it
now take both ends of the barrel that's
working with the barrel knot
and just tighten
it's nice to have it tight but don't
have it too tight because you know we
want this to slide up and down
now before
I do anything else I'm going to make
sure my button goes through here
now
we do want to take a little bit of glue
me tighten this a little bit more
and I don't want to put too much glue on
this because I want it just to be able
to slide so I don't want to glue to the
other two strands so since this is the
Strand that I tied with I'm just going
to put a tiny bit of glue where it's
coming out and not
some people some people don't do this
but I just feel a little more secure on
a tiny bit of glue
oh
so much for a tiny bit of glue
I like this GS hyper cement because it's
got the really small nozzle
and I need to find my strand again it's
not that one
it's that one by the
by this thick as that one
okay
so I'm gonna oops that's where you gotta
be careful
it might be good to use like um a
toothpick or something
so I'm going to flex these
now I'm going to do the other side where
it's coming out
a tiny bit
and this one I don't want it to move so
I'm not worried about where I put the
glue
I just like to be better safe than sorry
okay
wipe the excess glue off of other places
well I sure hope I didn't mess that up
[Music]
case I did I do want to
put this in at least I have my button
hole
in the right spot
I don't want to trim down the excess
until I find out
so I'm going to measure that my
buttonhole
okay
and once the glue is dry
you can come back and um
cut these about a quarter of an inch
away from the knot
it's not it so that's probably this one
okay
might have been smart for me to do this
next step first
um
well I want to go back to it because I
really want to do the other side
for when we make adjustments
okay this other side
um
you can do the same kind of barrel knot
but since you want to make sure your
beads are sticking up straight first but
um
since I'm going to be using a flat
button on this I'm not going to but I
just want to show you and because you
know the barrel knot is Thicker Than
This overhand knot
but you know I already showed you I'd do
the barrel knot here
it would be the same as for both sides
so and the button is going to hide these
that's another reason why I'm going to
do the easier overhand knot
and like I said you could do this
overhand not on the other side
so then you want to tape well if you had
um
if your Shank
is big enough to put both through put it
through
if you want to use a shank button
and then tie another knot
now if your shank wasn't big enough you
could just put one through
and feed your leather cord along the
other side this extra leather cord and
then tie the knot they do that a lot in
leather
you know making leather knotting
so I'm going to do this I'm going to try
the same thing with this I'm going to
try to put um
my leather up through this hole
and both since I'm using one and a
quarter
make sure your bracelet is facing up but
I'm using one one and a half millimeter
Leather So they both fit in these holes
okay make sure I just want to make sure
my leather is laying the correct way I'm
going to push this down towards the knot
and then I'm going to do an overhand
knot here now this is where you could do
another coil knot
but since they're not going to be seen
I'm doing the easier of the two
okay now if you did the coil knot I
would suggest
um cutting this and tying a couple knots
so it doesn't feed itself through or
just gluing these
so it doesn't come undone and that way
you can cut it like a quarter inch
behind so you can't see it
that way you don't have a little string
stand
s right well
well let me cut it that way you could
see what's going on on the other side
it wasn't so pretty with this
I'm just going inside the knot
putting a little bit of glue
after it dries I've got I'm in a little
bit of hurry so I'm going to cut it a
little bit shorter but after it dries
you cut it
I just want to make sure
to do this the right way
I made this so those dangles will go
next to my hand
and
okay
let me move the camera closer to me so I
could do this right
okay
I'm just making sure it's laying out
right so
cried on me
okay so I'm gonna put this on
and I made this adjustable so
we can tighten it up make it a little
bit easier I slid it down
one of the cords one quarter ended up
bigger than the other
so see how I tightened it up
by moving this down
after I put it on
so you can have that sitting on top too
if you want
I'm going to take it off so I can finish
the ends
okay let's see
okay
now what I want to do is I want to make
a couple of angles you know just
decorative ends
and tie the knot here
a smaller one
tighten it up
I use a large hole bead I slipped
through my beet soup for some larger
whole beads to put as dangles
and that way it won't get slide through
that Barrel knot
and then do the same on the other side
oops
me or not
I'm going to kind of space them just to
make it look nicer
space them a little bit
then you could put glue in these too oh
I got too much glue
and after you dry you just
snip it off about a quarter of an inch
down
then you have your knot
let me show you how to put it on this
way
it's a little bit easier than on my
wrist
and then
once you get it on you could just
slide this down to tighten it
okay
decorative dangles
on this one I misjudged on how many
beads I needed or something I was
sliding in I got um
so that's why I made a third one so like
I could have two Beetle holes or
whatever and you can see I made the
dangle shorter on here so it's just make
the length that you want
these are probably a little bit long I
could fix that later
but um so that's um how to
that's how do you put buttons you know
without having things sticking out of
the top on your
um wrap bracelets or any kind of cord
bracelets so if you have any questions
just leave them in comments and I'll try
to get back to you
thank you and have a great day