
Shop
  • Read our story

  • Each of our carefully researched, styled, tested and distributed collections reflects a particular aesthetic and ethos. We hope some of these speak to your own style, and help you refine and redefine your own look and style philosophy in the process.

  • How to Add 2 Hole Pyramid Beads and Add a Button & Beaded Loop Closure

    September 23, 2026

    How to Add 2 Hole Pyramid Beads and Add a Button & Beaded Loop Closure

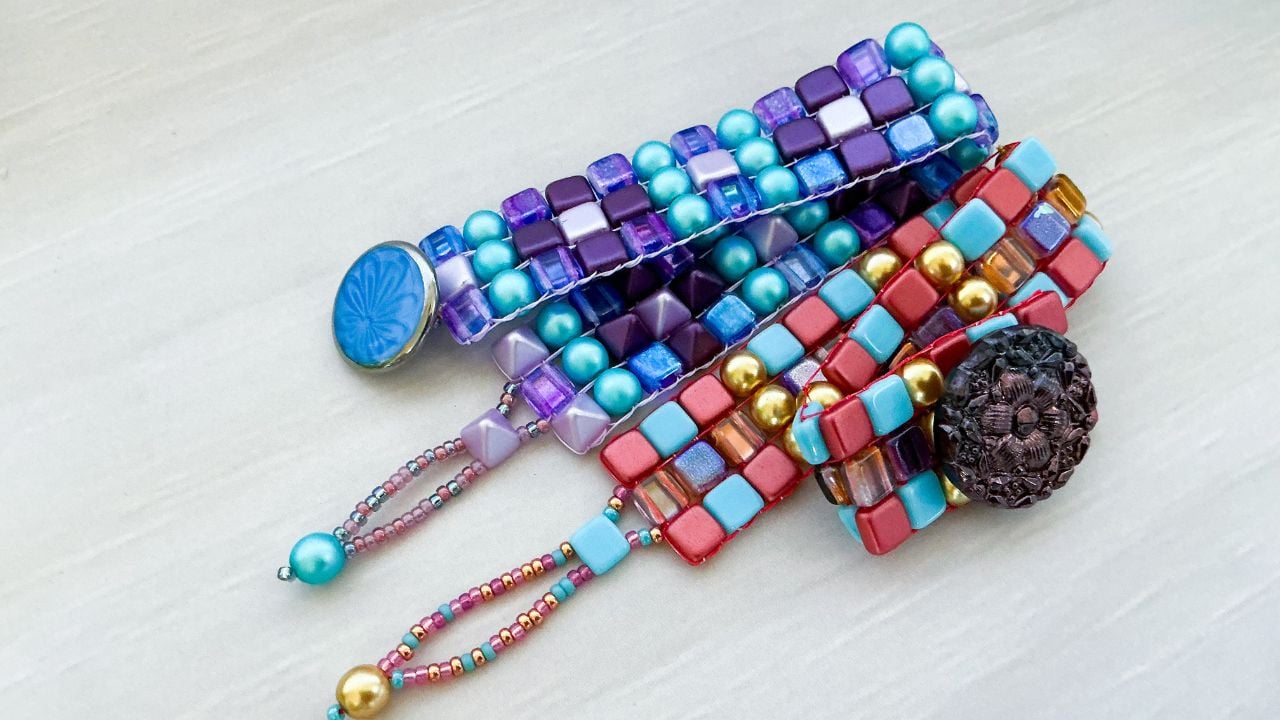
    Adding 2 hole beads to your loom designs gives it a different look. And when you add 2 hole pyramid beads, your design has more dimension and texture. Learn from Julianna C Avelar how to use these types of beads on the Original Jewel Loom. You will find using these beads much easier than expected. In the 2nd part of this tutorial, Danielle Wickes joins Julianna to demonstrate how to add a button to this design, plus made a beaded loop closure, so you have a decorative, eyecatching closure. 

    You can use the techniques learned in the first part of this tutorial for different designs, and also use the 2nd part for all your loom bracelet and necklace projects. 

    In the first part of this tutorial, learn how to use 2 hole beads, which may have different designs on each side or, like the pyramid bead, has a raised spot on one side. You will learn the "Right Hole Technique" so you know which hole to put the needle in, when preparing to first weave it on the loom, so you have the correct side facing up in your project. Watch the tutorial below and learn some secrets.

    If you would like to make an exact replica of the pattern Julianna used, the picture below can be your pattern.

    In the second part of this tutorial, learn the technique of adding a button to your loom design, then easily weave a loop closure for the button. 

    In both tutorials, Julianna and Danielle are using the September Jewel Loom Jewel Box and its altermative, the 2nd colorway. Find links to both below. Both boxes are only available while supplies last and cannot be restocked. Get yours before they sell out.

    Save 15% off your first order, plus Get 3 Free Patterns: https://jewelloom.com/pages/get-3-free-bead-patterns-and-save-15-percent-on-supplies

    Did you know Jewels has a Book? It’s true! You can get a digital copy of the Jewel Loom Inspirations book here: https://bellacraftspublishing.com/jewel-loom-by-julianna/ 

    You can find Jewels here:

    Follow Danielle at these links:


    Transcript to Tutorial 1:

    0:01
    Now we are. Okay. Hello everyone. Oh my gosh. Look at that. I did I Who didn't
    0:07
    prep her for area? If I was on the network right now and that was in the scene. Oy, good thing.
    0:15
    Good thing who knows the boss. [laughter] Well, welcome in. I see some of you in
    0:21
    the chat already. It is so lovely. I I love spending the afternoon with you. This has really turned out to be such a
    0:28
    great time. And so for those of you that don't know, I'm Juliana Avalar. I'm the inventor of the Jewel Loom bead loom.
    0:36
    Happen to have one right here. And I absolutely love bead weaving. I love
    0:42
    sharing that art with you. and just that meditative soulful dance of going back and forth on
    0:50
    the loom whether using beads or fibers. There's I always say that if it's not moving it's fair game and so [laughter]
    0:58
    hopefully you are also an advid bead weaver and if not I hope that you get a
    1:04
    chance to uh check it out. And so today I'm working with the September Jewel
    1:11
    Loom Jewel Box and I'm usually never this ahead of the ball game and I'm
    1:17
    still actually putting more things into the kits. We've actually got three this month and that's
    1:24
    just crazy crazy talk from Jules to have three on September 3rd because that just
    1:30
    never happens. And so I'm I'm going to applaud myself [laughter]
    1:36
    for being ahead this time and uh I'm super excited about it. And so I did
    1:42
    have a long conversation with our resident designer uh Danielle Wixs and
    1:48
    she and I were brainstorming on the next several months. And so I'm designing the projects, but she's definitely helping
    1:54
    me um tweak some things, do some things. And so we're just super stoked about all of that. the bracelet. And I'm going to
    2:01
    show you the kit here in a second. Um, this particular bracelet, let me show you so you could see the button. This
    2:08
    particular bracelet was actually a design. And if I back up a hair,
    2:14
    um, this was a a bracelet that Danielle designed for the Jewel Loom Jewel Box back in June of 2025.
    2:21
    And so last night when we were brainstorming, I was telling her that, you know, I
    2:27
    wanted to add that seedbeaded loop and button
    2:33
    closure into the box for September. And so next week, Danielle is going to come
    2:41
    on and she will be showing us how to do that. And then and then I said,
    2:47
    Danielle, do you happen to have any seed beads? cuz you know we kind of like sometimes we have to like go into each
    2:53
    other's inventory. [laughter] And um long story short, Danielle is making a special mix for both the main
    3:03
    September box and then the second colorway. And so I'm super excited about
    3:09
    that. And she she gave me a sneak peek of what those are going to look like. And and just looking at the colors
    3:15
    together, they look fantastic. And if I'm not mistaken, I think she shipped
    3:20
    them out yesterday, too. I don't I just don't know. I don't know how she raises two boys, runs a business, and then puts
    3:27
    up with friends like me. [laughter] But anywh who, okay. Um, I think she loves
    3:33
    it. [laughter] Hi, Danielle. And hi, everybody. Cecile, I see you. I see you. And I think I I
    3:41
    did respond to your email, so I didn't hear back from you. I hope that helped you. Um, or was that Cynthia? I don't
    3:48
    know. You both start with C and it's and I apologize, but one of you needed something and I I'm sure that I gave it
    3:55
    to you. All right. So, listen. The cool thing about the main September kit is that it's coming with the two whole six
    4:02
    millimeter pyramids. And if you don't pick up the pyramid
    4:08
    correctly, your pyramid will be upside down. And nobody wants an upside down pyramid, right? We want we want our
    4:15
    pyramid to be right side up facing the ceiling. And there is a proper way to
    4:20
    put the needle into because there's four holes. So got to put in the right one, right? So [laughter]
    4:27
    in order for it to to be uh facing up to the heavens, so to speak. Um, I'm going
    4:34
    to go ahead and I'm going to take you down to the mat and um, we're going to
    4:40
    do this in a very easy transition. I have been having all kinds of
    4:46
    conversations with the YouTube AI and it's just hysterical because um, it
    4:54
    tells me all kinds of things, what people like, when you know what I need
    4:59
    to do better. And so [laughter] I'm like, "Okay, whatever."
    5:06
    But it's always good stuff. It's good stuff. Like for instance, that little transition we just did. Yeah. It said I
    5:11
    needed to be better at it. So, um, and it's all positive. It's all positive.
    5:17
    All righty. So, I have my little piles and actually just going to bring that out a little bit. I am working with the
    5:24
    original Jewel Loom for this project. You've got your lavender. This is They're just gorgeous. They have like a
    5:31
    luster on them. Look how pretty those are. Now, these are in the main September Jewel Loom Jewel Box kit. And
    5:38
    then you have these gorgeous purple. Um, every strand has 25 beads. You've got
    5:44
    the twohole um [clears throat] they're like a blue purple iridescent.
    5:51
    They're just they're gorgeous. I love love love these so very much. Um a check
    5:56
    glass um button. That's a button. jewels. That's a button. And then you
    6:01
    have your check glass pearls. So, these are pearls, but they're check glass pearls. Now, I already went ahead and I
    6:08
    did warp the jewel loom. And I want to show you that I skipped three grooves. Let me just point that out for you.
    6:16
    One, two, three. And then I'd laid the wildfire down in the fourth groove. So,
    6:23
    remember, these are the grooves on the jewel loom. These are buttons. And there
    6:29
    are buttons on the back. And so you can see how I wrapped around that back button. Now, there are so many
    6:36
    directions on how to warp your loom in the library here on YouTube. And so I
    6:42
    will make sure that one of the end cards. That's what they call it. Um it's like that little screen within this
    6:50
    screen and it shows you what video you could go and learn from next. And so
    6:55
    I'll make sure that one where it shows you how to warp is there because I really wanted to focus on the beads
    7:02
    today. All right. So I have already I'm using what am I using?
    7:08
    I am using the wildfire. It's the
    7:14
    06. And this is the lilac. It's the lilac is
    7:19
    really hard to find. Now, I do believe I do have some in the Jewel Loom shop and
    7:25
    it is on sale. Um, I just went to go get some more from Beetelon and it's out of
    7:32
    stock. So, if you want some, you could go to the jewel loom.com shop and get you some. All right. So, I've already
    7:39
    got my Jewel Loom needle threaded because that's always fun to do off camera. And
    7:46
    what I'm going to do to get started, I think, is um I'm just going to make a
    7:51
    loose knot. Everybody Everybody does this a little bit different. Danielle's got a technique. I've got a technique. I
    7:57
    don't know. Janette probably has her own technique. Like, everyone typically has
    8:03
    their own way to attach the thread to the warps. And I just like to do like a
    8:10
    little knot. And I don't really pull too too tight. And what I do want to make sure though
    8:16
    is that my needle and thread are over here. This is my left hand, by the way.
    8:21
    This is my right hand. Oo, look at my ring. I usually don't wear jewelry when I'm
    8:27
    demonstrating. If I find that it's getting in the way of your view, I'm going to take it off. In fact, my bestie
    8:33
    Mimi, she was my buyer at, let's see, HSN jewelry television. No, not jewelry
    8:39
    television. Shop shop at home in Tennessee. I don't know if some of you remember that. Anyway, she always would
    8:45
    say, "Jules, the product is the star and your fingers are covered in jewelry."
    8:50
    [laughter] And I would be like, "Okay, I'll take it off." Anyway,
    8:56
    okay. I just want to make sure that I'm serving you in the best way with my camera shot here.
    9:03
    There we go. Okay. So, left hand. Okay. Left hand. This is my left hand. It's
    9:11
    holding the needle and the thread. And I'm going to grab that with my right hand.
    9:17
    And then what I'm going to do is I'm going to pick up, let's see, let's pick up just one of the two holes that's in
    9:24
    the kit. And now here's what I want you to pay attention to. I'm going to pull in a pyramid.
    9:31
    All right. And you know, let's bring this up to the camera. Can you Oh, it looks like Yeah. See the
    9:37
    little beady eyes? So you got two holes on each side of that pyramid
    9:45
    where the other guys go. Hello. Where you at? I know. There you are. Okay. So,
    9:52
    what we're going to do is we're going to set that pyramid down. And as you understand like how to pick up it, you
    9:57
    you won't have to be so like, oh, do I have to grab one and literally put it on my mat because that sounds time
    10:03
    consuming. You'll just you'll just get the rhythm. So, the needle needs to go
    10:12
    here. I got to move this out of the way because I really want Let's take our time. Let's take our time. And in fact,
    10:17
    I want to get a lighter one. The lighter one might show better.
    10:23
    So, I've got the pyramid sitting in front of me, and the needle and that
    10:29
    first bead are in my right hand, and I can see
    10:35
    it was in my right hand. Hold on. Got a got an escapee there. I'm going to take
    10:42
    and now I I transfer the needle over into my left hand just because it feels more comfortable. And the needle is
    10:48
    going in on the left side here. Okay. Top hole.
    10:57
    All right. So, I'm going to pick that up and I'm going to let it fall. And then I'm going to pick up another
    11:03
    two whole square. And then I'm going to let all of those fall. And let's see if
    11:08
    I did it right. Let's see if Jules knows what she's talking about because it'll be very funny if it didn't turn out
    11:14
    right. [laughter] Okay. So, all the beads are down. And I
    11:20
    did it right. Okay. Good. Thank you. Okay. Now, when I'm working on my
    11:26
    bracelets, I like them to be centered in um on the loom. And usually if you get
    11:33
    in between if you get in between the two holes where the metal rod is uh inserted,
    11:40
    you're usually pretty good. The reason is that it's so much easier when you have more warp thread on each end. Okay.
    11:48
    So now what we're going to do is we're going to take Let me get into
    11:55
    the camera here. There we go. Okay. Okay. So, if I just
    12:00
    move my body over. All right. So, I'm going to take the needle. I'm going back through that top
    12:08
    hole. And my needle is on top of the warps.
    12:16
    Okay. If your needle is not on top of the warps, what's going to happen is that the beads are going to fall off. So
    12:24
    now where the needle and thread are going over towards my left and I'm going
    12:29
    to pull. And remember I'm working with like two yards of wildfire. So I want to
    12:34
    be really patient and just help to guide that.
    12:39
    And then I'm going to pull just enough. And then I'm going to push
    12:46
    those beads down so that now their holes are underneath the warps. And this is my
    12:53
    left hand. Let me get it into view here. My left hand is holding the needle now.
    12:59
    And my pointer on my right hand is helping to guide and to relax the beads.
    13:06
    And I'm going through the bottom holes.
    13:11
    So you see the needle is underneath the warps,
    13:17
    right? And so we're pulling the needle and thread back to to the right side of
    13:22
    me. And again, we're just being really patient.
    13:28
    Okay. And so we're almost done with our first
    13:36
    with our first row. And now once again, I took the needle and we're on top of
    13:41
    the warps going through the bottom holes. Whoops.
    13:47
    And sometimes you just not sometimes you always just want to, you know, really help to guide them.
    13:53
    Now, one little thing I do want to show you. And how amazing is that? There's our first row. And so the cool thing
    13:58
    again is when you get your rhythm, you can really do that a lot quicker. So,
    14:04
    let me see how close I can get up here. Some If you don't pull just enough,
    14:10
    you're going to end up with like a little ribbon sticking out of wildfire. And at some point it's going to be like
    14:18
    no way to fix it. So just always make sure you're pulling just tight enough that the wildfire is resting evenly
    14:27
    against the side warp. Okay. So um let me see what do I want to do next. Now
    14:34
    what where's that one bracelet? There was another bracelet I wanted to show you. So I love this idea where Danielle
    14:41
    also took seed beads. So, you see how she's got um you know the two holes,
    14:48
    right? She has the two hole squares, but then she also incorporated seed beads and I love that because if you want to
    14:55
    get your beads to go further, what a great way to do so. You know, you could just get some 11 O's and
    15:04
    four 11 O's equal one 6 mm bead. You might want to write that down. Okay.
    15:11
    So, what I'm going to do, God, that just sounded so Didn't mean to throw it.
    15:17
    [laughter] [gasps] Okay. So, what we're going to do is I've got a single hole bead now. So,
    15:23
    I'm going to pick up three of these gorgeous, gorgeous
    15:29
    teal um check glass pearls. And these are in
    15:35
    your kit. And then I'm going to pop them up. So 1
    15:41
    6 mm round equals 1 6 mm square. Okay.
    15:47
    So again, notetaking, you might want to write that down. And I don't know if Joan already asked you, but um let us
    15:56
    know if you have worked with the pyramid beads. I know if you've been in the
    16:01
    Jewel Loom um subscription or if you've been buying my kits for the last six
    16:07
    years um we have used them in projects. So let
    16:12
    me know. Look how pretty this is going to be. So gorgeous.
    16:18
    So again, I'm working with the beads that come from the um
    16:24
    the main September kit.
    16:30
    All right. And this time, you know, the hardest part about all of this is just
    16:35
    picking out the bead, right? Like, what am I going to do this time? So, I don't know if I want to repeat.
    16:44
    I don't know if I want to do Okay, I feel like boom boom.
    16:51
    Okay, I think Let me see for giggles. I might just want to
    16:56
    repeat. So again, let's pick up a pyramid. And remember, we're going to place it down. And we want those holes
    17:04
    to be to the side. And the needle and thread are going through the top hole
    17:10
    and entering from the left side of the pyramid. Okay. And then we're going to pick up
    17:17
    another two-hole square except for they're being feisty.
    17:25
    Okay. There we go. And then we're going to let them all fall down.
    17:36
    And then we're going to pop that up. And my pointer, which is my finger, is
    17:44
    such a great tool. I'm just letting all of that rest on it.
    17:51
    And then I'm going to take the needle and the thread. I'm going through the top hole of that bead up and over the
    17:56
    warps. Again, you want to make sure Let me see if I can get a Yeah, I can. Do you see the silver of the needle and how
    18:03
    it's laying on the warps? So, that's what you want each and every
    18:08
    time. And then we're going to pull through.
    18:14
    And by all means, you could take the beads and you could lay out a pattern
    18:20
    beforehand. you know, that might be helpful for some of you. Um, and then I
    18:26
    am going to I push down. Remember, you push down the beads so that their bottom
    18:31
    holes are under the warps. And then I'm going to let them rest on
    18:37
    my finger. And I always do like a little wiggle wiggle to make sure that the needle has
    18:43
    gone through all the bottom hole holes. And let me bring that up again.
    18:49
    Let me get a better angle here. There we go. Okay. And then the needle and the
    18:55
    thread come all the way out again. And just another reminder, you've got a
    19:02
    lot of beading material in your hands. So, just be patient. And then once
    19:08
    again, see how I use my pointer finger so the beads are resting. I take the needle. I'm going back through that
    19:14
    bottom row up and over. And did did you just see that? Did you see how the
    19:21
    needle was like, eh, I don't want to go in straight. So, just let your needle
    19:27
    flow. I kind of came down at an angle. And just don't fight it. Just you can
    19:33
    straighten out your row after you get the needle and the thread through. Okay. So, don't ever get like stressed out
    19:39
    about that. All right. So, we're going to push that and and you'll see how periodically I'm
    19:46
    looking at the rows and I'm adjusting and doing a little scoochy.
    19:52
    Okay. Oh, I love this. This is just going to be so fun. Look at how pretty those colors are together.
    20:01
    And so, when you get your kit, you're going to have 11 O's in it. And this is
    20:08
    where like if you wanted to do a row, you certainly could. [snorts] Okay. So, I'm coming under again.
    20:16
    And let me see. What do I want to do? Do I want to um I just want to make sure that
    20:22
    I'm going to have enough. Let me do some math in my head really quick. This one had This one had 2 3 4 5 6 7 8
    20:34
    9 10 11 12 13 14 15 16 17 18 19 20 21 22
    20:44
    23. I have a 6 in wrist.
    20:49
    And that and that's perfect because Yep, that's perfect. So, 23 rows and I have
    20:57
    25 pearls. So, I probably want to wait a hot
    21:04
    minute. Um, okay. This time,
    21:10
    let's see. Let's do something different. I'm not going to be like really crazy on myself to get this pattern like
    21:18
    awardinning. All right. So, I'm going to I'm going to go in. I'm going to grab a pyramid. Again, I'm on the left side of
    21:26
    the pyramid going through that top hole. And then I'm going to do that again.
    21:33
    Top hole coming at it on the left side. And that's because I want the pyramids
    21:39
    to be facing upward.
    21:44
    Okay. And then we're going to pop those up. They're like little rock star beads,
    21:50
    aren't they? Okay. And then we're going to take
    21:57
    the needle and thread. And I'm going through that top hole again.
    22:02
    And let me see. Yep. Okay. Again, you just want to make sure that you can see
    22:08
    the silver part of the needle. You see that right there? So, I know that I'm on top of the warps, which is a good thing.
    22:15
    And then I'm going to By the way, did you see what I just did there? So, a lot of working with the Jewel Loom since
    22:21
    it's portable and very lightweight is number one making sure you're working on some sort of a non-skid surface, right?
    22:29
    But I do a lot of like it's almost like a baby. I do a lot with my hands. So, as
    22:35
    I transfer that needle, I automatically put my right hand on the belly of the
    22:42
    jewel loom to help secure it as I'm pulling the needle and the thread out.
    22:49
    So, it's like this little dance that you will figure out, you know, what works
    22:54
    best for you. But if you watch my hands, there's also a lot of learning
    22:59
    with them. Okay. So, now aha, hold the
    23:04
    horses. What happened here? So, I've got a little bit
    23:09
    Oh, okay. I've got a little bit of excess thread there. Where did that happen? It seems to have happened right
    23:17
    in this area. Let's see if I can't get that pulled because it's going to drive mama crazy when I when I see that.
    23:26
    Um, a fix if you don't happen to catch it. Okay. See, I just was able to pull
    23:33
    tight there. I didn't pull tight enough. Did Are you understanding what's happening? See, look at that excess.
    23:40
    So, I was able to like maneuver because I caught it in time and now I'll pull and I don't have that ribbon look over
    23:48
    here. Now, if that ever did happen and you got to the end of your bracelet and you were like, "Oh, sugar snap." Um, you
    23:56
    could add like a pico stitch and hide it. [laughter] Pico stitch is great for everything.
    24:02
    It's a good hider. All right. So, I'm going to take my pointer and I'm going through the bottom holes.
    24:10
    And again, I just want to make sure that the needle.
    24:15
    Okay, Jules, that the needle is going through.
    24:23
    That's funny. So, yeah. Let me see. Wiggle wiggle. Do
    24:29
    the wiggle wiggle so you know that that they're all there. And then this time, did you notice the left hand? the left
    24:35
    hand kind of came over here and grabbed um grabbed the warps. Hey, Zach.
    24:41
    So, there's this whole left right hand dance. Um when you're weaving, this is
    24:46
    going to be pretty because I'm going to mimic that next. All right. And then again, going on
    24:54
    going back through the bottom holes, making sure the needle is on top of the warps.
    25:04
    All right. And then you saw how I did a little scoochy scoochie just to make sure everybody was nice and aligned.
    25:10
    And then the next row is going to be just like that guy cuz why not?
    25:17
    And again, I'm just randomly doing um I'm just randomly doing a pattern. If
    25:23
    you want to get serious and lay it out, then I you know, totally I I get it.
    25:28
    Okay. So, top hole needle is coming into that pyramid from the left. Okay. Pick
    25:36
    it up. And then we're going to grab one of the squares
    25:42
    and pick that up. And if you happen to have a bead that
    25:48
    had like a square that had two sides, you would do the same thing. So, ooh,
    25:54
    look at that. Holy cow. Gorgeous. All right. So, we're going to go back
    26:01
    through the top hole. Whoa. Is that on the top there? It's always a little
    26:07
    [snorts] little deceiving. Okay. And then we're pulling through, holding its
    26:12
    belly with my right hand, making sure that all the wildfire is nice and taut.
    26:18
    But, you know, you don't want to distort the warps either. It's just a very perfect pull. And now holding those
    26:25
    beads, supporting them with my right hand and my pointer, I'm going to go
    26:31
    back through the bottom holes. And I'm under the warps. A little wiggle
    26:37
    wiggle. And we're going to pull that all the way through.
    26:43
    Okay. And again, just making sure that the wildfire is nice and taut. And we're
    26:51
    going to bring it up. So you can see that the needle is on top of the warps.
    26:59
    And we're going to pull this. Okay. And scoochy scooch. [laughter]
    27:08
    All the technical terms. All the technical terms. And then I think what would work best is a row of pearls. What
    27:14
    do you think? [snorts] I think that probably would be cool. Okay. So one, two. Now, typically, um, the pearls, the
    27:22
    holes are nice and clean, but if you ever got one that, you know, felt like
    27:27
    it had a little excess paint or whatever, just put your needle in there very carefully and and it'll pop out.
    27:36
    Okay. So, we're going to pop this up. And we're just popping the beads up in between the warp threads.
    27:45
    All righty. And then we're pulling through.
    27:52
    And again, just making sure everything is nice and clean. Nice and clean. I'm going to push these
    28:00
    guys over. And then what I can do is I can go back to that guy, can't I? So, let's do that.
    28:06
    So, somehow the squares got out of the frame there. So, I'm picking up a
    28:12
    square. And then I'm going to pick up a lavender [clears throat] pyramid. And I want to get that
    28:19
    left top hole. And then another.
    28:27
    So if I wanted, see how the see how one side is definitely blue
    28:35
    and then the other side is definitely more purple. Right? So So I would do the same thing because you know what? These
    28:42
    two were Oh, it's too late because I didn't. Or did I? I might have. Let me see. Okay. So, I'm going to do the same
    28:48
    thing where I'm going to come top hole hole is facing the left. And let's see
    28:55
    if I did it right cuz this this two hole does have like
    29:01
    it's two-toned. [laughter] It's a two-tononer. Yay. I did it right.
    29:06
    Okay. So, same philosophy, same technique. Um, that's fantastic.
    29:12
    Fantastic. Okay. I just got to make sure. Sometimes they're kissing in here so tight that you can't see. I got to
    29:19
    make sure I'm on top of the warp because I don't want my I don't want my bead to fall. Okay, hold
    29:26
    on. You know what? I think we got to put some light on the subject. There we go.
    29:31
    Let's do a little more light. And yes, thank you. Thank you. Light is
    29:37
    good. Okay. And then we're going to go all the way. Oh my heck. This is so beautiful.
    29:43
    already. I'm just drooling. I'm just drooling. So pretty. And again, this is the main September Jewel Loom Jewel Box
    29:52
    kit. So, if you are a subscriber, this is part of the kit that you are
    29:57
    getting. And we're going to do a little wiggle wiggle. So, these are the main components. And
    30:03
    then I'm still putting, you know me, I'm still putting stuff together. That's why, you know, I'm like, h, I
    30:09
    don't have it all dialed in, but my subscribers know that I get it dialed in, [laughter]
    30:15
    right? Hey, Deb. Oh my gosh. Thank you for being here. Thank you, everyone. I just am so appreciative. So, look at I
    30:23
    did it again. What is going on with the mama? What? She's talking. She's
    30:28
    beating. She's screwing up here, dude. Okay. See, I was able to. So, I had a
    30:35
    little bit of a rib in there. I guess I didn't pull tauts enough on that first pass, but I was able to fix it. So,
    30:44
    and again, even even if I went back and I saw that, a great way to hide it is
    30:51
    with the pico stitch. So, everything is fixable. Everything is
    30:56
    fixable. Okay. So, what did we Oh, boy. Now, what? So, if I did pearls here and
    31:02
    I did pearls here, do I do another row of pearls? How many do I have? 2 4 6 7 -
    31:10
    23. 7 - 23. Do math really quick, somebody.
    31:16
    7 - 23. Oh, it does look like a flower. Zach,
    31:23
    thank you so much. Okay, I think the obvious thing to do is another row of pearls. I just want to
    31:31
    make sure. So, how many pearls would that that 25 minus nine? That still
    31:38
    leaves me. Okay, so 16. Thank you, queen. Um,
    31:44
    and then and then uh nine from 25, Joan. Nine from 25.
    31:51
    You didn't know math was going to be involved, did you? 16
    31:56
    n. Okay. How weird is that? I feel like I feel like a um a very popular pop star
    32:03
    who [laughter] who does a lot of stuff with numbers.
    32:09
    Okay. So, we got 16. 16 / three. [snorts] Um
    32:16
    five. No, almost 16. Almost. So that would be five more rows. Okay, I'm fine.
    32:23
    [snorts] So what I was trying to figure out there and I'm just not it's just not that I wanted to talk numbers. Um
    32:30
    because I I'm not running by a specific pattern, but I'm doing it for you because I have a feeling I have a
    32:37
    feeling you're going to like this and you're going to be like, I want that pattern. [snorts] Um I just wanted to make sure that in the end I was going to
    32:44
    have enough. Now I have a 6 in wrist. So, if you start doing math with the way
    32:50
    this is laid out and you're like, "Girl, I'm not going to have I mean, you should have enough beads." If you don't,
    32:56
    implement the seedbead concept because I think that's really really great. See
    33:02
    how that took up some space? Again, four 11 O's equal one 6 mm. Okay, so keep all
    33:10
    that in mind. [snorts] We are in math class today. [laughter]
    33:17
    All righty. This is just looking so incredibly gorge. So incredibly gorgeous.
    33:24
    Oh my gosh. I feel like it just needs like a really delicious, beautiful,
    33:29
    like sassy sweatshirt. Like a nice one. Like you know, soft and yummy with a
    33:35
    pair of Levis's, a pair of denim. Math is hard. [laughter]
    33:41
    Okay. So now, if I'm not mistaken, I'm going back into this, right? This is
    33:46
    what I'm going to do next. So, had I paid a little bit more attention, and I'm not going to beat myself up about
    33:52
    it. It is what it is. I could have put my needle in correctly to have all four of these be purple, but let's do that
    33:59
    this time. Let's be a little bit more conscious of that this time.
    34:04
    It is 0.006 for the warps. Yeah, it's the wildfire. Um 0.006. So, we're going
    34:11
    to want to pull Let's bring these bad boys over here and scooch everybody over.
    34:17
    [snorts] Okay. So, what we're going to want to do is I'm going to want to go I want the purple on the top because I
    34:23
    want Well, do I or do I want to mimic that or do I want to
    34:33
    move that to there? Oh my heck. Stop, Jules. You're going to
    34:39
    drive yourself crazy. Okay. Boom. [laughter]
    34:46
    Boom. And boom. Okay. So stinking funny.
    34:54
    But these are things for you to think about. This is why I love doing this with you because we kind of go through
    35:00
    all the boooos and all the whatifs together. And then when you get your
    35:06
    kit, you know, you know more, you know better. You know what to do, right?
    35:12
    Okay. So, I pulled that tight and I'm going to go through
    35:17
    the top holes again. And the needle is gliding through the holes and over the
    35:23
    warps. And the right hand is holding the belly
    35:28
    of the jewel loom, the mama, the mama jewel loom.
    35:34
    [snorts] And then we're going to push those down so that their little holes are
    35:40
    underneath underneath the warps. You see how I did that?
    35:46
    And then we're going to just as a reminder, this is my left hand that I'm
    35:52
    pointing to. The needle and thread are in my left hand. This is my right. I'm
    35:57
    going to take and support those beads with my pointer.
    36:03
    finger and I'm going through the bottom holes and I'm going to do wiggle wiggle right
    36:10
    and then pull this through. And I just I'm I'm holding the warps
    36:16
    very carefully and pulling. And then I'm going to um I'm over here
    36:22
    on the right side now. Right hand coming through the bottom hole and gliding.
    36:30
    The needle is gliding on top. There's a good shot. See the silver? That's what
    36:36
    you want to see. You want to see that needle on top of the warps.
    36:41
    Right hand transferred securing the little belly to keep it in place.
    36:48
    It's a little dance between the left, the right, and the jewel loom. And then what did we do? We did Okay,
    36:57
    we're going to go back to doing three pyramids. So, I've got to pick up where's your holes there? From the
    37:05
    left side and pyramid from the left side, top
    37:10
    hole. And whoa, whoa, wait. Did I do that right?
    37:17
    Yes, I did that right. Okay. It's not the end of the world. Just pick up the bead. [laughter]
    37:28
    A thanks Danielle. That means a lot cuz I'm not even like I'm winging it, right? I'm just like I'm trying to be one with
    37:34
    the beads. So, thank you. Thank you so much. Okay. So, again, do you kind of
    37:40
    see how like the needle, you know, didn't really want to go straight across. It kind of came down a
    37:47
    little bit. That's fine because you can adjust everything afterwards. So, don't
    37:52
    ever force the needle because you don't want to break it. That would be no fun at all.
    37:58
    Okay. And I just noticed what I was doing. I noticed how I was leaving tension over here uh loose. So, I'm glad
    38:06
    I caught that this time. Okay. So, again, I've got all my holes and they're
    38:12
    under the warp. And I'm going through the bottom
    38:17
    hole of the pyramids. And then we're going to do wiggle wiggle. Make sure I'm through
    38:24
    all of them. And I am. And now we're going to pull that out
    38:30
    and scooch up. See how I was able to get that nice and clean and back in alignment and back through the bottom
    38:37
    hole. And I can see that the needle is gliding on top of the warps.
    38:44
    And that's what we want. And then we're going to pull all the way out. And again, just snug enough so that the
    38:52
    wildfire is really snug against those outside warps. And then our
    39:00
    last row in this little cute collage. Now, this is what I need. What do you
    39:05
    think I should do? Because I wasn't consciously going through the double-sided
    39:12
    squares. All right. when I first did this section up here because look it I got the blue and then these three are
    39:19
    purple. So how would I reverse that? Would it be
    39:26
    per uh iridescent side? Is it going to be iridescent side? Yeah.
    39:33
    Right. Iridescent side then a dark purple pyramid and then the blue side. Does that sound right you guys?
    39:40
    I I think that sounds right. Okay. What did I say? Iridescent. Okay. [laughter]
    39:46
    So, if I want the purple iridescent side, I'm going to go top. Where's the
    39:51
    holes? Where you at? There we go. So, I'm entering from the left side of the bead. I hope I'm doing this right. And
    39:58
    then I'm going to get a purple left side of the bead. Whoops. But then, but then
    40:07
    I want to kind of do the blue side. Is that the blue side? Where's my beads at?
    40:12
    How come they're not in the screen? That's weird. Here we go. Sorry, guys. Sorry, guys. Okay, so
    40:20
    so where'd you go? I think I'm doing this right. Oh my gosh. I hope I'm doing that right. Okay, let's see. If not, I'm
    40:26
    going to take them off and try again. Yay. I did it right. Okay, cool. So, did
    40:31
    you see that? [laughter] Okay, so purple, purple, blue. So now we
    40:40
    have like the reverse of what we did up here. Okay, that's fine. But if you all
    40:45
    do it, what you can be more conscious of is to do the purple. The purple. I mean,
    40:51
    this is kind of like a pink purple, but you get what I'm saying. Or you can do it like me. Or you just do it however
    40:58
    you want. But at least you know, right? You have options.
    41:03
    It's the little things that like really make me excited. Okay, so push down.
    41:09
    push down. And then again, we're going to come through here.
    41:15
    And I'm ultimately working towards 23 rows.
    41:21
    And wiggle wiggle. And so I I like how that worked.
    41:27
    So now it's just kind of like an opposite. You had this blue one up here and the
    41:33
    three. And now you got the blue one down here and the three. So I think that you
    41:40
    know what? Ain't nobody ever gonna know. [laughter]
    41:45
    Nobody's ever going to know but me and you.
    41:50
    And I just don't even think it's a problem. I think it's really cool. Okay, so we're doing this now.
    41:57
    Joan's like, "It's fine." [laughter]
    42:02
    Joan's like, "Bring in your whatever those three initials are called,
    42:08
    [laughter] your craziness. Bring it in, Jules." I just want to know why my beads are not
    42:14
    showing up here. Let me just figure out what in the Here we go. Somehow I slid
    42:19
    over to the North Pole. Okay, so um but isn't that what we normally do
    42:25
    when we're beating? Like we're just all over the place. Okay, so three, right?
    42:32
    Yes. Okay. So, three pearls. [laughter]
    42:40
    Thanks, Zach. I'm loving it. I'm loving it a lot. And uh I'm glad that it's
    42:46
    working out and I'm taking my time. I don't feel rushed. Like, hang out with me. Um give me some insight.
    42:54
    I'm here to be with you. Okay. So, we're going to pull this through again. I'm going to hold its belly.
    43:02
    or hold her belly. I'm going to hold her belly. And then we got two blues. So the
    43:09
    blue sides are up and then the pyramid. So I want to go
    43:14
    I want to go through the top hole from the left
    43:21
    and top hole
    43:26
    from the left. And then I got to get one more of these guys out over here.
    43:32
    And where's the hole? Where's the hole? There it is. Okay. [snorts]
    43:42
    Yes, they are. They're just gorgeous. I just got them in from the Czech Republic a couple months ago.
    43:49
    So, I was super excited that I could get them straight from the Czech. They're not from a shop. They're, you know, or a
    43:55
    distributor. They're literally from the Czech Republic. Fresh off the makers um table.
    44:03
    Okay. And then again, we're going to go through the bottom and of all three beads. Wiggle wiggle.
    44:12
    And then we're pulling through and scooching up.
    44:19
    And then I'm going to go back through. Back through. So, it kind of seems like when you have
    44:24
    two squares in a pyramid, the needle wants to go in at an angle. So, just be
    44:30
    just take note of that. That's what I'm kind of finding out as I go here. That's
    44:36
    where the needle seems to be fussy. [snorts] Okay. And then we want to pick
    44:42
    up three more pearls.
    44:55
    Thank you. You're being so You're always so sweet, but you're just I love all of your comments, Zach. Thank you. They're
    45:00
    so um uh I don't know what the right word is.
    45:05
    They're just sweet. They're just awfully awfully sweet. Okay, so again, just
    45:11
    making sure that I can see the silver on top of the warp threads.
    45:17
    Okay, now here. Oh gosh, you guys. Now, what do I do? I go back to this one, right? I go back to where where the
    45:24
    first bead is going to be blue, right? Because that's going to mimic
    45:30
    that. So, you have that and then you had that. And now I'll go back to this.
    45:35
    Okay. Talking out loud. Talking out loud. And once again, I've scooched all the way over. [laughter]
    45:42
    Hi, Carmen. How you doing? We're having fun. This is the September
    45:48
    jewel box, by the way. All right. So, I want this side to be blue, right? So, I'm coming in from the
    45:56
    left side top hole. And then I want a purple.
    46:06
    And then I want the other one to be the iridescent because that's what I did up
    46:12
    here. Okay. Thank goodness I have you. you um
    46:19
    amazing community peeps to be here and keep me
    46:28
    okay and see that for whatever reason this is fine. Do you see how the needle wants to go in? That's a real angle. So
    46:34
    it it tends to be when you're doing two squares in a pyramid that the needle is just like So what it's telling me is
    46:42
    that the holes are not exactly in alignment. But that's
    46:48
    fine because we're just going to go through. We're never going to force the needle. [snorts]
    46:53
    And then we're just going to straighten everybody up at the end. Okay.
    47:00
    And then we're going to come under. Danielle, what are you thinking about the seedbead um mix that you made for
    47:10
    for the main kit? It's going to look pretty awesome, isn't it?
    47:27
    and I'll make sure that there's a really good picture of this one so that you
    47:32
    guys can um mimic it for your subscription boxes. Okay. Then we have So, what I could have
    47:40
    done here's a note. Here's a note. What you could do, what I could have
    47:47
    done is I could have reversed the palette right here. Right? So, this could have been the light, the light,
    47:54
    the light, the light, and then the dark one. So, that's an option. Just keep that in mind. Like you could you could
    48:02
    do that. So, so when you have the pattern with your jewel box, you can kind of look at like what I did and then
    48:08
    maybe make your own changes. Um, all right. And so then what we're going to
    48:14
    do here is we're picking up again coming in from the top. Where's the photo?
    48:23
    Top hole needle is coming from the left. And then we need the lighter one.
    48:30
    And then we need another dark pyramid.
    48:39
    Okay. Yeah, I'm excited about those.
    48:45
    All right, so then popping them up.
    48:50
    And where am I at? I'm in the first hole. Okay, going back through the first hole.
    49:01
    Did you see what just happened? [laughter] I did not do that on purpose. I did not.
    49:08
    Do you see now why you have to be on the top of the warp? Holy guacamole.
    49:13
    Is that so f? Okay, so we we're good. This is what we're going to do. We're
    49:18
    going to back it out. We're going to back it out. Oh my gosh, you guys. I'm
    49:24
    glad this happened, though, so you understand why. Okay, so I'm going to do that. And I'm just going to hope that I
    49:30
    don't have to rethread my needle. Let's see for giggles if I can get back
    49:35
    through. Let me just see if I can get Thank you. Thank you. Thank you so much. Thank you.
    49:42
    Thank you. Okay. So, I got to get out of this little
    49:47
    situation that I got myself into. [laughter] All right. See, did you all see that? I
    49:54
    want you to How many minutes are we in? This is 12. We're in 50 minutes. So, you
    49:59
    tag that. Well, I'll have to tag that in the notes. Like if you screw up and you're you don't get your uh needle over
    50:06
    the the warp, this will be a good for the transcript. Okay, left side of the
    50:11
    bead. Now, let's try this again, mama. Okay, teaching moment. Oh my gosh.
    50:21
    Okay, so Jules, are you on top of the warp? You're here and you're here and I see
    50:29
    you gliding. I see you gliding. I'm going to come closer. Do we have an
    50:35
    overall approval? I think we're good. I think we're good. Let's do that again, but not
    50:42
    the same way. Thank you. [laughter]
    50:48
    Yay. We need an applause button. Can we get an applause applause
    50:55
    button? Okay. Wiggle wiggle. Oh my gosh. So stinking funny.
    51:02
    And pop them up. And then again up and over those warps.
    51:09
    I had I I it did not seem like that. It did not seem like I was not on top of
    51:14
    the warp. So that's very interesting. Okay. Now we're going to do we're going to do a purple. We want that purple side
    51:22
    of this square up. So that's going to be that way. And then what do I have? And then a purple. dark
    51:28
    purple and then
    51:33
    purple again. Where's the hole? There we go.
    51:39
    So funny. [laughter] I did it. I did it.
    51:45
    Okay. My lance. This is gorgeous.
    51:52
    So gorgeous. Okay.
    51:59
    All righty. And then we're going to go back through the bottom holes. Thank you guys so much for hanging out.
    52:07
    So, are you loving this color combination, by the way? Let me know what you think. I actually
    52:13
    was putting it together like sight unseen because when I had the opportunity to
    52:19
    look at the pearls I I mean they were in the check. It was just a picture. I was
    52:25
    like I think that's the way to go. So let me know if you think uh I got it
    52:30
    right. [laughter] Okay. So now it's a row of pearls,
    52:36
    right? It's a row of pearls. So let's bring some pearls in. So we got one
    52:42
    two. One, two, three. Okay. Oh. Oh, thanks, Joan.
    52:52
    Colors are great. Absolutely love. Yay. So, again, I always want to make sure
    52:58
    I'm on top of the Oh,
    53:06
    yeah. Okay.
    53:13
    Now, before this thought leaves me, do you just saw what happened when the bead
    53:18
    dropped and you and you watched me fix it and you watched how very carefully I
    53:24
    brought the needle back through. I need you to do that with with
    53:33
    confidence. I need you to do that with really taking a moment to make sure that
    53:39
    it's going to work because if it didn't work and I got in a knot or
    53:47
    you know what I'm saying? Like do you know in the moment when you think you're going to do something and you're like,
    53:53
    "Yeah, I better not. I need you to be conscious of that because that worked out. That really worked out." But it's
    54:01
    not always a 10 out of a 10. So, it worked for me. It worked for me
    54:07
    because I could see it with my own eyes that it was going to it was going to work. Um, but if you're hesitant, don't
    54:13
    do that because then you're going to not be a happy camper when everything gets stuck. So, you know, at
    54:20
    that moment, it's just better to like take your needle off and then rethread it. So, I hope that helps. Okay, where
    54:26
    am I? So, are we back here? And those are two blues, right? So, we want to get the blue side. So need to go from the
    54:33
    left. I need to go from the left top and
    54:39
    pyramid. And again I want to do
    54:45
    the left and blue. Okay. Blue
    54:51
    and poof. Okay.
    54:56
    [snorts] And then we're going to go through the top holes.
    55:06
    There's an awful lot of learning in this uh video, isn't there? There's a lot of like little techniques that are coming
    55:12
    up, a lot of little notes, which is why I love making these with
    55:18
    you so much because, you know, this is our connection.
    55:23
    This is the way we get together. And then
    55:33
    again sliding through and over. And then is it it's another row of
    55:39
    pearls, right? Okay. So, where's my pearls?
    55:44
    Oh boy. I really hope this works out with the pearls.
    55:49
    But it's okay if not because then the bottom is just different. Not a deal breaker.
    55:59
    Okay. And then we're going to pop these up. And if I'm if I'm looking at this correctly, I think this
    56:06
    might be my last section.
    56:11
    Okay, let me do some counting. Let me do some counting. Okay, where we at? Let's
    56:17
    We got one 2 3 4 5 6 7 8 9 10.
    56:28
    11 12 13 14 15 16 17 18 19 20
    56:39
    and we were going to do 23 rows because this
    56:45
    ending that ending is adding about an inch and
    56:50
    a half. So, I'm a 6 in wrist and I would normally do
    56:56
    I feel like mine mine are usually like 25 rows, but I think this little piece
    57:02
    right here that D designed, that little bit of a half an inch plus some is
    57:08
    what's making this only needing to be 23 rows. Chime in D, if you think I'm correct.
    57:16
    Okay. So then what we're going to do is we're going to go back to this, but we're going to do this guy. So they're
    57:21
    going to all this is going to be a purple. Am I going to have just enough? I'm going to have just enough. Holy cow. I
    57:28
    didn't even plan that. Okay. And then a purple and going in top. And then And then a
    57:37
    purple, right? Yep. And then a purple. So going Whoa, whoa, whoa. Turn over, buddy. Okay. Yeah. You think so? Okay.
    57:45
    It sounds Whoops. Uh-oh. Look at what I did. I didn't go under. So, look how I'm correcting this. I I didn't I forgot to
    57:51
    come under. It's okay. I already picked up my beads. I just needed to back up.
    57:57
    I'm getting too excited. Sorry. [laughter] I'm a very excitable uh weaver.
    58:05
    Okay. Yeah, I'm definitely going to go with like the squares and the pyramids.
    58:11
    The needle wants a little bit of a flex. So, I've just got a couple more rows and
    58:18
    a wiggle wiggle. Yep, a wiggle wiggle.
    58:25
    And I What? What bracelet did I do that with? I think the one that's staring at me.
    58:31
    I'll show you something because it's I don't I feel like you have your pattern,
    58:37
    right? And I feel like let's be realistic. Usually it's this area, right, that people see or that you see.
    58:45
    And I just don't think it's a dealbreaker if at times that this bottom piece is different.
    58:51
    Kind of add something like unique. Like maybe that's your signature area. I
    58:56
    don't know. I'm just thinking like don't beat yourself up about it. Okay. So then we're going to do
    59:03
    the dark and
    59:10
    the light and then another dark one.
    59:20
    Oh, hey now. Don't give me any grief.
    59:26
    Oh, this one seems to have a Okay, so
    59:33
    yeah, Jill [clears throat] Jill Wisman would say, "Clean your um
    59:41
    clean your holes out before you start." And she's not wrong. [laughter] She's
    59:46
    not wrong because guess what? All right, I'm not gonna fuss with this one. It's It's cleanable, but I'm not going to
    59:53
    waste your time. I'm going to put that to the corner. [snorts] And then I'm going to come over here.
    1:00:00
    And so that might happen. You just have to go with like a little bit of a hobby all
    1:00:06
    something and very carefully get the extra paint um out of there.
    1:00:12
    Okay. So, let me make sure. It's getting a little tight in here. And hi Jules. I
    1:00:18
    just posted a bracelet I made with two whole pyramid beads on your page. A
    1:00:23
    I can't wait to go see it. Very cool. I know. The two um the
    1:00:29
    two-hole pyramids are just way too much fun.
    1:00:35
    And wiggle wiggle. Yeah, wiggle wiggle.
    1:00:42
    So So see this is um I'm going to be ending with this. I won't be ending the way
    1:00:48
    that I started cuz I just don't need those rows personally.
    1:00:54
    So, you know, this is how we started, right? These first two. But if I do two more, the bracelet I think is going to
    1:01:01
    be a little bit too I bet that's to die for, Ivon. I bet that's really cool.
    1:01:06
    Okay. So, let's do the last one. Okay. And I'm mimicking this, right? Because I
    1:01:12
    want that blue. So, I'm going to do Am I under? I'm under. Okay. So, I'm gonna do
    1:01:18
    purple, right? And then I'm gonna do dark purple.
    1:01:25
    Oh my gosh, I'm cracking myself up. Okay, dark purple. But then I want it to be like I did here.
    1:01:33
    So, I want this guy to be blue, right? That guy's going to be blue. Okay.
    1:01:39
    I'm like beating myself right off my mat. [laughter]
    1:01:44
    Oh my gosh. I can't believe I can't believe I did this in that amount of time. That's awesome. So, even with
    1:01:50
    talking and even trying to pick put a pattern together live, it worked out.
    1:01:59
    All right. Where's Zach? Zach, did I do good? [laughter]
    1:02:06
    I think I did pretty good with the timing and like figuring stuff out, right? Okay. I'm so stoked. Okay, that worked
    1:02:14
    out. I'm glad that I kind of caught that, you know, where where I wasn't really paying attention to the squares,
    1:02:20
    but they do have two sides to them. So, okay. So, then we're going to go back through the bottom.
    1:02:28
    And now I'm going to leave my thread
    1:02:34
    attached because I have a feeling and I don't know because I'm not sure what Danielle's going to to want me to do
    1:02:41
    next Thursday. So, let's go ahead and let's move let's move some stuff over.
    1:02:49
    Okay, look at everything I have left, you guys. This is from the main kit. See, I could have definitely alternated
    1:02:56
    more of the light color in. I only have one of those guys. I could have done one
    1:03:02
    more row with pearls, so that's good to know. Um,
    1:03:08
    and then, of course, we're going to use the button next week. But this is what's still left. So you could maybe you could
    1:03:16
    maybe do a single row of bracelet with what's left over. 2 4 6
    1:03:25
    8 10 12
    1:03:30
    14 16 18
    1:03:36
    20 2 4 6 7
    1:03:42
    7 27 28 29 31. So 31 in a single row would
    1:03:50
    make a very thin streamed lined bracelet kind of like what I did last
    1:03:56
    month. And let me tell you, I wore these everywhere in town over the weekend cuz
    1:04:02
    I just couldn't get enough of August. This is August, by the way.
    1:04:07
    So you could maybe do something like a a just a one row, two hole bracelet with
    1:04:13
    what's left if you had this much left. So, okay, let me scooch this over
    1:04:18
    because and I'm not cutting. Like I said, I'm not going to take my my thread
    1:04:24
    away because I don't know what the next step is. I'm going to let Danielle tell
    1:04:29
    me what to do next week. So, I'm going to put my needle and thread very carefully in there. I'm going to move
    1:04:36
    these guys over. And then I really just wanted like ooh and awe. I just want to ooh
    1:04:43
    and awe and wow and omg.
    1:04:54
    It's really pretty. But you do see where if I wanted to, I could have reversed
    1:05:01
    because there ended up being did Zach or Danielle call them out as flowers?
    1:05:07
    So like we could have reversed this, right? So like you could have started
    1:05:12
    off with well we started off up here. So this could have been dark and then these could have been the reverse and then
    1:05:19
    that could have been dark and then this could have been the reverse. So I think this is a solid layout, a really solid
    1:05:27
    layout and then you can make your changes from there. What do you think? I
    1:05:33
    think so. I think that's good. Okay, so I you've seen this color palette. Now, let me
    1:05:40
    show you the second color wave because this one is just as flipping gorgeous.
    1:05:46
    Okay, so this is the main if you are a subscriber to the jewel box, this is September's
    1:05:52
    jewel box. All right, main kit. Now, the second color wave
    1:05:59
    is this. So, you've got these gorgeous blue, copper, two-toned. Look at how beautiful
    1:06:07
    those two-toned squares are. Oh my gosh, look at how beautiful. And then you've
    1:06:13
    got gold pearls, check glass gold pearls, and a vintage
    1:06:19
    button. Okay. And then Danielle made us
    1:06:25
    uh a special seedbead pack for this one as well. And then I'm working on some other um
    1:06:32
    accompanying beads. So this is going to be on the website.
    1:06:39
    It's going to be called second colorwave. All right.
    1:06:45
    Main box. Main box subscribers. This is what you get. There are some extra kits.
    1:06:55
    And this is the second color wave. I love this one so much as well.
    1:07:03
    All right. And then I want to show you the October. Why am I calling it October? I think
    1:07:08
    because October is breast cancer awareness. That's only why it's not the October jewel box. So the extra kit like
    1:07:16
    I don't even know where I got all this energy and stuff from. I guess when your mind is more clear, you work better. So,
    1:07:23
    you're going to get four strands. Okay, four strands of gorgeous pink two holes.
    1:07:29
    Super hard to find. Very expensive. Um, just got these in from the actual uh
    1:07:37
    check manufacturer. These are tiny little baby Hawaiian
    1:07:42
    flowers. So, you're going to get a full strand of these bad boys. What I'm thinking in this moment is that
    1:07:49
    I'm going to cut you some of the mermaid magical hemp cord cuz I think
    1:07:57
    that would look really pretty and I have it on hand. You think so? Okay. Thanks,
    1:08:02
    Danielle. And you can see how pretty that was. August. August had the magical mermaid.
    1:08:11
    And then you'll have a button. Okay. So, that's going to be your your warping with cord. Uh, your WS are going to be
    1:08:18
    sewn in with wildfire or fire line. And then you're going to do the old
    1:08:24
    school button. But these are wood, so you could paint them. So, if you wanted to, you could paint this like a really
    1:08:30
    pretty hot pink to match the flowers. And my thought with the flowers, and I've got I think I have some seed beads
    1:08:36
    I'm going to be able to throw in here, is that how pretty would that look like little fringe dangling?
    1:08:44
    I sent this to Danielle, so she might come up with something. But I was thinking kind of along the lines of what
    1:08:50
    we did in Octo in August with the fringe, right? In fact, who's going to
    1:08:56
    be wearing all of that together? I'm going to be so adorned. [laughter]
    1:09:01
    I'm going to be so adorned. Anyway, I'm super stoked about all three kits. I
    1:09:07
    hope that you um you are as excited as I am.
    1:09:12
    And let me come up because we are we are headed into that. Um
    1:09:19
    I'm I'm so happy we got that done. We must lost Zach because I didn't get an answer back from her. And let me just go
    1:09:27
    back to my camera. I'm doing I'm doing the best I can. Ask studio.
    1:09:35
    Now I'm having conversations with with AI. I mean, come on now. Look how pretty, you guys. Look how pretty. So
    1:09:43
    stinking pretty. I just love that. I love the way that it
    1:09:49
    came. I love the way that it came together. Look it. I'm already visualizing the
    1:09:56
    bracelet. But how cool. Like that would it would also make like a really cool um
    1:10:05
    like a cool like necklace like somehow like obviously not that long, but what
    1:10:11
    if we did like you could almost do two. Wait, let me get to the top. Like what
    1:10:17
    if you did like from there to there? Oh yeah. And then that could be like a
    1:10:23
    pendant. And then we could take and do some hand stitching for the necklace.
    1:10:32
    [laughter] I'm in love with it, too. And we literally just birthed it live on air.
    1:10:39
    And that's a that's the most fun part about doing the lives with you because I love beading with you so much. I really
    1:10:45
    really do. I'm going to pull you in a little bit closer. Next Thursday. Don't forget Danielle and I um will be here
    1:10:54
    and Danielle is going to show us uh oh, where did it go? Oh, I just spilled my beads.
    1:11:01
    [laughter] Sorry. Okay, so Danielle's going to show us next week how to add this loop
    1:11:09
    because that's going to be the bottom. And again, I'm going to be adding some of these fun little beads to your kit.
    1:11:16
    So, you're just kind of seeing the beginning of everything cuz I don't even know who I am right now being so
    1:11:22
    like early in the ball game. I'm usually like the end of the month like, "Oh my god, I
    1:11:27
    got to get everything dialed in." And then she's going to show us how to sew on the button. So, I'm super stoked
    1:11:34
    about that. And you'll have the seed beads and then I'm going to find some little guys. And you don't have to do
    1:11:40
    that. The main part of next week is the is the closure because that's what people like to know. So, I'm just look
    1:11:47
    at me. I'm like a kid in a freaking candy shop. [laughter]
    1:11:53
    I love when my when my energy and I'm sure you appreciate it, too, when I have
    1:11:58
    happy happy girl energy. And uh yeah, I can't wait to it'll be fun. I think it's
    1:12:04
    been a hot minute. Um because Jod was on last time. Jod was on last time. So,
    1:12:10
    anyway, thank you guys so much. Please make sure to subscribe to the channel.
    1:12:15
    Um, like the videos, watch the videos. Even if you just put it on in the background and you're watching videos on
    1:12:22
    the on the Jewel Loom, it what it does is it helps to push us out into the
    1:12:27
    YouTube hemisphere, right? And it and it's all about sharing the love of
    1:12:33
    weeding. Weaving weeding. No, we do not want to weed. Showing the love for
    1:12:39
    weaving on a loom. And so the more that you subscribe and you like and you
    1:12:45
    watch, then the YouTube gods [laughter] push the videos and the channel out into
    1:12:52
    um the YouTube galaxy. So would really appreciate that. Please sign up for the
    1:12:59
    newsletter if you have not already because that's where you find out about discounts and sales and
    1:13:07
    new techniques or new videos and just whatever might be going on. Um, what else did I want to tell you? I am doing
    1:13:13
    a whatnot tonight. So, there's just like stuff everywhere. Um, 6:00 p. p.m. Pacific Standard Time.
    1:13:20
    I will be on whatnot. And I've got um a
    1:13:25
    plethora of beads. They're all $3 starts. If you're not familiar with whatnot, um, it's fun. [laughter]
    1:13:33
    It's not everybody's jam. And that's okay. That's okay. I am actually trying to figure out there is a way for me to
    1:13:38
    stream to YouTube so that you can kind of get a little bit better of a feel and not be too nervous about it. Um, but uh
    1:13:47
    we have a lot of fun with it. So, and Danielle, I really love this one, too. I love how you did the little guys right
    1:13:53
    there. That one's really super cool. So many fun things that you can do on the jewel loom. Seriously. And we're going
    1:14:00
    to start playing with the baby loom a little bit more, too. All right. I love you. I appreciate you. Please do all the
    1:14:06
    things. Um it just helps to spread the love of weaving on a loom. And yeah, so
    1:14:16
    we will see you next week. Joan, thank you for all of your fancy finger work in
    1:14:21
    the background. So always so great to have you here helping when you're not um
    1:14:28
    with your hubby. And so yeah, we will um see you. And Zach, I guess you took off,
    1:14:35
    but if you're watching the end of this, thank you for all your lovely comments. I love um you're the best cheerleader.
    1:14:42
    [laughter] So, okay guys, have a great week. Uh
    1:14:48
    we'll see you again and tickle for noon on next Thursday, September 10th.
    1:14:58
    See you soon.
    Transcript to Tutorial 2:
    0:03
    Happy Thursday. Happy Thursday. It's noon. It's noon on the Jewel Loom
    0:10
    YouTube channel. I'm so excited to see everybody. Thank you so much for being here. Hey, today is going to be so much
    0:18
    fun. We have a special guest. Danielle Wix is here and we're going to be learning how to add our beaded lube and
    0:26
    our vintage button from our Jewel Loom Jewelbox September main kit.
    0:33
    And um so I'm super excited about that. I did add the photos to the second color
    0:39
    wave and the pretty and pink bracelet kit. I finally got those up this
    0:44
    morning. Um so go take a look at those. I know some of you have already ordered and so I'm really really excited about
    0:51
    that. Um, but they're they're definitely gorgeous. So, and I just can't there's
    0:58
    four boxes left on the August kit and I got to tell you, I just keep grabbing
    1:04
    these two bracelets every time I go out. So, [laughter] like this weekend though, I'm hoping to get my my September
    1:11
    bracelet finished and then I can, you know, switch it switch it up a little bit and and wear those. Okay. Um, what
    1:19
    I'm going to do, I do want to show you. Let me go down to the table really quick here. Um,
    1:26
    and yeah, I've got to get a better system for switching, but hey, it is what it is right now. So, stick with me.
    1:33
    Don't go anywhere. We're going down to the table. I want to show you I did get the mixes that Danielle put together for
    1:40
    us. So, these are special seedbead um mixes and they are Toho, correct,
    1:46
    Danielle? I think you shake your head. These are the Mayuki. Okay. I didn't put
    1:52
    it in the description because I was like, what did she say they were going to be? So, it's Mayuki, which makes me
    1:57
    just thrilled. Um I've been such a Toho girl that I don't know. I've just never I've never
    2:04
    stepped over to the Mayuki side, but um I think that's going to change. I think I'm going to be doing a little bit more
    2:09
    of that. So, super excited about that. So, this comes this comes in the September kit. And then I'm just going
    2:16
    to bring over some of the other items. So, you're going to get a strand of the pyramid beads. And these are actually a
    2:23
    higher retail. So, I've seen pyramid 6 millm two-hole beads all the way up to
    2:29
    like $7. Um, and so there's two different colors. You got the dark purple and I mean really we could call
    2:36
    this like a luster lavender almost because really that it does kind of lend itself to that um two whole um beads
    2:44
    that have two sides. And so last week we learned that if we wanted the pyramid side up to the ceiling and or the
    2:52
    decorative side or a colored side of our two-hole bead that we needed to insert
    2:57
    the needle in the proper hole. So, make sure you take a look at that video. Um,
    3:03
    we're also have a whole entire strand, 25 beads of the pearls. And isn't that a
    3:10
    gorgeous color with the teal? So, you've got 2550 75 100 beads, which typically is what
    3:18
    you need to make a bracelet that is over
    3:23
    the 7 and 1/2 in. So, like if you have an 8 in wrist or so, you definitely will
    3:29
    have enough beads. And if you um need to add a couple rows of seed beads, you're going to have enough of those as well.
    3:36
    Now, I just added these gorgeous check glass beads. And look at how
    3:42
    pretty this one. I do believe, let's see, it's a transparent oval. Um it's got the hole that goes from the top to
    3:49
    the bottom. And then some rondell's. Look at those gorgeous rondell's. Let me come up a little closer. And then I do
    3:56
    believe these are a bunch of little biconeses. So, are these little baby Ron? You know, those might be those are little baby
    4:02
    rondell's, too. Yep, those are little rondell's. So, so you're going to have um all of that. And then you've got a
    4:09
    vintage check glass button bead, which alone can
    4:14
    retail anywhere from $8 to $15, just depending on where you're shopping. And they're not readily available, so I got
    4:21
    those for you. Okay, so that is the September
    4:26
    um jewel loom jewel box main kit. So, subscribers, this is what you're getting. And then I just really quick
    4:33
    want to bring in the second color wave. And hi, you're going to grace us with your presents. I was just telling the
    4:39
    girls that he didn't even come out of the house. So, it makes me happy to see him. Okay, this one is unreal. Look at
    4:46
    this mix Danielle made for us. now tell me that's not the most beautiful thing you've ever seen. We were just cracking
    4:52
    up because she was showing me the bags [laughter] on our Zoom meeting. And I was like,
    4:57
    "Yes, yes. Mix all that together." [laughter] So, um I love that she and I have uh
    5:04
    very similar eyes when it comes to color palettes. and it matches the gold pearls
    5:09
    that you're getting in your kit and the copper two-hole beads along with these
    5:15
    beautiful blues. Judy um Judy M should probably really
    5:22
    like this because it's got that New Mexico kind of vibe going on here. Again, we've got a bead that's got two
    5:28
    sides. So, you're going to definitely want to learn which hole you put the needle in. And tell me if you remember
    5:33
    that. Tell me if you remember which hole that you put the needle in when you want
    5:39
    the pyramid to be faced up to the ceiling and or
    5:44
    you want um the certain color or laser um uh print to go face up. And I see
    5:53
    somebody just asked a question and I'm going to um I'm going to approach that in a second. you guys, this vintage
    6:00
    check glass uh button that's coming in the second color wave. Oh my goodness. I
    6:05
    know we've we've drooled on it before in the past, but man, you know what? I feel like it was way back. In fact, I kind of
    6:12
    feel like Trisha might have done the project and it was November of like I'm going to say at least three years ago.
    6:19
    But I love love love this. Danielle is loving it. And then look at the check beads that I was able to add. Look at
    6:25
    these beautiful facets. the rondelle's unbelievably gorgeous and so we're going to be able to add those as well to our
    6:33
    um projects. So that was the second color wave and um your girls been
    6:39
    working really hard and I also got the pretty and pink one and yes I'm using
    6:46
    baking sheets because they're super cool. Pick them up at the dollar store.
    6:51
    [laughter] So, this is this uh the color wave or the color uh for the pretty and
    6:57
    the pink. There's actually four strands of two holes. So, you're gonna have plenty for whatever size wrist. You're
    7:03
    getting an entire strand of the Hawaiian little baby um flower beads. Um a little
    7:10
    mix of beads that I made for you, some more check glass, a wood button um for
    7:17
    your closure, some hemp cord to warp with. And then some crystal, just some
    7:22
    plain glass. So that is your pretty in pink. You can see it on the homepage of
    7:27
    the Jewel Loom site. So I finally finally got that done. And now I know I
    7:32
    know I know we need to make we need to get the first bracelet done, then the second bracelet, and then the third
    7:39
    bracelet. So um it's just Yeah, it's a lot. I kind of need like I need somebody
    7:45
    here just making stuff. Hey, this is my pattern that I made last week. And
    7:52
    remember, one of the things that we talked about that I thought maybe was that I would have reversed my pyramids
    7:59
    so that you know these were not all dark. Maybe I would have like gone dark,
    8:04
    light, dark. It's not a deal breakaker. This pattern you can use and mix it up
    8:09
    as you see fit. Um, but I did get a good shot of it and by all means if you do
    8:15
    buy it, um, and you need me to send you that image, you know, you just email me and and I send it to you. Um, this is
    8:22
    what's left over. So, you could do earrings. You could do like a little um
    8:28
    pendant. So, you still have quite a bit of pyramids. And again, a lot of value
    8:34
    with these pyramids. They're not, you know, they're not inexpensive. They do retail for more than the squares. So,
    8:41
    this was making a bracelet that will fit at least probably a 6 to 7 in uh wrist.
    8:48
    And again, you're going to have some leftover. And so, if you do have a bigger wrist, um then you're going to
    8:54
    have the extra. So, all good. I always try to make sure that everybody can make a bracelet with what they get in the
    9:01
    kit. So, I think at this point now, I did see somebody. Oh my gosh, I love
    9:07
    that you all have so much to say today. What did Cynthia say? Cynthia said, "I received confirmation for my September
    9:14
    box. I requested the second color wave and the pink.
    9:19
    You requ them. I think you bought them in a separate order, but I'll I I'll check on
    9:26
    that for you." Okay. So, they probably were like in a separate order because I think you did that last week. And yes,
    9:33
    baking sheets are the way to go. So, all right. Let's go ahead and bring um Danielle up.
    9:42
    And there she is. All right. Awesome sauce, Danielle. Thank you so much. I appreciate you. Um, we had a lot of fun
    9:50
    kind of like planning out everything and um, catching up and um, and then you
    9:58
    actually did make the second color wave and you could go on to the jewel.com site and you're going to see that. I I
    10:04
    took I took your picture, by the way. And I [laughter] Oh, I need to send you a glamour shot of the finish.
    10:09
    Yeah. You know, I just Yes, cuz now you have one done. Yes. So, if you Oh, gosh, girl. That saves so much time for me. I
    10:17
    love that because now I just need to whip up the pink one. [laughter] It's like, you know, you know the drill.
    10:23
    It's like a lot. um you're going to show us and I'll just bring in
    10:28
    so I used a project that you did for us before and you know very similar but we
    10:34
    were working with laser beads and then you had actually shown how to do like a little pico stitch using seed beads and
    10:41
    decorative beads and that's how come I added some of the decoratives to this kit. Um, you could also do something um
    10:48
    like you did with this project with those extra check beads that I put in the kits and or make some fringe. So,
    10:56
    we've got options. You know, we we have been learning technique and ideas for my
    11:01
    gosh almost six years now. There's so much to pull from it's crazy. But, um, you're going to go ahead and I just
    11:08
    wanted to ask you, are we starting on the loop end or are we going to add the button? Um, let's see. We could do either.
    11:14
    Sometimes it's easier to do the loop side first because then you're learning to test. Okay. Well, you could see I'm a good
    11:19
    little student. I have what we worked on last week. But I think it is going to be better, Joan. Um if Danielle has the
    11:26
    entire screen so that everybody can see, right? Okay. Joan says yes. I'm already on it, girl.
    11:32
    [laughter] Wait, Danielle, you did the first one, too.
    11:41
    Oh my god, I love you. You are so good. You are so stinking. Look at that second color wave project. [gasps]
    11:48
    This is pretty. This one came out really nice. Oh my gosh, that is so
    11:54
    Yeah, it's so rich. Wow. Wow. Oh my gosh, that button. So, it's
    12:00
    Yeah, the button set it off. Like to do all of these attachments, it's kind of the same thing.
    12:06
    You're just jumping out of the center bead. Okay. And um I did follow that
    12:11
    convention of picking up the side that you want. I put the gold inside the red and the purple side in between the
    12:18
    really unique combination of color. And I went with red wildfire just for some I saw that. I have to tell you I was a
    12:25
    little like is that red wildfire? I don't know that I would have done that. And what I love about the fact
    12:32
    that you picked red wildfire is like you took us into the holidays but you kept us relevant to every day. You know what
    12:39
    I mean? Yeah. Yeah. So, I think you could go with blue wildfire. I think obviously the red is
    12:46
    working really, really well. Um, and you could probably even get away with
    12:53
    beige because really you're never going to see the beige. [snorts] True story. Yeah, you could do blue,
    12:58
    red, beige. I think you could also use pink. Okay. Yeah, sure. Sure.
    13:05
    I really I think because you've got the purple in there too, you could even go with the purple. So Oh my gosh. Okay. Well, you know what?
    13:12
    Yeah, use whatever wildfire you have, but don't be shy to use the red
    13:18
    because you did and it looks fabulous. So awesome.
    13:24
    And it's so nice to just have something different, you know, because I have a lot of different colors of thread and I always just use the same color of thread
    13:30
    over and over. Okay, you do something different. Awesome. You have the option of putting these
    13:36
    buttons kind of anywhere on the piece, you know. So, I experimented mainly because I made this one a little longer
    13:42
    than the other one. I had a pattern going I wanted to repeat. So, this one's a little longer version. Uh, and it really is cool
    13:49
    because you can have the button be a feature. You can even make that the top. I love that. That button is way too
    13:56
    expensive to be hidden. By the way, [laughter] those buttons are not cheap that I put in your kits. When they're vintage
    14:02
    glass, they are not cheap. I want you to know that. So, I love this idea because you've made you've made the button a
    14:09
    focal um that's fantastic. Look at that. Fantastic. I love it.
    14:15
    That's a fun one. Yep. Absolutely love it. So, okay. So, I got a question. I have a student
    14:21
    question. I have my needle and my thread out to the right side of my um Can you
    14:29
    Can you just pull me up really quick, Joan? Because I This is what's going to happen, I think, for everybody else. Um
    14:36
    so this is mine. Okay, this is me. Uh this is my left hand and this is my
    14:42
    right hand. So, when I ended I my needle and thread are over here on the right side of the loom and I'm thinking that I
    14:52
    need to take my needle and do I am I going to come down because I need to be
    14:57
    back up here. Right. I would leave all your threads where they are currently.
    15:04
    Okay. After you got it off the loom. Oh, you want me to rethread something
    15:10
    then? No, no, no. Looks like this is Are you holding currently the side that you um
    15:16
    that I finished your tail? Your Oh, your finished side. Okay, it's my finished side. I finished my
    15:21
    bracelet and now I have I I I have extra thread. So, my question was, do I
    15:29
    is there a way for me now to continue on to start to make the loop?
    15:35
    If you want to do it on loom, you can. What I did is I completely removed it from the loom, pulled the warps in, wo
    15:40
    in the rest, kept the two long ones to create the closures. Okay, so Gypsy is um commenting that
    15:47
    your mic is too low and my like is my mine is too loud. Oh, it could be because of my my iPad.
    15:54
    Sorry. How's that? Is that better? Um, I don't you didn't change, but I'm gonna like back off a little and um not be so
    16:03
    It's probably me being my settings and see if my mic is like on a lower setting or anything.
    16:11
    Uh, mic volume here. How's that? Is it too loud?
    16:16
    Um, it seems like it came up a little bit. I don't know. We'll see what everybody says in the Also, I mean, you
    16:22
    can just turn up your own personal volume, you guys, and see if that helps. But I did turn mine down and I'm not
    16:28
    going to talk so loud. I was hoping that people in the next town would hear me.
    16:34
    [laughter] Well, I tried um turning off my noise cancellation. How's that?
    16:40
    Well, Lisa is saying louder, Danielle. Louder. Okay. All right. Well, it's You
    16:45
    know what? You're not alone because when I was teaching at the bead retreat with bead shop, I um needed a
    16:52
    microphone. They had to every other speaker I got up there, they were fine. Then right when it was my turn, they're like they had to run to the hotel and
    16:59
    find a a mic. Okay. So, um this is what I'm gonna this
    17:04
    is what I'm going to do. Um the folks who are watching are the most important. And so I am going to have Joan
    17:12
    bring me off and bring you back on and I'm not going to ask any more questions because that way we could just focus on
    17:18
    what you're doing and then you could give me a private lesson later. I hope you could ask questions. I think
    17:23
    it's okay to to do that. Pop in and you've seen all this before. Actually,
    17:28
    this is what we we did a lot when we were doing our um the seed beaded ones. Do you remember the where we pulled the
    17:35
    warps in? You can still do that even when you only have these many or you can weave them in if you want to. But if you
    17:40
    guys are okay with it, I was just going to show you what I really do because it saves me time. It's just kind of how I how I like to work. Um I had to add
    17:47
    thread one time. That's what you're seeing here hanging out. That seems to always happen to me. So, I don't even
    17:55
    bother like doing anything. I leave the old working thread hanging out where I left off with my last row. Then I just
    18:01
    start a brand new row. I never tie any knots. I do that all at the end. And so now I have this ready to go design.
    18:10
    And the only place I'm going to cut is here where I tied my knots. I knot on the side.
    18:17
    So, it doesn't actually matter where you're not. Um, but the only spot I'm going to cut is here.
    18:28
    Okay. And I might have to do one more.
    18:37
    There we go. When you do that, it's going to free both of these side warps.
    18:43
    See these two here? So, these are free and you just have one
    18:49
    loop left on the back to remove. So, I'm going to get some chain nose
    18:55
    pliers, grab the loop, and just remove it. And then here on this side, your
    19:02
    [clears throat] two loops are going to fall right off.
    19:10
    And so, there it is. I even still have my needle on from when I was doing the
    19:16
    actual stitching. I'm going to turn this this way. There we go.
    19:23
    Actually, it's a little hard to see. I could raise up.
    19:29
    All right. Is that Is that okay, guys? You can see kind of the I copied Jules's pattern exactly the way she had it. I
    19:35
    just added one extra row, and I didn't have enough to start and copy this row.
    19:41
    Um, but I didn't want to end with pearls. So, I added on one more row with the pyramids at the side and the check glass is the center. That's just a
    19:50
    little extra row that I've got. I think Jules's ends right here.
    19:55
    And the measurement on this is
    20:00
    you're at six and a quarter before we put our button on. So, on this one, I'm going to put the button on the edge
    20:07
    instead of on the top. This one was a lot longer. Check it out. Not a lot longer, actually. Just a little. But by
    20:13
    the time you get your closure on, this closure style adds a ton of length.
    20:19
    So, we're already at six and a quarter. We're kind of already there. So, please
    20:24
    plan your pattern accordingly and just sort of go from there. So, let's get rid of our work threads.
    20:30
    Just super quick. What I'm going to do is take the side that has one of your sides will have two loops on it. And the
    20:38
    bottom side will have only one loop and it's in the center and the other two are loose. That's a
    20:44
    loose strand. That's a loose strand. That's a left thread. Get that out of the way. So, what you want to do is lay
    20:50
    it flat and then get some chain nose pliers. Grab one side of the center loop here.
    20:58
    Hold everything in place and just pull. And then this is what's going to happen
    21:04
    here at the top. Um, this edge loop right here is going to come right up
    21:09
    against this pyramid. And again, the spot where I'm pulling is right right
    21:15
    here.
    21:26
    Okay. So that disappeared. And now we're going to pull here.
    21:34
    So this one.
    21:46
    Oops. Sorry.
    21:51
    It should move pretty freely for you. Um, don't insist on it. If it doesn't,
    21:57
    you probably punctured a thread somewhere. And in that case, just go ahead and weave them in and that's totally fine. This is just a little time
    22:03
    saver. Bring that down. Okay. So, you literally pulled the two loops down, made them disappear.
    22:10
    Yeah. When I pulled this one here, this side, it made this one Yep. up against
    22:17
    that edge there. Right. And then when I pulled this side
    22:22
    Yeah. the loop that was here and pulled it straight up this way. So now it's hugging down here.
    22:30
    Okay. So just to FYI, I did not have a loop on my bottom. I only had the two
    22:35
    loops on the top. Oh, you might have cut it free. Yes, I did. So in that case, just go ahead and weave
    22:41
    them in. And we're going to show that here in a second with all the WS. And it's the same process. And so all all I'm going to do is pull
    22:49
    my one warp thread so that the other loop on the top disappears. Correct. Yeah. If you have any loops, you can go
    22:55
    ahead and slide those through. Save you weaving in in at least one spot. And then on those other spots, just, you know, we'll bring them through the rows
    23:02
    like we like we do and trim them. Okay? It takes a minute and it's it's not too um it doesn't add a lot of time because
    23:07
    there's only just a few warps on this design. It's really not too bad. Okay?
    23:13
    It's really just saving me time live. Otherwise, you guys have to watch me weave them all in
    23:18
    because you're putting them back on the needle and weaving them back in in the case of Yeah. If you're weaving
    23:24
    in, you'll need to put a needle on each of those ends.
    23:29
    But there's nothing wrong with doing it that way. It just takes a little bit longer. Yeah. But it's it's really not too big a deal
    23:35
    on a design like this, I don't think. Okay. All right. So, now I've just got my
    23:42
    basically my WS, which are these four cords going on here on the side. And then here at the bottom, I've got these
    23:48
    two strands. So, I just need to weave in.
    23:57
    And let me go ahead and just show that really really quick. [snorts]
    24:03
    And I can probably demo this without weaving in all of them because it take it does take a little bit. But we got at
    24:08
    least most of the center ones out of the way. And that's where we're going to be doing our closure work.
    24:15
    There we go. So, here's how to weave in one of your warps. You're going to want
    24:20
    to jump over a bead, go back through the bead.
    24:26
    This is how I do it with tiles. So, you'll have that. And that's just
    24:31
    because if you go back through the bead directly from here, um what can happen
    24:36
    is your this is a warp thread, right? It'll loosen the top row because you see
    24:41
    how this this is your weft thread. it is depending on this side strand being here
    24:48
    in order to stay hooked. And so if you were to take that warp strand we had and just go back into the bead, it's going
    24:53
    to pull it into the bead. So I like to go around the bead for that reason. And I know it makes the thread show a bit,
    24:59
    but that structurally makes sense to do at least um in the case of one of these check files especially. Okay. And then
    25:06
    from here just go ahead and weave through a little bit. So I'm going to go through this way.
    25:14
    head back this way. We're not [snorts]
    25:22
    getting through the beads here. And don't forget, if you don't know this tip already, if you're using wildfire and a
    25:28
    jewel loom needle, it definitely helps to use flatnse pliers to flatten the end
    25:35
    of that piece of wildfire so that it goes through that hole of the jewel loom needle much easier.
    25:43
    Oh, definitely. Yeah. And then you can either just flush cut trim or I like to thread burn
    25:50
    thread burn that end. And so there's that one.
    25:59
    Um, here's that tip. Jules was just mentioning it. Just flatten the end
    26:06
    so I can thread my needle.
    26:14
    Okay. Now, this is my this is basically the tail thread of
    26:21
    my um first row. So, this is my weft tail. So, you see how here's my here's
    26:28
    my warp strand. The strand running the side here is this one. I'm going to take the weft thread.
    26:35
    Notice that it's exiting from the bottom. Jump over it. We'll go through
    26:41
    the bead. And then I'm going to just head through the row and start weaving that one in.
    26:51
    And another thing you can do is you can go out through just one bead. So like in
    26:56
    this case, I just went through one. And then you can pick up the weft threads
    27:01
    that are running above. This is not a seedbead design, so your thread will show a little more than it typically
    27:07
    would in this kind of design. But you see how I've got my needle going under all those little weft threads.
    27:15
    Just just the top one because remember there's a sandwich in there. There's a weft going above and below. And we're
    27:21
    going to just pick up those. Go this way. And it gives you the ability to travel
    27:27
    without going through the entire row. And it gets you down to a lower spot in the work.
    27:33
    Especially important if you're weaving in a lot of strands because you're going to be covering the
    27:38
    same ground a lot. and it's going to create a lot of thickness in one place. So, this is how you can just kind of get out of dodge. Get you a little further
    27:46
    away from all the congested areas. It's like a shortcut through traffic. That's so funny.
    27:54
    So, I'm just going to go ahead and trim that here. Go a little little more would have worked, but I think that's probably fine.
    28:02
    And just thread burn. Okay.
    28:08
    And that's all there is to it. You just have a lot more of that to do if you are working with
    28:14
    all of them, right? Yeah. So, I'm keeping This is actually the weft thread that's left over from the
    28:20
    very last row I did. Keeping that one. I've got one warp left here on the bottom. Keeping that one because those
    28:25
    are pretty long. Um, really quickly, I could get rid of these two. I'll do that
    28:31
    really fast.
    28:39
    But the reason I do this off the loom is because it um it means that there's they're going
    28:46
    to slide freely if if I'd done this. But if I hadn't done if I had done the weaving and they may not have slid
    28:52
    freely when I was pulling those warps in. Yeah.
    28:59
    So I've just been weaving each piece back into the body. mostly the first two
    29:06
    holes and my second row are pearls. So, I've gone back through the pearls except
    29:12
    for I don't like this ribbon, but I don't think you're going to really see it.
    29:20
    Okay. Yeah, the gist of it is because I just want to have that psychological
    29:25
    visual connection. You cut it off the loom and then we are basically securing
    29:32
    the base. Like we're getting that secured. We're weaving the warps back
    29:37
    into the body. We pull the loops and then we're going to add the beaded
    29:43
    loop and the button for the closure. Yeah. Yeah. Does that sound right? Okay. I just want
    29:50
    to make sure. I'm a visual kind of brain. I need all those things in my head.
    29:57
    Yeah, me too. And usually these are um when the beads are really tiny,
    30:03
    it's um easier to hide all of the stuff happening, but it's harder to see it when you demo.
    30:09
    And the cool thing about these larger beads is you can really see in between. You can see really what's happening.
    30:15
    Okay. Pretty nice, right? You can see all the all that thickness there. I'm going to just get out of the way a little bit.
    30:21
    Yeah, I do like how it's securing the last two rows because those last two rows are a little were a little loose.
    30:26
    They were the beads were sliding everywhere. Yeah, this is going to give you a lot more strength.
    30:33
    Yeah. And I think that's important for the end of your project. Yep. And then when you're weaving in,
    30:38
    another way to add some strength to that weave in is to do what I call warp jumps. So
    30:45
    see how I'm exiting out of this side of the bead here and the warp thread's running on the front? Yeah.
    30:50
    jumping over it and heading back through a bead.
    30:55
    Okay, that's kind of like picking up a thread bridge in brick stitch. A really secure way to lock thread.
    31:03
    Soing in it's really nice to do that. Yeah, it's kind of like when um I've I
    31:09
    believe Well, my take on it would be like how when I want Yeah, it's the same thing.
    31:15
    It's like weaving like going under the warps back through the holes.
    31:23
    I Yeah, I think we both just have a different way of [laughter]
    31:28
    doing the same thing. We're just Yeah, we have different language because you
    31:33
    Yeah. Yeah. You have the off loom language.
    31:39
    So, I'm going to grab my button and my seed mix. Okay. And then get one. So you'll
    31:46
    probably have a few of these left. Yeah. If you have one of the pearls left, grab one of the pearls or just any round
    31:53
    bead. Grab your button and then grab your favorite color pyramid.
    31:58
    And they will actually have the check glass. Um, you know, the rondelle might look really, really pretty. That big. I
    32:05
    think it's like a I think it's a it might be a 9 by6. It's gorgeous.
    32:12
    Oh, that's cool. Yeah. any bead you have here that's gonna that's going to be so cool. Yeah,
    32:17
    that you can get away with lots of different ideas for these, but I just happen to
    32:23
    have a really nice little set of those.
    32:28
    [snorts] And so that's what I've got there. And here's your mix.
    32:36
    And so what I did for the button, I did something special for this one that I thought was cute. the using one of the
    32:43
    check glass beads to kind of jump you out from the edge. Yeah, that's cool. That's optional if you don't want to do
    32:49
    it. On on the one that we did for that example you held up earlier, I just ladder stitched those centers together.
    32:55
    Yeah. To create the same thing. But now that we've got a two-hole tile, bonus, let's use that, right?
    33:01
    And I had one two-hole tile left from this project, by the way, by the original box. Yeah.
    33:07
    Yeah. You just need one. And so I started with three. Three was a nice height.
    33:14
    And oh, sorry. Your thread. Let me tell you where your thread needs to [laughter] be.
    33:19
    Where does it need to be? You'll probably be exiting from the edge
    33:24
    of one of your of your last row. Okay. And if not, just weave till you are exiting from the edge.
    33:31
    Does it matter if it's on the left side or the right side? Nope. No, it doesn't matter. Our our goal is to be exiting from the side of
    33:37
    the center one. H. So from where I am right now, the
    33:43
    easiest path for me to get there would be to head back this hole here. Yeah, got you.
    33:50
    I'm going to continue past that through the middle one, but then I'm going to exit out of the middle one, but I
    33:56
    hole back or I don't want to be one hole back, but that's no problem because Okay,
    34:02
    just turn here. Okay. And head back this way
    34:07
    like that. And this might be easier worked on the non-pyramid side,
    34:12
    but [snorts] as you can see, that thread's just going to hide right like that. And now my thread is
    34:17
    coming out from here. Okay.
    34:24
    So, right where I want to be there. [snorts] Can you come up one more time so I can
    34:30
    see what what you came out of, please? Oh, yeah. Okay. Gotcha.
    34:38
    So, right from the the top um or in this case edge hole of the center tile.
    34:49
    And then we'll just string three of our 11 o seed beads. And then paying
    34:56
    attention to the pyramid side being face up, we'll go through. And
    35:02
    then also take a quick look at if you're on the, for example, I'm on the left hand side of my tile,
    35:09
    my thread. I'm on the right hand side. Is that okay? Yep, that's fine. Just when you put your
    35:14
    pyramid on or your tile, just line it up like that. And if you're on the left, go through the left. If you're on the
    35:20
    right, go through the right. Okay. And then just make sure when you string it on, if you just lay it like this, you
    35:26
    should have it coming out like that. It should be facing right side up.
    35:32
    Yeah. And you can get away with doing less than three if you don't want to add height here. Okay.
    35:38
    From here, we're just going to trace the button. And the way I did it is I didn't follow a pattern and I didn't even
    35:44
    bother doing a count. What I did is I laid the beautiful button down
    35:50
    and brought my seed beads into just a little pile. And I am using the loom needle right
    35:56
    now, the bigger one. Just start bringing beads on. You even have to worry about
    36:01
    which ones you pick up.
    36:07
    You didn't go through the button hole. Nope, not yet. Okay, we're not putting the button on this
    36:12
    side. We're actually doing the button loop right now. Okay, I got it. What I want to do here is use it to
    36:18
    measure. Okay. And so I just strung a bunch of beads. Okay.
    36:23
    What I'm going to do is just lay it over the top of the button just to make sure that the loop is going
    36:28
    to be big enough. Yeah. And that's looking pretty good. In fact, it's probably a little a little big. Let me
    36:34
    show you up close. Laying it across your button like that.
    36:40
    Yeah. Because you want to make sure that um the body of that button, which is about the size of a nickel. Correct.
    36:47
    Yeah. About It looks like that. So, I might need to just remove that many
    36:53
    and then see what I have. Okay. I better bring my button in. [laughter]
    36:58
    Oh, yeah. I got quite a bit here. [snorts] Since we're all working with the same seed beads and button, I can give you a
    37:04
    count. For me, it looks like one, two, three, four, five, six, seven, eight, nine, 10,
    37:12
    11, 12, 13. So, 15. Okay. 5 10. I had 18. So, so I was
    37:20
    close. [laughter] 18 might be great. Okay. Somewhere between 15 and 18, I think, is
    37:26
    going to be ideal. Okay. I'm gonna leave it at 18 for giggles then. Yeah. Also, there could be some
    37:33
    variation in your button. You never know. But set your button aside. Okay. Bring it. If you have an in bead like a
    37:39
    pearl or a rondelle, bring that one on now. Okay.
    37:45
    I'm going to bring the rondelle. And then just pick any seed bead. Just one.
    37:50
    Okay. So, so far I have the button loop, a
    37:56
    decorative bead, another seed bead. I'm going to skip that seed bead. Yeah. And go back through the pearl.
    38:03
    Okay. And then just hold the pearl in your hand. Pull to tighten.
    38:09
    And you're going to get that. Okay. So, we're going back through the decorative bead, through all the seed
    38:15
    beads. Whoops. Oh, yeah. Just the bead. And you don't want to go through your seed beads. Oh,
    38:21
    we're not going through. Okay. So, we're just gonna we're just gonna go through the decorative bead and then the needle is
    38:28
    just coming out. Gotcha. And then we're going to pull it tight like you said. Got you. Got you.
    38:34
    Back on track. Yay. And then if you if you did count them,
    38:40
    go ahead and string that count. But if if that's something that when you're working on a really big one like that, that can kind of get irritating. So, all
    38:47
    you really need to do is just lay it next to it and match it. Okay. Well, I do know that I had 18 because we both
    38:53
    counted. So, yeah, with such a short number, maybe easier just to count in that case,
    38:59
    but in this case, you'll go back through the other hole of
    39:04
    your tile.
    39:14
    And then once you've got that, you'll just connect by picking up three more seed beads.
    39:20
    And now connect to the center tile in the loomed piece by passing through the
    39:27
    hole from the opposite side. So we're going to go through that way.
    39:36
    And that is your same exact process from that design last year. Mhm.
    39:42
    Oh, and I have exactly three seed beads. One, two, three.
    39:50
    All right. Um, and I'm so sorry. Did Did you say to go
    39:58
    I was missing I missed which direction your needle after you picked up those three beads? Which direction did your
    40:03
    needle go back through? Um, it went through the opposite side of the exiting thread. So, your thread will
    40:09
    be coming out of it'll be coming out of one side where we started. And so, you'll want to
    40:14
    bring your needle through the opposite side. So for you, you're going to be heading in from the left.
    40:20
    Okay.
    40:26
    And basically, you'll have you'll have this. And wildfire is so strong. You'll have
    40:31
    something really good there. But I did reinforce mine. And it's so easy to reinforce it because check out where we are. You're going to be right where you
    40:37
    started. Okay. I'm happier than a pig in bed right now. [laughter]
    40:42
    Isn't it cute? how easily you can get through all those beads again.
    40:48
    Oh my god, this is so cool. I did switch down now to a 10, size 10
    40:53
    from the jeweling needle just because I was having a little bit of thickness with the passing through the tile.
    41:00
    Yeah, she's a big girl. But I do like the length. I can't hold
    41:05
    the little needles anymore because of my wrists. It definitely helped when I was doing
    41:11
    all the stringing. Wow. And now that part's done. I can get
    41:16
    through one side. Don't forget to use that little seed bead at the edge to turn. When you get there, then head
    41:22
    right back through that pearl. And then you [clears throat] want to head down opposite side from the one
    41:29
    that you just reinforced because that one still needs its Okay. So, I did not Okay, so I made a
    41:36
    boo boo. I was going back through the two holes. I wasn't going back through the loops.
    41:42
    You feel like we need to go out. It's It's okay with wildfire so strong. I think it's okay. You mean
    41:49
    I think so too. Yeah, I think we're good. But I get what you're saying. Like you
    41:55
    could have come back up and down because I have seen you do that. Okay. Um I just had a situation that I want to share. So
    42:02
    as I was going back through my two holes, um I did get a little stuck. And
    42:07
    what I'll do is I'll take my flats and I very carefully grab them onto the jewel
    42:12
    loom needle. Um I never force that needle and something happens when you
    42:18
    use the flats. It just kind of evens out the pressure. So don't ever pull really hard so that your needle doesn't break.
    42:27
    Oh my gosh, I feel so accomplished right now. Isn't it easy? It's really fast.
    42:33
    I just feel so accomplished. This is awesome. So 15 is a is a nice tight fit.
    42:41
    Wow. 18 be a little easier to get your button through. Um for some reason I feel like it loosens up over time. So I think the 15's
    42:48
    probably okay, but it's definitely tight. But like you say, the Wildfire is I
    42:54
    don't know. It's always been my favorite. It doesn't stretch too much, but I think what does happen is the work settles.
    43:01
    Oh my gosh, you guys. This rondelle is like stunning. I'll I'm going to let you
    43:07
    keep going and then we'll show everybody. [snorts] From here, I just have weaving in which I've already shown. So, what I'm going
    43:13
    to do is just get this thread a little out of the way. But one thing you can do is you can flip to the back and you can
    43:18
    do the little trick that I was showing you a bunch of times. Oh, yeah. To get yourself
    43:24
    Sometimes this little trick's easier to do one by one. You know, it's um I'm I I had become
    43:32
    such a warper of cord that I forget that the wildfire um I
    43:39
    mean again it's very strong, but going back through the body of the bracelet, it just makes makes it a little bit more
    43:47
    sturdy. I love doing this because it can be used
    43:53
    in that way as a way to get the center stronger. So
    43:59
    like for example, I feel like this is worth showing. I [snorts] know it's getting into like a
    44:05
    little bit of the nitty-gritty, but when you're making these to sell, you know how people are going to just yank that button loop go a little crazy
    44:13
    because they're putting it on in a hurry and so good putting our jewelry on in a hurry. But check it out. If you head
    44:19
    right back up here, you can reinforce this entire path. So
    44:25
    now what I've done is I've taken this all down to here and I've distributed some of that pressure into this row.
    44:32
    Okay. And now I'll just pass back through this one more time. If I can get through it once more.
    44:40
    And then now truly I'm just weaving in without purpose other than just getting the thread to turn a couple places.
    44:52
    one. And doing this on the reverse side from your pyramids is a little easier, I
    44:58
    think. All right. From here, I'm going to use
    45:04
    what I call the brick stitch trick. It's not really brick stitch, but we're just taking the side warp
    45:10
    and jumping over
    45:15
    to get. And a lot of what you're doing right now is just really securing
    45:22
    that end of the bracelet because that is where a lot of the um wear and tear from
    45:28
    wearing and taking them off, etc. come or on the ends. Correct.
    45:34
    Yeah. I mean that's like that's what your thinking is is to really [snorts] get all of that nice and secured.
    45:41
    Yeah. All bead weaving jewelry I have found when it's returned to me broken is broken closure
    45:47
    almost like I would say almost exclusively all the time unless I did something funky like where the
    45:54
    beading wire accidentally cut a warp [laughter] even when it's beating wire it's always
    46:00
    by the clasp. So I say that now and I'm like well actually It's typically always the clasp that's
    46:06
    that's that makes sense. I mean, I think that's even with like um like storebought
    46:13
    jewelry, like you know, it seems like that's where the wear and tear is.
    46:18
    But that whole rigomearroll I just went through, that was that probably took longer than the looming part. And that's
    46:24
    I think sets your quality apart. Yeah. That kind of time, even though it seems
    46:29
    a little bit like a lot. It's a bit much, but so here we're gonna have an [clears throat] easy time here. The
    46:35
    button is super super quick. Okay, so I have one thread left and in my
    46:40
    case, it is a warp thread. Uh, so I'm going to do that trick where I just go
    46:45
    back through the last bead since I am working with a tile
    46:50
    and go through it. And try not to puncture the thread on the side when you exit.
    46:59
    Again, the reason for doing that is we don't want to lose our top row. But now we can go ahead and we
    47:07
    back in from here. I got through one tile.
    47:14
    Here's the second tile. A lot of this is knowing the anatomy of your loomed piece.
    47:20
    Very true. And then here you can turn
    47:26
    to head through the hole here gets you to the top.
    47:34
    So I'm exiting out of the center and I happen to be on the right this time.
    47:40
    Oh, and I'm on the left. [laughter]
    47:45
    Oh my gosh. Where you end up? You end up Oh my gosh. And then this is kind of another one of
    47:52
    those like it's up to you things. On the other sample, I went with four seed
    47:57
    beads. Okay. And I set my anchoring for this into the
    48:05
    fourth row back from the edge. Purpose there being I wanted it to connect around when clasped. It didn't
    48:12
    quite connecting. I would have had to go into like the fifth row. I don't think I have enough. I my base
    48:18
    is not long enough to do that. So, in this case, it was just an unusual
    48:25
    case because I had a lot of beads and yeah, I was just I got a little carried away to be totally honest with you.
    48:31
    Yeah, I'm going to have to maybe even add I'm going to have to maybe even add six
    48:37
    seed beads. And I just wanted to show that you have that as an option in case anybody's in
    48:43
    the in the realm where they want to do a floating button. So So the main
    48:49
    purpose being is I love that. I love that. Yeah. And ideally for it to do that with a
    48:55
    button this large Oh, let me share just a quick secret in case anyone's curious. The the secret to doing this
    49:01
    is that the button shank is going to hug right up against whatever decorative bead pearly thing you have going on
    49:07
    here. Ah, so the larger your button Oh, you mean the just Okay, gotcha.
    49:13
    Yeah. So, a little bit smaller button is sometimes more ideal if you're going to attempt to do something like that. I've seen people do this thing where they
    49:19
    wrap around. Yeah. So, there's there's tricks that you can play with, but the simplest, most easy
    49:24
    way is what we're going to do here. Yeah. Going to jump out with four beads. Go through our button.
    49:30
    So, our button top is facing the table. Oh, actually it doesn't matter because
    49:36
    it's gonna flip around on you. So like see right now I've got it like this.
    49:42
    Okay. He's gonna flip this way
    49:47
    to flip around like crazy no matter what I do. If I was to have it facing up, then he would flip like that on me.
    49:53
    But this is just so I can see
    49:58
    like matter which side you Okay. So, on my but on this button hole though, these seed beads are not going
    50:04
    back through the hole. Nope, they shouldn't. Okay. Okay. I thought maybe the camera was just telling a different story.
    50:11
    Oh, no. So, I've got four beads on each side. Okay. I did six because I feel like my
    50:16
    bracelet um is going to be a little [snorts]
    50:22
    Yeah. And then same thing we did before, we're going to use the center here,
    50:28
    the top hole of the center tile and go through that.
    50:39
    And when you tighten all that up, your button is just going to hug the edge.
    50:45
    You want to reinforce that one for sure. Oh, yeah. Okay. This time I'm going to
    50:51
    listen to my teacher. [laughter] Oh my gosh, it's so snug though. Okay,
    50:57
    here we go. It does. It gets a little snug. I'm going to flip to pyramid. Yeah, that does get really
    51:02
    snug. The reverse side just for ease.
    51:07
    And I should be able to get through this at least one more time. And then I feel Are you going back through the seed beads?
    51:14
    Yep. You are. Okay. I My head was down. I'm being a good student. My head was down. So, you are going back through the seed
    51:20
    beads. [snorts] Yeah. I just kind of think ofing think of it as a circle. Yep.
    51:26
    And you can do that circle as many times as you feel you can get that as you can get that. Yeah. As you can get through here because right now,
    51:32
    but if you think about just wildfire in general. Yeah. When they say 12 pound, I guess I was
    51:40
    working with 008. Oops. You could work with six and it would be fine. I happen to be working with eight.
    51:46
    Eight is a six pound test, I believe. Or is it eight pound? Let me flip really quick. Um, here's a six pound and it is a Oh,
    51:56
    it's a 10 pound test actually with a 0. Long story short, are you going to put
    52:02
    20 pounds on that? Um, probably not. So, two passes, we're good. [laughter]
    52:09
    Yeah, I think so. So, I'm going to weave in Oh my gosh, I can't get through this
    52:15
    little guy. The secret to not having thread break honestly is not puncturing it with your needle and sewing through it because
    52:21
    that weakens and kind of destroys it to be honest. Totally. That's really the the other reason with
    52:27
    my loomed pieces. Even when I'm not planning to pull my warps in, I still avoid sewing through them.
    52:34
    That said, I've never had one break in the middle just willy-nilly. It usually is always at the edge.
    52:40
    Yeah. Yeah. So, we're pretty much there. That's all there is to it. I'm doing
    52:47
    that thing I mentioned earlier where I go back to like the third row by using the WS to travel.
    52:54
    It's a knit, but it's cool. And since you're dealing with a two-hole
    52:59
    bead, it's not like these beads, the these two rows of stitching aren't going to
    53:05
    separate from each other because those beads are it's one bead. So, you can just make that turn here at the back uh through the second hole, which we
    53:11
    haven't put as many passes through. because you don't want it separating
    53:16
    here. So, there's another little spot you can go through.
    53:24
    And I'll go ahead and keep going. Um, oop, sorry, hit the camera.
    53:34
    Wow, this is I can't believe I did it with you. [laughter] My um my burner though is nowhere in
    53:40
    sight. So, I still have all of my my um excess threads kind of everywhere, but I
    53:46
    can go do that off of camera. Do you have a flush cutter handy? Um I do not.
    53:53
    Yeah, the thread burner is nice because it's just easy to get the threaded, but sometimes I flush cut it. That's okay.
    54:01
    Oh, wow. This is incredible. Let me see. I hope it's Oh, I hope it's gonna fit. Let me get the loop.
    54:08
    Oh my gosh, if it is. I hope it's I hope it's what you're you're hoping for. It's all my hopes and dreams. [laughter]
    54:17
    It's all my hopes and dreams. I just hope it's not too big.
    54:24
    Oh my gosh, what a great great closure.
    54:29
    I don't, you know, I'm so Oh, we've talked about this before. It's like, you
    54:34
    know, we're doing left and right hand brain work and and sometimes it's hard to
    54:42
    sit and do. So, this is fantastic.
    54:48
    Oh my gosh. Fantastic. Okay. Um, how much seed beads you have enough to
    54:53
    do a holding bracelet? You really Yeah, we put in Was that seven grams?
    55:00
    10 10 grams of seed beads. Yeah, I still have like a bazillion. So, if you wanted to do like a scalloped like the um you
    55:08
    know like scallops on the sides or the um pico stitch like you definitely are
    55:14
    going to have enough seed beads to do that. And you already have video content on
    55:19
    your website that shows making those pico edges. Yes, we do. I think that would be 2025
    55:26
    if I'm not mistaken. Yeah, I think it was either June or July 2025. It was June of 2025. Yep. So,
    55:35
    that's a playlist, the Jewel Loom Jewelbox 2025 playlist. And then you're going to look
    55:41
    for the June project. And that's going to have those
    55:48
    those um Yeah, I'm going to have to weave.
    55:54
    [laughter] What's that? My So, I did make my button loop a little tight. So, anyone thinking of doing 15, do 16.
    56:01
    But you can get it on. It's just a little trickier. That's That's cute.
    56:07
    It is. I'm trying to get my needle back on my thread. Is sassy spiky pastels.
    56:15
    Sassy spiky pastels. I love that. I dig it.
    56:20
    I love it. It's our spicy. Um, okay. I'm not going to worry about that. I'll just bring um Joan, can you
    56:28
    can you um Whoops. That's the back side. Okay. So, just again, I don't have my
    56:34
    burner, so ignore all of my wild um but here is my end that I did. I'm
    56:40
    such a big girl. Now, look at the rondelle. You're going to have this rondelle. You're going to have
    56:46
    five of them in your kit. And then you have little baby ones. I think there's like eight.
    56:52
    And then you have that big drop. So let's see.
    56:58
    Okay, so I did 18 seed beads. Hindsight, I might have done 16. So we
    57:05
    both are kind of coming up with 16. 16 seed beads probably would have been
    57:11
    better. Yeah, we just goldilocks that for everybody. Yeah, we just did. Um,
    57:19
    okay. But that it's still I think I I don't think I would be worried about it coming apart.
    57:26
    Yeah, same. I think it's going to stay stay pretty. Yeah, but I would definitely do 16, you guys. So So when you watch this or
    57:34
    you're writing your notes down, I did 18. You did how many? I did 15.
    57:39
    And you did? Yeah, we both think it should be 16. As I took it off, it was really seemed
    57:47
    kind of perfect. Uh, but I think 16 you'll have an easier time putting it on. Um,
    57:53
    oh my gosh, there's so much humidity here. I can't even like move it. Yeah,
    57:59
    I think 16. I think 16. Yeah, because I did 18 and
    58:06
    I'm thinking I just wonder I just look at this rondelle. Whoops. Let me try to get up
    58:12
    to the camera. This will this Yeah, I'm pretty sure it's a nine by 9 by six. So, there's
    58:19
    three. No, there's five of them in your kit. So, if you wanted to, you could put one
    58:25
    here and one here, I think. Or do you need a two-hole bead right
    58:32
    here? You don't have to have a two-hole bead. No, you can do a couple of things. You can ignore that entirely and you just
    58:37
    instantly start going into your button loop right there. That's um but if you're needing to add length,
    58:42
    this is a cute way to do it. The other thing that's good about it is it makes it easier to measure a button that way
    58:48
    because you're going to get width from a six millimeter tuckile. Yeah, that's going to contribute to the size
    58:54
    of your button loop. That makes the count harder to calculate. Okay. That said, it's totally fine to do.
    59:00
    Okay. Sometimes, okay, so sometimes my button loops come loose when I do it that way. That's another
    59:07
    another thought, but it's not necessarily It could be a function of a lot of things and not necessarily how I exited
    59:14
    the tile. But the other thing here you could do if you don't have a two hole bead is you can just ladder stitch two or
    59:20
    three of the beads together by just looping them in a circle once you get that spot. So you basically you
    59:27
    would string as normal. Okay. through the interest bead as normal. And then as you're heading back,
    59:34
    when you get to the spot where you'd like your button loop to end, add two beads and link those two beads
    59:40
    to the adjacent beads. And then keep going by adding three more and then heading through your tile,
    59:46
    turning. Yeah, you have a two-hole bead, use it because it's saving you doing all that. Yeah. And and you should have some two
    59:53
    holes left in your kit. I'm loving this rondelle, though. You could always grab a superduo or
    59:59
    something. Superdos are cute because they don't add a lot of height. That went on a lot easier that time.
    1:00:06
    Yeah. So, I'm going to go back in and I'm going to check out all of my little strings here and figure out where they
    1:00:11
    need to go. I think I need to put the needle back on a few of them. This one I got down the backside of going
    1:00:18
    underneath the um we threads.
    1:00:24
    But wow, that's Oh, this is very very I feel like this is very secure. Whoops,
    1:00:29
    the button. [snorts] Where is my head of my camera? There we go.
    1:00:34
    Okay, there we go. My goodness. Fantastic. Gosh, Danielle, thank you so
    1:00:40
    very much. I feel so incredibly empowered by getting that done. I guess let's come back up. Joan, can you put um
    1:00:47
    both of us our faces? Well, I'll switch me, Jan. Oh, yeah. And I gotta switch me, too.
    1:00:52
    Sorry. I gotta switch me. I need the switcherooer, Danielle. What's the switcheroo?
    1:00:58
    I've been using camo and I'm I'm I'm love and afraid of it at the same time
    1:01:04
    because it it's finicky and it kind of does what it Okay. All right. I test it every time I'm going live. I
    1:01:09
    sit down and I test it. Sometimes I have to reboot. Okay. It's installed updates and and I don't
    1:01:17
    check beforehand and I get caught out by that. Yeah. Other than that, it's good. Thanks, Terry. Yeah. No, I'm super
    1:01:23
    excited. Like I said in the last video, I'm like, how did I manage to get three
    1:01:29
    kits together? [laughter] [gasps] Oh my gosh, they're so Oh, and you know
    1:01:34
    what? I would wear those together. I would, too. And since I made this one a little bigger, I can wear it higher on
    1:01:40
    my wrist. Yes. Oh my He love that so much. Oh my
    1:01:46
    gosh, I love that so much. Please take photos so that I can share them because I'll take photos and then I'll pop them
    1:01:51
    in the mail to you. Yeah. Oh, no. Where are yours? Don't be silly. You don't have to send them to
    1:01:58
    me. Do the the show thingy. The Vanna. The Vanna. Yeah.
    1:02:03
    Wow. I'm I just feel so This technique is very empowering. I'm just um
    1:02:09
    That is so cool. I love the way you did that. I love the Verondelle. So, so much.
    1:02:15
    Yeah, I really do. I like that. And I don't got to get rid of all these threads. But I and I'm really surprised
    1:02:20
    at like how nice and um secure the button is. So
    1:02:26
    definitely going to go back in and and secure the ends. This this end needs a little bit more
    1:02:33
    love. I can tell. But yay. So exciting. Versus hanging it on the
    1:02:40
    front. Same project. I I want to do that. So, the second one I wanted a Thanksal.
    1:02:47
    Um, you know what I was thinking too is like this cuz this bead you have two of these
    1:02:53
    beads in your kit and Yeah, they'll be so cute. Yeah, like you could totally make some
    1:02:59
    earrings with your pyramids and you know, but these you have two of these yummy opally blue because the hole goes
    1:03:07
    from the top to the bottom. So, just a lot of fun. Yeah, there's going to be there's going to be enough to do a
    1:03:15
    second something. I'm thinking [clears throat] probably something small like with with the August kit, you were
    1:03:22
    able to do a streamlined um Yeah. Oh, which by the way, somebody
    1:03:28
    asked me about doing any left? Somebody asked me, and I'm so sorry. I feel like it was Sharon.
    1:03:37
    I should have written it down. It started with you're in the chat. Well, it was somebody who emailed me and
    1:03:43
    she wanted to know if she could go if she could only do two beads across and I said yes. And so what I also want to say
    1:03:49
    is obviously your pattern is going to be different. So if you only go two across, you're going to do three warps. So it's
    1:03:56
    always one more warp than it is beads across. So she's going to do three warps. And then just know that your
    1:04:03
    pattern is obviously going to be different because you don't you don't have the width to do what um what I
    1:04:10
    originally did. But you can absolutely make this one thinner. So if any of you are wondering that of course you can
    1:04:16
    make a thinner bracelet a couple of And so if you did do a thinner bracelet
    1:04:23
    you're not going to have a center tile to jump out of but that's okay. M pretend that you're pretend that this
    1:04:30
    one is that is that wide. Too wide. Okay. Okay. String four or five seed beads. Go
    1:04:37
    through the tile so that it straddles the both of them. Okay. So, just make it a little longer so it
    1:04:43
    can center one of these tiles above the two. Okay. Have it kind of reaching together like
    1:04:49
    that above. Okay. So now you're when you reinforce it, you're going through the top two
    1:04:54
    beads, which is your entire edge of your bracelet. But that will actually work fine. You just need to get some height
    1:05:00
    so that you can come back together. Okay, good. Yeah, you can always Sure.
    1:05:05
    Definitely you could go more narrow and then try to I don't know. I mean, you could even do one single row.
    1:05:11
    One single row. Just keep going around and just keep going around and you'd have a wrap bracelet because we did do a
    1:05:16
    tutorial on on using the jewel loom for a wrap bracelet. So, you could definitely do
    1:05:21
    that. You could just have like an a single row wrap. Yeah, I think I think we were I think we were
    1:05:27
    able to do a two. I think you could do a two at least two around. You'd have plenty of
    1:05:32
    two around. Yeah, for sure. I think I have enough here to do a single one trip around the wrist.
    1:05:39
    Yeah, it's here. If I use the seed beads, the kits are very um they're very full.
    1:05:44
    I do want to say that if you order um I I think
    1:05:51
    yes, I do believe that I can get all three kits in into one jewel box. And you know that I'm really good about
    1:05:56
    adjusting shipping. So like if you end up paying shipping and then I go weigh it and I'm like, "Oh, holy cow, they
    1:06:03
    paid a lot more than they should have." Then I've always been really good at reimbursing you that. So, like if you if
    1:06:10
    you do that, just know that I'm very good about weighing and if the postage
    1:06:16
    is, you know, like, oh, I collected too much. I've always over the last six years, always have been good about that.
    1:06:22
    So, um, subscribers, it's not too late. I know credit cards hit today. They hit the 10th of every month. Um, and so got
    1:06:30
    to get everything packed up. It's going to be at least probably another week. So, if you want the second color way or
    1:06:36
    you want the pretty and pink, go ahead and buy that. And again, I'm going to put them all in one box. And if post if
    1:06:42
    I collected too much postage, then if you've been with me, um, you know that I
    1:06:48
    do reimburse overage. So, and if you haven't, I'm telling you now. [laughter]
    1:06:55
    [gasps] So, anyho, which color way? That's such a great question. Joan is asking in the
    1:07:01
    background, um, which color way do you like the best? So, you have the you have
    1:07:07
    the main Jewel Loom jewel box kit. Um, this is the purples and the really
    1:07:14
    pretty teal pearls. Okay, so this is the main one. This is the one that all the subscribers are
    1:07:20
    getting. And then Danielle, you have a finished one of the second colorway. So,
    1:07:26
    that's the second color way. And then h
    1:07:32
    cool. It's so it's they're both just so stinking pretty. I'm going to wear both of them
    1:07:38
    together. And then um the third is my baking sheet with all the pretty
    1:07:45
    and pink. So you have the beautiful I don't want to spill them. Uh two holes.
    1:07:51
    You have the Hawaiian hot pink flowers. So, I mean, all three of them are just
    1:07:57
    so stinking pretty. And so, Terry says, "I'm a purple fan for life." Sorry, blues and rust.
    1:08:03
    [laughter] They They'll be fine. I like So, I like them both because my
    1:08:10
    favorite colorway is this one. Yes. But I love pyramid beads. So, the
    1:08:15
    pyramid beads have me loving on this one. Yeah. the wearing them together though. I just
    1:08:21
    I I love wearing things together because then that's what gets people people's
    1:08:26
    attention and that then it help. It's kind of my like my leadway into like oh well yes I not only
    1:08:33
    made these I made the tool I made the tool. [laughter] I'm the Juloo mama. [gasps] And so and
    1:08:38
    so it's a it's a nice way to kind of introduce that. The pretty and pink will make a great design for the breast
    1:08:44
    cancer awareness month. Yes, we did talk about that. single strand bracelets to stack with
    1:08:49
    the main bracelet is a good idea. It is I do you remember those? I had those
    1:08:55
    single gemstone stretchy bracelets that we bought in Tucson. Um and I always
    1:09:00
    wear one of those with my beaded bracelets. And I'm so weird. I never put
    1:09:07
    anything on my left hand. I put every I like adorn my right arm like I'm a rock
    1:09:12
    star. I don't know. It's so funny. But I very rarely will be seen with anything
    1:09:18
    on my on my left hand. I don't know why. Interesting. I switch. I never do both.
    1:09:26
    But you switch. Okay. Reason. Yeah. One arm versus the other. I never know
    1:09:31
    why. Oh god. Joan feels naked and
    1:09:36
    and we know. So we're just not even going to talk about that. But she says she feels naked if she doesn't put a bracelet on both arms. I'm just saying
    1:09:44
    be careful what hotels you go to in Knoxville. Terry says, "Question and not loom related, but can the pyramid beads
    1:09:51
    be used with something like memory wire? Easy on and off?" Yeah,
    1:09:57
    I've seen it done. A little tricky because you're working with two memory wires. Yeah, you got two and then you have to
    1:10:03
    have a spacer that's got two. But I have seen that.
    1:10:09
    Yeah, I saw a lady do it where at the end of the two hole beads, she took the ends of
    1:10:15
    the beading wire and she rolled one this way and one the other way so the loops over overlapped each other.
    1:10:21
    Okay. Jump ring through it. Yeah. Um because they're about six millimeter.
    1:10:27
    So you're going to end up with your little 3mm if you use your bail formers. Oh, and you're talking about memory wire, not stretchy, not elasticity. I
    1:10:34
    was visualizing because I think on the elastic you could you could do that too,
    1:10:39
    but on the memory wire that's a great tricking. Yeah, that's that's a that's a Meredith.
    1:10:45
    [laughter] Meredith's done it, I think, with tile, which is kind of gonna perform the same
    1:10:51
    way a prim would. And it's definitely um problem with it is it's more likely to break a bead.
    1:11:00
    I You know what? Yeah. Yeah. because of that glass and the tension and the tension. So, I I don't
    1:11:08
    know. I would do elasticity all day because you're not going to have that. But the glass rubbing on that memory
    1:11:13
    wire and then the bending I don't know. I don't know. That's a great question.
    1:11:19
    But I have I have seen them and they do look cute. So, okay. Okay. Good thinking, uh, Terry.
    1:11:26
    Good thinking out of the box. So, all right. Wow. We accomplished a lot. It's It's uh 113
    1:11:34
    and Yes. and I agree with the stretchy bracelets. Give me a stretchy bracelet all day long. Maybe if I have some
    1:11:40
    mismatch leftovers. Absolutely. Yeah. Yeah. Or even if you just Well, now the
    1:11:49
    Chinese don't do two holes. Two holes are really a check thing. So, I was going to say
    1:11:55
    you could play around with your cheaper beads, but yeah, I think they're starting to
    1:12:01
    Oh, have you seen Chinese two-hole or you think that's happening? Um, yeah, they're made of gemstone
    1:12:07
    actually. I've seen some summer imitations. Well, yes, gemstone for sure. But I was thinking Chinese glass because I use the
    1:12:14
    we've used the two-hole Dakota. Yeah. Well, those are those are real gemstone. No, these are kind of like
    1:12:20
    like fake fake gemstone. They look like tilas, but they're not tilas. So,
    1:12:26
    yeah. Yeah, those I've played with and they are um they're I think they're acrylic.
    1:12:33
    Oh, okay. Well, play play around with your not so expensive stash. [laughter]
    1:12:39
    Anyway, you are so welcome, Donna. Thank you for being here. I appreciate everybody. We're going to go ahead and
    1:12:44
    and um Deb says, "Memory wire works on two holes if you use separate circles of wire and are very careful in stringing."
    1:12:52
    Great advice. Thank you, Deb. Thank you. Yeah, [snorts] not Deb Floros, Deb Polo.
    1:12:58
    Um I don't know if I'm annunciating that correctly, but thank you for telling us that because
    1:13:04
    Thanks, Deb. Yeah, awesome sauce. Okay. Um we're going to let you go next next Thursday.
    1:13:12
    Um, next Thursday, I tell you what, since it's a short week this week, why don't I
    1:13:19
    save my making of the pretty and pink and we'll do it we'll do it next
    1:13:26
    Thursday. We'll play with the pretty and pink. Cool. Yeah, that makes sense. We haven't
    1:13:33
    We haven't done that. [laughter] We haven't done that yet. So, um the
    1:13:38
    second color wave I think I think is um dialed in. I don't think we have to
    1:13:45
    spend any time with that. And yeah, I think that'll be good. Oh, I will be on
    1:13:50
    Whatnot tonight, you guys. So, th tonight is Thursday. Yeah, 6:00 p.m. I do have a Whatnot show. I've got vintage
    1:13:57
    check glass that I'm still moving through. Um, this is these are bead strands that I just have like sometimes
    1:14:04
    I have one or sometimes there are five, but it's just inventory that is not in
    1:14:11
    the in the jewel loom shop for a plethora of reasons and so it just gets pushed out on the whatnot show. So, if
    1:14:18
    you want to come over, awesome sauce. I know a handful of the Jewel Loom community do come over and and for some
    1:14:24
    of you it's not your jam and I get it. It's totally cool. Totally cool. But I want to let you know that I will be there. And you can always
    1:14:30
    just come say hi. Don't feel like you have to buy something. Um, and so that's my story for today. And appreciate you.
    1:14:37
    Appreciate you, Joan and Danielle. I love you both so very much. Love the Jewel community. Yes, big big hearts
    1:14:44
    always have a hard time with chubby little hands. I know. Me, too. I look like eyeglasses.
    1:14:49
    [laughter] Joan Joan has the perfect heart. She's doing it in the background. Joan. Joan.
    1:14:55
    It's perfect. Yeah, I can't see her. Okay, love you guys. We'll see you next
    1:15:01
    um Thursday at noon. So,
    1:15:07
    bye.