
Shop
  • Read our story

  • Each of our carefully researched, styled, tested and distributed collections reflects a particular aesthetic and ethos. We hope some of these speak to your own style, and help you refine and redefine your own look and style philosophy in the process.

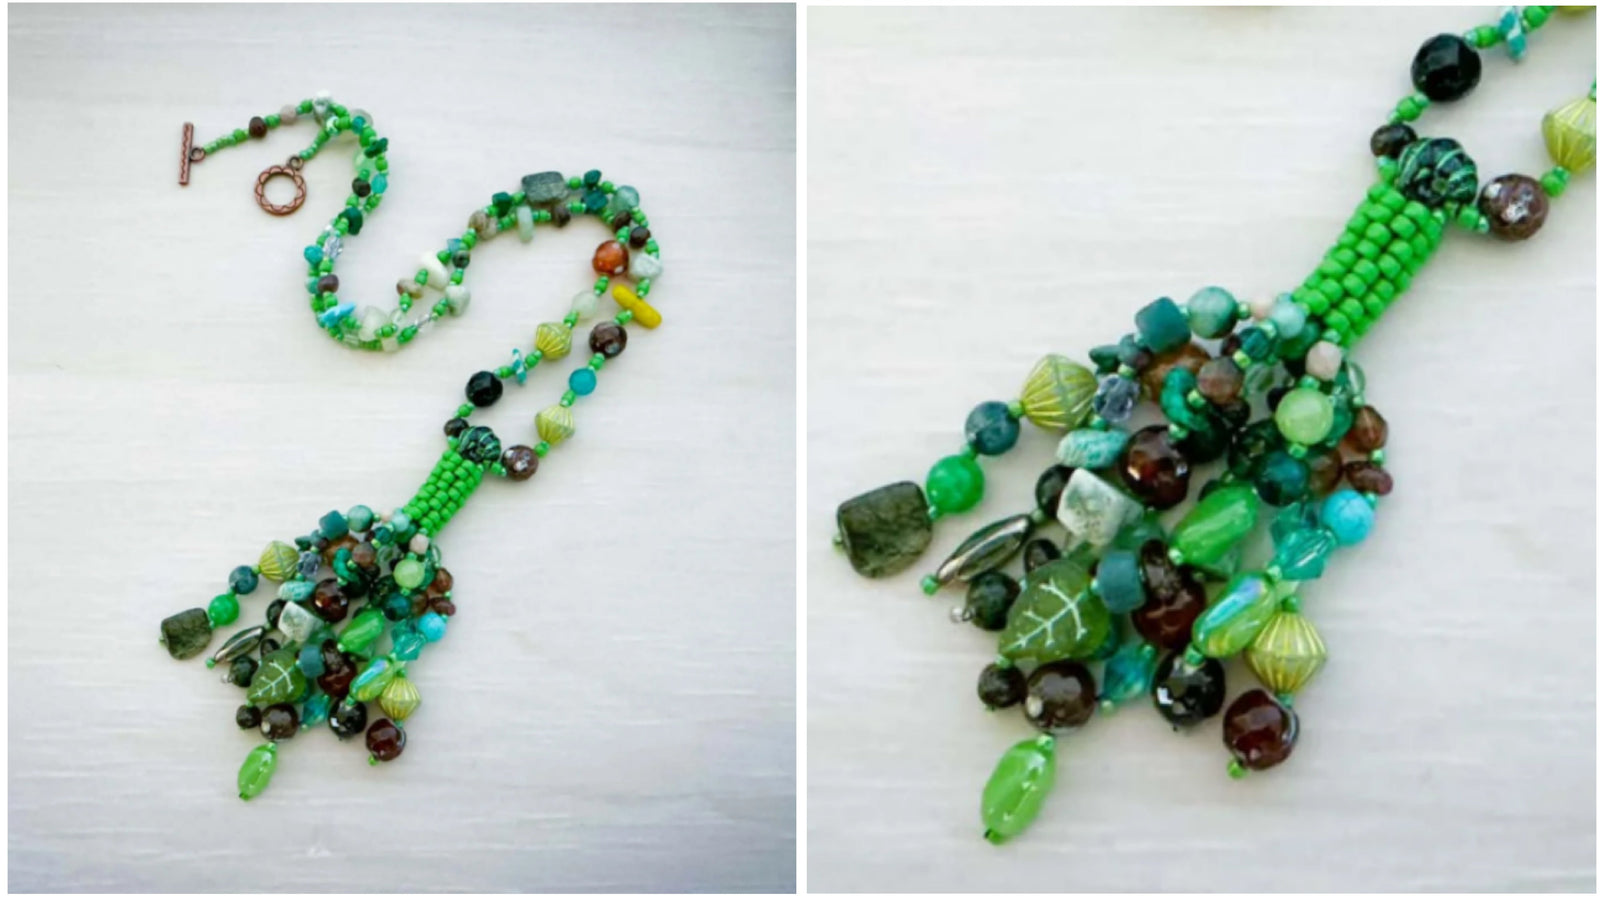
  • Beaded Fringe Necklace Using Bead Weaving

    July 15, 2026

    Beaded Fringe Necklace Using Bead Weaving

    Learn how to easily put together this beautiful necklace, using bead weaving. Danielle Wickes joins me to show you how, including how to stitch the sides of your 2 drop peyote stitch tube together, plus making the fringe below the peyote tube. Watch the tutorial below. (Note: video will start playing at the introduction to the necklace tutorial).

    The necklace in this tutorial is created with the March 2026 Jewel Loom Jewel Kit, which is crammed full of Czech glass beads, seed beads, and other random beads. You will still have plenty of beads, after this project, to create a project from your imagination. This kit also comes with a step by step tutorial pdf for this necklace project. At the time of posting this blog, we still have a few kits left and is on sale. Once they sell out, they will not be restocked. Find the kit here:  https://jewelloom.com/collections/patterns-how-to/products/the-jewel-loom%C2%AE-jewel-box-march-2026-last-chance

    If you are interested in the bracelet tutorials for the bracelet shown at the beginning of this video, you can find them at the below link. The bracelet tutorial is broken down into 4 videos, so you can easily find the steps you are interested in.  https://jewelloom.com/blogs/bead-loom-school/jewel-loom-jewel-box-beaded-loop-bracelet

    Save 15% off your first order, plus Get 3 Free Patterns: https://jewelloom.com/pages/get-3-free-bead-patterns-and-save-15-percent-on-supplies

    Did you know Jewels has a Book? It’s true! You can get a digital copy of the Jewel Loom Inspirations book here: https://bellacraftspublishing.com/jewel-loom-by-julianna/ 

    You can find Jewels here:


    Video Transcript:

    Okay, so I'm going to come up and then we are going to invite our lovely guest on who I feel
    like we've not seen in a hot minute um between life and the holidays. Um,
    I have to say that I think it's been since November and that's just wrong. So, [laughter]
    without further ado, I'm gonna bring our bestie. Hi, Daniel.
    [laughter] How are you, too? Oh my gosh. How are you? I'm loving that bracelet. That's really
    pretty. You know what? I am so stoked. So, this is the February kit. And um I think what
    happened with February is like well you know the there were the holidays and then Tucson came
    and then it was like oh wait we're where me Danielle. So um so I'm just super
    excited that you're back for for our monthly projects and we're kicking off
    with March. March. Yeah. Yeah. Yeah. So um the PDF I got it all
    printed. It's going to go tomorrow with um with the kit. And so that's great
    news because I didn't know if I was going to have to email it to everybody who bought the kit or I was going to be
    able to stick it in the box. So, good news. It's all printed and um I figured
    out on my printer how to doubleside
    like yay. Yeah. So, um yeah. So, why don't you what do you want to show off the March
    project and tell us a little bit about it? I'm going to get some some uh open
    up the door because it's so hot in California today. Switch my camera really quick and bring some bright light over.
    And so, this is I mean, this was just one idea
    that you could do with the kit. And so, I used a great idea. I like I use some of every
    bead basically that you had in the kit. Yeah, there's a lot of beads. I'll show that kit again at the end.
    It's [snorts] really fun and it starts out with a really easy um offloom technique that you could you could also
    do on the loom if you wanted to, but it creates a really fast peyote stitch to
    draw. And I'll show starting this if you want. And then we just bring it into a tube.
    zipper stitch that tube together. And then you just begin building fringe
    strands out of the base. And it's so funny because I said to you,
    I wasn't sure what you did on the bottom. I I didn't
    know if it was like a bunch of stringing or was it, [laughter] you know, like And
    when you said fringe, I was like, "Oh my gosh." Like that is the best ever. Look
    how beautiful that is. And just a reminder because um as I've mentioned at
    least a hundred times, every kit is a little different. And so, you know, just
    keep that in mind. Your beads are going to be mostly similar, but in some palettes, um they're a little
    different. So, [snorts] yeah. I feel like it was bead soup mostly.
    like there was a bag all different check beads. And speaking of checks, I see John in the
    chat. Hi, John. I say I know. Hi, John. And so the seedbead combination there
    just makes it so so nice as a way to just go crazy and use the beads in any fashion that you want.
    Yeah. There was one special bead that I did highlight and pull out that worked really nicely. I'm going to show you
    that one really quick. Okay. And I think this was a bead that was separate from the soup. So, I'm pretty sure it was included with all of
    them. I think there's something like that bead in every kit. I I think it's in the
    green bead soup kit. Like, there's so many baggies. I was packing everything
    last night where I was like, "Okay, there needs to be a resolve with how many baggies." [laughter]
    Like, there was a small a lot of baggies. [laughter] I like how it's it's kind of like pinch
    drilled at the top. Yes. But I mean any bead would work here. Any like gemstone bead or But what I liked
    about it was it made a really nice way to secure the top of the tassel. Oh. because you can secure through to
    the sides here on the top and then run a separate strand, a brand new strand through it again and it's going to
    suspend this way to make that bead was one of the finds in the
    secret room when I went to the check a couple years ago. Oh, was it? Okay. Yeah, it's cool. It's
    a neat one. It does feel like a button, huh, John? It's got the It's like got uh riveted.
    It's textured. Yeah, it's a way cool bead and I love the faceted gem. I mean,
    everything in this this this kit was everything. It had all the colors that I liked. So, every kit for the next few months is is
    like that. It's based on that Inspirations by Juliana 1990s throwback idea. And and so that
    bead, if I'm not mistaken, I've got it in blue and black and it's in another kit that will be coming up. So,
    Yeah, that's a good become like a kind of go-to thing, you know, like maybe
    I might have to go back to the check. [laughter] We might you wanted to do that anyway
    because Yeah. Anyway, [laughter] but yeah. So, um I have this one
    pre-made, but I can show starting it and then we can put it together. I'd love to see Yeah, I'd love to see
    that middle part because for me that's always the like how did we get there?
    I'll switch to the green again. You can use any color you want.
    And I used a start of eight beads. So I just pick up eight.
    And then the way I did my length of thread and like how much tail to use is
    you work with um I think I said about 85 inches or so. It just kind of depends on how long you're going to do your fringe.
    So there's some wiggle room there. But if you leave a really long tail, that tail can become your fringe later. So
    you don't have to work with like this really long strand when you're doing this part. You can leave half that length behind.
    I'll show you how how much length I've got here. It's a lot, but that's not the side I was working
    with. So if you do that, you end up with um a little easier time with having like the super long strand to work with. So super
    long tail, maybe half the length you cut. And then from there, you'll want to string eight. Okay.
    Two, three, four, five, six, seven, eight of those. Then you'll pick up two beads. Now,
    skip the last two that you strung. Okay. And go through the next two.
    Oh, and this is diagrammed in the PDF. And what is this? What is this step
    called? Uh, this is two drop peyote. Two drop peyote. Okay.
    So, you'll get this little Yeah. Almost like the legs of a little
    astronaut. Yeah. Yeah. Some just my friends from Canada say it
    looks like a nutchuck. Oh, I don't know what statues that were like Well, I first saw one when I went to a whistle there once
    and it was all in the mountains in the ski lodge areas. Okay. Stacked stones that look like person with arms outstretched kind of.
    Yeah. Yeah. Yeah. That's ex Yeah, that's what I was thinking. So, now you're going to the next two. You picked up two
    more. two more and skip two and go through the last two.
    Oh, okay. And see, now you have a peyote start. And in a pattern, that's rows one, two,
    and three. Oh my. Okay. So, we've got three rows right here.
    And we need a total of 14. Okay, that's great. And you'll just count that by seeing
    seven on the top and seven on the bottom. Okay.
    So, it goes really quick. So, you pick up two and now this time
    you're still skipping two and going through the next two, but it's much easier. You can just see them because they're the poke up beads
    and now you're going down. [snorts] Yeah. And the direction's less um
    because you know, you might flip it in your hand and Oh, so the directions, if I flip it this
    way, now I'm working upward. It actually doesn't matter as long as you're just going through the
    next set of beads. Okay. Well, that's good to know. It's a really forgiving technique that
    works up really really quickly. Well, that's very empowering. Now, why is it um not
    Why is it like um what is the word? It's not They're not even rows. They look
    Is that is what the stitch is? Is that why it's called that? Yeah. The p the peyote stitches are kind
    of offset [clears throat] to each other like a brick, like a packing brick. Yeah. Uhuh. Okay. That's what I was looking which makes cool zipper stitching easy.
    Now, you can still zipper stitch a piece like this that you loomed, but you would just need to completely square stitch that edge. And in fact, we've done that
    before, I believe. Yes. Okay. Yeah. I'm fascinated by off loom work. [laughter]
    There's always a way though to turn something into Melanie Melanie from Canada is working
    on a project right now on her loom and and it's a and it's an off loom stitch.
    Oh wow. Yeah. Yeah. I was quite impressed. Oh wow.
    Look how quick this comes together. It is really fast. Wow.
    So, I mean, I could actually even finish this one, but the way to tell how many you've got is you've got here's five,
    six, seven. So, I've got nine so far. Oh, okay. And my goal is to have a total of 14
    rows. Wow. So, you'll have seven here and seven
    here. Okay. [snorts] And from there, it's really easy to
    connect it into a tube. And this can be used in so many different ways. I mean, the tassel is
    one great idea, but there's a lot of stuff you can do with a tube like that. You can just string it on cord, you
    know. Yeah. No, I think you've done that on nlay silver silk if I'm not mistaken.
    Yeah, we do it all the time. This is like a go-to thing. I think Yeah, I was like that's a signature uh a signature style now
    [laughter] on the silver. Yeah, exactly. And before um something that I actually
    got into the habit of doing is before doing the zipper stitch, which is where we bring it together in a tube and zipper it,
    sometimes I just lock in the edge by just going back through. Oh, okay.
    And then back out from Oh, the edge. It's nice if you do that because then
    you don't have any loose. And you can even do that on your tail side. Okay, my tail side is really long again
    because that's going to become my fringe. Okay. But if I [clears throat] pop a needle on
    there, what happens to some folks, especially when they're new, is it gets loose on you when you're doing the zipper stitch, and that can be confusing
    and kind of frustrating because stuff's moving. But if you just do this little step here.
    Yeah. It's kind of like the first and last row on when you're looming. Like I like to go back through the first row
    and the last row. Yeah, exactly. It's just really nice. It saves you a lot of, you know, it makes
    it feel more stable like when you're working. Yeah. So, when you bring these together, you'll notice they lock like little teeth.
    Yes. Okay. That's very cool. So, what I'm going to do is I'm going to go through the next set of beads on this
    side just by coming over and going through it.
    It's going to pull it into a tube. And from here, I'm on this side now.
    Okay. I'm going to go through the two up beads on this side. Oh, okay. You're just gonna move your needle over.
    Yeah, you're just treating those like ex like pretend you're adding a new bead. And now we're on this side. So, we're
    going to go through the two sticking up on this side. Okay. Go through those two there.
    Okay. Last but not least, we'll go through the two on this side. Now,
    you know, it's it's um I don't know if you sewed at all, you
    know, when you were younger. It just reminds me of all of the, you know, stitching and hemming my pants,
    [laughter] sewing on button, you know, it's really the rhythm is really uh
    I know it's not identical, but it's it's similar, you know, like it reminds me of
    that. Exactly. It's a lot like slip stitch because that seam is just going to disappear on you.
    It's actually hard to find it afterward. You'll have this little open gap at the bottom. Okay. But that's really easy to close by
    just taking your needle and heading through the tail side. Ah, and then they come together.
    And now it's a completely sealed tube. Wow. And on one side I have this really long
    strand that can become fringe. Okay. And with the rest of my working thread on the other side, I'll weave to the top
    by just traveling back up. Okay. And the order you do this in is totally
    up to you. You want to make your fringe first, go ahead, make that fringe first. And if you want to do the top of the
    tassel first, you can do that first. So, okay. Whatever you like doing. [clears throat] Gotcha.
    I'm going to get some 11 O's now. So, some 11 O seed beads and a real pretty
    emerald green. Yeah. Nice. I do have the colors that are going to be in the kit, so I'll show
    everybody what ended up in the kit. Oh, yeah. I can't wait to see that cuz I
    kind of stashed those when I was I knew it was going to be greenish so I went with like greenish color. [laughter]
    [gasps] And so when you have this top of the tube, if you look at it, you can bict it directly by going across.
    Very interesting. Be doing is on one side you'll be skipping two and then there will be a back side where you're skipping three.
    Okay? But we're going to be adding the bead um this one here. Okay?
    And jumping over to go through the other side. So, see, we're exiting out of this one. Okay. And we'll jump over and go through
    there. But before you do that, pick up an 11 O. And then go through the bead.
    Okay. One more 11 O. And then here's that jump.
    Skipping to it. Actually, doesn't matter which one you do, but it will kind of create a front and a back a little bit.
    So, there you go. There's the top tassel. [snorts] And for now, you can go ahead and weave this one in if you'd like.
    Um, but if you want to reinforce it, which I kind of recommend doing, you can go down through a next bead here.
    Okay. Up through the adjacent, up through the one you were just coming
    down from. Gotcha. Head back through the whole bead. Try not to skip those
    11s. Make sure to get through those two. and then through the work on the other side. You can repeat that once, even
    twice more. Then just weave into the work and trim it. Okay. So, you've got that all ready to go.
    So, you have like your little body. Yeah. And and really, you just, if I hear you
    correctly, you know, it that that bead and that size are really what's most
    important to choose from in your kit. Because if if you don't have that
    particular bead in your bead soup, then then there'll be like I know that there were some big gemstones and stuff in
    there too that somebody could use. So yeah, this would work. Yeah, gorgeous brown ones would work.
    Yeah. Yeah, there's everybody's got some different stuff. And in fact, I had to
    make some more kits and I have to make I have to make some more of those little baggies with with, you know, those types
    of beads. So, I had three of them in mine,
    the three of those kind, but I feel like I'd love to see one I would love to see one with this bead on it even or like
    but I also think the gemstone would be gorgeous. I know [laughter]
    there I'm looking at I'm looking at the kit right now and it's a trip. I'm just like, oh my gosh.
    So cool. Yeah, there's just like a lot of really cool beads in this kit.
    But that so that's an easy way to do a tassel. Honestly, like it's the like super fastest way and it's a bead soup
    stash buster. You can use up any beads you want because from here on just go crazy with um I'm going to grab what I
    have left from the kit and then I have a little stash which I think is I have a July kit.
    If I need more beads, I can dash into that one and get those. So funny. Yeah, there it's all check glass. Yeah,
    David, I don't know David if you're asking about this kit or if you're asking what we're doing on whatnot, but
    what um I'm what's going on on whatnot is all it's vintage check glass. Um some
    preworld war German glass and some modernday check glass. So I don't I'm
    not sure David check glass question mark which project you're talking about. That
    is so beautiful. Oh my gosh, I just want to do that. Now I can see
    I was telling Danielle that a very very uh well-known and just very talented and
    accomplished designer more so in the craft world than the jewelry world um
    wants to buy one of the kits because they want to make Danielle's necklace. So [laughter]
    I was like, "Oh my god, totally. I gotta send you this one.
    There won't ever be two that are the same because you just go freestyle. Both the chain
    one for Texas. I wonder if I could get it to you when you had you could just ship it to Texas.
    I could just have you ship it to Julie's house so that we could have it for and for jewelry con.
    I can send it to you. Yeah, I'll give you Julie's address. Oh yeah, that'll be good.
    Yeah, then we can show it off to um everybody. I'm going to grab some slightly larger
    beads just out of here for for effect, you know, just to kind of show there's no rules for how to do this. Um,
    well, the technique is just so great that you can use the kit beads. You can use beads from other kits that you know
    you've bought from for the jewel box. And I'm trying I think that's Havasu.
    Is that This one is old. This is one that I pulled from my, you know, stash
    that I have going in there. I'm pretty sure that's that's Havasu.
    That's really nice. Yeah. I think the secret to making making cool
    tassels is there is a little bit of a rhyme or reason to the
    uh way you do the fringe, which is again freestyle. But if you want to start with some little smaller beads at the top,
    see how I'm kind of focusing on the 4 millimeter to the 5 millimeter sizes. Yep.
    And then as you kind of curl the bottom, you add a little bit bigger ones and then vary the length. Make those lengths a little different.
    But other than that, just go crazy. Do something that you want to do. If you have a special bead in there, it's like a story. Anything that you feel inspires
    you. Yeah. And then break the rule every once in a while for texture. So here you see I put
    a large bead at the top. Yep. So just whatever you feel like it's just
    totally at your at your whim. But the basic pro idea is to string one 11 O.
    Yeah. Okay. Your your thread will be exiting from the bottom from one of these and it doesn't matter which one. Okay.
    11 O. And then um let's see I find one of these chip beads. This is a gemstone
    I think. Chip. And we'll just space each of these
    with an 11 O. Let me grab a few more. See if I can
    find some. And here's a chip bead. It's a nice one.
    Go with one of these. I did use all those gemstones.
    Yeah, the gemstones are that I love gemstone chips. Like I when I first
    started back in the late 1990s doing this, I mean chips were
    chips were it. Like I I feel I don't know that we were limited to
    chips, but I just feel like there was an abundance of chips. I don't
    know. I don't know. Maybe round evolved. I don't know. I wonder if John knows the answer. He's I know he's the check
    daddy, but he might know. I think it'd be cool if like maybe for some of your future kits if he does more
    bead suit like you had in there. That was really cool. Yeah, I liked that. Yeah, really is inspiring.
    Yeah, there's um the the next few months are all based on this
    to keep it simple bead soup kind of concept where there's just a lot of different beads.
    So many gorgeous ones. So the length is up to you. Whatever you want to do is really good. And then so
    after you've strung something that you like, anything you want. I think I went a little long on this one. Pick up one
    more 11 O. Yeah, it does. And then head up through
    all the beads, but skip that last 11 O. Yeah. Yeah. That one hanging.
    Imagine becomes your turning bead. Then that's all you got to do.
    John, we'll be living in Chicago at some point. I can just see it now. [laughter]
    I would love to visit his warehouse. I know. Nle went for me last time and did some Yes, I know.
    purchasing like, oh my goodness, I love it. Yeah, it's
    And Laura is a sweetheart. Laura works there. Oh, yeah. I think she's helped me before
    with some orders, too. She's actually like a phenomenal designer and not just jewelry. Like,
    she's a fashion designer and the clothes that she makes are ridiculously cool. Oh [snorts] my gosh, that is awesome.
    Yeah. Yeah. So, there's your first strand. This one is really whimsical.
    Yeah. That's nice. Um once you've got your first strand on, it's really easy. You just make a turn and head down through the adjacent stack
    of two there. Yeah. And when you pull that through and tighten. Yeah. The cool thing, too, is it's just
    making that tube even more secure. Yeah, it is. And there is an optional
    step that I didn't include in the instructions because it's not really needed, but if you want it to be totally
    crazy, you could um run an additional set of fringe strands through the center
    of the tube that exit out of this bead. Oh, now you're talking. Yeah, because you know how we were when
    we were attaching it, the next step is going to be to bring a new strand through
    to become the chain. So the chain would just basically go through this bead.
    And if you want, you can use beading wire so you don't have to reinforce. But there's basically your necklace chain, right?
    Yeah. I was Are you using wire or fire line?
    Um, so for the for the fringe, I was using fire line. It's a little thinner. It's a little thinner. Yeah. Okay.
    Strong, but still has some motion. Yes. Yes. But for the chain, fire line might be the uh sorry, wildfire might be a
    better choice because it's going to be thicker and it's going to or stringing wire like you said, like 49
    maybe or something. Yeah. If you use fine beading wire through here, it will save you having to
    reinforce because you know when you make a beaded chain with beading thread, you want to go through it two times.
    Okay. And the way I wrote it up in the instructions is you start with one side and you string a chain
    and you go through here and then string the rest of the chain over here and then attach your clasp,
    make a turn and come all the way back. Travel all the way back through and tie off up here with your tail.
    Okay, timeconuming, but it works fine. Um, and it's flowy. And that is what was done here. But I thought a bit about it
    afterward. I'm like, hang on. I could have saved myself a few minutes if I had just put some fine beading wire through that and I could have just crimped it.
    So I think either way, whatever you want to do is great. So I put that as an option on CF if you like it. So stinking
    cool. So that is that is it in a nutshell. The rest of it just rinse and repeat.
    All right. Well, I'm going to go. Um, Joan, can you just put my overhead on really quick and I'm going to review the
    kit real fast and then Yeah, there we go. You can uh Yeah. Okay. So, this is
    the March kit. There are um some left.
    I'm not exactly too sure how many. So, you've got, you know, um some gemstones
    and then like a variety. I was trying to remember for the life of me because my mom packaged all of these months ago.
    Um, not this heart, but all the beads and I was like, where did because I hit up the Santa Barbara show a few times
    and so um so who knows? But I did add some of the teal um crystal which I just
    thought was gorgeous. And I'm trying to figure out which way to go here. And so there's that fun bead
    soup. And then I'm just going to bring this in. This is like a bunch of chips,
    some gemstone chips, and then some fun. Everybody got a wood um
    a wood bead that you could choose to do something with. And oh, here are the colors for So I ended up getting an 11 o
    transparent rainbow olivine. And it's really pretty. It's It's I
    don't know why the camera is taking away the shine. Oh, there we go. So you can kind of see. And I love how
    it just really called out these colors, you know.
    Yeah. I thought it was really pretty. And then I went with an 80 transparent
    rainbow teal. So these two Yeah. So when you're doing
    when you're doing the loops, you know, and you just have like a lot of contrast between the 11 O's, the 8 O's, and then
    all of the beads that come in the kit. And like I mentioned earlier, um we did
    get the PDF in time, and so I've printed them all out. Um they're two-sided, so
    you're going to have instructions on the front and instructions on the back. And then of course you always have your tea
    and cookie, which I should have made some tea except for this is chamomile and I still have my what not to do and I
    have to stay awake. So [laughter] I'm going to I'm going to bring me up
    and then um uh Joan, if you want to throw Danielle
    back up gently. Throw Danielle back up gently and me. [laughter]
    There we go. I used your wood button in a bracelet. Oh my gosh,
    I ran a little short of my hemp, so I ended up adding some color to the end, but it worked. Oh, I love that. What did you um did you
    knot that or macra or what is that? I can't tell. It's macra. A really easy macra
    technique. Oops. Okay. Sorry. Oh my gosh, that's amazing. Oh, I'm so
    glad you used the button. Yeah. See, there's really cute. Yeah, there's components that you can use
    specifically for what I'm teaching, for what you teach, for maybe like what something you've already done. Like I I
    just try to make the kits different. [laughter]
    It just there was something fun to play with and it got a little crazy at the end because I pulled in some other colors. I ran a little short of the
    green and so I had to, you know, um, bring in another color so it started
    changing and becoming something different. That's cool that you could do that. I love that. I was experiment so I didn't know and I
    didn't get it exactly right. Yeah. But now it gave me an idea for the future. Yeah. I love it.
    I love it. And you know, I just want to um I'll pull in the finished bracelet that I did. Um, so this was my take on
    February's kit, which Danielle did not have February's kit because we were still trying to get through all the life
    things and and just, [laughter] you know, like so crazy. But, um, so
    yeah, so for March, we have our project that's going to be Danielle's French necklace. I think everyone's going to
    enjoy that. And then in April, I'm hoping this weekend to get that all dialed in. and I'll get I'll get you the
    goodies so that you can make the community for Jewel Loom um something
    delicious. And yeah. Yeah, I think that's going to be really
    fun. And um we're always using the Jewel Loom or we're doing um an offloom idea.
    It It's kind of I'm going to always be on the Jewel Loom doing
    something. I don't I don't know. I don't know. I put I did a reel of
    this. Look at these. Is that crazy? This is cute.
    This is where it all started back in the 1990s on Alen's Creative Living. So, I learned how to do this technique
    and we would literally sit around, you know, when we weren't taping the show
    and there'd be fishing boxes full of beads everywhere and um, you know, like
    I mentioned earlier, I was always sewing on a clasp, right? So, the button clasp, always sewing one on. That's what's in
    my book, in fact. And we didn't have wildfire. We had fishing line. And so,
    so the earlier bracelets, um, the earlier bracelets were woven, I
    don't know, I had one here somewhere, but anyway, they were they were woven with, uh, with fishing line or like
    Nimo. There was like Yeah, there was like white white Nimo. There was no there was no like 15
    different colors. But, um, you know, the the technique lends itself to this is
    just like a a little a brooch pen. Um, I must have put the you could do like a
    barret and of course you know you know I love my go big or um stay home.
    [laughter] So all um the month of April I will play
    around with the kit and kind of take my you know woven technique on the loom on the jewel
    loom. you'll do whatever you want. Like you have to do whatever you want and um
    whatever Danielle does is where a lot of people who love the PDF will be happy. [laughter]
    Yeah. We'll do a little set of instructions. I was like I don't do PDFs.
    I I just You don't really need it unless you have a pattern that has to be followed or like there's a thread path. If there's
    no thread path, you're so good at that. Like I have learned like just don't like if you don't do something just let someone else
    do it. So and I don't do it. I don't do PDFs. I I just never have. Um thank you
    Zach. Yeah. Those were um my favorite my favorite
    projects. So, there was something else I was going to say and of course I've lost my mind somewhere along the way, but um
    Oh, next Thursday I will be in Texas. So, there won't be a Jewel school live
    and she'll be having fun. I'll be having fun. So, um, so I will,
    um, we'll catch back up, I guess, that first Thursday of April.
    And then Danielle, you'll just have to tell me like this is, I think this is the third. I think we were kind of doing
    the third third of the month. Third Thursday. Yeah, something like that. Third or
    last. So, whichever one works for you is when we'll have you back on to do
    April's project that I'm sure will be amazing. [laughter]
    I'll let you know. Yeah, it'll be when I see it. I'll see it when you see it. Yeah, I'll see it. Yeah, we're gonna see
    it together because that's what is on my list this weekend. I have so much to do before I leave. I'm just like, "Oh my
    gosh." Um, it's always It's always like that when you have to travel. It is. But I'm so excited. I'm so
    excited. And I got my hair done today, so I don't have to wash it. And [clears throat] I might not wash it until I get there because I know that
    sounds gross. Like, we're talking next Wednesday. I might have to break down and wash it. But as soon as I get off
    the plane in that Texas heat, it's going to fall. So, whatever. It doesn't like my hair like my big hair. Um, I am going
    to be on Whatnot at 5:30 Pacific Standard Time. And um John is
    going to be in the chat, so he'll be telling stories of where the beads came
    from. I will be um making them look pretty. [laughter]
    How do folks log into whatnot? Yes. Um so Joan's posting all of the all of
    the Oh, there's links. I might pop in if I can. Yeah. Oh, there it is. Yeah. Yeah. So,
    you have to have an account. It's like you download the app, you open up an account, and whatnot is been around for
    a long time. Um, you know, I I'm not going to say more than 10 years, but I think it's been seven.
    Oh, wow. And Gary Vee, who you know, I follow and I and he's been around forever in a day.
    Um, he was the one who was who's highly recommends people pe people's like,
    where did that word come from? highly recommends that people do it. So anyway, um you open up the account,
    they're legit. Don't worry, like it's not weird, you know, because you are
    going to have to put your paying payment info. Yeah, you can do that on any website
    nowadays, though. Do that on any website. So, um it's all legit and um and you bid on stuff. So,
    that's that's the fun part is to Oh, is to watch that to see like how that
    works because I've never seen it before. I keep meaning to log in, but yeah, get distracted.
    I get, you know, I get distracted by all the vintage jewelry because that's what
    I would I'm most interested like when I'm on and shopping. I'm watch all the
    people with their vintage jewelry and I'm like, hold back, hold back. Then I bid.
    [laughter] So, it's just fun and it's such a sweet
    community. Everybody's really nice, you know. Can't see anyone's face, but there's a lot of chat. A lot of chat, so
    it's fun. But yeah, pop in and say hi if you can. And um I appreciate you so
    much. Oh, I appreciate you, too. I really do. And the community appreciates you. And this is a great
    project and everyone's gonna like just have a lot of fun making it and be empowered by it. So, you know, they'll
    be able to take this technique and make more of that necklace with their own beads or with past kits or future kits.
    So, so um everyone, thank you so much. So,
    step four of February's project, if you had February's jewel box, this was step
    four. Simple, taking it off of the loom, adding the bead button. Um, and so step
    one, two, and three are um already done. And so if you bought
    the February box, you can see that. But if you buy the um
    or did buy the March box, what I did for February, you can do for March. And what we do for March, you can more than
    likely do in April. Like I'm trying to kind of have this synergy of like the freedom that these next several boxes
    this year are going to kind of be this, you know, do what you want. [laughter]
    So anyways, a thanks Zach. We appreciate you too. Love the Juloom community. Love your community too, Danielle. I think we
    share a lot of the same people. So we do. Yeah, Zach is one of ours. Yeah, Zach is amazing. So anyh who, um,
    have a beautifully blessed evening and I will I won't see you next Thursday, but
    um, I'll see you the week after and I'm sure Danielle and and all of our bey besties will be online doing something
    amazing. And if you're in Bellacon, I'll see you in Bellacon. I'll see you for Jewelry Con next Monday, the third or
    two Mondays. So yeah, and that's going to be amazing. Your project is awesome. And so if
    you've not signed up for um Jewelry Con, I don't know if we have the link handy
    or not, but we can get it in the on the Jewel Loom page and um I can do a post
    in the YouTube community. So Bellacon traditionally is like a lot of general
    craft, whether it's paper crafting, stamping, journaling.
    Um, but we've started to interject a little jewelry and then we were like, well, let's just have an all day jewelry
    event. And so Danielle and Deb Floros and Nle
    and Eene Hull, who's a scrapbooker, but she's a jewelry maker, too. And then Amanda Stevens, who's a card maker, but
    turns out she's a jewelry maker. I'm like, "Oh my god, these girls." And then our very [clears throat] own John is
    going to be speaking to the history of check beads which is just going to be flipping amazing. Um Meredith Rowdy from
    uh Beetelon is going to be talking about the essential tools for jewelry making. So that's super exciting. And then Laura
    is going to be doing her project is incredible. And so um it'll be fun to
    get to know her better uh the community to know her. So, I think I mentioned to everybody,
    [laughter] I'm looking forward to it. Yeah, it's going to be a lot of fun. And thank you for saying yes. [laughter]
    A well, thank you for inviting me. Okay. All right. So, another goodbye and
    we'll see you again very soon. See you soon. Bye. Bye.