
SAVE 15% OFF ON YOUR FIRST ORDER PLUS GET 3 FREE PATTERNS. SIGN UP BELOW!

0

Your Cart is Empty

Shop
  • Read our story

  • Each of our carefully researched, styled, tested and distributed collections reflects a particular aesthetic and ethos. We hope some of these speak to your own style, and help you refine and redefine your own look and style philosophy in the process.

  • Jewel Loom Jewel Box Beaded Loop Bracelet

    March 27, 2026

    Jewel Loom Jewel Box Beaded Loop Bracelet

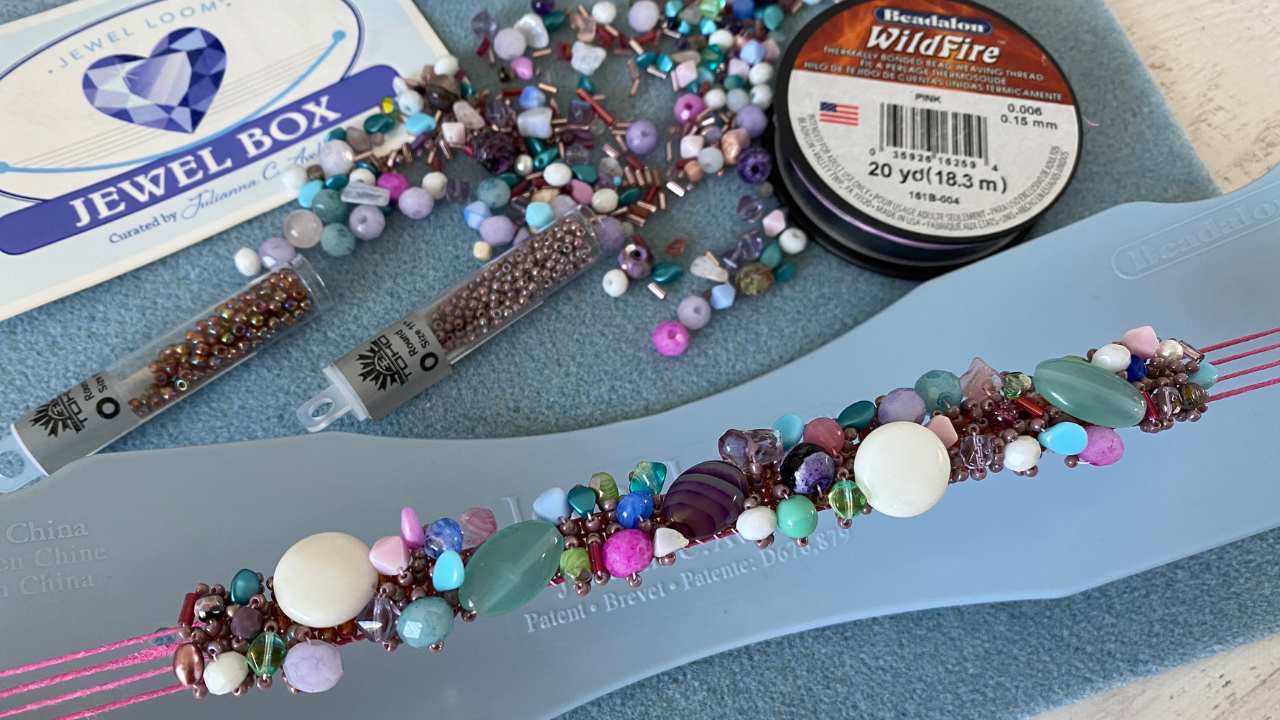
    From warping to adding a button clasp, learn how to make a loom bracelet with beaded loops to take your basic bracelet to the next level. Beginners even love doing this technique. Just start with a basic beaded loom base, then add your beaded loops. You can make your loops as large or as small as you want, just by adding more or less 11/0 seed beads to your loops. You can even use different loop sizes for a different texture. You can make these loops over the length of your bracelet or just in the center of the bracelet to cover the top of your wrist. This is definitely a technique you can make your own by changing it up to suit your taste. And this is a great technique to use up your bead soup as the center of each little loop, so you can create a different, colorful bracelet.

    This project is broken down into fofour ur parts, with each video shown below.

    In Tutorial 1, learn how to warp the loom. If you want the width of your bracelet to be thinner or thicker, just decrease or add  more warps.

    In Tutorial 2, I show how to add size 8/0 seed beads to your base, which you will use to add your loops later. 

    In Tutorial 3, learn how to create the decorative loops for this eye-catching bracelet.

    In Tutorial 4, I show you how to remove the bracelet off the loom and add a button for the closure.

    Though the February kit is sold out, you can recreate this bracelet in your own choice of colorway with size 8/0 seed beads, 11/0 seed beads, and an assortment of other types of beads. The March Jewel Loom Jewel Box would also create a great bracelet in this style. You can buy the March kit at this link (only while supplies last. Once they sell out, they cannot be restocked):  https://jewelloom.com/collections/patterns-how-to/products/jewel-loom-jewel-box-creative-soul-edition

    Find other supplies for this project, to create this bracelet in our choice of colorway, at the links below:

    Save 15% off your first order, plus Get 3 Free Patterns: https://jewelloom.com/pages/get-3-free-bead-patterns-and-save-15-percent-on-supplies

    Did you know Jewels has a Book? It’s true! You can get a digital copy of the Jewel Loom Inspirations book here: https://bellacraftspublishing.com/jewel-loom-by-julianna/ 

    You can find Jewels here:


    Transcripts:

    Video 1:

    3 seconds
    All right, welcome everybody. I love seeing everyone in the chat. Hello. Hello. Mel, Joanne, you were here first.
    11 seconds
    I'm so grateful that nobody was um being hurt in the background while you were hearing screams. That was quite funny.
    19 seconds
    Um Heather from Colorado, welcome,
    22 seconds
    welcome, welcome. Hey, listen. I'm going to get right to it. Tonight I am using the original jewel loom and we're working with the February jewel box kit.
    34 seconds
    I'm going to be warping my loom to accommodate the willow project and really it's more of an um a size idea.
    46 seconds
    So this is the willowy bracelet and basically what it means is that it's streamlined to the original very chunky
    56 seconds
    ocean bracelet pattern that you might be whoop a little more familiar with. So I
    1 minute, 3 seconds
    streamlined it so that if you wanted to make something uh quicker you would be able to do that. So I'm going to set up my loom to accommodate three 80o seed
    1 minute, 12 seconds
    beads across. All right. So again, I'm working with a jewel loom. You can see I've got the metal rod down here at the
    1 minute, 19 seconds
    bottom. I just want to give you a little logistics. Um, left hand, right hand,
    1 minute, 26 seconds
    loom is in the middle. And I'm going to take that metal rod. It's already inserted into the bottom hole. So this
    1 minute, 35 seconds
    end of the loom is facing my body. And then I'm going to
    1 minute, 43 seconds
    bring that up very carefully and snap in the top of the metal rod. I like to give it a little wiggle wiggle to make sure that the rod is nice and secure. Okay.
    1 minute, 55 seconds
    So, I'm going to bring in my hemp hemp cord. If you are, if you have purchased or you're a subscriber of the Jewel Loom
    2 minutes, 3 seconds
    Jewel Box, I recommend that you get, you know, whatever your favorite is.5 mm or one or both. Um because like with this
    2 minutes, 13 seconds
    project, I'm going to do the five the five since I'm going to be using seed beads. All right? So, you might want to
    2 minutes, 20 seconds
    order some basic colors, colors that are pretty. We're going to have um multiple pretty colors like pinks and purples and
    2 minutes, 29 seconds
    we're going to have earth tones and we're going to have gorgeous greens and we're going to have turquoise and blues and blacks and so you might just want to
    2 minutes, 39 seconds
    buy some standard hempique uh cord in bow sizes um in a couple of colors. All right, I
    2 minutes, 47 seconds
    just turned my jewel loom over and this button is closest again to my body. And
    2 minutes, 55 seconds
    I'm going to take the end of the hemp hemp cord. Love, love, love. And I'm going to tie that around that back button.
    3 minutes, 6 seconds
    Okay. And then I'm going to give it another little tie here so that it's nice and taut.
    3 minutes, 14 seconds
    And then I'm going to Okay, you see how I take my left hand and I place it on the back of the jewel
    3 minutes, 22 seconds
    loom and my thumb is actually under. So it's under the jewel loom. And then my
    3 minutes, 29 seconds
    right hand has a really nice grip on the hempique cord. And I'm going to flip the loom back over and I'm going to lay it down into one of the grids. Now again,
    3 minutes, 40 seconds
    this is 0.5.
    3 minutes, 42 seconds
    If I was working with one, one would lay on the grids. Okay. But it is 0.5, so it
    3 minutes, 49 seconds
    fits in there well. Well enough. And then I'm going to keep the pressure in my right hand here. I'm going to pull it all the way down.
    3 minutes, 59 seconds
    And then I'm going to just eyeball it.
    4 minutes, 1 second
    I'm not going to get all weird about trying to count the grids.
    4 minutes, 5 seconds
    I am, however, going to make sure that that is really nice and tight. I'm going to flip the loom over again. Go around
    4 minutes, 14 seconds
    that back loom. Now, don't get so fast that you accidentally go around the rod.
    4 minutes, 20 seconds
    If that happens, you're going to lose your tension when you take the rod out.
    4 minutes, 23 seconds
    Okay? So, pay pay close attention to what you're doing. Slow your roll.
    4 minutes, 29 seconds
    [laughter]
    4 minutes, 29 seconds
    I'm going to lay the warp uh the cord down. I'm skipping one groove.
    4 minutes, 38 seconds
    And then I'm going to come back up and we're going to go three across on the seed beads. So we're going to need four warps.
    4 minutes, 48 seconds
    Okay. Flip it over again. Wrap it around that back button. And we're going to lay that down.
    4 minutes, 57 seconds
    Flip the jewel loom over. Make sure I'm only skipping one groove. And I am.
    5 minutes, 5 seconds
    And I am working off of the spool and back around the back button.
    5 minutes, 13 seconds
    Skip a groove.
    5 minutes, 17 seconds
    Come back up to the top. And now I have my four warps. And I could just do a little strum.
    5 minutes, 25 seconds
    And that sounds pretty good. Usually, if you're going to have a loose warp, it's going to be this first one because
    5 minutes, 32 seconds
    that's usually where people lose the tension when they're holding on to whatever thread they might be using,
    5 minutes, 39 seconds
    whether it's wildfire, fire line, be whatever all those things are called [laughter] and the hemp cord. Okay. Um,
    5 minutes, 45 seconds
    so that's just normal and you know, you just need to practice. Don't don't be hard on yourself. So, I'm going to flip it over again, and I'm going to wrap
    5 minutes, 55 seconds
    around that back button a couple of times. And then I'm going to bring my scissors in.
    6 minutes, 7 seconds
    And I'm going to tuck under.
    6 minutes, 13 seconds
    I [snorts] just I just took the tail and I wo it under all the warps.
    6 minutes, 20 seconds
    And then I'm going to go back through that loop. All right. Now, the goal is simply to to get a knot. And if you go
    6 minutes, 28 seconds
    about that step differently, that's okay. But that's just how I do it. Okay.
    6 minutes, 35 seconds
    So, I do see in the comments that people are saying that they're not seeing this on the Facebook. So, a lot of people um
    6 minutes, 42 seconds
    I don't know if we want to go post over on the Facebook and tell them to come on over to the um to the YouTubes.
    6 minutes, 49 seconds
    And I just do it a few times. Okay. I just want to make sure that everything is nice and tight.
    6 minutes, 57 seconds
    All right. Now, another thing I want to point out, all right, is you see the distance between the bottom of the jewel
    7 minutes, 4 seconds
    loom here? This little where it's curved and you see the top row of the warps.
    7 minutes, 10 seconds
    The distance from these warps to the belly of the jewel loom should never be more than 2 in. So, if you're pulling
    7 minutes, 18 seconds
    your warp so tight that your jewel loom is is bowing more than that 2 in, you're really putting a lot of stress on it.
    7 minutes, 29 seconds
    So, be conscious of that. Um, and just know because that's a really great tip to know. Now, what I'm going to do is I'm going to remove the rod. Okay. Now,
    7 minutes, 39 seconds
    I like to use my body, my belly.
    7 minutes, 43 seconds
    So, I'm just very carefully going to pop that out. Don't ever force the rod to come out. If if it didn't come out right
    7 minutes, 51 seconds
    now, what I would do is I would simply turn my loom and then I would try to um take out the rod from the other side.
    7 minutes, 58 seconds
    And it usually works that way. But just don't ever force it. You don't want to You got to remember what's the what's what do I always say? The Jewel Loom is
    8 minutes, 7 seconds
    made out of a [snorts] flexible plastic,
    8 minutes, 14 seconds
    right? not a bendable one. So, just be kind to your Jewel Loom. All right, so
    8 minutes, 21 seconds
    we've got our Jewel Loom warped. This is the project that I am going to be doing over the next couple of weeks, but now
    8 minutes, 29 seconds
    I'm going to bring in the kit. I'm going to talk to you about the beads. Okay, so let's bring this in. It's absolutely gorgeous. When we went on air, there was
    8 minutes, 39 seconds
    only one left. So, if you don't have one and you want one, you might want to get on over to Jewel Loom and see if you
    8 minutes, 48 seconds
    can, you know, be that lucky one. All right, cuz every month, you know, we've only got so many. Um, starting over here. All right, this is February's kit.
    8 minutes, 59 seconds
    I And by the way, Marlon Brando's in the back. And you know, he only snores that loud when you all are here. Like he he
    9 minutes, 8 seconds
    holds it for Thursdays. Okay, so we got a cookie. We got some tea. I always try to put the cookie and tea. I think I've
    9 minutes, 15 seconds
    been doing that for 5 years now. Into your little baggie. There's always a little baggie. Um, Mama Bev made the
    9 minutes, 23 seconds
    stickers so that you know what month goes with what box. Way back in the day,
    9 minutes, 29 seconds
    we didn't do that. And then everybody would be like, "Oh, what project was this?" And I was like, "Oh, I guess it'd be nice if I told you." Um, [laughter]
    9 minutes, 39 seconds
    so, so you'll have that. This month I gave you a bonus strand of lasered
    9 minutes, 45 seconds
    two-hole beads because why not? They're not exactly relevant to what we're doing, but sometimes I just like to give you gifts. So, you're welcome.
    9 minutes, 56 seconds
    [laughter]
    9 minutes, 57 seconds
    Okay, we've also got these elephants that are just totally to die for.
    10 minutes, 2 seconds
    They're earrings, by the way. So, you would just put your fish hooks up here. Um, get some headpins, make your loop,
    10 minutes, 9 seconds
    and put some beads on there and call it a day. You've got a button.
    10 minutes, 15 seconds
    Um, this actually I do believe these have holes. It's going to be kind of funny if they don't.
    10 minutes, 23 seconds
    I know there's a hole in there somewhere. Anyway, you've got some some gemstone. Um, every kit, by the way, is
    10 minutes, 31 seconds
    going to be slightly different. So, you might have a face in your kit, you might not. You might have an elephant, you might not. You might have some other
    10 minutes, 39 seconds
    cool stuff. So, this is kind of like just a fun little baggie that I I put
    10 minutes, 45 seconds
    stuff in. Okay. Um, this here, this collection.
    10 minutes, 52 seconds
    All right. So, this is what I would call like a mix. I would say these two combinations right here. When you get your baggies,
    11 minutes, 1 second
    these are what I would refer to as like your filler beads. Okay. So, when we
    11 minutes, 8 seconds
    start sewing onto these projects, and I'm going to bring it in so it makes more sense.
    11 minutes, 14 seconds
    And I feel like I feel like the willow would be a good
    11 minutes, 20 seconds
    example. So, you see how we've got seed beads on the loop here? And then this is what I call a decorative bead. Okay. Um,
    11 minutes, 32 seconds
    is there a little guy somewhere? Like maybe this little guy. See that little guy? That could be like a filler bead.
    11 minutes, 40 seconds
    This is definitely a decorative bead.
    11 minutes, 43 seconds
    This is a focal bead. So, these projects tend to have like filler beads,
    11 minutes, 49 seconds
    decorative beads, focal beads, main beads, and really it just depends on [laughter]
    11 minutes, 57 seconds
    on what you want to use and what you want to call them. But I do feel like I hope that that makes sense. All right.
    12 minutes, 5 seconds
    Um, so again, kind of getting back to these two containers,
    12 minutes, 13 seconds
    a mixture of filler beads and like some little tiny focal beads.
    12 minutes, 19 seconds
    Getting into your bigger guys, getting into your gemstones. Look at how delicious those are. Everybody's got a baggie full of those gemstones.
    12 minutes, 30 seconds
    Um, we've got some more gemstones over here. So, so these would be like main
    12 minutes, 37 seconds
    beads, right? They could be like the main um let me bring in
    12 minutes, 46 seconds
    let me bring in Grandma Avalar's bracelet. This is the bracelet I made the night that my grandma my Portuguese grandma passed and I worked on this
    12 minutes, 54 seconds
    until 3:00 in the morning. And so it's a combination of the earth tone colors,
    13 minutes
    everything that she was, you know, was raised out on a ranch with her after they came to this country. And so you see like this guy, you know, that bead.
    13 minutes, 12 seconds
    So your bigger beads are just going to be again like a statement bead. Um the bigger they get, I kind of like to refer
    13 minutes, 19 seconds
    to them as focals. So maybe like these guys, these could be like a focal bead because that's a lot. It's big, right?
    13 minutes, 26 seconds
    So you have like if you look at those two and then you look at the willow bracelet and and this is also where you could
    13 minutes, 35 seconds
    bring in like one of your fun um beads that I've put in your kit. And again,
    13 minutes, 41 seconds
    everybody's kits pretty much going to be a little bit different. Not all kits were identical. They were mostly similar, but definitely not identical.
    13 minutes, 52 seconds
    So that's going to make it fun, too. All right. So, I hope that helps you to understand um you know the idea of of the beads.
    14 minutes, 2 seconds
    And then Oh, yeah. And then I included your 11 O's. So, you're going to get 11 O's and you get going to have 8 O seed beads in the kit.
    14 minutes, 14 seconds
    And they're going to match. [laughter]
    14 minutes, 17 seconds
    They were all different. Again, there's going to be like different color combinations. Some of them were the same, but that's what makes this season
    14 minutes, 24 seconds
    of jewel box uh very different. And let's see, is that is that Oh, I forgot these precious uh gemstones. Yeah. So,
    14 minutes, 33 seconds
    this kit in particular has a lot of gemstones in it. And even if you look over here, you can see Oh my gosh, come on now. Tell me that's not delish. So,
    14 minutes, 44 seconds
    this is a big guy. you know, he could probably go with my my focals over there, but he ended up in this bag.
    14 minutes, 52 seconds
    So, you can always look at all the beads and you can kind of lay them out and separate them however you want, but you
    15 minutes
    kind of will hopefully now have like a better idea of like why did Juul put so many beads in so many different baggies?
    15 minutes, 8 seconds
    I mean, not for nothing, I guess I could have put them all in one, right? But I I at least for this time I want you to understand the method to the madness.
    15 minutes, 16 seconds
    Okay. So I'm going to go ahead. I'm going to move this over. I'm not really seeing any questions about that.
    15 minutes, 23 seconds
    Um so we're going to scooch that over.
    15 minutes, 25 seconds
    And now I'm going to bring in all the finished designs that we've done.
    15 minutes, 34 seconds
    And there are instructions in the school.
    15 minutes, 40 seconds
    There are instructions here on the on the um in the YouTube. And so let's just do like a little history here of how
    15 minutes, 48 seconds
    this happened. Um we're going to scooch over again. This is the bracelet that I started off with many many moons ago in
    15 minutes, 57 seconds
    the 1900s when I was on Lean's Creative Living and I got addicted to bead weaving. Um this was the bracelet that I
    16 minutes, 6 seconds
    made the night grandma passed. So, lots of memory, all about her. Um, my Portuguese heritage, you know, the fact
    16 minutes, 14 seconds
    that she came to this country from the Azors,
    16 minutes, 17 seconds
    uh, just, you know, it's all about all about Grandma Avalar. Um, if you have the Jewel Loom inspiration book, you
    16 minutes, 25 seconds
    have instructions on how to do the ocean, um, ocean's desire bracelet and the same concept, different color palette, bigger clasp.
    16 minutes, 39 seconds
    I will tell you a quick little story. I had to run to a local bead shop when I was shooting the book and making these
    16 minutes, 48 seconds
    projects. And I can't even begin to tell you how much money I spent on this stinking class. Holy guacamole was it
    16 minutes, 57 seconds
    expensive. Um, but I needed it and it turned out to be pretty pretty stinking cool. So, I think it's a little tarnished probably from being at the the
    17 minutes, 6 seconds
    beach. So you have some examples of like where the concept of um you know laying out the bracelet
    17 minutes, 15 seconds
    going six across. Okay, going six seed beads across and then sewing lots and lots of sewing big beautiful bold bracelets.
    17 minutes, 28 seconds
    And then we started to think about, well, maybe somebody doesn't really want to bead the whole thing. And so we'll just do the center.
    17 minutes, 39 seconds
    And so on this one, you can see that the bracelet is just sewn in the middle. We
    17 minutes, 48 seconds
    sewed on some um feather charms. This is a variegated hemp cord by Hempique. And
    17 minutes, 55 seconds
    I love love love the I mean look at how fabulous the hemp cord just like it turns into an
    18 minutes, 4 seconds
    even bigger rock star than it already is. Um so you have that idea. Here's another example of that where we did a
    18 minutes, 14 seconds
    thinner bracelet, a thinner bed, a thinner foundation,
    18 minutes, 18 seconds
    and we sewed in big loops and we took one of the big gemstones. That's why I threw one one of the big rocks into your
    18 minutes, 27 seconds
    kit. Um, and here's another example of that. I actually taught this one at the Mall of America one year.
    18 minutes, 36 seconds
    So, you could see where we were starting to streamline and then, you know, it got to what I warp the loom for today, which
    18 minutes, 44 seconds
    is the willow. So, this is three across and these are 80 O's. If you are going to sew, if you're going to do the sewing
    18 minutes, 53 seconds
    technique, you need to use the 8 O's because the 11 O's are just going to be too too small for that needle and thread
    19 minutes, 1 second
    to keep going through it. Okay? So, I really need you to to um write that down, remember it. Okay? I love this bracelet. One of my faves. All right?
    19 minutes, 13 seconds
    So, that's the willow. And then from there, you can take the technique of making your base and sewing things on.
    19 minutes, 21 seconds
    This is a um like a little meditation prayer pouch. I've got a big old hunken rock gemstone. Whoopsie. In there.
    19 minutes, 33 seconds
    Um this one was actually a course and I've got video on how to make this one.
    19 minutes, 39 seconds
    I do believe this one is still in the school. So, if you see any of these and you're just like, Jules, can you direct me to the instructions of how to make
    19 minutes, 47 seconds
    XYZ, then just email me, okay? So that I can throw you into the course or tell
    19 minutes, 55 seconds
    you where to go. Um, you can also use the technique to do like a little pendant. All right? And so we used a
    20 minutes, 2 seconds
    slider. Um, you can, you know, clip that onto an existing necklace. And then we
    20 minutes, 10 seconds
    used a little crystal point. I love these. I think these are super cool. Um you can also do earrings. So it's all
    20 minutes, 18 seconds
    the same all the same technique and just so many ideas. That's why I was like, you know what? We're going to throw it back to the 1990s.
    20 minutes, 28 seconds
    We're going to bring inspirations by Juliana back. And I have something really special to show you here in a second. So, earrings and you know my
    20 minutes, 37 seconds
    favorite go big or go home rings. You certainly don't have to be as crazy as me with your rings. Um here's one with
    20 minutes, 44 seconds
    the gemstone chips. Whoops. Okay. Same technique, different look.
    20 minutes, 51 seconds
    Um I even found a pen, so like a lapel pen that I did, oh my gosh, sometime in the 1990s.
    21 minutes, 1 second
    So, I made the piece and then look at I glued it on to this. This is old. You could see the rust. How crazy is that?
    21 minutes, 8 seconds
    But here's an idea. You can also do that same thing with barretes. So, you would just get a barret, right?
    21 minutes, 17 seconds
    Whoa. Glue the piece that you made on. So,
    21 minutes, 21 seconds
    super cool. Um, and this I actually did on jewelry television. There is a PDF available for this.
    21 minutes, 31 seconds
    And so you've got like the little um I made like the little um what like the barrel, you know, to slide your silver
    21 minutes, 40 seconds
    silk or something through. So there are instructions on this and it does have a matching
    21 minutes, 48 seconds
    a matching ring. That's just the old school um ring technique. So you've got all these ideas and this is what we're
    21 minutes, 56 seconds
    going to be doing. And it's going every month it's really going to be up to you what you want to do with your kit. You know, do you want to make a full-size bracelet? Do you want to narrow it down?
    22 minutes, 8 seconds
    Do you want to go thin and do the willowy technique where you can get this one done very quickly? Do you want to
    22 minutes, 16 seconds
    make a meditation pouch? You know, do you want to make rings, earrings, um pendants?
    22 minutes, 24 seconds
    Make your base, sew on your beads. It's going to be all the same technique, just
    22 minutes, 31 seconds
    um different outcomes. And so I do want to share with you really quick. I'm going to move this over. Let's just do a pan. Delicious. Delicious. Yummy. Yummy.
    22 minutes, 41 seconds
    Okay. So, let me just bring in this other [snorts] um Oh my gosh. Every time I look at this, I
    22 minutes, 49 seconds
    want to just I don't know. Cry. Tears of happiness, you guys. Tears. This is where it all started. Look at all this.
    22 minutes, 55 seconds
    So, these were all of my bracelets that I did back in the 1990s. This is where it all started out. We were using fishing line.
    23 minutes, 6 seconds
    [laughter]
    23 minutes, 8 seconds
    We were using fishing line and nimo thread. That's how fancy we were. And we were gluing. Look at all that glue. This
    23 minutes, 16 seconds
    is like 30. It's got to be at least 30 years old. And then we did nothing but sew on the clasps. like there was no
    23 minutes, 24 seconds
    hemp cord. We were not adding w, you know, wood buttons of any kind. We were
    23 minutes, 30 seconds
    sewing on all of our clasps. Um, and all of these had names. I used to sell these
    23 minutes, 38 seconds
    kits. Look at this one. I can't remember that really stinking cool company that did these charms back in the day, but look at them. Isn't that awesome?
    23 minutes, 48 seconds
    So, they're just so many things. This was This was Celestial Dreams. This was a very popular kit,
    23 minutes, 55 seconds
    but oh my god, it's so thick because because we would glue them because again we were using fishing line and um and
    24 minutes, 4 seconds
    really thin Nimo thread. So, it's funny how how we've advanced. I can't remember if this was a kit. This might have just
    24 minutes, 11 seconds
    been a project. Um I think this was called Earth. Look how pretty that topaz bead.
    24 minutes, 22 seconds
    Oh, and I love love love this one. This is where I took like an old necklace apart and I used all of these. And again, these are all like 30 years old.
    24 minutes, 30 seconds
    This is where it first started. And then look at this guy. This guy's like falling apart.
    24 minutes, 36 seconds
    But look at how pretty. Just so many different ideas. And again, um you know,
    24 minutes, 42 seconds
    one of the gorgeous greens And there were no bead shows. I literally was getting cataloges mailed,
    24 minutes, 52 seconds
    okay? Not on the interwebs,
    24 minutes, 55 seconds
    uh, from, you know, a company in New York. I had a company here in California. And I would sit there with a
    25 minutes, 2 seconds
    catalog and I would just wing it and make all these kits. But this is where
    25 minutes, 9 seconds
    it all started and this is where we're going. We're going to have so much fun with these kits over the next several months. My plan is to keep doing these.
    25 minutes, 20 seconds
    And yeah, so let me come on up. We'll switch cameras here.
    25 minutes, 32 seconds
    [laughter]
    25 minutes, 34 seconds
    I've been trying to keep up with um AI is interfering with my live choices. Oh,
    25 minutes, 39 seconds
    let me get this out of my face. I don't know what that means with your live choices. It's telling you what to do.
    25 minutes, 45 seconds
    It's picking things for you. Um I saw that Carmen was in here. Hello. And I did say hi to Mel.
    25 minutes, 52 seconds
    So good to see everybody. Sherry, hi.
    25 minutes, 54 seconds
    Oh, good. You got your box. I never know how ex long they're exactly, you know,
    25 minutes, 58 seconds
    going to take, but um yeah, so this month's box has a letter in it from me
    26 minutes, 6 seconds
    to you with a bunch of links on, you know, if you bott what you need to do, where you can find information.
    26 minutes, 15 seconds
    And as always, just email me, reach out to me. For subscribers, you got a phone number.
    26 minutes, 24 seconds
    It's personal, okay? [laughter]
    26 minutes, 29 seconds
    Remember that I'm in California. Don't wake me up in the middle of the night.
    26 minutes, 32 seconds
    [laughter]
    26 minutes, 33 seconds
    But if you need me, um, you now really have me. And uh again, that's a personal personal number. So you have that in your you should have that in your box.
    26 minutes, 44 seconds
    If for some crazy reason you don't, just just email me and I'll give it to you. I want to be able to help you because this
    26 minutes, 51 seconds
    is kind of a I don't really want to say it's freestyle, but in a way it's kind of a freestyle season.
    26 minutes, 58 seconds
    I received a very cool awesome to hear. Awesome to hear. Thank you. Thank you,
    27 minutes, 4 seconds
    Caroline. So, yeah. Um, I I don't know if there's any more questions. Joan, do you have any input on uh what we're doing? [snorts]
    27 minutes, 18 seconds
    I can't hear. We can't hear you
    27 minutes, 20 seconds
    [laughter]
    27 minutes, 21 seconds
    here. Oh, maybe if I just add you. Yeah. Wait, don't wait just a minute. Um, there we go. There we go.
    27 minutes, 28 seconds
    Sorry. Um, I hit the wrong button. Don't forget to tell them about your whatnot show and what's going to be on it.
    27 minutes, 34 seconds
    Yes. Okay. So, um there's a Wattnut show. There's going to be a Wattnot show every Thursday. Tonight it's at 5:15 and I have gorgeous 3mime, 4mimeter,
    27 minutes, 47 seconds
    6 millimeter, and 8 millimeter fire polish and it's beautiful. It's the crackle finish that's very hard to find.
    27 minutes, 56 seconds
    Um, I know what not is kind of a mystery to a lot of you, but those of you that have figured it out, have come on over
    28 minutes, 2 seconds
    and and had a blast. You absolutely do not have to buy anything, okay? But I do have unbelievable deals for you over
    28 minutes, 12 seconds
    there. A lot of it is vintage um vintage check. That's the the shape of the bead
    28 minutes, 21 seconds
    may not be being made anymore. the um color may not be, the polish may not be.
    28 minutes, 29 seconds
    So, a lot of it is vintage glass that's like 20 plus years old. There's beautiful buttons. It's all stuff that I don't carry in the shop or put into the
    28 minutes, 39 seconds
    kits. Um some of it's big and bold, some of it's some of it's small and and in
    28 minutes, 46 seconds
    every color. So, I know we had the link up here at one point. You don't they don't have to scroll up very far to see it.
    28 minutes, 54 seconds
    Okay. You don't have to um You don't have to I think I see it. Let me see. Is this it?
    29 minutes, 3 seconds
    Yeah, because I have the link to the show. So, I looked it up and then $15 if they're new to it.
    29 minutes, 11 seconds
    Oh, those are not the choices I want.
    29 minutes, 13 seconds
    Yeah. So, um, you just you you download the app, you open up an account, and
    29 minutes, 22 seconds
    there are several people on here who have figured it out and who come over. Um, and it's just if it works for you,
    29 minutes, 30 seconds
    awesome. It's not ever a forced mandatory like you have to come.
    29 minutes, 36 seconds
    [laughter]
    29 minutes, 37 seconds
    Okay. Mustang 73 is saying, "It's a fun time in Great Beads." Yeah, we went a couple Saturn, not last Saturday, the
    29 minutes, 45 seconds
    Saturday before we were on I John and I were on for was it four hours or five hours? Like I literally could not speak.
    29 minutes, 55 seconds
    [laughter]
    29 minutes, 56 seconds
    Oh wow.
    29 minutes, 58 seconds
    But we were having so much fun and people were getting what they wanted and um the pricing is is phenomenally. It's
    30 minutes, 6 seconds
    just great. So um if if you want to come over, Awesome Sauce. So then I mean if they don't have to stay the whole time
    30 minutes, 13 seconds
    either. You can just drop drop out come back again later or whatever people. Okay, I'm just going to tell on
    30 minutes, 20 seconds
    myself. So I watch a lot of the um vintage jewelry shows because I am actually working
    30 minutes, 28 seconds
    on producing a vintage jewelry show. So I'm trying to learn from the the best over there like what
    30 minutes, 37 seconds
    are they doing and you know like you know just to learn right like we all learn from each other. So, one night I
    30 minutes, 44 seconds
    just fell in love with this one this one um presenter and she was speaking so softly. I fell asleep. [laughter]
    30 minutes, 54 seconds
    Fell asleep watching whatnot.
    30 minutes, 57 seconds
    Still managed to somehow buy two things
    31 minutes
    [laughter]
    31 minutes, 3 seconds
    in your sleep. It's like [clears throat] I don't know. There's something mesmerizing about the whole channel. Like I don't know. I just I chill out. I just like like talk to me.
    31 minutes, 16 seconds
    Wake up in time so I could buy something, you know? It's just
    31 minutes, 19 seconds
    [laughter]
    31 minutes, 20 seconds
    that Hi, CeCe. Oh my gosh. So great. And then it's really kind of fun because everybody has like a code name. Not Not
    31 minutes, 28 seconds
    It I would say the majority of people do not come on as Joe Smith, right? They come on with some
    31 minutes, 35 seconds
    handle. And so everybody has like, you know, we're all calling people by their handle and it's hysterical.
    31 minutes, 42 seconds
    Anyway, it's just a fun time. It's just a fun time. So, [laughter] and I like to put the effing fun.
    31 minutes, 51 seconds
    I'm glad that's what it said. [laughter] I like to put that.
    31 minutes, 58 seconds
    Um, again, there was only one February kit when I went. Um,
    32 minutes, 4 seconds
    I'll see if it's still there. Yeah. See if it says sold out or not. Um, and so hopefully though there will be more
    32 minutes, 12 seconds
    March kits. I think there's going to be more more. It's still available.
    32 minutes, 18 seconds
    Okay. Okay. So, as of 4:30, it was still available.
    32 minutes, 26 seconds
    [laughter]
    32 minutes, 27 seconds
    All right. So, if you're going to do the Willowy project with your kit, you want to do four warps. I used 0.5 mm uh hemp cord.
    32 minutes, 38 seconds
    And then next week we're going to do our base. We'll start sewing in our 80 O's.
    32 minutes, 44 seconds
    And then from there we'll start doing the sewing technique and we'll be working towards making
    32 minutes, 51 seconds
    a streamlined bracelet.
    32 minutes, 55 seconds
    I know this is Well, this is the one I did a couple years ago, I think. I know you've been showing it all, you know,
    33 minutes, 1 second
    all night, but it's also really cool further back. You know, you imagine seeing like if I'm shopping and you see it like across the room or something.
    33 minutes, 10 seconds
    Yeah.
    33 minutes, 11 seconds
    Yeah. You're like, hide it in your pocket so no one tries to take it.
    33 minutes, 15 seconds
    [laughter]
    33 minutes, 17 seconds
    So, yeah. So, get your loom uh ready,
    33 minutes, 20 seconds
    your jewel loom. If you uh you could also do this on the small wisdom warrior. That's going to be the same footprint. So, you could do that,
    33 minutes, 28 seconds
    but I'll be working on the original jewel loom.
    33 minutes, 33 seconds
    And if you have a real tiny wrist, you could do it on the baby loom. That would be tiny. That'd be very tiny. But yes. Yeah,
    33 minutes, 41 seconds
    we I don't know if we still do, but we used to have a couple people with really tiny wrists on here.
    33 minutes, 45 seconds
    You did? Oh, who was that? I know Nicole had a little Nicole and there was somebody else. And I had a tiny hand.
    33 minutes, 52 seconds
    Yeah, I know there was at least two.
    33 minutes, 54 seconds
    There were two people who had really tiny wrists and I can't think of the second person now.
    34 minutes
    Anyway, okay guys, I'm going to go ahead and let you go. Get get busy. Get your warps on. Again, please email me if you
    34 minutes, 10 seconds
    need access to one of the projects that you saw. Um Oh, Melanie says Maria had a small wrist.
    34 minutes, 19 seconds
    Marie. Okay. Okay.
    34 minutes, 22 seconds
    And yeah, you know what? I do remember her saying that now. I do remember her saying that. Melanie, you've been killing it. Your projects are just like
    34 minutes, 31 seconds
    [laughter]
    34 minutes, 32 seconds
    I mean phenomenal. Your warps are spectacular and your color combinations and everything that I see on Tik Tok and everywhere I happen to be scrolling. Um,
    34 minutes, 45 seconds
    so my heart is full and you're just doing a great job. So,
    34 minutes, 51 seconds
    okay everyone, I'm gonna check out and see you Stephanie. Let me know if you have any questions or if you need access to anything. You're doing perfect, Mel.
    35 minutes, 2 seconds
    All right, we'll see y'all next Thursday. Bye.
    35 minutes, 8 seconds
    Oh yeah.

    Video 2:


    Alrighty, welcome in everyone. Oh my gosh. Welcome to Jewel Loom School Live.
    Um, I'm in a little bit of a new spot back in back in my old studio space. I
    needed a little bit more light, but I do kind of feel like I'm in a cockpit, [laughter] like an airplane. It's kind of
    interesting. I I should probably get like something pretty behind me. Anywh who, today we are going to be working
    with the jewel loom. And if you recall last week, we did add our warp threads.
    And I'll make sure that the link to that is um in the show here and a part of the
    video. So, we're going to be doing the Willowy base. This is three 8 O's
    across. So, that is why we did four warps across. So, it's always one more
    warp than it is beads. So, you remember that. Okay. All righty. So, I'm going to
    go ahead and we're going to get down. Going to get down. Okay. [laughter]
    I'm going to switch up the camera here and we're going to go to the overhead.
    There we go. Um, we're working with the February
    jewel box kit, by the way, and that kit sold out. Um, the March kit is
    available. Same concept where we are going to be um we are going to be making
    all of these fun old school inspirations by Juliana
    Designs. And I'll give you a peek of that. But I want to get our base going.
    So to add your wildfire, I'm using the pink, by
    the way. Let me give you a quick little peaky. This is wildfire 0.006. You could
    use a fire line if you like, but I really like the wildfire. It's very
    sturdy. Um, so sometimes people will knod off. Um, our beady bestie Danielle
    has a way that she likes to anchor um, her thread to the warps.
    You know, it just depends on what day it is. [laughter] I can do I will just call
    this like a little simple under over under over and then back again. Sometimes I add a little knot on the
    side. Really, it's just kind of up to whatever you want. So, what I'm going to do is I'm going to grab um some of the
    Toho ADO rounds. And I've got three of those on my
    needle. Hello, Wendy from Colorado.
    And I let those beads drop. And then I'm going to pop them up and in between.
    And then I'm going to take my needle and we're going to go back through. I'm just
    gonna put a little bit more light on the situation. There we go. Let's do that. Okay. Cool
    beans. So, let me bring that up to the camera so you can see that the needle is
    going back through the beads and it's on top of the warps. And then with my left
    hand, I'm pulling the needle and the thread. And then I'm just going to give it a nice little tug. Not too too tight,
    but tight enough so that we don't have any of that excess thread like leaving a
    little bit of a ribbon. You don't want that. Okay.
    And hi, Shirley. All right. So, again, we're going to pick up three
    size eight seed beads. These are in your kit. They're going to be in every jewel
    box kit. um for the inspirations by Juliana
    collection. And so that is the season we're in. Oh, hey, witch, great news. Let me tell you
    right now, Danielle and I had a really beautiful conversation the other day. Um
    you know, Danielle lost her little brother um about a month ago now. and
    and at the same time I lost one of my best friends and so we had a beautiful
    conversation and Danielle is going to be creating a project with the jewelbox
    kits. We weren't too sure. I didn't want to bug her because, you know, I wanted to give her her time with her family.
    And the great great part about that is that she's going to make a PDF. I know that
    some of you are just you really like that feature and I felt really bad
    because a couple of you were like, "Oh, I'm so bummed there won't be a PDF." Um,
    so Danielle's project will provide a PDF. So, I think a few of you are going
    to be um happy about that. I know I am. So, I'll continue to do my Thursday um
    jewelbox lives where I'm going to be using the kit and I'm going to be um
    making one of the projects. We're just going to do this all year. Um, and then Danielle's gonna put a twist on the kit
    that's all her own and she'll do a PDF. And then I think what we're going to do is we're going to come on like maybe the
    last Thursday of the month and um and then we'll talk about her project and
    you know she can speak to maybe some of the technique of it like you know I
    don't know you know we just do our thing. But I'm really happy about that and I hope that you are too.
    Okay. So, Cynthia from New York, how's it going? Are you guys still cold
    there? My son is in Jersey. So,
    all right. So, I'm going to concentrate on building this space. And this is all I'm doing. We're picking up the seed
    beads three at a time. We let them fall on the wildfire
    and then we're popping them up. We're using our pointer and then we take the needle and we can see that the needle is
    gliding on top of the warps and that's real important.
    Okay, let me bring that up to the camera. Trying to see if I can't get the light
    to There we go. It's kind of funny. This is a really
    beautiful color bead, but the bead and the pink hempique hemp cord and the lighting.
    [laughter] I just kind of I don't know there it looks a little um dull, but they're
    actually really really pretty. Which, by the way, I just want to tell you that, you know, all like every kit is going to
    be somewhat the same, but mostly different.
    And I know that sounds like, what do you mean by that? Well, like not every kit's going to have the same exact 8 O and 11
    O, but they're always going to be complimementary to the beads. And then
    what I'm doing is I'm finding like really cool focal beads
    and and then I'm spreading them out over the amount of kits that I'm making. So, it's
    going to be kind of fun. Like everybody's pieces are going to be to be
    slightly different, which I think is some people really enjoy that.
    Same but different. Exactly. Thank you. [laughter] Also, also I wanted to give you a little
    surprise for March. Um, I went ahead and I bought the Hempique Hemp cord. So,
    everyone's going to have three yards of cord in their March kit. So, if you're a
    subscriber or you have bought or will be buying the March kit, um you're going to get your cord in it.
    So, I just thought um that I would do that for you. And then what we'll do too
    about that PDF, we'll see how Danielle is doing with time. All right. If she's
    done and I can get it and get it printed and put in the box for March, I will.
    But if it's getting kind of like, hey, girlfriend, I got to get these shipped out. We want to give her time, okay? I
    don't want to push her. And so we want to give her the time she needs to get it dialed in. And so March March's PDF
    might be electronic. Um but then thereafter we're hoping to get back on track and and have it in in the actual
    box that's shipping out to you. Okay. So just a little grace.
    All right. So I'm going to bring this up to the camera. So yeah, I'm just making sure that the
    needle is on top of the cord. You don't want to pierce it.
    I have almost two yards of wildfire on my needle, by the way.
    And I'm a scooper when I pick up my beads. I would say Danielle's like a picker. [laughter]
    I don't know what Joan what Joan does. I'm a stabber.
    You're a stabber? Dear God, how come I I should have just guessed that [laughter]
    and and there's no right or wrong way. It's like your way like however however
    you want to pick up the beads. Um you know, and with that and with that
    said too, like I'm working with the Jewel Loom straight up and down in front of me, but I'm pretty sure it's Trisha
    who likes to work with it from left to right or right to left. And it and it doesn't matter like that too is optional
    and it should just be however you're comfortable.
    I've never worked with it side to side. [laughter] I don't know why. I've always just
    always just done it this way.
    Yes. and March's kit is up there. Um,
    it's very pretty. It's a a combination of some greens and some blues and it's probably
    the closest to the ocean um concept.
    It does have a darker green, like an emerald green hemp cord. It's got a really nice um wood bead
    and what else? It's got a little charm in there,
    lots of focal beads, obviously some gemstones,
    and then you'll have this concept, uh, the Inspirations by Juliana concept
    and all of the ideas that can be birthed from there. And, um, in fact, I'm going to make a
    list of that. I think that might be helpful. I've been sending out a letter every month to um with the box.
    So, I'll make reference to a lot of the things I'm talking about right now
    in that letter. And so, what I'm going to do right now
    too is I just want to make sure that I am like straight, you know, like I've got
    everything um my rows are even and they're nice. Oh,
    well sh surely you're in the right place to learn. If you've never learned
    before, you might want to just pick up like, you know, the baby loom because it's always in the warp position
    and just to see if you even like it cuz it's at a low entry price.
    So, I'm going to bring in the finished base just so that we know what we're working on.
    So, this is the thin version of the original bracelet that I made way back
    in the 1900s. [laughter] And so, every project has a base, right?
    So, the this is your base. And it's usually something like an 80 seedbead.
    You don't ever want to really go smaller than a 80 o because you're not going to be able to get your needle back through
    when you're sewing in all of the amazing beads.
    So again, under the warps and
    just picking up the 80 O's, three of them for this project.
    I made I made Brando. Um, thank you, Shirley. I was just going to say
    [laughter] so. Um, it's not so much as how many
    rows, it's how long your your you know, your bracelet needs to be. I have a 6 in
    wrist. And let me let me hold on. Let me get the
    tape measure.
    Okay. I think it's like I know it's in the book. I feel like it's 40 something.
    So, we got a ways to go. I just measured that. Um, and we'll we'll count, but
    again, it's going to depend on how long of a piece you make uh
    to the size of your wrist. I have a six, like I said, I have a 6 inch. So, yeah,
    whoever asked that, snoring. Marlon Brando is behind me.
    He's a Velcro Frenchie, so I cannot go anywhere. [laughter]
    What I did, um, I made him a little bed underneath one of the tables.
    And I got to peek at him so he feels really nice and secure. And yes, he
    snores. He's so f and he waits. He just waits
    till I'm like on and you know, and he snores.
    And I have a whatn not show right after this at 5:30 Pacific Standard Time. And
    it's so funny because the people a lot of the people that go watch me over there, they don't know about Brando and
    they're just like tripping out like what? [laughter] Who is snoring? The book says 45 rows.
    Okay, cool. Thank you, Cynthia. Did you hear me talk about the PDF?
    [snorts] because I know you were you were really wanting one. And so Danielle is going to
    be doing a PDF for the project she makes. And I told her to do what she wants. It
    does not have to be a loomed project. It can be off loom,
    which I think will be really cool. So, you'll have, you know, your ideas for
    the loom and then you'll have [snorts] um off loom and then yeah, [laughter]
    I felt so bad. Cynthia really wanted a PDF. I was like, "Oh, girlfriend." But
    she has a book, so like that that's a great thing. Um,
    so my book is available through Bella Craft Publishing and there is a digital
    version and there is a printable version. Um, and
    I have seen the printed version and I got to tell you it's just as nice as what my fancy publishers in New York
    were printing. Um, and so well worth the money. I do think I think it's like it
    might be 40 bucks though. But there are so many projects in there and it's well well well worth it and and it's not that
    high because you know Ann and I are like going to Vegas. It's just that costly to
    print. [laughter] But you could just get a digital version
    of it, too. And that's that's half the price I think. So
    [laughter] this guy,
    this is always where when I was teaching in person, this is how I got all the chatty catties to uh quiet down.
    Remember those day Jo? Those days, Joan, like a JTV, all these women would come
    rushing into the class and they were just 90 miles a flipping minute. They
    were so happy to be away from home. [laughter] I don't know. I do not know
    what was going on in the CASA, but it I mean I would just have to like, "Okay,
    mamas, let's focus. Let's focus." And then I would get them going on the on
    this part and and [snorts] they would finally chill out and then it would get so quiet.
    Um, I won't say what we were serving at the hotel before they got to your classroom. [laughter]
    I knew you probably had something to do with it. Joan was like dishing out uh
    dishing out cocktails. Yeah, those were great events, man. Have
    they had one recently? I don't know if they've had one over the last couple of years.
    It was a lot of fun. Last year was online. They No, wait. Oh, 20 2020 online 2025 there wasn't one.
    Oh, okay.
    Well, we have Jewelry Con. I don't know if you've seen the information on that.
    So, right after Bellacon, I'm going to have to push this back a little. Hold on. Um, right after Bella Con, we are
    doing a one-day event called Jewelry Con. Bella Jewelry Con. And
    it's an all day event. We have John
    Kubri who's going to be talking to us about the history of check beads. We
    have Meredith Rod Rody. Rody, it's I'm really hard on my Rs. Who's going to be
    um and she's with Beetelon. She is going to be um sharing the essential tools
    that you need for your jewelry making.
    We have uh Julie McGuffy. Julie McGuffy's been in the crafting world
    forever and a day. I asked her to do a stretchy bracelet for us. So, for real beginners, um she's
    going to do that. And then we've got um our very own Nele Nle Patel
    with um with Silver Silk and his his
    kits are amazing. We have Deb Floros.
    We have Danielle Wixs. We have Amanda Stevens who shocked me.
    She's a actually a very popular um card
    not only maker, but she has a company and they do those really super cool
    lights. They're like you put the light in the card and then it lights up. Have you ever seen that? That's my friend
    Amanda. Well, Amanda
    said, "Well, I'd like to do Jewelry Con." and she sent a picture of a bracelet she made and we all fell
    off of our seats because we had no idea that she knew how to make jewelry. So Amanda's going to be a teacher and from
    what I know, Eene Hull, who is also a very popular
    um paper crafting person, um she is supposed to be joining us, but
    I think we're not 100% sure, but I'm pretty sure. And then of course yours truly. So I will be on both Bella Con
    the craft and I will be um a part of the jewelry con and Ann Butler and I will be
    hosting the jewelry con and we will be in Texas. There's a handful of us. we
    will be in Texas um live and the event is virtual and
    then there are teachers that are also going to be uh chiming in
    uh virtually and teaching. So there is a fee there is a fee to join and you're
    you only need to buy workshop kits if you want to learn and take and make that
    project. Everybody has like their own kit. Um, so yeah, I don't know if we had
    the um, yeah, I see it. We had we posted the link.
    So you could check that event out. There is a swag bag with the Bella craft part
    of it. Um, you can buy either all of the workshops and the swag bag. You can buy
    the workshops only. You could buy Jewelry Con only. Like there's a couple options. So, you really just have to go
    over to the site and check it out. But it's going to be like it starts does it
    start on Wednesday the 24th and then it goes through the 30th. It's
    like five or six days of content. Like it's amazing. It's really really
    amazing. Annne Butler, who is the publisher of Bellacraft Publishing, she used to throw this event at the Mall of
    America in Minnesota. It used to be in person prior to um 2020. [clears throat]
    And so, yeah, she's got a lot of experience with that. And so, she had to
    go virtual. Um we are hoping to um do something in person.
    We'd like to do that this year. We've only been talking about it for a hot minute, but
    got to find the right venue and the right location.
    I vote for the South because I want Joan to come. [laughter]
    [clears throat] Okay. So, it looks like I still have
    still have some rows to go. And I do I got to check myself out here. I want to make sure I'm not getting crooked. Okay.
    It's just so pretty. Oh my gosh. I just wish the lighting
    So the the beads have a transparent they're transparent rainbow and they're really, really, really pretty.
    But here's the funny thing. When when you do these bracelets, you don't even
    see the base. So, it's almost like you could just like use whatever. [laughter]
    [clears throat] You could just use whatever.
    [snorts] I know. See, I even start to get a
    little a little messed.
    Little mesmerized, little calm.
    Yeah. I um you know there's always like leftover beads, right? What do they call
    that? Bead soup. So [clears throat] yeah.
    So you can always like if you're going to sew on top of the base like
    you could always just use whatever color you had.
    I mean if you're making them to sell, then of course I'm going to say, you know, make everything so it coordinates.
    [laughter]
    All right. I'm just going to pull in my
    Okay, let me see where we're at.
    Okay, so it looks like I have maybe a little bit under an inch to do.
    And then I'm going to talk to you about the actual count um of rows once I get
    done with mine so that you know what you would do.
    So again, just for those who might be tuning in, we're building the base to our Willow project. It's a bracelet
    and I'm using the jewel loom and some hemp tee hemp cord. It's my favorite.
    You know what? That bead looks a little small.
    And I'm sewing in I'm weaving in the 80
    O towhose. They're round.
    And then I'm just putting that needle back through and making sure that I'm on top of the warps.
    If you are not on top of the warps, what happens is when you pull your your thread through your the bead falls off.
    So that's why it's important to go on top of the warp so that you don't drop a
    bead. And these little um you know just
    leaving this the way it is. I mean, these great these make great friendship bracelets. Like, you could just knock
    your socks off and make a bunch of these and not even go to the next level of sewing and just make like a bunch of
    friendship uh bracelets for um your friends, for gifts.
    Okay, I'm going to do another I'm trying to keep my loom in the in the
    frame and I got the computer in front of me and
    I do have a newsletter which um you know it's email marketing and and so um you
    know there's a few emails that go out every week but it does get you in on all
    of the deals. Okay, it looks like I need about three more rows.
    [snorts] Oh, get back under the warps.
    Okay.
    his snoring like and the rhythm of the weaving like [laughter] everything combined.
    It's like okay, you're like literally putting me into a comeomaos state.
    [laughter]
    Okay, let me try that again. Let's see. [snorts] Let's bring that into the frame
    here. Okay,
    you said 45 rows earlier. Oh gosh, I still need another two. [laughter]
    Just when you thought you were done. All right. So, one, two.
    Okay. So, what did I say? Another two. Get another two on here.
    Two. Three. [snorts]
    Okay. So, All right. So, I do think that's
    probably what I need.
    And you know what I'm going to do is I'm going to put the willow that I've already made and bring in the tape
    measure. So, yeah. So that's what did it say?
    6 in. And this is 6 in. And then I do believe
    somebody posted from the book. You said that was 40
    45. Hold on. Let's see. I thought she said 42. Rose.
    Say 42. Okay. Let me count. One, two, three, four.
    All right. Now, why do I have 50? Did I make too many? [laughter] Is somebody else going to inherit this
    bracelet? I don't know. That doesn't make any
    sense. That's so funny. All right. Well, we'll see in the end if it fits. Um, so what I'm going to do is,
    okay, so what I wanted to do is show you that, let me just scooch this over really quick. Okay, this particular
    bracelet I sewed a button clasp onto. Okay.
    All right. So, if we put this on
    So, that button clasp added like a good inch.
    I have a feeling my bra my this bracelet's going to be too long. [laughter] But that's okay. That's okay. It's It's
    going to end up being a gift. I can feel it. I'm making it for somebody. I just don't know who yet. So, you want to keep
    in mind what your wrist length is.
    [snorts] And then the if you sew on a button clasp, it's going to add another inch.
    And depending on whether or not you like your bracelets tight or not, so I wish I
    had that page in front of me. My book is inside of the house. I can't I can't read that. Um maybe if Cynthia is still
    on, she could tell us if that row countage was for a certain
    length because you could see like this one I
    have like a lot of room. So it's almost like seven inches in the
    end and it's it's loose. It's loose. So,
    um, and okay, so if you were not going to sew a button, but you were going to
    use the technique that I've taught you a lot with the but, you know, with a wood button, tying the hemp cord,
    then your length is it's still going to be similar. Sometimes it's just kind of
    like a hit and miss. Like you just have to figure out like this is five and a half, right? Is this five and a half?
    This is like five and a half inches long of a base
    and my wrist is six. But then I've gained,
    you know, like almost an inch over here. So I know this is one of my favorites,
    too. You made this, right, Carmen? I'm pretty sure.
    So, see, I I like to always
    do this technique first if I'm learning because then you can better understand
    the length. Yeah, this is like one of my flipping favorites.
    Um, so yeah. So, I'm going to bring So, that is step
    two. So, just keep in mind, step one was warping the loom. Step two, we built our base. And what I
    want to do now, just bear with me. Oh, by the way, if you still have like at least this
    much thread, let me show you. What do I have? I have like say 6 12 like 18 in
    maybe. I don't cut off. So, what I do is
    I leave that all intact because then I will
    go ahead and use this to start sewing in my loops. And so, next week, whoops.
    Next week, we're going to start that and it's going to make more sense. But what I want to say to you is if you are
    building your base between now and next Thursday, March the
    what is it the 12th um 2026. Just if you have excess thread, leave it
    on your needle. All right? And just put it to the side till we meet again. Unless you're courageous and you want to
    go without me, which is fine. There's lots of tutorials. All right? So, I'm just going to put my needle in here to
    anchor it. And I'm going to scooch everything over and then I'm going to bring in some of the examples so we can
    revisit. Oops, I had to borrow the other cookie
    sheet. So, oh my gosh, look at this. Okay. Hey, listen. When it comes to the
    meditation pouches, I was going to tell you, why don't we wait till I have
    I think I I think I want to do it with
    amethyst. You made one in black. Okay. But you
    don't have to. Like you every single one of these kits, you're going to be able to do whatever. You're going to be able
    to do meditation pouches or you're going to choose to do the
    original thick sewn bracelet or you're going to do what I'm working
    on right now which is the willow that's the thin streamlined version.
    Um you can work warp with the variegated hemp cord and you can do just like a
    little chunky piece in the middle. Um, you can do a streamlined piece and have
    some chunky in the middle. You can do [snorts] a ring.
    Okay, you can do a ring. You can do a pendant.
    Here's another pendant. And you could do a barret. So, you would
    make the piece and then you would glue it onto the barret. You can do that to a This is crazy. Look
    how old this is. This is like 30ome years old. [laughter]
    But um but we were doing these pens and then you just add the you know the
    pen back to your piece. Pretty crazy, huh? Now what I would have done is I
    probably would have covered all of that with fabric so it didn't look so gnarly. But not bad for a 30 some odd year old
    piece. Um, earrings. You can do this technique with earrings.
    You could do that on the baby loom. You can take the technique and just do your
    base and then do a little bit of sewing. Maybe use a really pretty button.
    I realized I never finished this one. I got to figure I got to finish that. [laughter] I guess I could do the slip
    knot technique on that, right? I guess cuz I don't know. Or do I do another button? I don't know. Um and here's like
    another ring. So, there's so many different things you're going to be able to do. Last month you have um this
    palette which is very springy, very fresh.
    Okay. Um and that's sold out. And then this month, March, you've got,
    let me bring it. Oh, wait. Let me bring it over here. This month, you've [snorts] got like
    this blue green, some gemstones, you've got a dark dark
    button, some really beautiful AGOT, some more chips, some focals.
    I don't know if those were little garnets or not. I think they are.
    Okay. And every month is like a colored based
    month. Just kind of keep it simple. I'm going to come back up.
    Okay. So, there's just so many different things that you can do, right? So many
    different things. Gotta scooch over in the cockpit here. But I don't know. I
    really I want to do I want to do an amethystbased purplebased.
    Maybe I could find some gold to go with that kit. And I just think that um you know doing
    doing the pouch, you know, with the amethyst. You don't
    have to. I'm just saying like there's some there's like you got to kind of think about it though, right?
    Like am I oh what am I going to do with this month's kit? Am I going to make a bracelet? Am I going to make a ring? Because you could probably make a couple
    rings. Um, yeah. There's just so much stuff. And I'm going to I'm going to
    write these down in my next letter to you when you buy the kit.
    I'm liking talking to you in a letter. [laughter] I'd hand write them all, but I can't.
    We would never get anywhere. [laughter] So, um, coming up at 5:30, I am
    going live on whatnot. I guess you can't see everything. It's all over there.
    It's pretty cool. So, WhatNot is an app. You would have to download the WhatNot
    app. And it's been around for a long time. I want to say it's been seven
    years, I think, but it's very popular. And what we do over there is I have a
    ton of vintage beads and um and so we have fire polish and we have table cut
    and we have mushrooms and we have buttons and we have triangles and we have bic cones and
    you know just all kinds of different beads. And it runs like an auction.
    And so all of the strands start off at $3. And you can
    make a bid of $3. And then if somebody bids above you, you can choose to or not. You could just choose to come over
    and say hi. And that would be fine. [laughter] But it's actually really a fun time. and
    um and a lot of people from the community are already, you know, come over and and do a little shopping. And
    then there are folks that I've I've just met so many new people. It's like a whole other world over there. So, a lot
    of fun, but gorgeous, gorgeous, gorgeous beads. So, you do have to start an account. And then Joan was posting the
    link to where like if you use that link, um you get a $15 credit in your whatnot
    app. So, it's it's kind of similar to maybe like what you see Dakota Beads
    doing, what you've seen Jill do, what you've seen John do, but they use a program called Comment Sold. And so,
    this is different. This is definitely different, but kind of like the same jam. So, like if you're like, "Oh,
    what's that?" It's kind of like that, but a little different. [laughter]
    So, thank you um for all everybody that's got the um February kit. Again,
    that's sold out. So, you will have made your base, you know, warped your loom,
    added your 80 O's, and then next week we're going to start sewing. And that's going to be really cool and very
    meditative and calming. We need that. We need that.
    And you can get your March kit. you can buy your March kit. I still have
    some March kits and um and they they'll go out in about a week [snorts] and a
    half maybe. I'm going to I'm I'm hoping Danielle can, like I said, get her project done and then I'll be able to
    make a copy of the of her project and get the PDF in there. If we don't make it for March, then what you do is you're
    just going to be like, Jules, I need the PDF. I'm gonna shoot it over to you electronically
    and all will be well in the world. Okay. So, awesome. Thank you, Joan. Thanks
    everybody. Such a great thing. Okay. Uh reach out if you have any questions. Make sure
    you're in the Facebook group because that's where a lot of um chat goes on
    and a lot of people help each other and it's just a really beautiful community. So, I appreciate you so very very very
    much. And that's my story and I'm going to stick to it.
    [laughter] All right. Love you. Have a great evening and maybe I'll see you over on
    the whatnot. [snorts]

    Video 3:


    Wow, I'm so excited. Today we are finally going to start sewing in the
    beads to our base. So, here's the base. This was step uh two that we did last
    week where we sewed in the Toho Give you a closer look right there. And
    this week today, we are going to start sewing in the beads. And so this is an
    example of a bracelet that I made, oh, I don't know, maybe a couple of years ago. And it's called the Willow because it is
    a fraction of the size of the original
    really thick and chunky bracelet that I started with all these years ago. way
    back in the late 1990s, the 1900s as we like to say it. Hey,
    Zach, welcome in. So, um I know people are watching on the Facebook Jewel Loom
    page and there are people here and hello Danielle. Danielle made my heart so happy today
    and she is going to do the same with everyone that's bought a subscription
    box. There are some that are still available. Let me just get that for you.
    So, Miss Joan decided that she Here comes the ticker.
    [laughter] That's the ticker for the uh subscription box. Now, you can subscribe or you can just buy a single box.
    But I do believe Joan said that today was opening day at Dollywood. And I
    guess if you're in that area in Tennessee, um it's a big to-do. And so
    [laughter] and so she is not going to be with us and I'm so bummed.
    But listen, Danielle sent me over a sneak peek of her version
    of the March kit and it's amazing. It's
    just made my heart so happy. I love how Danielle can
    mimic my style but put her twist on it. And so we work really good like that
    together. Like and I just give her that freedom. I'm not I'm not [laughter] I
    don't really tell her what to do. Just like okay fine. [laughter]
    I'm shipping stuff to you. But anyhow, so one of the things that you want to do
    first when you're working on this Inspirations by Juliana concept
    technique, whatever you would like to call it, um, is you you want to give some thought to the layout of your
    beads. Now, I would say you have to give it a little bit more thought when you're
    doing like the willowy look, right? Because you want it to lay out. you want your bigger beads to be in place. Um,
    versus, you know, the original concept because really with the thicker bracelets, you
    can pretty much kind of wing it. But it is kind of nice to have an idea of where
    you're going to put things. Um, here's the Oceanceans Desire version. This is
    the one that's in the Inspirations by Juliana book. And so you have the um if you have the book, you definitely have
    the instructions for that one. Um yeah, so I'm gonna go ahead and take you down
    to the table. Hi Stephanie. And I'm going to show you
    the February kit cuz that's what I'm using right now. February sold out in a blink of an eye. Okay. So, all what
    we're selling right now is March because it is March, but I'm working [laughter]
    with the February beads. Every kit for the next several months is
    going to be based on this concept. So, it really doesn't matter if it's February, March, July. It's all the same
    concept, just different projects. So, don't get caught up in that, okay?
    You'll be good. All right. Caroline says, "Joining the fun tonight. Love the Jewel Loom kits with Danielle." I know.
    We're so blessed to have Danielle. I'm just so happy. All right. I'm going to take you down to the mat because I want
    to show you um the different
    Well, I was going to show you. Where did the cameras go? Let's see. [laughter]
    Row. Here we go. Here we go. Okay, good news. Good news. So, um, this
    is the February assortment. Okay. And so, I'm going to be working
    with these beads, but again, you can use the March, you
    can use the April, you can use the May, you can use the June, you can use the July, you can use as long as it's
    Inspirations by Juliana season. Um, you're going to be able to do what I'm
    doing. Okay? Doesn't matter what kit. So, this is the variety of beads. We
    have just little tiny bugles. We have little tiny um 4mm fire polish in there.
    We've got some big guys. This is like what I would refer to as filler. Um along with this dish, this
    could also be um considered Where am I going? There we go. Considered filler.
    And so you have quite a variety and assortment of beads. Then they start to
    get bigger. Okay, we've got gemstones. We've got big guys. These guys are a
    little bit heavier. So when I'm when I'm putting them on my bracelet, I'm going to be thinking about that. I'm going to be thinking about the weight. And these
    gemstones are super super lightweight. Okay. So they could probably go just
    about anywhere. And then the kits are always going to have like a combination
    of focal beads and they're going to be bigger and not everybody is getting the
    same assortment. Every kit is going to be similar but different. Okay? So, it's
    going to be fun. Um, there's always going to be a little bit of something different. That's why Danielle's piece
    that she just made for us, again, super similar. Maybe a couple things are different, but mostly similar. So, it's
    going to be fun, you know. Um, yeah. So, okay. I'm gonna go ahead and
    what I want to do is I'm going to I'm going to I'm going to leave agots out.
    I'm going to pour these guys down on my mat. I'm going to maybe
    sprinkle in a few of those guys. And I definitely want um I want some of
    these. So, I'm going to keep them over here. And I'm just giving you an idea of like how I work. So, I'm going to scooch
    these over. And I think what I want, let's see. Do I want D?
    And then maybe these. But then I was kind of thinking that.
    So, I'm going to do that. And then I'm going to do that. And I'm going to do that. So, in my bracelet, I'm thinking
    that these five, these five big guys here are going to be like my
    center. So, I'm going to divide my bracelet up like into fives, if that hopefully makes sense. Hey, Carmen.
    [snorts] And um and then I'm just going to sprinkle some of these down. And boy, we
    still have a lot of beads left over. Now, um,
    your seed beads that come in the kit, we've already used our 8 O's. And you can see that I still have a lot left.
    So, I could probably, cuz it looks like a half a tube, like I used a half a tube, if that. So, you
    could make another bracelet, you could make earrings, you could um, many times
    I will use my 80 O's as filler beads as well. So, not a decorative, but like a
    filler. Um, and I'll I'll do that along the way, just so you know what I'm talking about. And then this is when I
    bring in my 11 O's. Okay? Now, remember, everybody got different color
    combinations. So, your 11 O's and 8 O's may not look
    like mine. And Brenda and Sherry, who are sisters, they may not have
    [laughter] identical ones either. So, it's going to be fun. All right. So, we're going to put those to the side.
    And here's my I'm just trying Let me get better with the camera here. Let me get
    better with the camera. There we go. So, we've got filler beads. We've got some
    decoratives. And we got some more decoratives. And we got like these focals. And then
    I'm going to pour out my seeds. Okay. So, these are my 11 O's.
    And I'm just gonna pour like a pile of those out. I'm gonna get some more light on the
    situation. And that's going to be super helpful. And then I'm going to bring my loom in.
    All right. Let's see. We're going to have to scooch this back
    and come in a little bit more. Here we can do this. There you go. All right.
    So, you may or may not recall that last week when I finished the base. So, this
    is my base. Every on loom project has a base. I think that might be fair to say
    for off loom Danielle. I don't know. What do you think? [snorts] And my needle and thread. I still had plenty of
    thread, so there's no sense in me, you know, wasting that. And so, what I'm
    going to do, I'm down here at the bottom. Okay. And this is closest to my body. So, this is my left hand and this
    is my right hand. And the loom is in front of me. And this bottom row that I
    finished um in the LA last episode is closest where's my pointer? Is closest
    to my body. So, what I'm going to do is I'm going to turn that. So, now the
    bottom is face up. Face it's faced away from me. And the only reason I'm doing that
    is again when I ended I still had thread. So there was no sense in me
    cutting it, tying it, removing it. I'm just going to go ahead and use as much of of this as I can to start my looping.
    And all is well in the world. Okay. So always here to help you understand.
    Um I think I'm going to do that just one more time for giggles. Last episode, I
    finished my base with my 80 O's. Okay. And when I got done, I still had a lot
    of wildfire left. All right. You can use wildfire, you can use fire
    line. Um fire line's a little bit thinner and it it might be a little bit more flexible for the loops, but I'm
    just a big wildfire wildfire girl. So again, I'm going to turn my loom because
    I want to start with the um
    well, I'm going to I'm going to put my needle in. Okay, I'm going to thread through
    and then I'm going to turn it again. All right. And so now I've got my needle
    and my thread on the right side. Hello, Cynthia. And I'm going to take my
    needle and I'm going to insert it into that first
    I'm going to come up to the camera. I'm going to insert it through the first 80 O. And that's the 80 O that's on the
    right side. It's closest to my right hand.
    And I'm going to pull. And now I'm going to come down here and I'm going to pick up some 11 O's. And again, I just want
    to get a little more I've got like this felt and the
    tablecloth and they don't they don't like each other. Okay. Um
    the more 11 O's I pick up the bigger the loop. And I want to show you. Let me
    bring in the willow. Do you see how tiny that loop is?
    So what did I do? I picked up one. Is that three? That might be three 11
    O's and then a decorative bead. Whoops. Let get closer here.
    Okay, I'm gonna hold still so that the camera will find it. So, three
    decoratives, I'm sorry, three seed seed beads, one decorative, and three more
    seeds. And so what happens is the fewer 11 O's that you pick up, the tighter the
    loop. Um, let me see if I got something that's got a big loop.
    Okay, so like the go big or go home ring. Look at look at how big the loops are on that. So you see how big these
    guys are. So the more seed beads and the more decorative beads that you pick up, the
    more wild like this. Oh, I am swollen. That usually fits that finger. Hold on.
    It's a little hot here in California today. A little muggy. So, the bigger the more seed beads that you pick up,
    the bigger the loops and then you get more depth. And then the less you get, it's tighter.
    So, I'm I'm going to go with the three. So, I'm going to pick up three seed beads
    hopefully here. Why are we not coming? Come on. Come to mama. Okay. So, one, two,
    three. And because this is like the end of
    my project, the bottom is a better way to explain it, I'm going to just pick up
    a small filler bead.
    Well, maybe not. I'm going to pick up a bugle. [laughter] They're being very stubborn tonight. So,
    one, two, three. And let me bring that up to the camera.
    Okay. So, we've got three seed beads, a bugle, and three seed beads. And then
    we're going to let that drop. Yes, it's one of my most favorite rings.
    Okay. And you can see that the three seed beads, the bugle, and the three seed beads are at the bottom of the
    thread now. And I'm going to take the needle and I'm going to come back
    through that right side. And I'm going
    through that bead. I'm over I need to make sure I'm over the warps. And I'm
    going to go all the way out.
    And that's my first loop.
    Okay. So that's loop number one. And now I'm going to make a loop on this far
    left ado right there. So again, I'm going to pick up three seeds.
    And I'm just going to try to stay with some smaller beads just to, you know,
    again, because I'm at the I'm at like the bottom of my bracelet. And then I'm going to go back through the right side
    of the bead. And we're going to pull
    We're going to pull through. And this is going to be Oh, did I forget to pick up?
    I did. [laughter] I forgot to pick up three more beads. Okay, not the end of the world. We're
    just going to pull this through. Now, you're probably thinking, "Well, Jules, what if you didn't add three more?" And
    you know what? This is what would happen. Absolutely nothing. It would
    just be that your focal bead would be kissing
    very tight against the base.
    And you know what? I'm not going to beat myself up about that. I'm going to leave it. Okay. And so what I'm going to do is
    I'm going to turn the loom so that I can come in on the bead right
    there. And my goodness, it feels like it just went up to 100°. I heard it was
    going to be like in the valley, like close to 100 today. All right. Um,
    bringing the needle through.
    So, I I love it when real life uh beading situations happen. So, we're picking up three. Usually, I'm not
    talking and doing this because this is a very calming meditative
    movement. And so, when you're chatting and trying to focus, uh, this one always
    gets me. All right. So, I'm picking up another small bead. And I'm picking up three more seeds.
    So, one, two,
    three. And then I'm going to go on the side, the right side of the 80 O. My
    needle's going back through it. Going back through the middle bead. I'm going to bring it up to the camera here.
    and then all the way out. Now, you could certainly put a loop
    on every single ado. I just want to make sure I'm on top of
    the warp there. Um, but it would get really tight and I
    mean it still would look amazing. So, there's our first three our first three loops.
    Okay. And I just noticed that that ticker um the ticker is still running.
    Let me just kind of get it off of here really quick. I don't have my Joanie.
    Okay, there we go. [laughter] I forgot that was on there.
    Joan is having fun at Dolly World. All right. So, we're on that last
    um I'm going to see if I can't get the camera to How about that? That might be a little
    bit better. Okay. So, again, I'm going to pick up three.
    I don't know if my eyes just need new glasses, but man, those beads seem really tiny.
    Also, when you're putting these um on, just maybe think about the colors, too, right? Like, you wouldn't necessarily,
    if you'd already picked up a white round one, maybe you wouldn't do that again. You would try to pick up a different
    color.
    Okay. So, we've got three seeds, one decorative, and three
    more seeds. And we're going to let those fall.
    And then I'm going to go back through the right side and all the way out.
    So, you can see that. Look how quickly it's coming together. Right? So now what
    I kind of need to think about is I'm gonna see if I can't get the whole thing. So if this is my middle
    and and these Whoa. Let's see. And these are
    my sides. Am I almost Okay, so I've got a few more
    I got a few more rows and then I'm probably going to want to do one of my my focals. So, let's do like three more
    rows and then we'll add that big guy so you can see how that works. Now, so
    right now, just take note that my needle and thread,
    okay, my needle and thread are in my left hand. This is my right hand. All
    right. And I just finished my last loop. And so what I'm going to do is I'm turning the
    loom so that now my needle and my thread are
    in my right hand. And I'm going to make a loop coming in from the right side.
    And I'm going through that first bead.
    And then I'm going to pick up some seeds.
    Okay, so three seeds. And then let's see. What do we got going on up here? So many pretties.
    This is always the hard part. What bead to pick? What bead to [laughter] pick? Let's see. What do I already have? I have some blue.
    I've got white. Um, this is pretty. How about this pink one? Pink biconee.
    And then we'll do three more seeds. One, two, three.
    And Danielle, I don't know if you're still there, but I was going to ask you whether or not you would be available next Thursday.
    Okay. And then I'm just going to And we're always just making sure too that we pull tight enough
    so that um it stays nice and looped.
    And so again, we are picking up three
    and we'll pick up one of those guys. Okay, awesome.
    Yeah, because next week we'll take the finished piece off of the loom and I'll add the button. And really, that's not
    going to take long at all. So, it's probably a great time to come on and we could just chitchat about the process of
    your project.
    Okay. So, isn't that so fun?
    This is always the part where in person people like if you have a really rowdy
    bunch that comes in and they're just chatties. This is when I finally get them sewing their loops. It's like
    calm, quiet. [laughter]
    Okay, now I feel like I need a little little pinch of color right there. So,
    I've had my eye on this bugle. This is really cool. So, I got it like a little um red pink.
    So, then I'm going to go through the side again, the right I'm on the right
    here, and I'm going through that first bead. Whoops. And I'm going to go all the way
    out. Oh yeah, look how pretty that is. Just
    that little little tinge of like an iridescent red pink bugle.
    Okay. And now I will work with my thread until I
    can't like maneuver. [laughter] You will have to decide for yourself um
    how much thread like I have probably like a 12 in maybe. Right now I'm going
    to I'm going to work it until I'm going to go all the way. All right.
    This Oh, this would be fun. This color. Where's the hole on this guy?
    Come on, Bubba. There we go. So, picking up one of
    those. It's like a beach glass bracelet. Yes, it's they're like little treasures. And
    honestly, putting these kits together for you, that is exactly um how I feel. So, the other day when I
    was working on March, I was counting all the beads and I was like, "Oh, poop.
    [laughter] I was short." So, it was so fun to like go back into
    the Jewel Loom bead section and
    find some more deliciousness to add to March. Let's bring this little section
    up. So, that's really fun. I think I needed
    to do I got to turn my loom now. So, I'm turning turning um because I want to start on the right side.
    And basically, you know, it never was because I was right-handed. Like the way
    I learned and the way I do this from and kind of referring to the right side and using my
    right hand, it was never because I was right-handed. It was literally how the technique was
    taught to me. And when I've had lefties in my class,
    um we
    um basically have just like had them like follow the same thing to see if
    they could if they could like with their right hand and their mind work it out.
    And most people were able to. But like if you can't, you just pretty much do it from the left. It's not a deal
    breakaker, in other words. Okay. Um
    I don't know. Did we have I feel I feel I feel I feel like I feel like it should
    be one more row and then one of these big guys. Those guys are going to They're big. I wonder how that's going
    to work out, Jules. Well, we're going to find out. All right. So, I'm going to pick up one of the gemstones.
    You do tend to talk to your beads a little bit more in this project. I will just tell you [laughter]
    you're a lefty. Okay. Have you tried this? Um, Cynthia.
    Okay. So, I want to I want to get a little bit more balanced here. And I'm
    thinking H.
    So, I'm kind of wondering whether or not I want to come in sideways. I'm kind of thinking I might want to.
    So, I'm I'm going to get a little crazy. I'm
    going to pick up two I'm going to pick up two seeds.
    I'm going to put this big old guy on here and let's see how he might lay.
    Oh yeah. Let's see. So then I would probably need at least two more seeds.
    Two more. Let's pick up two more seeds. Let's see what happens. I think this
    should work. I just I want to see um and I want to figure out Let's see. Hold on.
    I want to figure out where in the Bajiba is that camera's
    okay, there we go. I want to figure out where I'm going to come back in.
    I feel like it should be that row. Let's
    see. for giggles. I'm going to come through this row. I got to get my hand out of the way,
    though. Okay. So, I'm going to I want to come through this row.
    Okay. So, I can still I don't have to be so crazy about that. Okay. Let's do Let's release. I feel like I'm holding
    on for dear life. Okay. So, let's see.
    Let's see. Oh, yeah. Yeah. Oh yeah, yeah, yeah. Oh, that's such a Okay,
    love. That works out good. Okay, so I instead of like making it um
    straight, I like came in at an angle.
    So, I'm loving how that worked. Now,
    I do want to put a loop over here. So let's let's hold on.
    I hope what you're getting across is that
    the technique, the idea, the sewing, the looping is just that, right? It's this
    pick up your beads, go through an ado, go back through it. And the freedom to
    like create completely out of the box is up to you.
    Like I just that's why I love these projects so much. I feel like you can
    use the technique and then
    go to town. Okay. So, I'm trying to think what I want to be nestled up
    against this big green guy. So, I've got three. I don't think I want it to Let's do this
    little guy. Let's do this purple. I think that's a fire polish. Yep. Okay. Let's get this guy.
    And one, two, three.
    And so we're going to go back through. So I'm on the right side of that bead. Let me bring it up to the camera.
    Okay. And then I'm going to pull through.
    And sometimes you just want to guide the loop.
    So now that is kissing
    up to and sometimes you might have to like just kind of massage that.
    Okay. So now that's all up in there and now
    we're going to turn.
    Now we're going to turn and we are going to
    we're going to I don't Let me see. Let me see. Let me
    see. I feel What do I feel?
    I feel like I want to do one on the middle bead and the last bead.
    Okay. because it's hard to tell. But you see how this is taking up all the space
    right here. So, I don't really feel like I want to put a loop
    right under it. Although, I could. And if I did, what I could do is I could just do like seed beads and then it
    could just rest on seed beads. But I don't I don't know that I need to. So, I'm going to come through the first and
    second, but then I'm going to come out between that second and third bead. So,
    I'm going to put a loop on the middle. I know. We're getting wild. [laughter]
    I'm telling you that I just love these projects. All right. So, now I need to get I
    probably don't want to go too too big. So, what could I do there? Oh, I could do another bugle, maybe. Huh? That would
    be cool. We could do a bugle. What color though do we Oh, that would look nice
    because we have we have a pink red one and then we could like have one here and
    then it would look like it was a setting like a high-end jewelry setting.
    All right, we're going to do that and then I'm going to pick up three more three more seed beads.
    Okay. And now I'm gonna go on the right side of that bead
    and I'm gonna go all the way out. Okay. So I have a nice little Oh yeah,
    that's going to work out really well. And then I'm going to make one more loop over here at the tip of of my big my big
    uh bead. And I am getting woo I am really getting close with the thread here. But that's okay. I I feel
    comfortable doing that cuz I've been doing this for what 30 years. If you're
    not comfortable, don't do that. Okay, so we really need to like get a different color over here. What are we going to
    do? I feel like I just saw something really fabulous. What happened to it?
    Do we want to do I have one of these in my kit. Do I want to do that? I could do
    that. That's kind No, that's too much in one spot. Um,
    poopies. Okay. What are we doing? What are we doing? Ooh, what about that color? Here's like a green.
    I like that. Okay. And then [snorts]
    one, two, three. Okay. And then I'm going on the right
    side of that 80 O and all the way out.
    And and when you're working with a really tight area like this,
    just make sure you're not wrapping your loop around another loop. So, and
    especially when you get to where your thread is really short, just really pay
    attention. So, at this point, I
    I am thinking [laughter] I'm thinking
    [gasps] um Okay, what am I thinking? I'm thinking, okay, I want to look on the
    side over here. I turn my loom around. I just while I'm up in this area, do I
    feel like there needs to be because remember we would have skipped these rows.
    We skipped them because we laid this big guy across them.
    Do I want to do something there? I mean, I could I could because then I can weave
    this thread back through. And that's how I could like finish off this thread.
    So, I'm gonna say, where am I at? I'm up in here.
    I'm up in here. And where's my next row at though? This is the When it gets
    really tight like that, it's kind of hard to find. It's kind of hard to find where you're
    where you're at. But I think it might be this guy. Is it that guy?
    And if it is that guy, sometimes I'll turn it over to guide so my eye
    my eye can watch what's happening because if you what could have happened right now is this needle could have
    ended up back through my loop. So sometimes you're going to do like a little gymnastics
    [laughter] bead gymnastics. A Jules, I still have my beaded loop
    bracelet you taught me back in our Alen days 34 year probably 30 plus years ago.
    We had to use the sew in. Yeah, I know. It's a trip, right? [snorts] Uh, okay.
    So, I'm coming through. I'm coming through. I'm just watching it from the backside.
    Okay. And I want to be I want to be over there
    because I think I want to some It's kind of weird, but now I'm like guiding my
    needle right on the back side. These projects are just a trip and
    they're fun. They're [laughter] just so fun. Okay, cuz what I wanted to do is
    ultimately get over here on the right. Here's my right hand again, you all. Here's my right hand. and my needle and
    my thread and and everything are over here in my right hand. They're on the right side of the piece. And what I'm
    trying to do is I wanted to get I wanted to sneak a little I want to sneak a
    little loop in here. And okay, so and look at I am Whoa, I'm
    really pushing it. Okay, I got to get this guy out of the way. Um, one,
    two, three. Whoops.
    And what is it though that I want to communicate right there? I just feel
    like it should be small and precious. So, what do I have that's small and
    precious? Ooh, I don't know. Oh, should I live on
    the edge and do that? Let me bring this up cuz that's a really gorgeous fire polish.
    Oh, I kind of like that. Okay, this is like a Let me hold it up to the camera.
    Whoa. Okay, so let me get three more seed beads on here.
    Sometimes if you're just trying to fill in space, you don't even have to use a decorative bead or a filler bead. You
    could just do nothing but seed beads. And that's also where your 80 O's, like
    if you're like, well, I just want to have like a little something, then you could use an 80 O.
    But I think this bead's going to look pretty stinking cool. So So
    now we have to go back through. And I'm I once again
    I'm going to have to turn. Yeah. See, I wasn't even going through. I wasn't even
    going through. So, let me let me get through that guy.
    I'm going through the first one, but my my needle is turning.
    Okay. Awesome sauce. I got it. I got it. Okay. And then there's going to be that.
    Oh, okay. Now, all right. Love, love,
    love. So cool. Boy, I am pushing it. [laughter] Right. So, I'm [gasps]
    going to turn it now. I'm having a little problem over here with my colors. [sighs]
    Oi, oi. Um, I feel God, these bracelets
    make me feel okay. I'm like a therapy session. Um, I just I
    don't know. Am I being crazy? Am I just kind of feel like do I want a little
    something something? Because if I do, I actually need to go
    up one, but that's not really going to solve my my issue. I could go down.
    Okay, I could go down and then I could come back up. Whoa, whoa, whoa. Where'd
    you go? Okay. And whoa, I'm pushing it with the
    thread. I am pushing it with the thread. Am I gonna be able to do this? Okay,
    [laughter] let's see if my 30some years can. All right, we're going to pick up We're
    going to pick up what? We're just going to pick up two. And then what color What
    color do you think? What color do you think I should put
    over here? You guys give me an idea. Something needs to be right in here and
    it needs to kind of break up this. So like if you were at the islands
    and or beach and you saw a little treasure chest,
    you found this really big guy right here. Pink. Okay, that's a good idea. I
    like pink. I wonder if I should go as big as putting an AGOT there.
    Should I do an AGOT? I don't know. Let me put Let me see. [gasps] That would be gorgeous, wouldn't it? Do
    we love that? Okay, we love that. Okay, let me pick up two more.
    So, one, two. Okay, and then where was I? Okay, now I
    got to go back through the side. And because I can't see, I got to I got
    to peek. And I'm good. I'm good. I'm going through all the 8 O's
    and good call. Good call, friends. Oh my
    gosh. Okay, I totally love that. I totally love that. Now, now the focal I
    don't know. It might be hard to see, but now the focal is floating
    really well. That's what I was kind of trying to to get to. Okay. So, now I got
    to turn the loom again because I want to be back on the right side. Right hand needle. Everything's on the right. Um,
    and now I really probably should call it [laughter] I should probably figure out
    and attach and tie. Okay. So, I'm going to go
    I'm going to go back through here. And again, I just need to turn around to
    see if I'm going through. [snorts] Okay. Wait a minute.
    Oh my goodness. Everything is shiny. Am I through the beads? I can't tell if I'm
    through the beads. I think I'm through the beads. Okay, I think I'm through.
    Okay. And then what I'm going to do, the only reason I'm working from the
    backside is because that big bead kind of um took
    away from being able to see everything on the top. So, I'm just I'm just threading I'm weaving
    um the thread because I I want to tie off so
    that I can add more. I want to show you that. Um, and so I'm gonna come up a row
    [snorts] and and I'm going to come through the first
    bead and out between that first and second bead.
    And then I'm going to grab a warp.
    You know, of course, when everything is like the same flipping color, [laughter] it's hard to see.
    I'm trying to get under. There we go. There we go. Life is good. Okay, we did it. All right. Now,
    I think I'm going to have to back into that loop cuz I really pushed it. Yay. I
    did it. I did it. Okay. I still got it. I still got it. Um, can I get You know
    what? I think I'm just going to um I think I'm just going to
    hold that thought. Hold that thought. I'm just going to come in with the um wildfire
    burner. Oh, holy guacamole. Um, and then when I'm done, I'm going to come back
    and I'm going to sizzle that into a really tiny little tiny little sizzle. Okay, so now we need
    more thread. All right, there's our first patch.
    Okay, so you can just see like how fun and funky these can get, right? So, we
    need I've already threaded more wildfire because I was prepared. I knew we wouldn't have enough. [laughter]
    And this is probably a good yard and a half. Um, and what I'm going to do, so
    again, the goal is to always be over here on the right side. All right. So, I
    need to add more wildfire anchored into the base of my project.
    And the goal would be to um the goal would be to
    [sighs and gasps] have let's see if I do that that's probably not going to work but if I do that and I come back here then that
    would work. So what that means in English [laughter]
    in non in nonjul beady talk um I got to
    come up. So there's here's the row I want to be on. Okay, here's the row I want to be
    on. This is an open row and I need to come up one. I need to come up two, of
    course, in my tightest, craziest row. I've got to try to get in here. Holy
    guacamole jewels. All right, let's see. Let me see if I did it. Okay, I did. Thank you, bead
    gods. Okay, so we're going to just pull this through.
    [snorts] And you know what? If you do this a different way, awesome. This is just how
    I do it. And then I'm going to come through this
    row. I'm going to come through. Whoa. I'm going to come through this row.
    All right. Whoops. And you just want to make sure you're going through the beads.
    And so now now my needle and thread are going to be
    back to where we got we want to be on the right side of the bracelet.
    I just want to make sure because what is that? Is that where I That's where I Okay,
    that's the little piece that has to be zed. Okay. So I've got a little bit
    going on here. I'm going to leave about I don't know like 4 in so that I can maybe put my needle back on it and weave
    it back in. And so now my needle and thread are back on the right side and
    I'm going to start all over again. So I'm going to come
    um up and out of that first bead. And if you didn't have excess and you were just
    like, "Jules, that looks like more fun than humans are supposed to have, [laughter] then you could just cut like a brand new
    um length of probably like two yards and weave with that. You just need to go slow. If you're not used to working with
    so much wildfire, just really go slow. Okay, so
    we're going to keep that tail over there. And now I'm ready to make my first new loop.
    So again, we're going to come over here and we're just going to repeat all the fun that we had above.
    Okay, so that's three. And then I could see like I probably need some some blue.
    I don't know if somebody just said blue, but I'm going to go with blue.
    Got a little pip here. And
    yeah, there's, you know, I can't really think of a bead you can't use in these projects.
    And then we're going to go back through the right side and we're going to go all the way out.
    Okay. And what you might want to do at this stage is remember we were gonna I was
    going to I was going to put my purple in the middle.
    And so if I'm going to do this again, I got to be thinking about the distance
    between, you know, how many rows. And you by all
    means do not have to do this, right? You you do you. [laughter]
    and you figure out like the bead pattern or the beads that you really want to um
    to use. But so, okay. So, for me, that kind of looks cuz this is the middle, right? Maybe over a little hair, but
    and I could also I could I could also do it so that the bead is going that way. I
    don't know. I'm going to have to I'm obviously not going to get this done. Um it'll be done for next week. But, let me
    finish this loop. And I hope that um you you get the
    technique and understand that it's it can be as repetitive as you want. It can
    be as organized and structured as you want or it can just be a free ride. It
    can be really fun and um random and all kinds of cool stuff. All right. Um
    maybe that's cool. That's a That's a gemstone.
    Let's get that guy in here. Where's the hole? Okay, there it is. And then three more.
    And remember, I'm using three because my loops are going to be um small and
    tight. And you can make you could add more seed beads and then your loops
    would be would be more fluffy.
    Oops. And I will tell you, when you're working with two yards, just kind of keep your area clear
    because I just grabbed a bunch of bracelets.
    Okay, cool. And then we're going to turn. So, we're always coming in from that right side after we finish a row.
    And now, this guy is kind of taking up a lot
    of space. So, I don't know that I'm going to do one on the end. I'm going to come in the middle again.
    How many of you sew? Like, how many of you have a sewing background? Even if
    it's just himming pants. Cuz if you were anything like me, my my money went to
    buying a really cool pair of jeans, but then I had to I had to learn how to hymn them when I was in high school.
    [cough] [snorts] Okay, so I'm picking up three more
    seeds. And
    I like this guy. Let's get that guy.
    Oh, very cool. Absolutely. And um I don't know if you
    were here. I think you were Caroline maybe um when I mentioned that March's kit Danielle has made a project using
    the beads. And so um yeah, it's going to be really fun to just see what everybody
    does. So there's the middle.
    And then I'm going to do one more loop and then I'm gonna um show you March's kit because I've added
    more beads to that kit since I think I showed you. Yeah, for sure. Since I showed you last week. So now, let's see.
    What color do I want in here? Honestly, that's the
    million-doll question all the time. Let's see. Oh, I haven't used uh one of the white
    gemstones since down here. So, I'll do that. What I usually try to do is like
    not use the same. I try to space it out. So, if I have this white gemstone here,
    I'll put one here. And then, you know, like I try to alternate it.
    Come on. the last bead and it's being a little booger.
    Okay. And then we're going to go to the right of that 80 o. Whoops.
    At least I thought we were. Come on, buddy. Okay, there we go.
    [snorts] Yeah,
    Juloom's got a little bit of a wiggle butt. And Brando says, "Yep." [laughter]
    Oh, perfect. Okay. I'm really, really, really happy with this. Look at how fun.
    Look at how fun. Now, if I wanted if I ever felt offbalance for whatever crazy
    reason, like I You totally can go back and sew stuff in. Like, you're literally
    just sewing right? You're sewing stuff in. So, I've done that before where I've
    gotten done with a piece and I was like, uh, I really I really want to come over here and maybe put something. Um, not
    that you have to cuz this is all about you. But look at how fabulous that is.
    I'm so pleased. Okay. So, I'm going to go ahead because obviously I got a lot
    of work to do with this project and we're going to do it off camera, but I do want to share with you the March kit
    because again, I've been working with February and February is sold out. Um,
    so I've got March and we're just going to scoot on out of the camera.
    We had sewing. Yes, we did. I had homeck um in high school for sure. So, March's
    kit is going to have actually um I'm waiting for the order to come in. It should be here.
    I got uh [clears throat] excuse me, something's really getting my throat. I got what you call um the teal,
    the rainbow teal in the 80. Oh, it's so pretty. Okay, so
    this is I'm going to back it up a little bit.
    And we're going to bring in these are some of the new ones that I added some more. That's jade.
    Um [snorts] this is some This is some Chinese crystal, which the
    Chinese are doing really a great job on their glass. I used to be very snobby
    about the Chinese glass, but I've come to um make peace
    with it. [laughter] Such a weirdo. I know. More um more
    gemstones and more gemstones
    and let's see more gemstones. So, this is
    March. This is March. Trying to get it all in the camera. I might have to come up a
    little. There we go. There we go.
    And got two more trays full of beads for March. These kits are just um thick, you
    guys. They're thick. There's a lot a lot a lot of beads.
    Okay. And then I'm just going to scooch the um so you always get the 11 O's and
    the 8 O's and then there's and then you have a tray full of your um focals like
    and all of this is like usually random like I choose and pick a bunch of
    different stuff and that's what makes all the kits so different. So you have this is March. It's delicious. There are
    still some kits left. Um, oh, for March, I went ahead and bought you um the hemp
    cord. I just felt nice. [laughter]
    Hit and miss on whether it'll come in the kit, but this month I was like, "Oh, I'm going to get everybody some cord."
    Um, and you have a wood a wood watch.
    Yep. One of those. A button, also known as a watch. And then there are some random uh wood charms that I threw into
    the kits. And you always have your um cookie and
    your tea when you get a jewel box. Oh, is that over here? I'm running out
    of camera camera space. And everything comes in your little organza. And we
    started adding the date. We put a little label in there so that you know that this is the March kit. And then if you
    want to put that on your box, um that's a good idea. somewhere so that you can
    identify the beads with the box. So, okay, I'm going to come up really quick
    here and we're going to take the light off of the situation. [snorts] We're going to
    um put my I was going to say put my clothes back on. I have clothes on. I need putting my sweater back on because
    I'm not sweating bullets. [laughter] [clears throat] You know those fun moments. Okay. So, let's switch the
    camera. I'm going to come back up to see you. Coming up. Coming up. And poof.
    Awesome. Here we go. Wow. Wonderful.
    Well, I am thrilled. I cannot wait to um to work Whoa. to work on this some more.
    And so next week, what we'll do is I will have my piece finished.
    I will take it off of the loom and I will add
    I will add [clears throat] um I don't want to get my kits mixed up.
    I see it. I'll add my button. It's over there. This is March's button.
    I got to make sure. I mean, it's not a big deal. It's not a big deal if you mix stuff up. You might do that. Not for
    nothing. Um, so this will be finished. I'll take it off the loom. I'll put the
    button on. That's going to be really easy peasy quick. And then Danielle can come on and speak
    to the project that she did. We're not going to do a demo on that because she's
    going to have the PDF available for us in in the kit, but we can speak to it
    and she can maybe um give you some insight on anything that she thinks you
    might you might need to know. Um she's a great teacher. So, I I think that's it.
    Um, again, full chunky bracelets,
    the willow bracelet, if that's what you choose. Um, you know, you can take it
    down a notch and only do the middle. You can really make it thin. Okay. Um, so as
    far as bracelets go, you can go big or go home. You can bring it in. You can
    squish it in. You can um make the pennants.
    All right. I think that might be a free PDF in the school. I think it is. Let me know. Um you know
    the meditation bags, barretes, rings,
    pend more pendants. I love this style. Um there's so many things. the technique
    of just sewing the loops equals so many different projects. So anyway, I think I
    saw everybody's um everybody's comments.
    Yeah, I was well I was a teenager in the 80s. I'm I'm an 80s baby. But we had
    home and we did thank goodness learn how to do things. I mean we even learned how
    to do a checkbook. I don't think the kids learn anything these days about
    just living life, right? But that's okay. We're going to teach them. [laughter]
    We shall teach the children. Okay. I adore you. I am so grateful to you. And
    um if you need any help or you have any questions, please feel free to email me.
    I'm really good at answering. And again, there are March kits left. And so if you
    already have one, awesome. If you don't, maybe you want to share the love with somebody, you can subscribe or you can
    buy as you go, whatever works for you. Easy peasy. And um and we are we do have
    a whatn not tonight. So if you are signed up for whatnot, it's an app and
    it's where I have a plethora of
    great beads at great prices and so [clears throat] that's always a
    lot of fun. Anywh who, all right, we miss our Joan and uh hopefully we'll see her next week along with Danielle and
    myself. And again, if you need any help, please, please, please. Yes, you're so
    welcome. I love being with you all. I I just wish I could hug you. So, thanks,
    Carmen. Okay, you all have a great evening and a beautifully blessed weekend, and I will see you again. Thank
    you so much, Cynthia. We got a PDF. [laughter]
    We're so excited. All right, see you guys.

    Video 4:

    Welcome to Jewel Loom School Live. I am so excited. I've been staring I've been
    staring at my finished bracelet for days now. Look at how beautiful it came out. I'm so happy with it. I love how I was
    able to really um separate the big focal beads and make it just all work. And I I
    love the angles and it just really it really made me happy to see it finally
    finished. And so today I'm going to take it off of the jewel loom and add the
    button. So that's going to be a lot of fun. And that will finish the February
    the February jewel box kit. So I'm going to go ahead and take you down to the
    table. when I get done, we've got a special friend who's going to join us and so she's going to be talking about
    March's jewel box. So, that's going to be a lot of fun. All right, so let me switch up the camera here and we will
    get to this very quick demo of taking the bracelet off. Oh, there we
    go. Awesome. Okay, so I've got it. You know, originally what we did Whoops.
    Where'd we go? We did the knots. And so when we were um
    warping our loom, we wrapped it around that back button and we made our warps
    out of hemp hemp cord, which you know I love a million times. And then we added
    the beads from our February jewel box. We sewed those in with the looping
    technique. And I'm just again I'm really really happy with it. How it turned out, how
    the angle of those big old focal beads worked. It was really a lot of fun. So
    I'm going to go ahead and bring my scissors in. And remember, when we're taking a piece
    off of the loom, and I'm just going to see if I can't angle this camera a little bit better there. Um, I will wrap
    my hand. Okay. Around I'm trying to get it positioned so you
    could see it. Let me scooch my chair. Okay. So, I have I have the bracelet sitting in the palm of my hand. And then
    I bring my index finger over it. And then I bring my thumb. Where'd you go?
    My thumb. This is my left thumb. My left hand. So, I've got like the jewel loom in the bracelet in this sandwich. And
    the reason I do that is when I cut the warps, um, the tension,
    woo, is going to relax and I don't want all of those glass
    beads bouncing off of my surface. So, it's just the way that I cut it off. It's the way that I try to protect my
    piece. You may come up with a different um way to do that, and that would be fine. So, all right. So, what we're
    going to do is um these are the warps. And I'm just going to take two. I'm
    going to bring them together. Try to get these guys. They're a little
    dancy. And then I'm just going to make a knot so that it's the closest to the beads.
    So, I'm going to come in. I've got two of the warps. And sometimes what I like
    to do is bring in the point of my scissors to help walk
    that down and then push with my right hand and just really try to get it as
    close as I can. And then I'm going to come over to the other side
    and we're going to do the same thing. And we're going to w walk that down as
    far as it will go. Grab the point of the scissors. Push it down. This one's a
    little bit better. So, you can see I didn't get that one as far down as I would have liked. It's not
    a deal breaker, but you can you can see that just by pushing it and using the tip of your scissors, it does help. So,
    I'm going to do the same exact thing on the opposite end. And this is just um for me I just feel
    like adding a wood button is or adding a button period is it's just a simple way
    to finish your project. There are many different ways that you could um you
    always kind of want to know how you're going to finish before you start. It's going to determine [snorts]
    a lot of things. you know, the way you warp, the way you add your beads, what kind of bead you're adding, you know,
    are you sewing in a button. Um, you know, Danielle's got really great
    how-tos on that. And so, yeah, um, I like to sew in a
    button, um, clasp, a box. That's how I learned way back in the day. I didn't
    know all this other stuff. [laughter] I was sewing in all those clasps.
    Okay, so now we have the warps nice and secure. And while we were doing that, we
    were also paying attention not to, you know, pull one end more than the
    other because we don't want the warp warps to shift. Um, okay. So, I like to
    use the shortest end, the shortest end of the warps. Let me bring those up to
    the camera for my button because I like to have the longer warps available for the little
    loop that I'm going to need for my button to slide um through. So, I'm just
    going to take the end here and we're going to put those through
    And so I'm going to grab these two warps. And we're going to put these through.
    And you've got a couple options at this point. If you wanted, you could just tie a knot.
    Or I have been taking the two ends and then putting them back through the
    opposite holes so that I can hide the knot. And then you get this really cool
    look. It looks a little bit more finished, but I think if you if you leave it where the um the knot is on the
    top, it's just a little bit more bohoy, right? Just a little bit more organic. So, you can see
    how that looks. And then I'm going to take those and then I'm just going to pull them so that we can snug them
    up to the base of the project. Let's see. It looks like I There we go.
    I want it to be nice and even. Okay. And then at this point, I'll just
    put the button on its little belly. And then I'm going to tie.
    And I'm just I'm going to give it a good two knots until I know for sure
    everything is working out according to sizing. So, I'll just I haven't pulled
    on that one too too tight. I'm going to I'm going to wait. So, there would be the one end.
    And then what we have to figure out is how big of a loop we need for that button to go through. Oh, I'm already
    super excited. Look at how beautiful that is. Oh my gosh. [laughter] I knew it was pretty, but So, I'll I'll
    put it on my wrist like this. And then I'll just do like a
    one-handed little thing here where I can kind of do a visual of like, okay, that's how big I
    need the loop to be. And then I'll try to work myself out. It's like a little
    magician's movement there. Okay. And then we're
    going to come back. And I've done so many of these that I
    kind of know visually. So, since I have towels that are pretty long, I've got the ability to
    to just do a it's a knot, but it's it's better to
    have all these guys like under your control. So, there we go. Cuz
    I want to get all four of them, all four of the warps. And then I could see like that's going to be too tiny. So I'm
    going to walk the knot up. And I'm just kind of visually seeing.
    And then what I can do is I can bring this over here to Okay,
    perfect. I can see that the buttons going to fit through. And now it's just a very patient,
    very um intentional walk of the fingers and
    the pulling so that I know. And then I'll you see how I'm taking my
    pointer finger and my thumb and I'm holding the warps below the knot. And now I'm just going to take each warp and
    just gently I'm pulling to make that knot even tighter. And you can see how the the warps tightened up there.
    Whoops. So, if all went well, [laughter]
    if all went well, then I should be able to, and I am, get my button in there.
    And yeah. Whoa. Where do we go? And it's all done.
    So now at this point, I'm going to take this off and just kind of give you a
    couple ideas because I got all these all these warp threads that are having a
    party on my wrist here. Okay, there we go. So, um,
    what we could do, what you could do with the beads in the kit is you can take the ones that have the bigger holes
    and you can slide them on to the ends and add, excuse me, add another
    finished element. I was just thinking whether or not I have, let me look in my stash. Hold on one second.
    I know we did on the um here we go. This was on the
    boomerang on the boomerang project. And so you see how I just took
    the gemstones and I put them onto the warps and then I
    tied. So that would be, you know, this would kind of be like the before
    and this this would be the after. So that's an option that you could do. And I'm loving that look. It just makes it
    more finished. Um so you could take some beads from your kit and absolutely do that. This one definitely had um some
    gemstones in it, the February kit. And now that I know that this is going to work, I can come in here and I'm
    going to get a little bit more tight. [snorts] And I'm going to give it another knot
    for giggles. The third knot is always for giggles.
    Okay. And I'm still just going to um trim off a little bit here just to hide.
    But again, if you wanted, you could use Whoops. keep falling out of the picture frame there. Sorry. Um, you could leave
    those and you could add you could add some more beads. That's an option, too. Anywhere there's length and a bead with
    a hole, [laughter] it's fair game, right? So, perfect.
    All right. So, let me go ahead and put this back
    on. And I can't wait to wear it now.
    And so yeah, so we've got we've got our bracelet all finished.
    Okay, so I'm going to come up and then we are going to invite our lovely guest on who I feel
    like we've not seen in a hot minute um between life and the holidays. Um,
    I have to say that I think it's been since November and that's just wrong. So, [laughter]
    without further ado, I'm gonna bring our bestie. Hi, Daniel.
    [laughter] How are you, too? Oh my gosh. How are you? I'm loving that bracelet. That's really
    pretty. You know what? I am so stoked. So, this is the February kit. And um I think what
    happened with February is like well you know the there were the holidays and then Tucson came
    and then it was like oh wait we're where me Danielle. So um so I'm just super
    excited that you're back for for our monthly projects and we're kicking off
    with March. March. Yeah. Yeah. Yeah. So um the PDF I got it all
    printed. It's going to go tomorrow with um with the kit. And so that's great
    news because I didn't know if I was going to have to email it to everybody who bought the kit or I was going to be
    able to stick it in the box. So, good news. It's all printed and um I figured
    out on my printer how to doubleside
    like yay. Yeah. So, um yeah. So, why don't you what do you want to show off the March
    project and tell us a little bit about it? I'm going to get some some uh open
    up the door because it's so hot in California today. Switch my camera really quick and bring some bright light over.
    And so, this is I mean, this was just one idea
    that you could do with the kit. And so, I used a great idea. I like I use some of every
    bead basically that you had in the kit. Yeah, there's a lot of beads. I'll show that kit again at the end.
    It's [snorts] really fun and it starts out with a really easy um offloom technique that you could you could also
    do on the loom if you wanted to, but it creates a really fast peyote stitch to
    draw. And I'll show starting this if you want. And then we just bring it into a tube.
    zipper stitch that tube together. And then you just begin building fringe
    strands out of the base. And it's so funny because I said to you,
    I wasn't sure what you did on the bottom. I I didn't
    know if it was like a bunch of stringing or was it, [laughter] you know, like And
    when you said fringe, I was like, "Oh my gosh." Like that is the best ever. Look
    how beautiful that is. And just a reminder because um as I've mentioned at
    least a hundred times, every kit is a little different. And so, you know, just
    keep that in mind. Your beads are going to be mostly similar, but in some palettes, um they're a little
    different. So, [snorts] yeah. I feel like it was bead soup mostly.
    like there was a bag all different check beads. And speaking of checks, I see John in the
    chat. Hi, John. I say I know. Hi, John. And so the seedbead combination there
    just makes it so so nice as a way to just go crazy and use the beads in any fashion that you want.
    Yeah. There was one special bead that I did highlight and pull out that worked really nicely. I'm going to show you
    that one really quick. Okay. And I think this was a bead that was separate from the soup. So, I'm pretty sure it was included with all of
    them. I think there's something like that bead in every kit. I I think it's in the
    green bead soup kit. Like, there's so many baggies. I was packing everything
    last night where I was like, "Okay, there needs to be a resolve with how many baggies." [laughter]
    Like, there was a small a lot of baggies. [laughter] I like how it's it's kind of like pinch
    drilled at the top. Yes. But I mean any bead would work here. Any like gemstone bead or But what I liked
    about it was it made a really nice way to secure the top of the tassel. Oh. because you can secure through to
    the sides here on the top and then run a separate strand, a brand new strand through it again and it's going to
    suspend this way to make that bead was one of the finds in the
    secret room when I went to the check a couple years ago. Oh, was it? Okay. Yeah, it's cool. It's
    a neat one. It does feel like a button, huh, John? It's got the It's like got uh riveted.
    It's textured. Yeah, it's a way cool bead and I love the faceted gem. I mean,
    everything in this this this kit was everything. It had all the colors that I liked. So, every kit for the next few months is is
    like that. It's based on that Inspirations by Juliana 1990s throwback idea. And and so that
    bead, if I'm not mistaken, I've got it in blue and black and it's in another kit that will be coming up. So,
    Yeah, that's a good become like a kind of go-to thing, you know, like maybe
    I might have to go back to the check. [laughter] We might you wanted to do that anyway
    because Yeah. Anyway, [laughter] but yeah. So, um I have this one
    pre-made, but I can show starting it and then we can put it together. I'd love to see Yeah, I'd love to see
    that middle part because for me that's always the like how did we get there?
    I'll switch to the green again. You can use any color you want.
    And I used a start of eight beads. So I just pick up eight.
    And then the way I did my length of thread and like how much tail to use is
    you work with um I think I said about 85 inches or so. It just kind of depends on how long you're going to do your fringe.
    So there's some wiggle room there. But if you leave a really long tail, that tail can become your fringe later. So
    you don't have to work with like this really long strand when you're doing this part. You can leave half that length behind.
    I'll show you how how much length I've got here. It's a lot, but that's not the side I was working
    with. So if you do that, you end up with um a little easier time with having like the super long strand to work with. So super
    long tail, maybe half the length you cut. And then from there, you'll want to string eight. Okay.
    Two, three, four, five, six, seven, eight of those. Then you'll pick up two beads. Now,
    skip the last two that you strung. Okay. And go through the next two.
    Oh, and this is diagrammed in the PDF. And what is this? What is this step
    called? Uh, this is two drop peyote. Two drop peyote. Okay.
    So, you'll get this little Yeah. Almost like the legs of a little
    astronaut. Yeah. Yeah. Some just my friends from Canada say it
    looks like a nutchuck. Oh, I don't know what statues that were like Well, I first saw one when I went to a whistle there once
    and it was all in the mountains in the ski lodge areas. Okay. Stacked stones that look like person with arms outstretched kind of.
    Yeah. Yeah. Yeah. That's ex Yeah, that's what I was thinking. So, now you're going to the next two. You picked up two
    more. two more and skip two and go through the last two.
    Oh, okay. And see, now you have a peyote start. And in a pattern, that's rows one, two,
    and three. Oh my. Okay. So, we've got three rows right here.
    And we need a total of 14. Okay, that's great. And you'll just count that by seeing
    seven on the top and seven on the bottom. Okay.
    So, it goes really quick. So, you pick up two and now this time
    you're still skipping two and going through the next two, but it's much easier. You can just see them because they're the poke up beads
    and now you're going down. [snorts] Yeah. And the direction's less um
    because you know, you might flip it in your hand and Oh, so the directions, if I flip it this
    way, now I'm working upward. It actually doesn't matter as long as you're just going through the
    next set of beads. Okay. Well, that's good to know. It's a really forgiving technique that
    works up really really quickly. Well, that's very empowering. Now, why is it um not
    Why is it like um what is the word? It's not They're not even rows. They look
    Is that is what the stitch is? Is that why it's called that? Yeah. The p the peyote stitches are kind
    of offset [clears throat] to each other like a brick, like a packing brick. Yeah. Uhuh. Okay. That's what I was looking which makes cool zipper stitching easy.
    Now, you can still zipper stitch a piece like this that you loomed, but you would just need to completely square stitch that edge. And in fact, we've done that
    before, I believe. Yes. Okay. Yeah. I'm fascinated by off loom work. [laughter]
    There's always a way though to turn something into Melanie Melanie from Canada is working
    on a project right now on her loom and and it's a and it's an off loom stitch.
    Oh wow. Yeah. Yeah. I was quite impressed. Oh wow.
    Look how quick this comes together. It is really fast. Wow.
    So, I mean, I could actually even finish this one, but the way to tell how many you've got is you've got here's five,
    six, seven. So, I've got nine so far. Oh, okay. And my goal is to have a total of 14
    rows. Wow. So, you'll have seven here and seven
    here. Okay. [snorts] And from there, it's really easy to
    connect it into a tube. And this can be used in so many different ways. I mean, the tassel is
    one great idea, but there's a lot of stuff you can do with a tube like that. You can just string it on cord, you
    know. Yeah. No, I think you've done that on nlay silver silk if I'm not mistaken.
    Yeah, we do it all the time. This is like a go-to thing. I think Yeah, I was like that's a signature uh a signature style now
    [laughter] on the silver. Yeah, exactly. And before um something that I actually
    got into the habit of doing is before doing the zipper stitch, which is where we bring it together in a tube and zipper it,
    sometimes I just lock in the edge by just going back through. Oh, okay.
    And then back out from Oh, the edge. It's nice if you do that because then
    you don't have any loose. And you can even do that on your tail side. Okay, my tail side is really long again
    because that's going to become my fringe. Okay. But if I [clears throat] pop a needle on
    there, what happens to some folks, especially when they're new, is it gets loose on you when you're doing the zipper stitch, and that can be confusing
    and kind of frustrating because stuff's moving. But if you just do this little step here.
    Yeah. It's kind of like the first and last row on when you're looming. Like I like to go back through the first row
    and the last row. Yeah, exactly. It's just really nice. It saves you a lot of, you know, it makes
    it feel more stable like when you're working. Yeah. So, when you bring these together, you'll notice they lock like little teeth.
    Yes. Okay. That's very cool. So, what I'm going to do is I'm going to go through the next set of beads on this
    side just by coming over and going through it.
    It's going to pull it into a tube. And from here, I'm on this side now.
    Okay. I'm going to go through the two up beads on this side. Oh, okay. You're just gonna move your needle over.
    Yeah, you're just treating those like ex like pretend you're adding a new bead. And now we're on this side. So, we're
    going to go through the two sticking up on this side. Okay. Go through those two there.
    Okay. Last but not least, we'll go through the two on this side. Now,
    you know, it's it's um I don't know if you sewed at all, you
    know, when you were younger. It just reminds me of all of the, you know, stitching and hemming my pants,
    [laughter] sewing on button, you know, it's really the rhythm is really uh
    I know it's not identical, but it's it's similar, you know, like it reminds me of
    that. Exactly. It's a lot like slip stitch because that seam is just going to disappear on you.
    It's actually hard to find it afterward. You'll have this little open gap at the bottom. Okay. But that's really easy to close by
    just taking your needle and heading through the tail side. Ah, and then they come together.
    And now it's a completely sealed tube. Wow. And on one side I have this really long
    strand that can become fringe. Okay. And with the rest of my working thread on the other side, I'll weave to the top
    by just traveling back up. Okay. And the order you do this in is totally
    up to you. You want to make your fringe first, go ahead, make that fringe first. And if you want to do the top of the
    tassel first, you can do that first. So, okay. Whatever you like doing. [clears throat] Gotcha.
    I'm going to get some 11 O's now. So, some 11 O seed beads and a real pretty
    emerald green. Yeah. Nice. I do have the colors that are going to be in the kit, so I'll show
    everybody what ended up in the kit. Oh, yeah. I can't wait to see that cuz I
    kind of stashed those when I was I knew it was going to be greenish so I went with like greenish color. [laughter]
    [gasps] And so when you have this top of the tube, if you look at it, you can bict it directly by going across.
    Very interesting. Be doing is on one side you'll be skipping two and then there will be a back side where you're skipping three.
    Okay? But we're going to be adding the bead um this one here. Okay?
    And jumping over to go through the other side. So, see, we're exiting out of this one. Okay. And we'll jump over and go through
    there. But before you do that, pick up an 11 O. And then go through the bead.
    Okay. One more 11 O. And then here's that jump.
    Skipping to it. Actually, doesn't matter which one you do, but it will kind of create a front and a back a little bit.
    So, there you go. There's the top tassel. [snorts] And for now, you can go ahead and weave this one in if you'd like.
    Um, but if you want to reinforce it, which I kind of recommend doing, you can go down through a next bead here.
    Okay. Up through the adjacent, up through the one you were just coming
    down from. Gotcha. Head back through the whole bead. Try not to skip those
    11s. Make sure to get through those two. and then through the work on the other side. You can repeat that once, even
    twice more. Then just weave into the work and trim it. Okay. So, you've got that all ready to go.
    So, you have like your little body. Yeah. And and really, you just, if I hear you
    correctly, you know, it that that bead and that size are really what's most
    important to choose from in your kit. Because if if you don't have that
    particular bead in your bead soup, then then there'll be like I know that there were some big gemstones and stuff in
    there too that somebody could use. So yeah, this would work. Yeah, gorgeous brown ones would work.
    Yeah. Yeah, there's everybody's got some different stuff. And in fact, I had to
    make some more kits and I have to make I have to make some more of those little baggies with with, you know, those types
    of beads. So, I had three of them in mine,
    the three of those kind, but I feel like I'd love to see one I would love to see one with this bead on it even or like
    but I also think the gemstone would be gorgeous. I know [laughter]
    there I'm looking at I'm looking at the kit right now and it's a trip. I'm just like, oh my gosh.
    So cool. Yeah, there's just like a lot of really cool beads in this kit.
    But that so that's an easy way to do a tassel. Honestly, like it's the like super fastest way and it's a bead soup
    stash buster. You can use up any beads you want because from here on just go crazy with um I'm going to grab what I
    have left from the kit and then I have a little stash which I think is I have a July kit.
    If I need more beads, I can dash into that one and get those. So funny. Yeah, there it's all check glass. Yeah,
    David, I don't know David if you're asking about this kit or if you're asking what we're doing on whatnot, but
    what um I'm what's going on on whatnot is all it's vintage check glass. Um some
    preworld war German glass and some modernday check glass. So I don't I'm
    not sure David check glass question mark which project you're talking about. That
    is so beautiful. Oh my gosh, I just want to do that. Now I can see
    I was telling Danielle that a very very uh well-known and just very talented and
    accomplished designer more so in the craft world than the jewelry world um
    wants to buy one of the kits because they want to make Danielle's necklace. So [laughter]
    I was like, "Oh my god, totally. I gotta send you this one.
    There won't ever be two that are the same because you just go freestyle. Both the chain
    one for Texas. I wonder if I could get it to you when you had you could just ship it to Texas.
    I could just have you ship it to Julie's house so that we could have it for and for jewelry con.
    I can send it to you. Yeah, I'll give you Julie's address. Oh yeah, that'll be good.
    Yeah, then we can show it off to um everybody. I'm going to grab some slightly larger
    beads just out of here for for effect, you know, just to kind of show there's no rules for how to do this. Um,
    well, the technique is just so great that you can use the kit beads. You can use beads from other kits that you know
    you've bought from for the jewel box. And I'm trying I think that's Havasu.
    Is that This one is old. This is one that I pulled from my, you know, stash
    that I have going in there. I'm pretty sure that's that's Havasu.
    That's really nice. Yeah. I think the secret to making making cool
    tassels is there is a little bit of a rhyme or reason to the
    uh way you do the fringe, which is again freestyle. But if you want to start with some little smaller beads at the top,
    see how I'm kind of focusing on the 4 millimeter to the 5 millimeter sizes. Yep.
    And then as you kind of curl the bottom, you add a little bit bigger ones and then vary the length. Make those lengths a little different.
    But other than that, just go crazy. Do something that you want to do. If you have a special bead in there, it's like a story. Anything that you feel inspires
    you. Yeah. And then break the rule every once in a while for texture. So here you see I put
    a large bead at the top. Yep. So just whatever you feel like it's just
    totally at your at your whim. But the basic pro idea is to string one 11 O.
    Yeah. Okay. Your your thread will be exiting from the bottom from one of these and it doesn't matter which one. Okay.
    11 O. And then um let's see I find one of these chip beads. This is a gemstone
    I think. Chip. And we'll just space each of these
    with an 11 O. Let me grab a few more. See if I can
    find some. And here's a chip bead. It's a nice one.
    Go with one of these. I did use all those gemstones.
    Yeah, the gemstones are that I love gemstone chips. Like I when I first
    started back in the late 1990s doing this, I mean chips were
    chips were it. Like I I feel I don't know that we were limited to
    chips, but I just feel like there was an abundance of chips. I don't
    know. I don't know. Maybe round evolved. I don't know. I wonder if John knows the answer. He's I know he's the check
    daddy, but he might know. I think it'd be cool if like maybe for some of your future kits if he does more
    bead suit like you had in there. That was really cool. Yeah, I liked that. Yeah, really is inspiring.
    Yeah, there's um the the next few months are all based on this
    to keep it simple bead soup kind of concept where there's just a lot of different beads.
    So many gorgeous ones. So the length is up to you. Whatever you want to do is really good. And then so
    after you've strung something that you like, anything you want. I think I went a little long on this one. Pick up one
    more 11 O. Yeah, it does. And then head up through
    all the beads, but skip that last 11 O. Yeah. Yeah. That one hanging.
    Imagine becomes your turning bead. Then that's all you got to do.
    John, we'll be living in Chicago at some point. I can just see it now. [laughter]
    I would love to visit his warehouse. I know. Nle went for me last time and did some Yes, I know.
    purchasing like, oh my goodness, I love it. Yeah, it's
    And Laura is a sweetheart. Laura works there. Oh, yeah. I think she's helped me before
    with some orders, too. She's actually like a phenomenal designer and not just jewelry. Like,
    she's a fashion designer and the clothes that she makes are ridiculously cool. Oh [snorts] my gosh, that is awesome.
    Yeah. Yeah. So, there's your first strand. This one is really whimsical.
    Yeah. That's nice. Um once you've got your first strand on, it's really easy. You just make a turn and head down through the adjacent stack
    of two there. Yeah. And when you pull that through and tighten. Yeah. The cool thing, too, is it's just
    making that tube even more secure. Yeah, it is. And there is an optional
    step that I didn't include in the instructions because it's not really needed, but if you want it to be totally
    crazy, you could um run an additional set of fringe strands through the center
    of the tube that exit out of this bead. Oh, now you're talking. Yeah, because you know how we were when
    we were attaching it, the next step is going to be to bring a new strand through
    to become the chain. So the chain would just basically go through this bead.
    And if you want, you can use beading wire so you don't have to reinforce. But there's basically your necklace chain, right?
    Yeah. I was Are you using wire or fire line?
    Um, so for the for the fringe, I was using fire line. It's a little thinner. It's a little thinner. Yeah. Okay.
    Strong, but still has some motion. Yes. Yes. But for the chain, fire line might be the uh sorry, wildfire might be a
    better choice because it's going to be thicker and it's going to or stringing wire like you said, like 49
    maybe or something. Yeah. If you use fine beading wire through here, it will save you having to
    reinforce because you know when you make a beaded chain with beading thread, you want to go through it two times.
    Okay. And the way I wrote it up in the instructions is you start with one side and you string a chain
    and you go through here and then string the rest of the chain over here and then attach your clasp,
    make a turn and come all the way back. Travel all the way back through and tie off up here with your tail.
    Okay, timeconuming, but it works fine. Um, and it's flowy. And that is what was done here. But I thought a bit about it
    afterward. I'm like, hang on. I could have saved myself a few minutes if I had just put some fine beading wire through that and I could have just crimped it.
    So I think either way, whatever you want to do is great. So I put that as an option on CF if you like it. So stinking
    cool. So that is that is it in a nutshell. The rest of it just rinse and repeat.
    All right. Well, I'm going to go. Um, Joan, can you just put my overhead on really quick and I'm going to review the
    kit real fast and then Yeah, there we go. You can uh Yeah. Okay. So, this is
    the March kit. There are um some left.
    I'm not exactly too sure how many. So, you've got, you know, um some gemstones
    and then like a variety. I was trying to remember for the life of me because my mom packaged all of these months ago.
    Um, not this heart, but all the beads and I was like, where did because I hit up the Santa Barbara show a few times
    and so um so who knows? But I did add some of the teal um crystal which I just
    thought was gorgeous. And I'm trying to figure out which way to go here. And so there's that fun bead
    soup. And then I'm just going to bring this in. This is like a bunch of chips,
    some gemstone chips, and then some fun. Everybody got a wood um
    a wood bead that you could choose to do something with. And oh, here are the colors for So I ended up getting an 11 o
    transparent rainbow olivine. And it's really pretty. It's It's I
    don't know why the camera is taking away the shine. Oh, there we go. So you can kind of see. And I love how
    it just really called out these colors, you know.
    Yeah. I thought it was really pretty. And then I went with an 80 transparent
    rainbow teal. So these two Yeah. So when you're doing
    when you're doing the loops, you know, and you just have like a lot of contrast between the 11 O's, the 8 O's, and then
    all of the beads that come in the kit. And like I mentioned earlier, um we did
    get the PDF in time, and so I've printed them all out. Um they're two-sided, so
    you're going to have instructions on the front and instructions on the back. And then of course you always have your tea
    and cookie, which I should have made some tea except for this is chamomile and I still have my what not to do and I
    have to stay awake. So [laughter] I'm going to I'm going to bring me up
    and then um uh Joan, if you want to throw Danielle
    back up gently. Throw Danielle back up gently and me. [laughter]
    There we go. I used your wood button in a bracelet. Oh my gosh,
    I ran a little short of my hemp, so I ended up adding some color to the end, but it worked. Oh, I love that. What did you um did you
    knot that or macra or what is that? I can't tell. It's macra. A really easy macra
    technique. Oops. Okay. Sorry. Oh my gosh, that's amazing. Oh, I'm so
    glad you used the button. Yeah. See, there's really cute. Yeah, there's components that you can use
    specifically for what I'm teaching, for what you teach, for maybe like what something you've already done. Like I I
    just try to make the kits different. [laughter]
    It just there was something fun to play with and it got a little crazy at the end because I pulled in some other colors. I ran a little short of the
    green and so I had to, you know, um, bring in another color so it started
    changing and becoming something different. That's cool that you could do that. I love that. I was experiment so I didn't know and I
    didn't get it exactly right. Yeah. But now it gave me an idea for the future. Yeah. I love it.
    I love it. And you know, I just want to um I'll pull in the finished bracelet that I did. Um, so this was my take on
    February's kit, which Danielle did not have February's kit because we were still trying to get through all the life
    things and and just, [laughter] you know, like so crazy. But, um, so
    yeah, so for March, we have our project that's going to be Danielle's French necklace. I think everyone's going to
    enjoy that. And then in April, I'm hoping this weekend to get that all dialed in. and I'll get I'll get you the
    goodies so that you can make the community for Jewel Loom um something
    delicious. And yeah. Yeah, I think that's going to be really
    fun. And um we're always using the Jewel Loom or we're doing um an offloom idea.
    It It's kind of I'm going to always be on the Jewel Loom doing
    something. I don't I don't know. I don't know. I put I did a reel of
    this. Look at these. Is that crazy? This is cute.
    This is where it all started back in the 1990s on Alen's Creative Living. So, I learned how to do this technique
    and we would literally sit around, you know, when we weren't taping the show
    and there'd be fishing boxes full of beads everywhere and um, you know, like
    I mentioned earlier, I was always sewing on a clasp, right? So, the button clasp, always sewing one on. That's what's in
    my book, in fact. And we didn't have wildfire. We had fishing line. And so,
    so the earlier bracelets, um, the earlier bracelets were woven, I
    don't know, I had one here somewhere, but anyway, they were they were woven with, uh, with fishing line or like
    Nimo. There was like Yeah, there was like white white Nimo. There was no there was no like 15
    different colors. But, um, you know, the the technique lends itself to this is
    just like a a little a brooch pen. Um, I must have put the you could do like a
    barret and of course you know you know I love my go big or um stay home.
    [laughter] So all um the month of April I will play
    around with the kit and kind of take my you know woven technique on the loom on the jewel
    loom. you'll do whatever you want. Like you have to do whatever you want and um
    whatever Danielle does is where a lot of people who love the PDF will be happy. [laughter]
    Yeah. We'll do a little set of instructions. I was like I don't do PDFs.
    I I just You don't really need it unless you have a pattern that has to be followed or like there's a thread path. If there's
    no thread path, you're so good at that. Like I have learned like just don't like if you don't do something just let someone else
    do it. So and I don't do it. I don't do PDFs. I I just never have. Um thank you
    Zach. Yeah. Those were um my favorite my favorite
    projects. So, there was something else I was going to say and of course I've lost my mind somewhere along the way, but um
    Oh, next Thursday I will be in Texas. So, there won't be a Jewel school live
    and she'll be having fun. I'll be having fun. So, um, so I will,
    um, we'll catch back up, I guess, that first Thursday of April.
    And then Danielle, you'll just have to tell me like this is, I think this is the third. I think we were kind of doing
    the third third of the month. Third Thursday. Yeah, something like that. Third or
    last. So, whichever one works for you is when we'll have you back on to do
    April's project that I'm sure will be amazing. [laughter]
    I'll let you know. Yeah, it'll be when I see it. I'll see it when you see it. Yeah, I'll see it. Yeah, we're gonna see
    it together because that's what is on my list this weekend. I have so much to do before I leave. I'm just like, "Oh my
    gosh." Um, it's always It's always like that when you have to travel. It is. But I'm so excited. I'm so
    excited. And I got my hair done today, so I don't have to wash it. And [clears throat] I might not wash it until I get there because I know that
    sounds gross. Like, we're talking next Wednesday. I might have to break down and wash it. But as soon as I get off
    the plane in that Texas heat, it's going to fall. So, whatever. It doesn't like my hair like my big hair. Um, I am going
    to be on Whatnot at 5:30 Pacific Standard Time. And um John is
    going to be in the chat, so he'll be telling stories of where the beads came
    from. I will be um making them look pretty. [laughter]
    How do folks log into whatnot? Yes. Um so Joan's posting all of the all of
    the Oh, there's links. I might pop in if I can. Yeah. Oh, there it is. Yeah. Yeah. So,
    you have to have an account. It's like you download the app, you open up an account, and whatnot is been around for
    a long time. Um, you know, I I'm not going to say more than 10 years, but I think it's been seven.
    Oh, wow. And Gary Vee, who you know, I follow and I and he's been around forever in a day.
    Um, he was the one who was who's highly recommends people pe people's like,
    where did that word come from? highly recommends that people do it. So anyway, um you open up the account,
    they're legit. Don't worry, like it's not weird, you know, because you are
    going to have to put your paying payment info. Yeah, you can do that on any website
    nowadays, though. Do that on any website. So, um it's all legit and um and you bid on stuff. So,
    that's that's the fun part is to Oh, is to watch that to see like how that
    works because I've never seen it before. I keep meaning to log in, but yeah, get distracted.
    I get, you know, I get distracted by all the vintage jewelry because that's what
    I would I'm most interested like when I'm on and shopping. I'm watch all the
    people with their vintage jewelry and I'm like, hold back, hold back. Then I bid.
    [laughter] So, it's just fun and it's such a sweet
    community. Everybody's really nice, you know. Can't see anyone's face, but there's a lot of chat. A lot of chat, so
    it's fun. But yeah, pop in and say hi if you can. And um I appreciate you so
    much. Oh, I appreciate you, too. I really do. And the community appreciates you. And this is a great
    project and everyone's gonna like just have a lot of fun making it and be empowered by it. So, you know, they'll
    be able to take this technique and make more of that necklace with their own beads or with past kits or future kits.
    So, so um everyone, thank you so much. So,
    step four of February's project, if you had February's jewel box, this was step
    four. Simple, taking it off of the loom, adding the bead button. Um, and so step
    one, two, and three are um already done. And so if you bought
    the February box, you can see that. But if you buy the um
    or did buy the March box, what I did for February, you can do for March. And what we do for March, you can more than
    likely do in April. Like I'm trying to kind of have this synergy of like the freedom that these next several boxes
    this year are going to kind of be this, you know, do what you want. [laughter]
    So anyways, a thanks Zach. We appreciate you too. Love the Juloom community. Love your community too, Danielle. I think we
    share a lot of the same people. So we do. Yeah, Zach is one of ours. Yeah, Zach is amazing. So anyh who, um,
    have a beautifully blessed evening and I will I won't see you next Thursday, but
    um, I'll see you the week after and I'm sure Danielle and and all of our bey besties will be online doing something
    amazing. And if you're in Bellacon, I'll see you in Bellacon. I'll see you for Jewelry Con next Monday, the third or
    two Mondays. So yeah, and that's going to be amazing. Your project is awesome. And so if
    you've not signed up for um Jewelry Con, I don't know if we have the link handy
    or not, but we can get it in the on the Jewel Loom page and um I can do a post
    in the YouTube community. So Bellacon traditionally is like a lot of general
    craft, whether it's paper crafting, stamping, journaling.
    Um, but we've started to interject a little jewelry and then we were like, well, let's just have an all day jewelry
    event. And so Danielle and Deb Floros and Nle
    and Eene Hull, who's a scrapbooker, but she's a jewelry maker, too. And then Amanda Stevens, who's a card maker, but
    turns out she's a jewelry maker. I'm like, "Oh my god, these girls." And then our very [clears throat] own John is
    going to be speaking to the history of check beads which is just going to be flipping amazing. Um Meredith Rowdy from
    uh Beetelon is going to be talking about the essential tools for jewelry making. So that's super exciting. And then Laura
    is going to be doing her project is incredible. And so um it'll be fun to
    get to know her better uh the community to know her. So, I think I mentioned to everybody,
    [laughter] I'm looking forward to it. Yeah, it's going to be a lot of fun. And thank you for saying yes. [laughter]
    A well, thank you for inviting me. Okay. All right. So, another goodbye and
    we'll see you again very soon. See you soon. Bye. Bye.