Your Cart is Empty

All right. So, here's the beautiful kit and all the little components. You get so many cute little extras and there's
seed beads for us to use. And then the star of the show are these gorgeous uh
check tiles with the laser etching. These are really, really awesome. Um, and so to get started with our project
today, in addition to your creative soul kit, you're going to want to have your blue original jewel loom. And then I'm
going to be using some wildfire beading thread. And I'm going to use 0.006.
I think with this color palette, you could use either or any really any of the colors. I think blue would be
pretty. Uh, frost would be really nice. Um, or black. So, uh, gray, beige, if
you have it. I think all those colors are going to look really good. So, to get started, we're going to warp our
jewel loom. Begin by inserting the U stabilizer bar
or the tension bar, sorry, into your jewel loom and then working from the spool of thread,
start by tying a double knot to one of these buttons here on the side.
All right. Bring your thread behind the button.
And then we're going to put just a few warps on. We're going to have one.
And then flip it over. Go around the back. Skip a total here. Uh on the on the um
oil bar, you want to skip a total of three. And forgive me, I didn't skip three there. I only skipped
two. Here we go. I'm going to skip a total of one, two,
and three. And that's going to be the way to fit these on there
like that. So, three. Then come up here and same thing.
Sometimes I just count them with my fingers. Make sure I don't miss any. [Music]
Same thing. Skip one, two, three,
and go around. [Music]
Making sure I'm skipping three at the top here, around the button on the back. And now what I'm going to do is I'm
going to go around this button a few times here on the side. And then hold my thread steady while I
trim it. Leave yourself a little room uh when you do trim it so that tying the knot is
easier. There we go.
[Music]
Now, we don't have a tail to tie to on this side. So, what I did is I went under the thread there and then through
the loop. And I'm just going to pull that as tightly as I can,
trying to get a good knot on there. And then I'm going to repeat that one more time.
So bring this under and then through the loop
again. Pull really tight. And if you want to do that a third time like I did on the starting side just to
be sure. It can't hurt. There we go. So now we can go ahead and
remove the bar that tightens everything up. And so just very carefully do that
by resting the jewel loom against your stomach. And then just use your fingers to gently remove the bar
and it'll tighten up those warp threads for you really nicely. So you can set the pieces to your jewel
loom aside just for now. I often will put my little tension bar away so I
don't lose it. A couple times I've lost it and had to search the house for it. So we need a little more thread. This
time cut a wingspan. So, 65 in or so
of thread. And again, I'm using Wildfire 6.06.
And trim that. And then, uh, I'm going to grab some
chain nose pliers really quick. If you flatten the end of your chain nose pliers,
makes it easier to get that needle on. I'm just going to grab a beading needle.
Believe I'm using a size 10. size 10 hard beading needle. These are
the ones from Beetle One. Fold over some amount of thread just to make a manageable working length. And
then um what I'm going to do is get some of my beads ready here.
Let's turn and arrange it like this. Bring your
needle under. And I'm just going to poke that aside for now. And grab some of my
beads.
Just really gently free some of those up. [Music]
And then let's grab the other color. What a neat little combo this is. It's a really pretty combo.
And I'm just going to have those at the ready
[Music] right here. Sorry if that wasn't visible while I was rearranging those. Um, and
so go ahead and pick up for this first step, pick up two,
slide down, leaving about a 10-in tail.
And then bring your needle back through that same hole and use it to stabilize those beads in between your warp
strands. And pull that needle out. And then bring your needle through them
again. this time staying above those warps. And when you do that, you'll get
something that looks like this. And I'm going to flip these forward so that the second hole, these beads have two holes.
Flipping it forward this way so that it's ready for the next step.
And let me go ahead and pull this through just a little bit. There we go. Bring that down.
And now what what I usually do is I'll just kind of push these forward a little bit so I can see the second hole. bring my needle through.
There's only two of them, so it's should be at least pretty easy to get through the both of them.
Bring that through.
And now, same thing. You just want to pass back through that same second hole of both of those beads. This time,
keeping that needle above these warp strands. [Music]
All right. And so we have our beautiful beads on there.
[Music] So let's create another row of checkiles.
I'm going to string one green and one red.
And again, bring that underneath the warps. Arrange so it sits
just underneath and just above the uh the last row you created.
And then pass back through those last two holes, the same ones your threads currently going through, but staying
above those warps just like we did before. And then again, we're going to need to
pick up the second hole of those check tiles,
making sure we keeping we're keeping the thread underneath the warps that whole way.
And then bring that thread right back through those same two holes, one in
each bead. Um, staying above the warp.
So, so far we've got that. And the way the pattern is is it's this cute little diagonal at first. So you
you're just adding one red and one green. And then go ahead
and bring on the two green.
There's those. [Music]
Same thing again. We're going to go under. And here we go. Just going to pass through both of those beads.
Bring that through. And then bring your needle through those two top hole of those checks once again.
So there you go. That finishes the next the next row there.
So they they move around a little on you, but they should pretty much stay nice and stable just like that.
So, I'm going to create a nifty little pattern here that introduces the red bead now and
then the green bead. So, it's going to kind of look like a little diagonal stripe once you get a lot of rows on. So,
here's the Oops. Next beads. We'll have red and then green. Then a
row of two red. Then it'll go one green, one red.
and then a row of two green. And we'll be right back with the row I'm currently working. One red, one green.
So, in the end, you'll get this really pretty little diagonal going as we work.
That'll look just kind of like that. Really nice little simple pattern, but it's going to be really cute as it's finishing out. So, go ahead and work
that to um the desired length of your bracelet.
um minus about, you know, a distance for the closure.
So, here's what it'll look like. And so far, I've only got 5 in. So, I'm going to be needing to add thread.
Unfortunately, I was just a little hair under what I needed. Um, so I got 5 in
having cut 65 inches of beading thread, leaving a 10 inch tail. So, if I maybe
cut 75 inches, I or or 80 inches, I could have saved myself adding thread.
But, you know what? It's It's not too hard to add thread. So, leave your old working thread in place. Just leave that
hanging out. Um, and then bring on a new strand by threading a new needle,
picking up the next two beads you need in your pattern. And of course, I brought that underneath my my warps
there as I'm doing that. Got one and two. Those are the next beads.
Leave a tail. This one can be shorter. It can be like seven inches. Just enough to weave in.
Arrange. And then go ahead and pass back through the top.
Pass back through the holes of that those beads staying on top of the warps. Sorry, forgetting my words. There we go.
There's my tail. Make sure I left just enough tail there.
Pull a little more out there. Okay. So, probably got about five inches there. That's uh less than I would normally do,
but I think five is okay. Seven is better. Easier to weave around, but this
being such a small little band, I think that will be okay.
And I'm going to pass back through. [Music] All right.
And so that's how you add thread. And then just leave these for now. We'll weave those in at the end. Then bring
that that um thread underneath. Now I've used almost all
of the beads.
There we go. And let's check my length now after I
get this row on. [Music]
So, let's see here. There we go. Uh, I've got a couple left from um those
first two strands. Now, I do still have these full strands. I haven't even used those yet. And so, the length I got
before even using those is
um six. So six inches there. I think my closure
is going to bring it to seven to 7 to 7 and 1/2 in depending on um how much I
build out. So I might stop here, but if you'd like to continue adding rows, you can. And um just keep going to your
desired length for the design. I think the closure will add uh you can count on adding an inch. It might add a little
more depending on if you make it adjustable. Okay. So, let's do our next step. Let's go ahead and take this off the loom. And
then we're going to do some fun little uh additions to this design.
So, to remove it, go ahead and go to the place where
you've made your knots and just remove those places. Um, and sometimes I think
the easiest way to do that is just to get under that loop there that's on the button. Do that same thing down here.
So there's those two. Those will just, you know, become free.
Same here. And then we just have this one little loop to remove. Just use your chain nose pliers, pull that free from
the button, and now you've got your gorgeous bracelet ready to go.
Our fun next steps.
So these are our weft threads. Weft tail. remaining working is this one
here, this longer one. My needle's still on it. Putting that up and out of the
way. So, weft weft and weft. Ignore those for now.
Um, and what I'm going to do next is pull one of these loose ends that has um been cut free. This one's been cut free
from the knot. And I'm just going to go ahead and pull. Make sure you've got a loop um
a loop here, right? And then this one here has no um
nothing attached to it. We're gonna pull this side. Hold everything just kind of flat as you do this. Then just very
gently pull this.
And I feel like the edges are usually the most tricky ones. Here we go.
There it goes. It might be a little tight on you at first, but don't sweat it. And keep those beads keep those
beads in place, you know, so they look nice and flowy. And then we're just going to do the same thing with this strand. And this strand,
again, on one end, it doesn't have anything attached. The other end is a loop.
And so we're just going to hold everything nice and tight and pull this until that loop up there comes down and
hugs the top of the bead. You can almost kind of feel it snapping into place there.
[Music] So make sure everything looks good and is nice and flowy. You can even try it
on. Isn't that cute? My gosh, I like that even as it is. But we're going to have fun and we're going to jazz it up.
But even just that, I love. So start by weaving in. So, to weave in
um any of these strands, you'll need to put a needle on. And I'm going to cut the knots free from these
ends. There's knots on that end.
And then just go ahead and take those chain nose pliers and flatten.
Grab a needle. I'm going to grab a new needle. I left my other one on my working thread. Oops, that's not a
needle. One second here. There we go.
Yes, my little needle jar has a spider in it if you guys spotted that. It's not a real one, don't worry. Here we go. So,
from here, this is a warp thread.
And the the difference here between like when we usually do this type of work, we always
have like a single bead. Since this is a two-hole bead, it's actually okay to just go through
the top two beads here. Even though that's a warp strand,
normally I wouldn't do that, but because it's got a second hole, it does not destabilize your work.
I'm just going to weave through the next one here. So, go ahead and weave in all but your
two longest strands. And um you might have to add thread, but just you know as a start, keep your two longest. And from
here, we're going to just weave to exit from the second hole from the edge. And it
doesn't matter what side of the bracelet you start on because they're going to be the same, but just get your your thread
exiting from the second hole in from the end of your bracelet.
And then pick up one of these cute bar beads and slide that down
and go through the other side. This is a two-hole bar bead. So go through the
other side of that bar bead. And then what you want to do is go down through the top hole of that next tile.
So it'll be this red one right here.
And I'm just going to bring that on. And what'll happen is this cute little
bead will sit just on the side of those two like that. So that's what we're going for.
And I'm going to carry on through this next side here.
Pick up another bar bead and slide that one down. And then go ahead and bring your needle
through that side. And you'll pass through the second hole here.
And this time I just exited from the middle.
And so now you have a bar bead on each side. Looks just like that. And just like
that. And so your thread will be exiting from the bottom hole on the inside of
this top edge of of bricks or uh sorry tiles. Um and so what you'll do is you
see your threads coming out right here. Go ahead and jump and go through this
one right here and then carry on through the bar bead.
So you'll get through like that.
Alternatively, you can you can keep going all the way through and then through this one and through that one.
Just somehow the goal being to get your thread exiting from this one right here.
So, this is the second heading down the bracelet part of that bar bead. All right. And so now I'm going to pick up
one 11 o seed bead. And those are the the gold seed beads in your kit. I'm
going to pick up one of these 4 mm um beautiful shiny droo beads.
Another one of the 11 o seed beads. And then let's string on a gemstone
rondelle. Repeat the seedbead droo seed bead
configuration and slide that down. And now pick up another bar bead.
With this bar bead, what you want to do is you're going to
skip the ne. So, we've basically got the way to think about this configuration is
you you've got the square of four check tiles and each of these bars is going to
be using the the middle of it, right? We're
going to skip the next set of two. And then we're going to put the next bar in
the middle of think of this one as our next square. So how that looks is just skip over this
one and go through the second hole of the next one. So just like that.
And what that's going to do is it's going to bring it on like this.
And on this side, just pick up another bar bead for now. Slide that down.
Just like this. Turn through the second hole of that bar bead and go through
the top hole of the fifth tile down.
And you may or may not be able to do in one swoop. I try to get through all of them. The bottom hole of that bar bead.
See? So now we're getting this gorgeousness. Just like that.
All right. And you guessed it, we're going to be stringing another set of these.
Okay. A gemstone. Another set
of these. And another bar bead.
So, just like that. And again, we're going to skip the next set of two. So, picture this is a
square. Skip these. This will be our next square. So, we're going to go in the
second hole here. So, just like that.
Let me just get those seed beads out of the way so you can see really well. So, now it's going to look like that. Pick
up another one of these bar beads. String it down.
And then turn to head through the other side. Continue through the tiles next
hole. Right. So, just like this.
So, this is how you do the first side. Tighten that up.
It's going to look like this. I'm going to continue doing this all the
way down. So, you're going to have it look like
this. So, skip and then here. Skip and then here.
And so when you're creating your um bracelet on the loom,
if for some reason you have a different count than me, which you may very well have,
one thing you can do when you're first starting your bracelet, is you can lay out like this to see
where they're going to position. And if for some reason you have a extra row
here, that's actually okay. Okay, we'll just have that side be the um the side that you put the um non-loop part of the
closure we're going to create. And in that case, um it will kind of make up for that lack of symmetry. So that's the
easiest way. So, for example, if you had an extra row here, don't worry about it. Just, you know, end with an extra row.
Or if you want, you can try to center it. Um another reason to center it is in your kit, you're going to have a total
of I still have four extra. Uh, and let me
show you just the measurement here really quick. Now, the closure is going to add at least at least an inch and a half, probably two inches, but I'm at
six here, and I'm planning on my closure adding an inch and a half. So, I'll be at 7 and 1/2 there, having done 1 2 3 4
5 6 7 8 9 10 11 12 13 14 15 16 17 18 19 20 23 rows. So, if you have an odd count
of rows, you'll end up with the symmetry of these bricks being like that. Uh, and if you don't, it's no sweat. you just go
ahead and leave one edge with, you know, without an you just have another little set here. It would look like um let me
show you so you can have a visual. It would just maybe look like this for
you if you had an extra row. And that is totally fine because we'll
just put the pretty side of your closure here. So either way, that's fine.
Another thing you could do is you could try to try to center it, but I really don't think you need to. But um you have
another set of two. So keep in mind every set of these is adding quite a bit of
length. So I do think this will accommodate all all desired lengths out
to 9 in fact. Um because each of these little segments adds an inch and a half.
So, you'd want to, if you used all those beads, you'd be out at, let's see,
we'll measure from here. And then we'll add on another set of
those. And another set. Yeah, you would be you'd be at eight. And then with the
clasp, you'd be at nine, nine and a half if you used every single one of these.
So, that's that's how to figure out your length there. And you can always um
adjust the length of the closure. I'm going to show you how to do that when I get to that part. So, we have some
flexibility when we get to creating the um the finishing to change the length up
a bit. So, what I'm going to do first here is I'm going to keep working. I'm going to need a few more of these.
Get these out. Keep doing this. Creating
like that. another one of these. One, two, and
three. So, like that. And then putting on a bar.
And then you want to skip the next set and go down through the second hole,
the one after that. And there you go. Another bar for this
side to help us do our turn on this side. Bring that down. head through the
second hole and go through the set of holes below. And if you're lucky, we can in one swoop join that bar. And if not,
just do it in two steps. That's okay, too. So, basically, you're just getting
getting those loops to go just like that. And then make sure that's nice and
tight. I'm going to repeat that to the end. And then I'll show you how to work the other
side. Hooray. Look how pretty. Isn't that
cute? I really like it. So, that side is done. Let's do the other side. From
where we are here, we're exiting from this bar bead on the edge from its outer hole. And what I'm going to do is just
go back through the second hole of it, which I guess is the first one if you're counting heading that way. So, from
here, just go back through this one. And, you know, make sure everything is staying tight. Just give it a Well,
don't do that, but just give it a little tug right here to make sure everything's nice and tight. And you can even just
maybe hold it in place as you bring your needle through. And I'm going to try to get
all the way through to the other side here.
If you can't do that all in one swoop, don't worry. You can always, you know, weave around to get where you want to be.
So, I'm exiting from the second hole on this side. And from here, you probably already know
how easy peasy it's going to be to do what we're doing next. We're going to pick up a seed bead, a
droo, a seed bead, one of these beautiful rondell's. Gosh,
guys, look at these. They have rainbow in them. Not pretty. It's a little red and turquoise. So pretty. Look at that.
Okay. And then another seed bead. Duke seed bead. So like this. And that's all
you need now because our bar already there. And we're going to head through the first hole of the next bar.
Bring that down. And we're going to come up through the second hole of that bar. But I want to
show you one little trick. So when we go through the second hole of this bar, you can just go right through it. Just like
that. Right? Or if you want, you can grab that thread bridge first. And this is just a knit. You don't have to do
this. I just, you know, me being me. But I'm going to go under this thread bridge here. See, by just going in between
these two beads. And the reason for that is that it's just going to make it extra like strong there. Because why not? It
doesn't hurt anything. Just go through, flip it over, and bring your needle up
through that second hole.
That just makes everything tight because now you just double anchored that bar onto the thread bridge. And and in this
case, it's actually the warp that's running that side. So, let's do another set together.
Seed bead, drise seed bead, beautiful rondelle, and uh let's get more seed beads. I'm
almost out. Some more of these
seed bead. and drew can seed bead.
So that's our pattern there. Same thing here. We're going to go through the first hole of the next bar.
Okay. Bring your needle if you'd like to under
that thread bridge that the bar is sitting on top of. And then bring your needle
back up through the bar this time through the second hole.
Just like that.
So, I'm going to carry on like that, adding my rows all the way down to this end, and then let's work together on
putting the beautiful closure onto it.
All right. So, here comes my last side of the embellishment here. And my thread, this was my original warp
thread, uh, one of the sides of warps, and it made it pretty far. But if yours didn't, you can always weave in a new
strand at any point. And I'm going to show you right now how to do weaving in uh for this design.
So it's also how you add thread, weaving in and adding thread. So the um current
position of my thread is I just went through this bar. And what I'm going to do is I'm going to
go through a set of beads over here. So let's just pass through this whole row.
Why not? And if you can't get through the whole
row easily, you can always just go through one tile. I think that might be the best choice for me actually in this case. And now I'm going to turn and go
through the other hole of that tile.
There we go. And what I might do now is you see how
my thread's exiting from from this tile here? If I go under this thread bridge
right now, it doesn't matter which direction I go. Basically, the goal being to go back
through the bead on the opposite side of that warp thread. So, you can either go
under it or just make sure as you jump over it and go through the bead that you're going
over the warp. And when you do that, what happens is it
makes a really nice weaving in turning spot. So, watch what happens with this thread really quick. So, it's going
going. And see how it just catches like that on the edge of that warp thread.
That is a really strong turn for weaving in. And so, if you just do that a few
times, you can do it here on this side. Now, just making sure. And if you're not sure you made it under the warp, what
you can do is you can go literally bring your needle underneath it like that,
right? and then head back through that bead.
I'm gonna try to get through one here.
So, when I bring in a new strand, I'll do the same process, but I'll likely do it down here somewhere and then just
weave the strand up so I'm not overlapping a lot on this just one edges. It's okay to make turns in this
direction. See? Like that.
going through the beads here. Flip it over.
I'll go through a few more. And this is where I'm going to trim this
thread. And so again, if you needed to bring a new strand in, it's the same process.
You just do that until the tail stops moving.
And you can weave in at any point along your work. Thread burn that or just flush cut it.
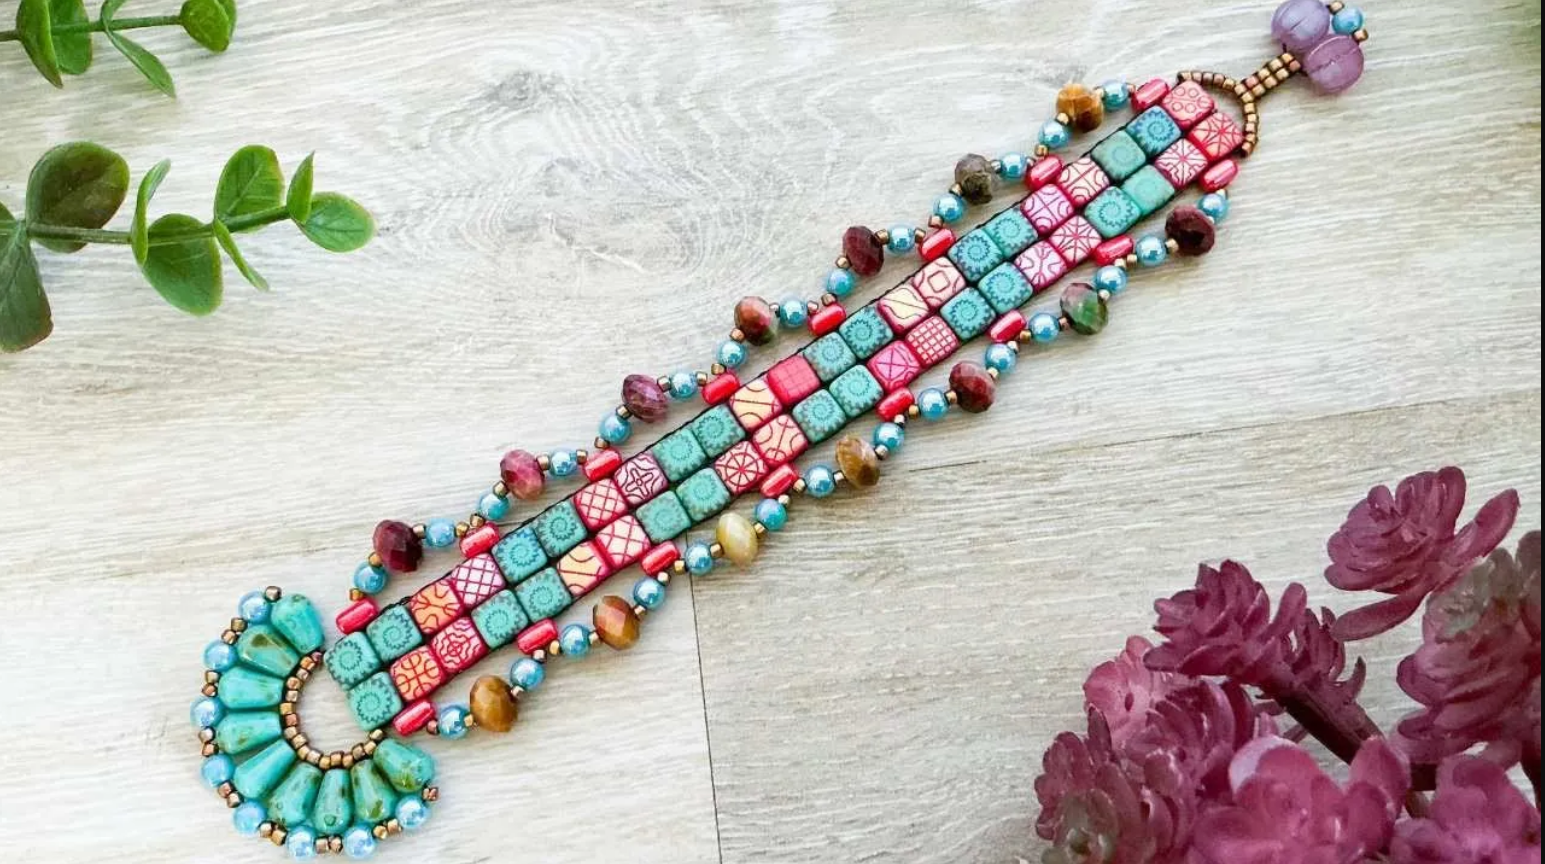
All right. And so there's our beautiful, beautiful design. It's very statement. Isn't that cute? My goodness, I love it.
So, we need a beautiful closure. But for the next step, go ahead and grab these
beautiful beads. These are those little check drops.
All right. So, I got I got my bracelet off to the side here because for now we just need these items, the dukes, the
seed beads, and these new item we haven't used yet. These pretty drops. Go ahead and string one drop
and string it from the cone, the small side to the larger side. So, looking
just like that. And we're going to go seed bead tuk seed bead. And now string
another one of these drops, but this time go from the wide side. So, like that.
and we'll bring that down.
Leave a tail that's um about five inches or so.
So, like that. And now what you want to do is string another seedbead and go back through the
first drop, the first little check drop there.
So, five to seven inch tail or so. My tail is probably closer to seven. We're just going to use it to weave in,
but create something that looks like that. If it helps you, you can put a stop bead
on, but I I honestly I just hold it just kind of move it to the side and hold it and use this step to tighten everything
up. And bring your needle back through the beads we added here.
It might loosen things up on you a tiny bit when you do that, but don't sweat it. So, we're going to go all the way
back through. All the way back through the seedbead
and all the way back through the drop. Pull to tighten.
That extra reinforcing pass is essential because otherwise it's going to wobble and go all crazy on you. Pick up another
seed bead. Another droo. Another seedbead.
And then pick up another one of the drops
like that. Go through it.
Okay. And if it flips around on you, don't worry. We're just going for this. We need one more seed bead and then go back
up through that drop. It'll be where your tail's going out of.
So now you've got that. And now we're going to need to travel
through the beads. Go one,
two, 3,
back through the drop. And that's going to put us down here.
Just like this. Now, we need one seed bead because we're at the bottom side, right? And then we need another drop.
We're going to string that drop through its thin side. So like this, right? And then
seed bead, droo bead, and seed bead back through
the last drop.
Go through seed bead and the drop and pull tightly.
So you're going to get this pretty thing here.
So repeat everything we're doing here using the rest of the drops you have.
So now you're going to have a little fan, this cute little fan here. And um after you add that last bead um
depending on you know where you started your thread your thread could be exiting from up here. Just bring it to exit from
the bottom of this drop and weave around if you need to. And what we're going to do from
here is we're going to pick up a seedbead. Go through the next 11 o seed bead right
here. And we're going to fill in the gaps here. So for the space between each seed
bead, we're just going to pick up a new seed bead and go through the next one. And keep
this all really tight. If you need to reinforce this last connection, feel free to do that.
We're just going to go around
cuz right now the fan is just a little bit floppy. We want it to be stronger.
So just keep filling in these little seed beads like that.
So you'll have filled in seed beads all along there like that. Okay. And now um
right here just bring on one more seed bead because remember when we were exiting from here we started with one. We're going to bring on one more there.
Okay. Now bring your bracelet back. And remember when I was saying it
doesn't matter if you have an extra row here that it's okay. Just whichever row you have an extra row on. Bring that
over. And check this out. Matches so perfectly in the size. So what I did is
I just went back through the whole row here.
And that it's a pretty elaborate button hole. We're going to use it as kind of more
like a lariat kind of style, but um closure, but it's yeah, it's really cool. So, reinforce this. The way you
reinforce it, super super easy. Travel through this ring of seed beads multiple
times, connecting it to the edge row here. So,
just keep going. Keep going through these. Get through them. Get through them.
Go all the way through. once, twice, and then meet me back here for weaving in
and we'll do the other side. So, doing that reinforcing really
strengthens it up quite a lot. Here's my uh thread exiting from that last seed bead. Go back into the
edge here. And feel free to go through the whole edge of that row if you'd like. And then
remember when I was showing you weaving in earlier, I'm going to do that same thing again. And weaving in is very forgiving. You can go through the bar if
you want or not. I mean, it really is totally up to you. You can use these beautiful
embellishments as a place to turn and go through. And if there's any spots here that you'd
like to strengthen up with your extra thread that you'll probably have for making this button
loop, just head through some beads. I'm just going through a few here. So,
anyway, carry on like that. And if you need to use that little thread bridge trick for weaving in, go ahead and do
that. And then um take a look over here. We still have the tail thread coming out from when we made this button. What I
recommend doing with this tail thread, remember you only have like maybe five to seven inches of it. Is bring it back
up through one of the you'll probably be exiting from one of these. In fact, you
will have it exiting from one of these little ones. Bring it up through like this one. And then just go around all
the way around there down through a drop and then head into the work. And you only need to make maybe one little turn
inside of this. And and that's all you got to do. So get that woven in and then meet me over here.
All right, let's make a button. So to make a button, we're going to create and I I actually was just kind of thinking
out loud that you could go ahead if you want to and weave in the other end of your bracelet, which is what I did I
actually ended up doing. So, I've got my button hole here. We're just going to go ahead and weave in a new strand because
you'll want to create the button separately. It was more tricky, I thought, creating it with the tail. So, apologies for that, but that was just an
afterthought as I got to working um that it's actually easier to do it with a brand new strand. So, cut yourself a new
strand of wildfire. You probably only need about, you know, 25 inches or so. I I cut way more than that because I like
to waste thread, you know. So, pick up these two melons. These beautiful little
melon beads and go ahead and string on one
and then go ahead and put on a seed bead, a droo, and a seed bead. And then
another melon. So, you've got that. And then we're going to string on just
two seed beads. Bring your thread back up through the melon bead.
So you've got something that looks like that.
And reinforce that around two more times.
There's one
and then back up through that melon bead. Use that tail to tighten.
Do that one more time.
So you'll have that three passes nice and strong. And now go ahead and go through these beads here.
Go through the melon bead seed beads one more time.
Just like that. And for now just push this tail out of the way. We are going to use that. Just
push that out of the way. And what we're going to do is a wide ladder. So pick up two seed beads like this.
And go back through the last two that down.
Try to get those to sit side by side as best you can. And then what you'll want to do
is go back through them. Okay. Repeat that one more time or you
know, sorry, a few more times. getting distracted by my chain nose pliers are getting carried away.
It does help if you tighten them kind of like that first and then string that on.
There's two more.
So, the length of this is kind of up to you. This is how we add length.
I would go for at least four like that. But you could do more.
I might go for five.
There we go. All right. So, you'll have something
that looks like this. Now, before you do anything else, get another needle from your uh stash here and go ahead and
flatten the end of that tail thread that we left at the beginning of the design.
It'll be exiting from a melon bead. See? Go through the seedbead stack of two and
weave your way around. So, go this way. Next one.
down until you meet this last one.
And however many you did, it'll work out that they're going like that. So, they'll each be exiting from a different
side. Let's bring our bracelet over.
So, we've got our bracelet here. Now, we're going to string five more seed beads.
and go through the top hole at the edge here
and go all the way through the entire row here.
So, just that top side. And so, it'll look a little bit like this.
I'm going to pick up five more and go back through these two seed beads
here.
So, it's going to attach our button like that. If you feel like that's too many seed beads, you could probably get away
with four seed beads there now that I'm looking at it. But, it's really up to you. And it's this is another way you
can add some length. When you reinforce that, they'll also pop a little bit better. They won't look as connected
like that. Al, al alternatively, you can also string little decorative beads in
between, but you don't want to add any thickness here because that's the part that's going to kind of sit in the button.
But I'm probably going to just go with this. So, five beads. I'm going to reinforce that. Just looping through
here. And I'll use the working and tailside thread for that.
And so, here's what it looks like after three passes. way less wonky, a lot more pretty strong connection there. Um, one
trick I can show you, if your passes through these beads here at the top are getting tight, which mine pretty much
are, remember our thread bridges, you can always use those. So, just head under
those on the side like that. They give you a great place to anchor and turn and
head right back up through the work,
which will actually put you heading in the same direction as your tail thread.
So, same thing on this side underneath that thread bridge on this side.
And that enables me to put five passes through here.
So from here, just go ahead and weave your tail thread down. Weave this side down and weave in here. Um, if you felt
like doing a knot with your tail, you could. I'm not gonna do that. I'm just gonna just weave it in and trim my
thread. There it is. Okay. So, there's our
pretty fan and our button here at the bottom. And so, I'm going to go ahead and just try it on and show you how it
fits. So, when you're putting on your bracelet, um, the beads will not fit if you try to
put them through this way. And that's that's good. You don't want your button to come loose, right? So when you're putting it on, you want to push the
buttons through one by one or sorry the the melon beads. So how it works is just
kind of pick up one side and push one through and then the other.
So it's a little tricky, but you know, we don't want it to be tight. I mean, we don't want it Sorry, we don't want it to
be loose. We want it to be tight. So one melon bead and then push that other melon bead through. And then when you're
wearing it, see, you get this little very good connection here. And I have
lots of cool ideas for things like I really love the way bracelets look when they fold over like that with clasps. So
I'm like, hey, how could we I always kind of wish like for hook and eye clasps for these kind of beads. I don't
know if that's something that could be invented by an inventor who who might see this video. So I don't know. Just a
thought. something we could put like a little something to hook to, you know, like a little hook and we could just make a seed beaded loop that hooks to
it. Wouldn't that be cute? I don't know. My brain's always going crazy. But this looks really neat. Even just like any
button, right? So, I made a button with melon beads because I wanted to use these beautiful beads in some like cool
way. But if you have one of like Jules Dell Soul buttons would fit this. I I have a few here that um I was really
tempted to add because they kind of fit really nicely too. So, a Dell soul button. Um, why I say Dell soul, it's
because we used it in that little pouch one. If you remember, uh, last year create a soul, we did those little
pouches. It had that little sun button, those wooden buttons. Um, those would fit this, too. If you would prefer a
little button designer, any kind of like Okay, so 15 millimeter to 18 millimeterish button is going to work
for this. So, this is just a cool way to do a button loop just because, you know, I wanted to do something sunny looking.
So, there it is in a nutshell. Um, I hope you love it. I hope you're wearing your bracelet around and dancing and having a good summer. And I'll catch you
for the next one, our August uh um design. Um, or maybe sooner because I I
still have a few beads left. I might have an earring idea. You never know. Uh, I'll try to try to put another video
out there if that idea comes to me. It's brewing. So, uh, but until then, I hope you love your bracelet and your kit, and
I will see you for the next one. Bye for now. [Music]