SIGN UP FOR MY NEWSLETTER AND RECEIVE 3 FREE SEED BEAD PATTERNS PLUS 15% OFF

0

Your Cart is Empty

Shop
  • Read our story

  • Each of our carefully researched, styled, tested and distributed collections reflects a particular aesthetic and ethos. We hope some of these speak to your own style, and help you refine and redefine your own look and style philosophy in the process.

  • Tile Beads Button Hole Earrings - Jewel Loom School with Amber & Tricia

    April 14, 2022

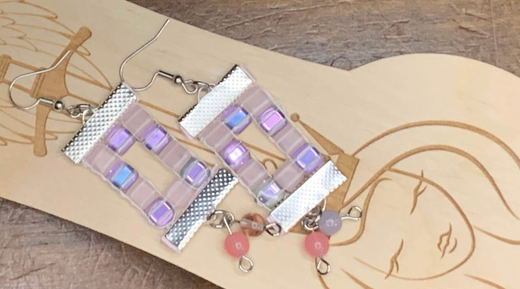
    Tile Beads Button Hole Earrings - Jewel Loom School with Amber & Tricia

    Want a quick, easy project to make on a loom? Learn to create button hole earrings, using tile beads, with Amber Scott & Tricia Giazzon in another episode of Jewel Loom School. Grab your original Jewel Loom, baby loom, or your small wisdom warrior and bead along with us.  You can purchase all of these looms at the Jewel Loom website.


    Want an quick, easy project to make on a loom? Learn to create button hole earrings, using tile beads, with Amber Scott & Tricia Giazzon in another episode of Jewel Loom School. 

    You can also support Tricia and Amber by using our affiliate links. This week's links are geared toward Amber. Amber’s link:  https://jewelloom.com?aff=4

    6mm tile beads:  https://jewelloom.com/collections/beads/6mm-2-hole-tile?aff=4

    12 mm ribbon clamp:   https://jewelloom.com/collections/accessories/products/silver-ribbon-crimp-12mm-1-pair?aff=4

    Wildfire:  https://jewelloom.com/collections/jewelry-making-buttons/wildfire-beading-thread?aff=4

    Jewel Looms & Accessories:  https://jewelloom.com/collections/jewel-loom-bead-looms-for-jewelry-making?aff=4 

    Wisdom Warrior Bead  Looms:  https://jewelloom.com/collections/jewelloombeadlooms?aff=4 


    Transcript:

    an action i just well oh boy [Laughter]
    we're gonna make these really funny um this is actually um amber's project this
    week she is gonna teach us how to do these gorgeous uh keyhole earrings is that what you
    call them yes okay or a buttonhole or a keyhole whatever
    so if you head over to jewelry.com please excuse the mess on my table here
    as i pull out everything she this is the size we're using tonight this is the six millimeter so if you got
    some for the earrings last week or if you have the creative soul jewel box all of those would work
    um so i'm using this pretty it's like a
    pink on the inside silver backing one gorgeous and then this this pale pink one tonight
    trish has more of um where is it like a mavi and a gray
    i guess it's called hope yeah i mean but all of these are available at jeweloom.com
    and exciting not only if you order tonight
    um we will send you a free easter beading bracelet
    and that's if you use our our uh affiliate links so we're using mine tonight
    um but if you use trish's too that is awesome um
    if you do that uh you will get that that bracelet pattern but also jules is
    throwing in extra beads into whoever buys only tonight well not beads she has
    some some really cool things though the um the flowers and stuff
    oh right yeah that's what we're doing that's what it was yes but they are so cool guys so you get free gift of
    purchase for thursday night only tonight on thursday nights we're gonna do this
    where you get a free gift with purchase doesn't have to be any amount we do
    appreciate any um but you need to use our affiliate links to get
    that and the affiliate links are in the description um so you can just use tonight is amber
    um so but we'll be doing this it's from what i can tell pretty often we're going
    to be offering the free gifts off and on so definitely so i was just showing these are all the six millimeter that
    jules has available in the shop beautiful so pretty so pretty you will also need
    some kind of ending piece so if you recently bought a
    kit you can get jules is now putting these into
    the original jewel loom kits these particular color beads or if you got the
    january creative sole box kit that was in there she also has all kinds of beautiful
    czech glass bead mixes so i have this one was from one of the
    creative soul boxes but she has all kinds so you could use beads from that so you'll need
    something to put on the bottom for your angled angle so
    you will need i think these are 24
    25 do you remember which size millimeter it's 24 25 it's not quite 26 it's
    shorter than 26. yeah it's a three-quarter inch that's what i call them but
    it's gonna be in millimeters so whatever that equals in millimeters so you can use either jewel loom needles
    tonight i'm gonna spotlight you now sweetie okay oh yeah that's fine there you can get started uh you can also use
    beading needles uh trish added a picot edging to her so she's probably gonna flip her camera
    while i'm doing that and um so either or if you're doing the picot
    edging you're probably gonna want a beading needle but you could always switch off of your jewel loom needle
    after you do the main the beginning um so i mentioned these
    the ribbon clamps i believe will have them in the shop you're gonna need you know either some craft wire or some um
    eye pins or head pins some uh ear wires
    some jump rings some wildfire
    and then a loom of your choice
    and we're gonna get started on our earring on on our earrings here oh and some scrap ribbon
    or whatever you have around so this one is
    3 8 of an inch or 9.5 millimeters
    so not super wide as you can see i'm still gonna have to
    trim some of it off so you just need small pieces of scrap
    because we don't want to put the ribbon clamp right on the wildfire
    so uh this and a loom you can i think trish is on
    she can she's flipped now she can join back with us here she's on the original
    and i am on the wisdom warrior so
    um we'll be working
    with my uh that's we're working with the six millimeter tile beads yes and then
    um this is all in the bottom in the description here's my affiliate link if you didn't
    hear you will get a free easter beading pattern
    uh if you order tonight in addition jules is gonna throw in some fun stuff
    uh into your order only tonight if yeah if you use our affiliate link
    anytime we will send you you just got to tell us you used it we will send you the pattern
    but the free gift and there's a link to the wildfire jules has a 12 millimeter ribbon clamp
    so i'm throwing all these links at you guys um okay
    and then here's the hopefully it'll take here's the link for the original loom
    cool and then i'll throw in the let's see if it'll take that yeah
    now guys if you want to make the picot stitch you will need some 11 0's so keep that in mind you don't have to amber
    doesn't have that on hers but you if you want to make them like these ones you will need some eleven o's okay the ones
    i'm using are called rosaline i believe in a frosted they're frosted rose only
    so sorry i just wanted to add that oh by all means let me get some of this stuff
    out of the way and so we haven't we talked about how we
    haven't um shown you how to
    warp the origin the not the original the wisdom warrior in a while so we thought
    we'd show you how to do that so i'm going to warp the wisdom warrior if you use
    uh the baby loom you can get two earrings out of it it's a little tight but you can
    definitely do it um just because these are a little longer that we're making tonight
    um so i would recommend doing the original or the wisdom
    but um that is your choice i definitely i did my test ones on the baby loom and it
    worked uh it just makes it harder for tying off the ends that's a big difference because
    you just don't have as much to tie off if you center them just right though you can make it work yes yes
    so for um the wisdom warrior we start out
    by knotting on our cute little peg up here so i just
    got my wildfire and it's focusing on my wildfire
    go focus about a wildfire let's see anyway so i nodded the knob here
    oh you spotlighted me again you go girl
    so i found i'm trying to remember i think it was
    just like the original you're gonna it has grooves up here and they're the
    same distance as the original oh hey kara i'm sorry you lost us i'm
    glad you found this again here we are oh joel said joe i think jules just sent out a link to the oh
    awesome group so good i think neely must be finished up okay
    yeah very fun yes neely is just talking it looks like
    with danny's on that song yeah so and we do a lot of that what are you talking about on top
    sorry you know no no yeah right but just like the original you're gonna lay it in the
    grooves um i don't worry too much about making
    it completely perfect on each end but i've been doing this for a while so i
    line up pretty close on the original you do get tension pretty easily when
    you take the bar out with this one you have to create your tension
    so i wrap around twice and then you're gonna need
    one two i believe it's three spaces let me good way to check it is to take out what
    beads you're doing i'm lined up here hey joan joined us yay
    so it'll be three spaces wide
    double check that that might be too much so this is just a good easy way nope
    that looks pretty good i think that's what i used was three yeah so on
    yes so you just want to hold your tension while you're measuring that all out
    and then come back up here and go one two three when we say three we mean
    three open spaces so it'll be the same on the original and we only need to do four so we're
    gonna do three beads across so we only need four warps
    so let's see where that starts
    one two three and go in the fourth one
    two three there we go hold that tension sometimes if you see i have my finger
    there that helps hold it i'm going down to the bottom
    so one two three and then put it in the fourth
    wrap around twice let your wildfire fall on the floor
    and that's okay yep it happens then you probably can't see
    there we go one two [Music] three
    go in the fourth so same thing on the original one to the advantage of doing it on one of
    these looms is just uh being able to tie it off easier honey could you scooch that forward just
    a hair yeah i was picking up my wildfire sorry okay no that's okay i was just thinking
    the girls could see a little better thank you awesome
    thank you thanks for letting me know sure that's all we
    do and get that string out of the way so counting
    one two three go in the fourth hole wrap it around twice hold my finger
    there i got all this extra wildfire and you want to get some good
    good nippers out yes and cut
    enough so you can tie it off
    it's always hard to tie it off while you're live it is it's hard to it's hard to do it
    all while you're live no joke oh yeah i mean as far as the warping goes i'm always having a party when i'm i'm
    warping on here at home i'm like whipping it out yeah i don't know but once you go live it's like awkward in
    the city and you don't know what it is i don't know what happens but it's a camera i guess
    oh i think i locked definitely lost some tension there all right yeah i lost some tension
    see if i can do you want to work on that and yeah since you're starting the next part
    but that's how you warp uh the wisdom warrior and now we're gonna
    highlight trish over here and she's gonna show you the next step
    okay guys so this is my original and just like amber just showed i did three
    spaces between each we have four threads so always one extra thread
    is compared to how many beads you're using so reason three beads four threads okay and three spaces apart okay and
    then that's what we're gonna get here i did do a picot stitch you don't have to
    um so what i did here i to make my life easier i flip my my loom over because i
    like to work from the bottom up so i just tied off my uh pink wildfire
    which jules has that in her shop i believe um too so if you haven't tried the paint
    guys it has my heart but anyway um so i tied that on to
    our outside left warp okay and the next thing we're gonna do is
    just pick up our beads okay i'm going to show you a couple rows and then we'll get back over to
    to amber here but all i'm going to do my pattern here you can't see but my
    pattern here starts with the taupe so i'm going to pick up a taupe a gray
    and a taupe okay i have those on my needle
    and i'm just going to push those down
    penny we are just talking about how when we're not live we can whip it out but when we go live
    sorry are you wiping it out i just got here and the first thing i hear is i'm just whipping up
    yeah yeah that's me guys i mean yeah sorry all right we'll move past
    that this is a children's show no it's not i was just i didn't even think that until you
    started laughing okay so once i have those beads moved down guys i'm going to slip my needle
    underneath and i like to hold on to the thread as i'm pulling it across that's just something i enjoy
    penny says haha i thought where did i land where am i [Music]
    you're with us penny no worries yeah yep you know you're here when you hear stuff like that so and i'm just going to take
    my finger guys underneath and i'm just going to push up with my left hand and it looks like i'm
    struggling because i am um but you just we won't let anybody know you're at work
    no um so we have our our beads across here and i'm holding them there and i'm going
    to go over top of the right warp and then i'm going to go all over top of
    all the warps as i'm going through the holes in the beads and you can see your needle through the beads to make sure
    you can see silver as you're going across then you know it's locking it in for you okay
    and then uh to do the next row the girls uh actually amber and jules
    showed me this which is pretty cool they tilt their towel beads down just to make sure that they're gonna
    catch them under the warps as they go across and that's a good rule of thumb
    for your um two hole beads any of them it seems to
    work nicely so yes a lot of times you can turn your um loom
    sideways if you need to i do do that at times because you know to get
    straight through and you guys are probably a little more talented with that kind of stuff but my um
    motor skills aren't what they should be all the time so but so we go across
    underneath we're underneath those warps and now we're going to do the same thing we're going to go over top of the warps
    i'm going to put my needle in that right bead and make sure that i can see it the whole way across as i'm
    attaching on our tail beads okay
    so that's monroe there amber would you like to get back
    are you not quite ready yet oh i am so it's you're good i'm we can have both of
    us up okay thanks okay uh might be mine are slightly different b only because
    this one if we can get it to focus on it maybe
    has a silver backing so when you're putting it on if you do these they're gorgeous in
    person you just have to be aware of how you lay it on your loom
    so um so yeah so i'm gonna and if you wanted
    to you could just like jules did with the bracelet you could lay out the beads
    that you're gonna do so you know what's coming up
    how are you gonna finish it off that kind of thing yeah
    definitely so i'm just doing my second row because
    i'm doing these ones i did i did one row on the bottom just like amber we just did one of each
    um where we did two yes yeah sets anyway um
    this this one up here i did two rows and then started the buttonhole okay so i'm
    doing my second row at the bottom
    okay just push those down here i'm putting this one on
    so if you see if i flip it around this is how you have to be aware when it
    has two different colors as you can see oh well you probably can't see but my
    silver is facing up instead of the pinkish clear that i reflector side
    so i need to make sure i go back and pop this bead off and flip it over
    so it helps with these for me at least and the same with the spikes that we did
    last so it's the same idea as the spikes is i put my thread under first
    and then my needle is going the right way so my needle that's very smart trick
    so whether if you're beating from bottom up your needle be going the opposite way
    but i i bead from top down
    like most people but no we should take a poll yeah we should
    we should definitely take a poll oh thank you for answering that question joan okay so
    um now i'm gonna go and attach one bead oh do you want to show your knob on the back of yours do i want
    to show my knob yeah so that she can see what what john's talking about
    you see how that's attached yes john i did show how to warp the wisdom warrior
    so we didn't show how to warp the original just the wisdom but we did that in last week's show so if anyone has any
    questions they can certainly reference uh last week's show yes and check that out
    so just like trish is doing make sure you see your silver needle
    all the way through when i was doing my practice run today i was dropping beads oh yeah i did that
    yesterday too um so i'm just gonna attach one guys and so i put my bead on i'm gonna do the
    same thing i'm gonna run it underneath pull that across but i'm gonna put it up through the
    needle up through the middle this time because we don't want a bunch of string showing on our project
    right we're working on the buttonhole showing how to do the buttonhole technique
    yes there you go um so i'm just pulling that up through the
    middle that string and then i'm just going to run it back
    through the bead on top of the warps just like we normally do but we're just doing it on one row okay
    leave the middle and the the far end opposite end open yes
    okay and now i'm going to tip my bead down and i'm going to put the needle through
    the second hole and i'm going to bring that up through the middle
    is this close enough for you guys or do you need me to zoom in a little bit just let me know
    and then over top so now we've managed to put one bead
    on one row of the warps okay so i'm doing the same thing i found
    weaving underneath these two warps and then over the top of that one
    worked well for me to remember where i was going gotcha
    i don't know if that's what you did i was focused on mine um or something similar i do it the same
    way as i normally do it except yeah i put my needle up through the middle and right that's all i did okay
    i'm like thinking okay did i make it too complicated
    that's all right don't take much hm don't take much for me for either of us but if you guys are wondering what
    projects we're working on see amber has one on her screen to her left and then i
    have mine here the buttonhole earrings
    okay so i put my gray bead on i'm gonna feed that through
    and up through the middle i hear birds singing on your side oh
    it's so lovely isn't it i just couldn't bear myself to close the window yet i'm like it's okay
    i got a little bit of car noise here and there isn't so bad oh you do nancy she beats from the
    bottom up one button [Laughter]
    i don't have a competition but still [Music]
    awesome we're soul sisters nancy
    push this up a little bit so you guys can see what we're doing
    there we go now if you're noticing um
    [Music] stuff on my fingers you may not be but that's just glue i do wash my hands i
    have some too yeah i was busy making disney breaths and all
    kinds of stuff today so amber and i both got our hair cut short so
    yes i thought well let's make some pretties for in our short hair so yeah that's what i was working on
    trish very kindly i i start chemo tomorrow so trish very kindly
    uh chopped her hair along sadly we couldn't be at the store together but uh
    in in along with me and i'm wearing my yes that's beautiful amber i love that
    i could i can't think of the my fight bracelet i guess yeah breast cancer awareness yeah
    your fight bracelet i think that's a good term for it so guys i was gonna put that next bead
    on but then i realized that it's time for me to do three across again
    oh yeah i did that when i was practicing earlier yes because i have no i have four on so
    i do not never mind so yeah we're just gonna listen i thought i was there but i'm not
    oh i did i did four so my pattern is off of you like different from yours oh yes
    it's time to start that row i didn't even trust myself so we're
    gonna do like we did at the bottom where we're gonna take now you have one more don't i you're right you have one more
    row no yes you're doing a double oh you're doing
    that four right no nine these are doubled yeah
    it's okay i know both of us
    ah jones says send you lots of love hugs and prayers your way amber she sure can use them guys
    yeah early this morning uh insurance finally approved it so i
    get to start tomorrow
    yep you'll have your hubby by your side yes
    for five to six hours oh my gosh that's crazy i never thought it was like that i
    didn't think it took that long but yeah well it depends on how many i'm getting four different drugs so
    okay that's why gotcha yeah it takes time i guess so
    so yeah i started my new row but i'm only gonna do one on each side
    so i'm copying the one i have here earlier yes but i also have this one
    i was trying all different ways having all kinds of fun yeah real simple just like the ring a real
    quick project real simple i'm gonna put that down just a smidge so
    you can see a little better guys and jules has used so many tile beads recently that you can definitely um
    reuse extras yeah all kinds of fun things you could do wouldn't it be pretty to make one of
    these in rainbow like with all your little extras yes that'd be cute
    and you could definitely do this you could do this with um rondelles you can
    do this with crystals that we won't name like there's you know it doesn't have to be a
    two-hole bead that cracks me up every time it's like harry potter
    yes we don't talk about bruno no there you go
    the latest right thank you kara i really appreciate your prayers thank you i really appreciate that so
    um yeah so it doesn't have to be a two-hole bead
    we are just it just looks really cool with the tile beads that's why we're doing it
    but uh it does yeah i like the way it looks yeah you could do a buttonhole with a a
    bunny clearing with anything really round beads would look super cool yeah
    they would fire polish would look super cool all right so you're finishing up i finished up my bottom row
    okay i'm gonna go back now through this bottom row the top of it
    doesn't matter if it's on the bottom or the top now because it's already locked in there
    and now i'm going to bead from the bottom up and add in
    my other side and do the same thing we were doing on the other side just
    beading around the one the two warps not the four
    so just on the opposite side
    and i'm just trying to get my my needle into position so i can start my other side
    but going back up now you're going to be doing you could flip your loom or
    you could just do the up so you start on the bottom instead of the top of the bead
    now that for those of us who work bottom down for those of us who work
    top no top down bottom up there you go
    uh and i'm sitting here agreeing with you as you're saying you're going to do the opposite
    so just do the opposite of what you did what you normally do yes
    so i'm going to flip my limb as well no
    i do so you could flip it i kept mine in place uh whatever you're most comfortable with
    um usually i loom like kind of sideways but i wasn't sure if you could you guys
    could see it that well so i had it straight on but it looks like it's so you can
    see i'm working my way up it's still pretty oh
    [Music]
    [Music] so we're working on these but i don't know how well i'll be but i'm excited
    trish is going to teach my other technique next week yes uh
    and an ombre we're going to do an ombre so it'll be this earring with an ombre
    that's going to be so cute oh my goodness i can't wait
    so pretty i'm sitting here dancing to amber singing yay
    joan cause i'm working my way back to you
    you're a good singer happening over in this department believe
    [Laughter] me you can let any of us know and you
    can let joan jules trish or i know if you order tonight and we will send you it's an
    easter egg uh pattern it's really cute um we'd love to share it with you guys
    so and free gift from jesus and free gift from jules so lots of good yummy goodiness if you
    order tonight using the affiliate links yes
    and if you forget to use the link and you wanted to go to us you can just tell jewel let yeah let jewels know
    because friends as much as we love this we don't get paid to do this but we love
    it we just get the affiliate so you truly are a blessing if you use it
    yes for sure because we love jules she's awesome and we're happy to do this for her and she's
    very good to us yes she's an awesome sauce lady
    yes very good to us she's a mad fan i don't know why i'm i am like you were
    on it tonight probably totally tired and probably get a big day
    um so i'm gonna get my name thank you nancy i'm gonna get my needle back in position
    because i'm actually gonna do my pico stitch before i take mine off the loom
    yes so i'm just going to put it back where i want it i want to start up at the top
    i highly recommend if you're going to do the picot to switch to the beading needle the jululum
    needle is great for the looming but the picot is difficult yeah this is just a seed bead
    needle guys because i know um by practicing this that um as many times as you have to go
    through the beads yeah it worked worked out better for me personally because i
    actually cracked this hobby but it wasn't because there's anything wrong with the jewelry needles they're perfect
    but when you have to put all that extra stuff on it gets crowded in those beads
    so while she's showing you pico i'm just going back and reinforcing so
    okay get that in the view there guys
    so i'm just going to cross over here and i'm going to do one side at a time
    i'm going to spotlight you so they can see the picot really well okay all right so i'm just going to get my
    needle back on this side i'm just going to start up the right hand side and i'm just going to keep it in position like
    this my loom okay let me get these out of the way and we will do
    um some 11os like i said this color is in frosted transparent frosted rosaline
    it's one of my favorites i'll put them right here so you can see them guys really cute
    oh kelly great question polymer clay beads um
    so you're talking bracelets if you're talking bracelets i would go with either the original or the the one i'm using
    which is i'll put us both back up so this is a small and trish has the original can you
    turn your site like so she can see right raise my camera up a little bit so
    these these two are the best uh ones to do um bracelets on
    um the great size so most spray this is about 13 inches if i
    remember correctly and bracelets you know can run anywhere from 5 inches up to 10 inch you know so this
    is a either one of these two are really great to do that kelly
    i'll let you go back to your pico okay um so yeah i got my lemons out here guys
    and i'm going to pick up i've got my needle in this position at the bottom
    and i'm gonna pick up three seed beads
    and i'm just gonna push those down my needle and you're not crossing over on this
    as far as every time you put your beads on you can go the whole way across but i
    just try to do the single bead on the outside because then i'm getting less thread in the other ones that i need to
    use once i get to that other side great idea
    so and then you just pull that in and you can see it gives you the cutest little trim i think that's my favorite way
    um yeah i love pico edging too yeah to finish so and then what i'm going to do here guys is i'm going to take my needle
    up or through and up through the next bead i can get my angle
    right getting it through there there we go did you knot it off before you started
    the picot edging no i'm using the same thread yep well you could do an a safety
    knot in there if you want you could do a safety knot and um you could use a separate thread for that matter if you
    wanted to true um but i just this seems to work good i still think i
    have enough thread so we'll play or by ear here so i'm going to pick up three more 11 0s
    and then go through the next hole on the on that bead
    push it up through give it a good
    i'm gonna put it into position and there we have two just the cutest little stinking thing
    ever no yeah so while trish is doing that i'm starting my second earring and trish can
    show you hers you want to make sure you leave lots of space because we're going to tie off the warp
    threads once we take it off so just fyi
    yes absolutely and really i i could slide mine up a
    little bit don't tell anybody [Laughter] i have done that multiple times yes
    i do that too but yeah because you know none of us are perfect no we're all human and
    and we don't talk about bruno and we don't talk about them oh my gosh you're giving disney a lot of
    credits you are full of it i really am aren't i
    i am tired i have somebody has energy huh i don't know if that's energy or punchiness punchiness maybe
    no i have been in how many doctors offices in the last two weeks
    let's not even not even go there so you gotta keep your keep your head up
    you know keep a good sense about it
    all right so there's our next one if you have any questions guys don't don't hesitate to ask questions you know
    yeah we're happy to help so i'm just going to angle my needle
    and put it through that hole if i get like i said it takes a little maneuvering
    especially when you have shaky hands but let's try this this way
    i swear like my hands my motor skills are getting worse yeah and i use my hands every day
    i know we can thank lyme disease for that we're up messes aren't we we are
    we are oh goodness so i'm going to turn it this way guys so i can see it a little better
    because it's looking very pretty i love that pink and gray combo so thank you
    pink and whatever that color is called taupe
    thank you in case anyone's looking forward on the
    side yes for sure yeah if you look um click on the link for the six millimeter
    you will see all of the ones i was showing earlier and all of their glory
    okay cara yeah thanks um i just thought of that as i was doing my first pair
    because i thought you know i don't want me to be filling the threads up on the other side you
    know i can just use this bead to do what i need to do and the same on this side so it's not a chance of me
    cracking the beads you know so oh you know i come up with it
    sometimes better for the goods sometimes not but
    but thank you i hope that helps got you guys when you're doing it
    if you want to do a picot and i and that's the way i always just
    think i have to add more and more and more and more and it gets ahead of me sometimes but
    a lot of the bracelets that i make get so huge so i'm funny it's just like
    a few more loops won't hurt anything right of course not i'm going to move these
    over so you guys can see better and the same thing here
    actually on this one guys when you get to this top one you're gonna go the whole way across
    because then you can start back down the other side okay so we're not filling up the hole unnecessarily i
    don't know how well that sounds it just um yeah it works better that way
    but for me personally anyway so i'm on the other side
    now i'm on the other side and i have this sides all done if you can see you know it's hard to see that color oh it
    looks great yeah it matches your nails so well it's it's almost like i planned it but i didn't
    uh i did my entire life from working today i mean i've only had these on a day and i already messed up
    oh it's all right i'm so sad i'm not allowed to wear nail polish during my treatment oh that is
    sad so sad all about the pretty nails when i'm done
    oh sandy says she likes to um hide the threads too oh nice yes
    i do too it's all about the hidden threads a few
    times so there we go on this side we're just going into that next hole
    and then the same process i'm going to turn it this way so i can see where i'm
    needing to go here
    all right whoops see that i thought i had it but
    like i said it's a little tricky you might want to wear your glasses over get that magnifier out and get that
    magnifier out i have my glasses on so what's that zoey something about over 40 that's what it
    takes i'm almost in the next department pretty
    soon a few more years we don't talk about that yet
    we'll worry about that when we get there right
    so i've got my three and i'm going to do the same thing here push through and out
    of the first bead
    okay back through the next one
    three more seed beads these are hard to see on camera aren't they these were as lean yeah
    they're so pretty in person they are they're gorgeous especially the frosted i like them all
    but my the frosted are my favorite
    yeah they go with the frosted ones i'm using yes absolutely
    okay three more how's everything going for you over
    there amber good i'm almost um working on my second earring
    oh cool so yep
    yeah i cheated i have mine done ahead of time
    well i told you to in case i couldn't do it so you're all good
    you're all good in the hood would it be so nice if youtube would let
    us play music while we bead it then you don't have to listen to the
    usings of amber [Laughter] for the entertainment we didn't
    [Laughter] [Music]
    almost there guys and i'm sorry if you do hear the street traffic we do live on a
    little bit of a main road it's so busy but it's busier than mine
    well you live in the suburbs i live in town that's true makes sense true beans
    yeah for being in town it's not terribly busy no
    um but we do get the cars
    okay one more set and then we'll get everything tied off
    and show you where i'm at see yes oh looking good you're almost done
    if you when you're done if you want to show how to take it off and tie it sure
    and then i can show the uh put in the ribbon crimp on if you'd like sounds awesome okay awesome sauce
    okay so we've got our last bit i'll go back to you since the pico's so tiny
    we've got our last bit i can't be too fast with this camera but of pico it still looks a little blurry
    but um so that's what our finished look is so i
    have taken my thread just through the one bead and i'm going to tie it off
    here in between both of these beads so i've gone and my bead is coming up oop i'm sorry guys
    beads coming up and i'm gonna put my needle down through on the other side
    of the thread okay
    and then i'm gonna bring it back up
    through on on the same warp but on the other side and then just run my needle through
    that loop okay i can grab it without it popping out
    there we go and i'm just going to give that a tug
    now i'm going to do this one more time so i'm going to pull the the knots down
    when i put the last one in so then it'll be on the actual bottom of the
    the back of the piece excuse me we get there
    so same thing i'm taking the needle down and i'm sure everybody has their own
    techniques on tying off but this is something i found that works good for me
    i always like to share the way we do things so in case you haven't thought of it then
    maybe it'll help you know so there's our second knot and now i'm gonna take my needle down through beside
    that knot like so i'm gonna pull it and i'm gonna pull
    down on it and that flips my needle to the or my excuse me my knot to the back okay
    so now i can go ahead and snip this cord off
    or use the thread burner yeah um i had an incident earlier yesterday with a thread burner so i'm
    gonna kind of just instead of cutting the
    the thread i wanna it's so tiny in there i just yep no i
    don't always do that and i don't know i i've been using my trimmers right but
    anyone else you are more than welcome to and you can see here even right there there's i double knotted that and you
    can't see it the pico the picot is in front of it so you could just leave it as is but i'm
    going to take her back through just for good measure you can also go back a little to the
    middle of the earring and do the knot there and then pull it under as well yeah but
    like this one that's not really an option oh yeah no but i did that yes with this one so i
    my threads underneath now and i double good double knotted it underneath very good
    that's another one i was just giving another idea yeah absolutely i mean and i think normally that's what i do i go
    back sort of to the middle like you do amber um i just was like okay what do i do with this oh right with the picot
    yeah well because the opening in the middle yeah you know
    because it's different that's where you go yeah that's true yep so
    very true i'm going to squeeze this a little bit with my pliers because we need to get it threaded and it's not
    cooperating so oh no well the only thing is with using the
    seed bead needles which i'm sure most of you know the holes uh for the eye of the needle
    are much smaller yes so it can be a little challenging at times
    for people yes kelly we used wildfire tonight for both um that's why we were talking about the
    thread burner possibly uh getting the wildfire on the warp
    so this project we we're using wildfire for both the warp and the beading right
    and you can use same color on both i used gray for the base and pink for the
    stitching but you know you can certainly use the same color i used white so yeah
    gray probably blends in really well i went with white because of the i don't know with the clear well it's nice
    because it pops too a little bit with that you know the white does this kind of blends
    you know so it's all on what you're looking for guys too right so i did my two different earrings that i had done earlier
    and uh she's tying her stuff off there um i will show you
    so taking it off the loom is very similar on both looms so you're gonna go find the
    knob on the loom whether it's on the original
    so that i don't have my original near me but here's a baby loom so there's a knob like this on the original
    and you just go near the knob as close as you can get
    and you want to hold your warp threads and you want to close cut as close
    to the knob as you can you want to the reason i'm holding the warp threads
    is so my project doesn't go flying and i'll go back and clean this up later
    and then the other end was just where i wrapped so i could just unwrap it and pull it off
    so and that would work the same on a baby or the original the same technique
    and i'm getting ready to cut if you guys want to see me cut this off it's the same concept but
    just the difference on the and i found i don't know let me raise this up a little
    bit guys that there's a little bit more springiness in this when you cut it
    so because it gets with that being plastic and having that bar it gets crazy tight sometimes
    which is good but i like to hold my loom and hold my
    threads as well and then i'll just go in and cut them and you can see how that pop is
    guys that's why it's important to hold your threads okay yeah it doesn't pop as much on the
    wood but but it's a good practice to have no matter
    which loom you're taking off oh so i want to just put you in there how do i do that there we go
    got it okay okay so now we're off the loom and
    so for the the before i cut it apart try and make sure you give each of the
    earrings off of your loom enough space as i mentioned before to
    tie it off so i tried it my best to go in the middle
    and cut those warps okay
    and then these are super long lots of extra you want to just cut those
    end loops too you won't need that much but this is about a good amount just
    enough that you're gonna take two of the warp ends
    and double knot it so you don't want to pull too hard enough that it gets right up
    next to the bead but if you pull too hard you're going to mess up with your your warp around all
    the others so just tying a knot there
    and then here and then we do the same thing on the other side
    yeah you want to make sure and tie that a couple times at least that's what i do i like to make sure it's quite
    secure yeah two three times yeah and then i also get my hypo cement out
    yes and put it on the nuts before i trim
    them yes that's definitely a good technique to do as well because sometimes guys even if you think
    you have the knot as tight as you can possibly get it they can still
    slip out so that little bit of glue is just a little bit of insurance
    so well i'm going to leave my threads
    um longer yeah longer because i'm going to be putting on the ribbon crimp but
    i like to use those for a little bit of security oh yeah i totally agree
    amber does as well i don't trim them until the very last minute right now
    absolutely so back down a little bit if you have some hypo cement a great way
    to get it ready is just heating it up and not squeezing it so
    that's what i'm doing now and i got all my stuff out and ready what are you laughing at
    i i the the jeopardy theme just went through my head because because it's like waiting for
    the glue to to dry yeah or warm up what we were talking about earlier when
    you take it off now these warps down here might be a little short
    so very gently i can pull i wouldn't recommend it all the time but you could pull your warp
    through a little make it slightly longer since i have so much on this end just to make it easier
    to tie off but do it very gently you don't want to make your beads go funky no
    yeah that's a good tip joan thank you
    these little threads oh i love my hemp though i gotta say yeah
    hemp is much easier to tie knots with yes most definitely but it wouldn't look right with this
    project i don't think no i do like the way the wildfire looks with it for sure
    very feminine and yeah and we'll use bees and all wildfire next week too
    yes we will and bead slides
    so we're doing the ribbon crimps this week next week will be
    the bead slides i don't know if i have bead slides uh oh they came with this one i made with um
    oh the brown kit there yeah okay yeah there should be some in there okay i'll
    check it so what we're talking about is jules has a an earth tone kit i don't know if
    there's any left but we did a bunch of projects with bracelets and earrings and stuff all of our videos live on youtube
    yeah so if you've missed something or want to learn a technique uh all of these techniques you can find
    somewhere on youtube or ask one of us and we will we will tag you or send or
    send you a link to make sure you get to the right video and i actually there was a lady in the group this week that
    needed to know how to put her ribbon crimps on and i tagged i um messaged her
    to the two videos as well as posting them on the feed on the group so if you have any questions about that that's
    there we do this a lot with the so you'll see this quite often the crimp
    you know putting on the ribbon crimps um yes trish and i really like
    magnetic clasps so the ribbon crimps
    yeah i didn't add in my uh chain yet my safety chain yet but no yep and then yeah
    we really do like the to crimp i have some that are with buttons like
    my um love cuff i do oh yeah the way it looks oh yeah it does there are certain ones well the button i wanted for this
    one was just too big to hold it yeah yeah i had to switch it up
    beautiful so i'll just use it as a centerpiece so are you ready to show them how to do
    this almost yep i was just going to tie off my other one here and i'm almost to the top i was trying to look on the
    website to see about that earthzone kit but i uh
    so i know we started late so we're at about probably 50 minutes even though it
    says an hour on our screen yeah that's fine yes kelly you can use
    the hemp on these looms um yes and we have many projects that live
    on youtube and jules does that use hemp we use hemp a lot so
    um and don't forget guys free gift with purchase tonight make sure to use the affiliate links
    and that'll get you over there and you get a free gift with purchase and amber is kindly giving us one of her
    designs bracelet patterns for a real cute easter egg bracelet too
    so you let one let us know when you order and we will make sure that you get that
    she is so kindly doing those those patterns are awesome that she's coming up with i a little
    birdie told me she might have a poodle one for me but i'm not sure [Music]
    so anyway guys so we're gonna do the the ribbon crimps now so i just have my crimps here
    um i use super glue gel a lot for this you can use uh uh gs hypo it
    really doesn't matter whatever makes you happy and that's all
    you need add a little bit of ribbon so i'm gonna cut my ribbon using these which i shouldn't
    that's how i got them doll yeah you know that oh yeah
    i do it too okay so what i like to do guys
    is kind of put my ribbon underneath here okay i'm going to leave a little bit of
    an end so then i can trim it when i bring it back to the middle so i'm going
    to fold this over and then i'm not explaining it well guys but we're going to leave a little end
    here and i'm going to fold it over like so
    and then we're going to fold this end back over to the middle so we don't get a seam on the outside
    most of the time your ribbon crimps will encapsulate your ribbon but sometimes it doesn't so that's a good way to avoid
    having a raw edge okay so i just lay it there like this
    hold my strands down you can see how i have them pointing down there and i try to make sure they're kind of
    pulled in because i if i want to trim or do whatever i do not want my
    strings to be sticking out to the side too much okay so
    put my ribbon there take a little take the cup off with your teeth
    and then put some gel over top of it yeah i know
    about that teeth technique there yeah but i have um
    tried putting ribbon crimps on every every which way and i have found this is my technique
    that i prefer because i've really done some
    some neat ones over the years there with putting the ribbon crimps on so i'm just going to give this a little tug over
    because i'd like this to be in just a smidge from the edge so i'm just going to kind of pull that
    over make sure it's not on your bead and press down on your glue at the same time
    okay and this is just guys this is glueing to your threads we've already locked everything in place
    but it's giving you something for your ribbon crimp to clamp into it because
    with the wildfire you don't always have to do this with hemp but with the wildfire you really should
    put ribbon ends on on it because put ribbon on your rib underneath your ribbon ends
    you're laughing at me i swear we're about to prepare
    that's okay like i said that's what this show is about being human and don't stick it to your bead mat either guys
    yeah i do that all the time too so i'm going to move that out of the way bring this
    here so once we have that guys i'm just going to put a little bit more glue down this is my thread from up there we don't
    want that about halfway across don't stick your fingers to it
    nope especially not the super glue because oh my goodness that's no fun no it's not a friend of
    mine had a whole bunch um come out of the bottle one time and she was making she was trying to seal
    something off with her jewelry making and it just coated her hands oh it was awful i felt
    so bad for her so i'm just going to hold that there in place again we're making sure we're not
    sticking to anything because this stuff is vicious yeah it is my ribbon is
    let me look at my little thing here we have
    mine's three years quarter inch and i have three eighths yeah so i mean
    pretty much whatever you have on hand as long as it's not too um you're gonna have to trim it anyways
    yeah yeah you will trim it that's true so it doesn't really matter so i'm just going
    to go in now and i'm going to trim that where that is in the center with my scissors
    and now we have our seam in the middle okay i'm feeling glue on my fingers that's
    not working yeah i got glue in mine too we've got it now i'm going to put the
    other one on the other side so we'll do it one more time here as i keep my bead mat out of the way
    i'm just going to push that down i want that to be as even with that as i can
    okay and like i said like amber said we're going to trim it in half almost any way
    i do with the quarter inch so whatever you got use what you got
    so same thing we're gonna lay the earring down here great project for scraps absolutely
    leftovers and scraps i always say use your stash you know
    if you buy it a new um strand of beads okay buy a new strand of beads but then
    use stuff from your stash to go with it super fun you know shopping your stash i mean shopping
    shopping is fun too but yes so same thing i'm just going to lay that glue over the top
    okay and i'm going to bring this across
    gently and making sure i'm not going over top of my beads and this is kind of awkward at first here
    guys until it starts setting sorry about that that just kind of moved but
    once you get it where you want it
    it'll hold real nicely for you it's super glue
    super duper it means business so i always as i do this once i feel like it has a little
    bit of a hold you could put this like do this on a piece of wax paper or on
    something like if you have a rubber mat or something so it'll pull up easily like like i'm
    using leather so it's coming off but mine's on my bead bat yeah well and
    that's the thing i've done three times and it's supposed to stay nice so when i make videos i don't look
    like a loser but it never does what are you saying
    what are you calling me i'm not calling you anything i'm saying so i don't look like a loser
    i'm just auditioning that guys i'm just bending it where i think i want it okay and i'm gonna kind of hold my finger
    there and then i'm gonna do the same thing just put put it about halfway across
    and then lay my ribbon down and hold it there
    not long enough that your finger sticks to it but you can hear it pulling up too
    yeah but yeah we're getting a good it's locking in there nicely for us okay
    and then um we're gonna do the same thing we're gonna cut it right in the middle
    so we have seen the seam in the middle
    all right looking good looking good so now
    as amber had mentioned i like to cut everything down you can use scissors you
    can use thread cutters this would probably be easier to do because of the thread and
    the ribbon but you will dull them yep if you do that so so i'm just
    basically as a as i'm sniffing this ribbon it's it's snipping off those extra
    threads as well okay
    here we go okay and i like to use my chain nose pliers i have a favorite pair
    that i like to use and of course i don't have them over here right now so but we're gonna go for it i think we can
    handle it i'm spoiled by those wubbers
    yeah for sure so here this is a good plier as well but i
    do have to say i prefer those but anyway i love you be the lawn um
    i'm using my uh nylon jaw yeah you can also use that i don't have much luck doing that but i
    know amber does that yeah as well so so i'm just taking it and i put it in the jaws of my
    uh chain nose or in your um whatever pliers you choose
    yeah and i'm just gonna give it and make sure before you squeeze guys make sure you're
    backed off enough that you're not gonna squeeze on top of that bead even with just your plier
    again speaking from experience you don't want to do that not good
    it'll crack your bead uh yep especially if you have heavy duty pliers it'll definitely crack it so and
    i'm just working around on that guys i'm just kind of pressing it a little here a
    little there you don't want to give any drastic squeezes because you're going to get marks or indents
    on your ribbon crimp but that's basically it right one of the reasons you can use the
    nylon jaw pliers and honestly i should have centered that a little bit better but you guys will i know you will you're
    better doing that but um so let's take another attempt here and see if we can center this one better
    so i'm just going to trim it again on this side
    does anybody have their ac in yet we have central air so yes yeah you have
    central yeah but using their ac i should have said but no
    yeah i'm at the point where i probably could have last night but the humidity was
    really done last night so i'm just fitting that over that cut end
    and trying to center the best that i can on the actual beads
    move that over just a hair and see that's why i use my other ones
    these slip unfortunately on on this kind of thing they don't slip into general right i don't know that
    they had their ribbon crimps in their mind when they were designing them sure they did not
    they were thinking of you yeah i guess so i'm just
    give that a little squeeze if you wanted to under the ribbon clip crimps you can always put a dab of glue
    yes um if you wanted but i i always i feel pretty secure once
    i go on my ribbon and i don't need to put more but that's totally your call i
    mean that's extra security so there we go guys you don't have to and
    that one is really good i'm gonna have to [Laughter] deal with that later
    but we'll look at this end right so all i'm gonna do guys i have some
    really gorgeous these are gem cut beads that jules also
    carries and i thought these ones are really pretty like oh yes neutral
    color and then they have like a purple clear inside of them you know like a
    transparent purple so i thought i would use one of those as my dangles dangle i'm
    just going to do the wide angle but here here i just use just the hearts
    you know you can use anything you want so go ahead amber you're oh no i was trying to there we go i was trying to
    switch it okay perfect they can still see you but i'm there too
    yeah i'm not floating out and never never you want to show them how to do the jingle
    dangle uh sure sure
    if not that's okay i can do that i've got all kinds of earring craziness going on here so um
    yeah so you'll need two jump rings one for the top one for the bottom
    an ear wire and i did two dingle dangles and a charm
    so grab a charm here
    i get it eventually i'll do the next this one
    that one i was trying to just show you but oh just me then you click on my
    little the little head on my okay there we go sure there you go um
    in here yep so these are uh come if you buy the original
    jewel loom the you'll get a kit with some of these beauties in it or if you
    um also this is was the january kit
    that jules put out i don't believe there's any extras so i'm gonna pick pick up purple then i
    have a charm i just have eye pins tonight quick and easy
    um just slide on the eye pin hi gable
    yes joan the the the uh charms the wood charms from oh yeah will be awesome on
    here i just didn't have any that matched i have a lot of charms but
    except for like a rainbow or something and that wasn't really right i didn't have any doubles that'll be
    coming soon though yes yes uh i had them here to show them i don't
    know what i did with them uh bummer yes there are beautiful wood charms and
    there are more coming so that would be totally awesome but i
    didn't have any matching ones for tonight but and then i like my uh one my uh super
    duper one step looper yep too especially for things like this keeps it
    simple keeping it simple don't go too close that you crack the bead make a loop
    and then um you need
    your pliers so you need two sets of pliers when you
    open a jump ring always good to have two and always open it
    towards you and away from you not up and down um
    so close up this loop and
    you pop pop the charm on there or the this dingle dangle
    through the loop of the there i'm gonna grab my other pliers real
    quick put on a charm
    and the wood charms would be awesome they are a whole bunch in the shop
    and then if you know how to make a simple loop you know real quick you can do that too
    um you don't have to have the looper
    our happy looper here but happy looper
    everything's falling off my jump ring hi gail i did i don't know if i said hi
    to you honey if i didn't i apologize uh yeah we're running a late show
    tonight yeah we waited a little to see if we could let uh
    neely finish up his show for sure since he was using the silver itself jewel loom tonight so yes
    definitely good go check that out as well guys so when we post this we'll probably joan
    will probably weed out some of the talking at the beginning so it'll probably end up being an hour because i think we talked
    about 10 minutes yeah she's good at that so yeah so
    here we go and when you close up your jump ring
    same thing front uh this way not up and down
    and then add another jump ring to add on our ear wire
    i'm doing surgery over here all right now i gotta take that ribbon crimp off if it's bugging me
    that's why you wanted me to finish the project
    you know how i do i gotta have it
    and there we go folks perfect perfecto mundo
    i think my charms backwards but oh well i'll fix it
    [Music] so funny i had two slightly different designs one shorter one longer
    yeah cool cool beans and i will show you
    just a second here once i get my crimp back on do you want to flip oh
    flip your camera well i'm gonna as soon as i finish this i'll show them how i did my dangle and then i will definitely
    flip okay just let me hook this in so it's not crooked
    yes sorry we went long tonight uh but we are trying to let neely finish out there before we uh started
    and trish is going to show you her earring here in a moment and if you
    haven't heard this is the one we're doing next week
    this is the one we did tonight so definitely if you didn't get to see
    the whole show watch the replay okay guys so
    this is what i used i used a piece of that gorgeous chef glass but you could put multiples on here you
    could do um sorry i kind of worked my earring a little bit when i
    did that it's okay now but yeah i'm vicious but so yeah this beautiful glass so i'm
    going to go ahead and switch around here
    i just closed my lens i i figured that out it seems good because then i don't make
    people sick you know well i turned you off until you come back that's good perfect so yeah so this is all going
    wiggly wobbly if you sign up for jules's texting or um
    [Music] or her newsletter
    you get a 15 off coupon tonight good time to do it tonight because if you place an order with our affiliate link
    you would also get a free easter egg bead bracelet bead pattern
    and a free gift from jules shop and 15 off oh my goodness so all the
    goodness tonight yeah jeez so yeah so
    uh make sure you also check out jules's blog yep uh
    not only where our videos live here but they will live on the blog too yeah lots of places you can find us and our
    youtube channels as well and then joan will do all the magic and have all of the uh
    needed materials listed and yeah absolutely so
    thank you joan as always and jules and thanks you guys for joining us tonight
    as always we had a great time hope you enjoy our humor as well as our
    instructions yes so that's what we like to do just keep
    it light keep it honest keep it straight kelly um make sure you contact uh jules
    directly yes to get that code um and if if it doesn't come through by
    the time you order she'll yeah talk to her she'll get you all straightened out she'll be all fixed up
    yeah she always does she's so good like that so text her to the number i have up
    here and let her know that your code hasn't come through and she will get you taken care of so
    don't forget to come back next week guys we're going to do the ombre loopy rings which are going to be super fun
    that was amber's design and i'm just tweaking it a bit by putting it into ombre colors not even tweaking it i'm
    just changing the colors out i guess but we're gonna see how it goes
    so good night ladies good night friends yeah thanks guys
    see see you next week take care have a great week guys