SIGN UP FOR MY NEWSLETTER AND RECEIVE 3 FREE SEED BEAD PATTERNS PLUS 15% OFF

0

Your Cart is Empty

Shop
  • Read our story

  • Each of our carefully researched, styled, tested and distributed collections reflects a particular aesthetic and ethos. We hope some of these speak to your own style, and help you refine and redefine your own look and style philosophy in the process.

  • Leather & Pearl Embellished Bracelet Tutorial - Jewel Loom School Live with Tricia & Amber

    June 10, 2022

    Leather & Pearl Embellished Bracelet Tutorial - Jewel Loom School Live with Tricia & Amber

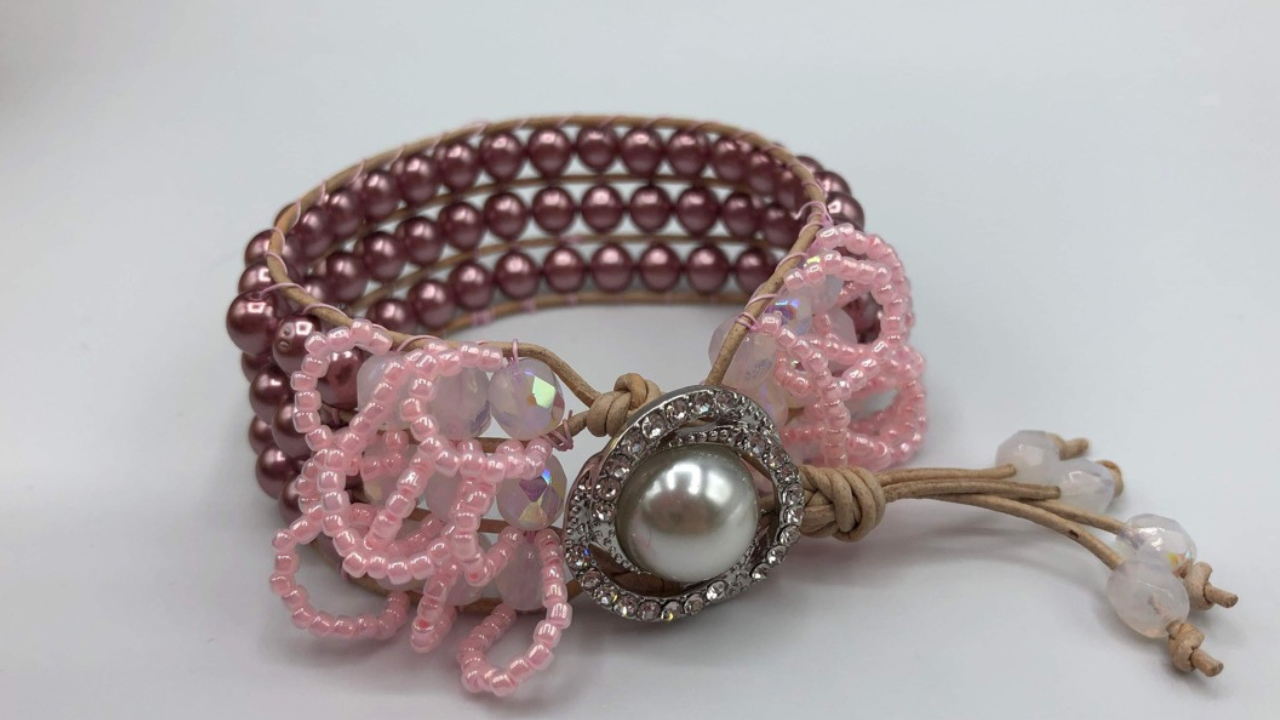
    Join Tricia Giazzon and Amber Scott on Jewel Loom School Live, as Tricia teaches how to make a pearl and leather bracelet with awesome loops for an accent. Great way to learn simple techniques, plus embellishments, to take your loom jewelry to the next level!

    Items used:

    • 6 mm pearls
    • Wildfire
    • 6mm fire polish beads
    • 11/0 seed Beads
    • leather
    • button


    Get the items used at the following links:

    You can purchase all of these looms and materials at the Jewel Loom website. You can also support Tricia and Amber by using our affiliate links. This week's links are geared toward Trish. Trish’s link:  https://jewelloom.com?aff=6

    Subscribe to the Jewel Loom YouTube channel to access past & current tutorials:  https://www.youtube.com/c/JewelLoom

    You can subscribe to the monthly workshop with kit (Creative Soul Box) here:  https://jewelloom.com/collections/subscriptions?aff=6

    Sign up for the Jewel Loom newsletter & get 15% off your first order, plus a free pattern:  https://jewelloom.com/pages/save-15-on-your-first-order-get-a-free-pattern

    Receive text notifications for Jewel Loom shows & special deals by texting "Sign Up" to 1-805-768-0568

    You can find Amber and Tricia online through our link trees:


    Transcript:


    look at that mess back there oh well hey hey hey guys we're live
    hi friends look who we have with us tonight
    you my friends you you you you
    you i'm not touching you
    all right we're both a little quirky tonight enough silliness uh and i have to
    apologize ahead guys if you can hear my dogs in the background they are just a mess today so i do
    apologize right out of the gate for that one not a whole lot it can do
    with it so so what has your week look like amber what have you been up to
    hey melanie i actually got to some beating this week
    oh there it is on the web not my watch
    my watch is talking to me so this is so gorgeous honey thank you this is from
    february i think it was i think so too yeah the heart so if you're new
    thank you if you're new with us that's from the creative soul jewel box
    um and it's a monthly workshop that jules puts together
    and uh i didn't hear if we have any left for this month but this month is a stellar
    one too yeah so yeah well that happens just gorgeous
    yeah we'll reveal it next week so but i'm sure you can send jules a message
    and ask if uh if there's any spots left i think we still have a couple may if
    she hasn't sold out i haven't heard anything about june but
    boy that would be great yeah if there were it's gorgeous but you will need the
    large wisdom warrior for dunes yes that's right but she's a beauty you won't you won't you know be mad about
    getting that it's just a beautiful you won't regret it it's a beautiful loom yeah it looks like we have
    eileena hi elena hi kathy melanie is here
    sandy's joking is here oh nice baby is here is it elena maybe i is it cause you know
    i always get mad because people like butcher my name but i do the same thing you know
    they call me trichia that's a new one what planet are you
    from and i just say just call me trish it's just easier
    i get called amanda and amy and all kinds of names huh heather
    hey peggy hi joanie you're in pa2 that's awesome i pronounced it right
    oh how did you say it i think it said ilena
    oh well i'm sorry hi becky
    did we hear who the winner is from last week i don't think that you know what
    i'll message jules here and see if she can let us know make sure you get that
    for sure yes and don't forget about our giveaway that we have every week guys
    yes so if you're new with us you can enter the giveaway uh what you need to do
    is you subscribe to the youtube channel and
    also to the newsletter um and i feel like there was something
    fantastic that's it facebook facebook page yes those three things
    and i believe guys it's for new subscribers only yes i'm
    pretty sure that's what jules said so if you've already subscribed you've already unfortunately
    i don't think there's you know you can win the prize but it's for new subscribers um
    so invite your friends yeah yeah invite your friends in and
    maybe split it yeah share the goodies right that's what we'd like to do with our stuff all the
    time yeah so i messaged her so we'll wait to see she might be out and about to but if we don't then of course we'll
    always um announce it in the groups and the group and also in the um on the
    jewelum face and page yes and in the newsletter she usually does too
    i'm yeah i'm glad you could join us too joanie that's if you're a grand so
    yeah yeah i'm so glad you could join us as well i don't know where miss vicki is she's usually in the life of the party
    and she's not here yet i know i know
    wow well how about i'll spotlight myself and you can flip around because you've got a beautiful project to share with us
    tonight so it is this beautiful hey penny and peggy and
    helena um i think i got everybody there so excited to have you all
    mixture of facebook and youtube and yeah and i'm excited to be here with you
    guys tonight so fun um but trish is gonna make this really
    really pretty pearl bracelet with some really cool hoops sorry we were a little behind the
    times and getting it posted and everything for you guys yes that was my fault it's just one of those weeks
    [Laughter] you can go ahead and put me up there okay
    okay guys here we are and just to show you here this was last
    month's creative soul box this is the garden trellis bracelet that we did
    so come on isn't that gorgeous wow it has the rose button i love it i love it it is so pretty
    so um my style guys in case you don't know um i like a lot of um
    romantic looking jewelry um vintage
    um victorian mixed with boho i just really like
    you know that kind of look so i was fortunate this month
    and i was able to order jules has let us order um what makes us happy as far as
    for our projects so i was able to order in the colors that i liked and everything like that so
    i came up with this i'm calling it my flirty pearl necklace or bracelet excuse
    me and this is the back of it believe it or not this is the back that has the button
    on it okay and then it's made with these gorgeous czech pearls
    you like that look to becky it's awesome i just love it it's so pretty thank you thank you um it's simple but
    it does look a little bit harder than what it really is but i'm going to show you guys here we're going to use leather
    tonight so that'll be a hopefully a good learning experience for you i'm just
    going to set that here so what we're going to do i'm going to use the original loom this week i love
    the original you've probably heard this before but i really enjoy
    um working with the original let me just straighten this out a little bit and for leather with the original i like to
    use the original with the bar in so if you don't remember how to put the bar in
    um and i mean by putting by using it with the bar in i mean just letting it in there not taking it out and the
    reason for that is is because if you take the bar out and say that you're working on the project over a few
    days it may stretch your leather out and not give you the tightness that you need
    to continue your project so it's just easier if i just leave the bar in it works great whether i need to put it
    aside or not then i don't have to worry okay so to review what we do as far as putting the bar in
    our original jewel bloom um you're going to this is my belly area down here guys and
    you're going to press the bottom you know let me see if i can move this up so you can see it there we go
    and i'm going to press the bottom into my belly like so and i'm going to just slightly
    flex the jewel loom okay i'm going gonna hook my bar
    in the bottom and then i'm going to flex a little bit
    more and then push my rod into the top now i'm sure you guys know oh the bar
    it's the facebook whatever that is i wish you let us know who you are because it's just showing up facebook user but
    yes we always love bars but get that off of me now but
    that's a great kind of art but um i lost my shirt i thought for a second
    okay so once you get that in um you've got to keep in mind guys
    number one it's flexible not bendable so you want to be gentle and make small
    movements with your loom when you're putting your bar in also and like i said i know this is a review
    but if your bar ends will not go incorrectly you can just take a plier and just open it up just a hair just put
    your plier on the end of that rod and just push it up slightly so that way then your bars will go in
    comfortably and stay in for you okay so we are going to
    this is one millimeter um tan leather i love it it is just gorgeous and supple to work
    with this is from jewelum.com i'm going to turn this over and i'm
    going to tie my leather onto the button on the back and what i do is i usually go around twice before i even tie it
    and then i'm just going to tie two knots to hold this in place that's what my preference is
    it seems like that's plenty with all projects that i've done so we're just going to tie that
    twice and then this is going to be three rows
    and they're going to be four wide so what i mean by that four grooves
    wide so what we're gonna do is we're just gonna lay our leather in here in one of
    the grooves and with this one millimeter leather it fits in here very nicely it sits nicely in the grooves and then i'm
    just going to eyeball it and bring it over to the other side and approximately in the same place
    and then what i'm going to do once it's in that groove i'm going to turn it over and i'm going to catch this button on
    the back be sure you do not catch your rod guys because that will make your tension
    uh not be correct either so just make sure you're doing that and then we're going to skip four
    two three this is the hardest part for me because it's hard to see the
    at my age it's harder one two three one more
    so we have four wide on that one two
    three four i just like to double check so you want to make sure our beautiful pearls and fire polish sit in there
    and then we're gonna go over to the other side same thing one two three and four
    oh does anybody want dogs
    the poor things my girls are my heart but man today they are on my last
    nerve so one two three and four let's slide
    that one over just a hair that was gonna give us five and then i just felt like this one moved
    on me over here i just wanna double check it one two one two three four perfect
    okay and then i just grab that button and i'm going to come back over the top here and we're going to do four more
    wide let's do one two three
    four okay and then over to the other side
    and we're just gonna do so if we're gonna do three rows you guys know that means we're gonna
    need four strands because we always need one more strand then we have rows
    two three four and i'm not putting it in the fourth
    groove i'm putting it in the fifth groove but i'm letting four spaces one two three four okay just to make sure
    that's clear all right and i'm catching it on that
    back button again and bringing it up and doing four more
    the leather is nice it's pretty easy to warp because it's just really supple and
    bendable and it just really likes to do what you want it to do
    one more i like leather too yeah it's so beautiful to work with
    so one two three four okay
    uh facebook user i do you see your comments um it doesn't
    but i'm not i haven't seen your name come up i see the comment that says do you see my comments i'm not seeing any
    comments but mine so i'm not sure who you are
    permission and that will help with that facebook user yeah she has to give stream your permission
    that makes sense so and when you go into it it asks and when
    you go into the live it'll say you know do you want to give stream your permission and you need to go through
    that oh it's vicki look here over there we were just asking where you were
    there see she's lurking tonight i'm using her real name she's hiding out on us
    i'm just gonna pop this one over just double checking make sure nothing moved on me and then i'm going to turn it over guys
    and i'm going to wrap this around here one more time whoops and again don't catch that rod in with
    your um leather it will not be um it will unlodge you well for your
    tension okay so i'm just wrapping that around tight
    and holding my thumb on it now i'm just gonna trim leather so i have enough room to tie it
    off how did you get in here i shut the door oh no did you hear her
    she pushed it open oh
    my god that's okay that's all right she's 14 we'll let her
    go so i'm just i i fed that underneath the
    um the other warps on the back here and i'm just gonna tie a knot i fed that over
    or fed that under and then i'm just going to tie this like you would just
    any a simple knot overhand and i'm going to do that twice okay okay
    so when i do that i'm kind of still holding it and i'm pulling it and pulling it and i don't let go until it
    gets right close to the um to the knot to the finish of tying it
    to the knife yes they work no it's okay yeah and are you holding it just so it
    doesn't break on you or something too the leather um no i just want to hold that tension i'm
    trying to hold the tension with my thumb if that's if you know what i mean yeah when i bring it over i don't want to
    lose that tension so i keep my thumb pressed down on it until i can get my first knot in once you get the first
    knot in then you can do the second one no problem and i'm just tightening that okay and don't pull too hard on leather
    guys i mean you want it taut but you don't want to pull too hard because it will snap if you pull too hard
    okay so that's done our loom is warped i want to show you what we're using these
    are some gorgeous czech glass pearls i use the pink color in this one and we will be finishing on a pink
    bracelet but these are the toe color which are also very very gorgeous so you
    need two strands of those excuse me those are six millimeter
    and then you're gonna need two strands of six millimeter fire polish and if that doesn't wanna make
    you wanna run and buy these right now i don't know what will those are just so beautiful have you
    ever in your life okay so we need two strands of those and
    then we're going to need some 11 0s to um do the loops on the end of course
    your wildfire your tools and your needle and a button so these are the buttons that i got this
    was just bought at a craft store they have them hanging around or you can get them if you want something that's
    decorative or whatever um but these are the buttons i chose for on this bracelet so
    okay so let's get our thread tied on and get started
    on that so i'm just gonna take one and a half
    wingspans of thread because a lot of times you'll hear people say they take two wingspans to start i have really
    long arms so for me two wingspans is way too long for me to do a project so i
    like if i have to add thread i have to add it i would rather just be more comfortable
    with the actual beading part and not have my thread wrapping around everything in sight so one and a half
    works for me so i'm just threading my needle here hopefully this goes well
    right in the first time you need to have a celebration for that one party
    it's a party that's craziness that never happened all right so we have that done
    and we're just going to tie on to the left hand side i'm going to leave enough space here so we can
    finish our bracelet off so you want to kind of keep everything to the middle here and i usually make about a six or
    six and a quarter inch bracelet uh so for me that works out perfectly i
    can just kind of center it up and that gives me the area to tie on my button and etc
    okay so i'm just gonna wrap around this leftmost move this up
    the leather here of our warp and i'm just gonna tie it i'm not gonna crank down on the knot i like to put in two
    knots but not real tight knots in case i want to weave it back through
    good i am one of those people that i don't mind a start knot on my pieces a
    cup because a lot of times i use thread that blends in with my pieces anyway so you know it works out okay for me so
    let's switch this over and get this stuff out of the way and we're going to open up our pearls
    a strand of our pearls here and a strand of our fire polish and this is just a basic technique
    guys excuse me your basic technique
    but not so basic beads and that's what really makes it over the top you know a
    lot of times your beads just will elevate something to another level
    you know not on there yes uh trish did you announce last week that
    there was a giveaway do you recall i believe so okay yeah i may not have though because
    you know things were yep oh maybe it wasn't
    you know what that was probably my fault because i was on by myself last week was yeah you were
    that's okay so uh yeah so anyway you guys go ahead the newbies go head over and
    sign up for that and you could win a really cool kit
    okay so we're going to start out and you can see on this bracelet i decided to do the fire polish on the ends because i
    wanted these seed beads to kind of really pop off of the bracelet the color of them
    so i thought the the fire polish did a great job of that so i'm just going to pick up
    three of my fire polish we have a great question from sandy here
    uh do you leave the bar in for leather projects yes that's why this is in and
    the reason i did talk about it earlier but i'd be glad to explain it again the reason that i leave the bar in for
    leather projects is because your leather will have a tendency to stretch out on your loom and eventually
    you will have too much give in your leather okay because your limb will just keep
    flattening out that's just how it's made so to keep the bar in for leather it keeps you a nice taut
    top to use with your warps and if you have to sit your project down for a day or two you don't have to worry about it
    straightening out right aw
    you sing our comments oh you guys are so sweet anyway
    okay so i put my three beads on my three fire polish and i'm just feeding my needle underneath
    the leather linda says that is just beautiful she likes it too oh thank you so much guys i
    just it it worked out so perfectly it was just singing to me so
    so and i'm just going to add those fire polish on there and i'm holding that there with my hands and i'm with my
    fingers underneath and then i'm going to take my needle and go up over the top of the leather and
    through the beads making sure that i am over top of the leather and going through the beads as i go across
    so that's what you want it to look like you want to be able to see that metal in those needles between excuse me the
    metal in between the fire polisher beads that you're using okay
    so i'm going to scooch out just a hair because i saw it kind of back down so i want to make sure that i have a good starting point so i have enough leather
    so i'm just going to pull that through and i am using this gorgeous wildfire this is the beige this is one of their
    newest colors and jules does carry that and it looks so gorgeous with this natural leather
    and these pearls this is just more like a muted version of the pink one okay which a lot of people
    would love that too you know i like muted versions of things too you know especially pink
    yeah yeah definitely and then we're just gonna pick up three more fire polish we're gonna put nine fire polish on each
    end of our pearls okay hopefully everything's in there
    there we go i'm trying to get four because i love them so much and i'm just going to push those down
    on my thread and then put my needle underneath
    this is how i do it guys and i know i've showed you 100 times but i just hold on to my thread when i'm feeding it under
    it just seems a little bit more in control for me when i do it that way i like to hold it too yeah
    and as it's coming to the end i can just continue with my hand pushing that up in
    between there okay yeah the fire polish that's over there
    on jewel's side that was so hard to pick they are absolutely gorgeous what i want to do
    is do an entire we're gonna do i believe is that next week or the week after next
    week because you're next week um yeah we're gonna do a fun fully fire polish
    oh yeah bracelet i think that's two weeks yeah two weeks yeah so
    it will be to die for i'm sure because of the beads it's a basic concept but it just really
    yeah elevates it okay so there's our sorry oh both peggy and ronda say that they
    the um well they're loving the colors and rhonda really likes uh the colors of the threads oh yes me
    too they really make it i do like that so we have our three rows of our fire
    polishing again and then we're going to just start with
    our pearls then and it's the same thing because they're they're both six millimeter so
    um it's going to be the same process except we're going to use our pearls now what you want to do guys is as you go
    i think i had 20 i had um made approximately a six or six and a
    quarter and i have written here that i did 27 rows total
    of everything so if you want to divide that you know you have your
    i think that it measured about an inch
    on the fire polish so if you can kind of think okay there's an inch there's an inch and then i want to make the middle
    so long okay and how much would you like uh for the end like for your ending like an
    inch for your button and stuff or an inch what do you mean for leather
    no for when you're like if you have a seven inch wrist which is you made six and a quarter
    yes i have a seven inch wrist i have a seven inch wrist so well i usually make
    a six inch bracelet is what i usually make i leave an inch yes okay message
    received sorry about that so we just have our pearls here guys and
    we're gonna do the same exact thing put these under
    uh yes vicki um i did see your earrings that you posted
    and they were awesome i love them those are so gorgeous those are the uh yeah the firecracker
    earrings they were really really pretty
    such a great project and we're just gonna continue with our pearls
    as we go here vicky goes 27 i think i can count that
    high 10 twice oh we love you vicky yes we do we were
    looking for you when you your name wasn't popping up and i'm like wait a minute what's going on what's going on
    we have our our our girls that always join us oh sami and
    peggy everyone vicky and melanie a lot of the regulars are here tonight
    so yes we just have our own little cult following i guess
    and we deeply appreciate you guys believe me it's no fun if you don't have anybody to demonstrate for you know
    so do we need a theme song you know now probably would be good can
    you work on that for us sure i'll ha i'll put jeff on it good job he's good with music mario is too maybe i'll send
    him your way sounds good we'll barbecue and they can play there
    you go because they need more to do they don't have enough on their plates yeah
    now i'm noticing guys and i've said this before like with seed beads um
    pearls have very small holes as well my jewelry needle is going through it
    snugly okay so you can sew this part on with your jewelry needle and the reason
    i like to do that is because of the length of it it makes it so much easier but you could if you were having trouble
    with the pearls that you have you could change to a seed bead needle if necessary
    they are just pearls are known to have teeny tiny drill holes
    so we'll do a little bit of this just to kind of get everything in place
    and then we'll do our loops and our finish
    oh sandy that's so sweet we just you guys don't even know how much when you post your
    um items that you make from our lives how much it means to us yeah it's just such a great feeling
    and maria also says that your design is fabulous thank you
    guys we just need to hug all of you i know
    and i know i'm just going to move this briefly so you guys can see this mess here
    [Laughter] oh i miss my girl
    she's a mess so that is my helper tonight
    yeah if you guys are in pennsylvania or nearby we hope to be at bead fest in august
    we'd love to meet up with you guys that would be awesome okay bubba i'm clean
    oh becky says or you can ream them yes that is true you can rain and frame
    them and you know what guys for christmas i got the new beadalon oh how is that
    that's awesome and i got the cupboard attachment for the end did you know
    as well and boy does that make it nice when you're making your own wires oh thank you linda
    it's actually a little girl it's a girl her name's kaylee and then i also have a white standard poodle her name is irwin
    um they are our babies we do not have children so they are done you do our children we do have children they just
    have fur yeah but yeah there are buddies
    this is going to be gorgeous i can tell already oh these pearls come on
    [Laughter] jewels just get such high quality stuff and it just shows
    it really does oh and he says the doggy's making sure your elbow stays lubricated so it doesn't get
    sore that's true this is true i want more of those fire polish i'm trying to pick those up
    uh peggy had a great question uh what is the millimeter of the beads
    these are six millimeter pearls and six millimeter fire polish and then you're going to need some 11-0 seed beads to
    put the loops on yeah and this is actually one millimeter leather in case you're wondering on that
    as well all of the links are in the description uh i did put them in the comments at the
    beginning if you need me to repost them let me know okay
    oh sure you got the reamer and bird attachment as well it's great do you like it sherry
    oh yes you say i love them i gotcha yeah it's pretty good
    vicky says where did you have your elbows last the fridge poodles are a smart [Laughter]
    they are smart she grew up with a small poodle and a siamese cat
    the cat was the boss yeah unfortunately in our house a cat would
    not be the boss because arwen has other things in mind [Laughter]
    and bunnies and birds i mean in squirrels it's terrible but it's only natural they're waterfowl
    retrievers hunters by heart so it's just we keep her away from those
    kind of critters probably a good idea yes
    kaylie liked like to chase squirrels in her day but she doesn't do that as much anymore
    she's good at playing catch though fetcher oh she is yeah she loves her toys so
    we'll do a couple more rows here guys actually it looks like i got one more row left for these
    pearls i didn't open my uh second strand that's why you would need your second strand of
    two strands of the six millimeter pearls and uh two strands of the fire polish
    penny says we know that you put peanut butter on your arm i did i'm bribing her because i haven't
    seen her enough today oh i'm home with them constantly because
    you guys don't know that but no they they're good i don't know what to do without them for company you
    you and yeah the girls my mom that's my saving grace
    yes meat well now i got my pup yes you sure do you know all about that
    all right guys so this is our last word we're gonna put in but it is the concept of using
    the pearls in the middle and the fire polish on each end and i have nine fire polish on each end so once you get to
    this point you would add your nine fire polish on on the top and i'll show i'm
    going to show you now how to add your loops on the other one see how that's kind of
    i'm coming off camera but it's a little bit stuck in the pearl there it does happen it's just the pearls are
    teen titan teeny yes so all right so let me set this one to the side but hopefully you got the
    concept on that i know my girls are on here are super super smart and sharp
    so i can't wait to see what they do with this project
    they're so talented much more than i am i don't know how i got on this show and they didn't
    oh anyways all right guys so i'm gonna use these
    cute little pink seed beads this color is ceylon innocent pink
    um i adore so i'm gonna move my instructions over here and bring my one that i have made so
    this is what it looks like before you put your loops on the ends guys
    now on these loops i'm gonna tell you
    i didn't count anything i went in every bead but i did it very
    um differently because i just kind of picked up a row and sewed them in and
    then picked up a row i didn't count any of them and actually i really liked the way that that turned
    out because it almost gave it like a florally appearance by doing that don't ask me why don't ask me but i just
    really like the way that just doing different sizes
    works and a lot of times you can count and do different sizes for sure guys but i just found that it worked for me just
    to kind of go with whatever i felt was a good amount on my needle so we'll give that a go
    i think my pearl button's in there i'm gonna need that
    and if you guys haven't seen this bowl look at this gorgeousness amber got me
    yay i got that in maine people so gorgeous that's glass in there
    oh so anyway on to the project back to the project so i already have my needle here and
    this is in the last bead that i sewed in okay and we're just gonna work
    with it that way so what i like to do
    to get started because you know you have to go back in through the speed to make the loop to get the get the loops going
    so what i'll do is since i'm coming out the top here i'm going to go around this
    leather and go underneath on this bead okay so that's going to secure it
    because if i just went back through it it will pull it out you know so it's going to secure it here and then i push it up between the first
    and the second bead okay so i pull that in
    so now i can start with my loops so we're just going to lay out a pile of seed beads
    because i like to just scoop and just start
    picking them up little by little
    vicky says i have some rust colored pearls and have some amber crystal beads
    sounds like a project for me oh i can't wait to see honey i know so i
    just picked up an odd amount of seed beads
    and i'm just going to go like we're going to go over top of the speed guys and i know a lot of you know
    but for any newbies out there i want to go over it um i'm coming out this side so when i put
    my beads on so i want to go around and put my needle through that
    first bead again and through the second one okay when i'm tightening this on
    all right so we have that and now we're going to do the exact same
    thing you're going to just scoop whatever amount
    you feel hi sorry hi nicole
    um you'll find with me guys that i like to just fly by the seat of my
    pants when i need jewelry it's just that gives me the most creative space
    and i find that if i don't box myself in i do much better with my creativity
    so that's just me personally so if you see me say well you know you can use this amount or you could use this or
    that you know because it needs to be flexible because everybody has a different idea
    of what they like you know on their jewelry making i'm just pulling that second loop now
    that one you can see it's much bigger that's fine by me that's the look i'm going for
    so we came out we went through the second bead and now out through the third bead so we can put another
    loop so vicky says oh goody we're gonna get loopy loopy loomer sounds like a team
    name to me so we should call ourselves yeah definitely the loopy loomers over
    here i love me some loops yeah so again i'm just picking those up
    and i'm out through the side of this third one so i'm gonna go back through
    the third bead and out okay i hope you guys know what i'm doing you
    can see what i'm doing here but that gives you i came in through the other side between the
    second and third and then we're going out i put my beads on and then we're going to go out of the third
    if i can get it to not move around my lip okay
    so now what i'm going to do guys i'm just going to take my needle on the end here and go into the next row
    i'm going to skip over to this row and i'm going to come up between the first and second bead again so we
    can continue our loops okay
    and that tightens everything in there i'm going to do the same thing on the second row
    and if you mistakenly cut your piece off of the loom before you do this you can
    add loops later i've done it but i do recommend if you can do it on the loom to do it it just makes it a lot
    easier to manage the project so we're going in through the first and through the second
    and oh what but penny used to be in a crochet group and
    she never wore the t-shirt because it said happy hookers yes no
    oh yeah that's a little sensitive yeah especially their own children
    yeah about that yeah i had to learn all that child sensitivity because
    we're not used to over here watching but i'm trying i'm learning you doing a
    great job yes
    in through the second and out through the third what's that amber oh nicole is asking what you worked with
    i worked with one millimeter leather okay but you could certainly do hemp but yes
    you could certainly do hemp i just really like the quality that it makes it kind of gives it a more high-end look
    i think especially with the ends it's getting a little blurry but
    it's so pretty but i mean oh there we go there yes so you can see the one millimeter leather
    ends there with the fire polish on you're welcome honey
    okay so we're just gonna do our third bead in the second row same way guys
    vicky says i do everything by the seat of my pants two
    we usually right usually spandex or body shapers
    oh
    i know so back through and i'm going through that third bead
    right into the next row
    and out through the first bead between the first and the second same same same same thing
    yeah i mean there's a lot of basic techniques in this piece it's just the way that everything's combined i think
    that makes it really nice you know is it really pretty
    she agrees thank you haley no
    oh god bro um hang on one moment guys i'm going to shut my door again
    anybody have any questions um make sure it shut good this time yeah
    and you know what look cute even with the skies if you decided to use like a variety of colors even for your loops
    that would be really pretty you could do two or three colors and that would really make it pop
    and the reason i did that is because i felt like these loops just pop off of this fire polish i think they would have
    kind of like got lost on the dark rose beads
    you know what i mean yeah so we're gonna do that
    how much time are we doing on time still good yes okay good so i'm just gonna put these loops on
    guys sorry oh penny says that was my fault i yelled
    squirrel to see if your dogs could mental out they will believe me they meant a lot
    about a lot less than that believe me penny oh that was wonderful penny thank you
    that made my day no you guys always do even if we're not feeling well or what's
    going on in life you always bring laughter and light to our world you probably know
    sweethearts they are okay
    so we'll do one more loop on this side and then what we can do is i'll take it off with only the one side done and then
    i can add my loops later like i said you can do so i will that way then i can show you the finishing process as well
    guys great so we'll do this last loop you get the idea i think nine loops
    but i just see how that lays it almost looks like a flower don't you think totally
    i mean that's my art aside looking at it but i know we're all creatives on here so maybe you see it too
    [Music] it's not just me seeing things well
    that that's questionable all right so we're putting our last loop
    on there get this back in the range the camera and then now what i want to do guys is i
    want to tie this off so my my string is coming out the top over top of the leather here so i'm going to do the same
    thing we kind of did at the beginning but go backwards on it i'm going to wrap
    this wildfire around this outside warp by going in the bottom of
    the bead and it's holding it there that way then i can go in and i can stitch
    you pull this thread back through here i can not stitch but i can tie my knot in the
    middle so it's less noticeable okay so top we're going to go in and around and
    through the bottom of the bead and then i'm going to take my needle and bring it up on the other side
    of this leather i know it's really hard to see okay and we're just gonna tie
    a couple knots here and i'm gonna go around the leather one more time
    see that individual okay
    and then i'm just going to tie it off and i'm going to do that twice just to make sure that it has a good and
    you're going to want to probably put some geos hypo cement on your knots if you don't um already know that it does help to
    secure your wildfire from um coming out the wildfire knots from
    coming out okay and i'm just gonna do the same thing
    and then once i get those two knots i always take my needle and i put it down through the work
    and i pull down and it rotates that needle from being on
    top of the work to being on the bottom of the work what a helpful so that that knot yeah it takes that knot down to the
    bottom so you just give that a little tug it'll take it to the bottom of your work and then you can just
    take your um thread zapper or your cord cutters and just
    cut that off all right so let me get these seed beads out of the way so i don't spray them everywhere
    when i'm showing you how to finish this and i just spread them anywhere but that's okay
    oh no right they're not that bad but anyway so
    now picture we have both of our ends done with loops and now we're going to just cut it off
    of the loom now with this bar in you don't have to worry about your um thank you mary you don't have to
    worry about your loom recoiling on you like it does when you are taking work
    off of it normally because your bar's out of it so
    it's going to have more of a tension or more of a recoil when you take it off so your bar is there so all you have to do
    is just turn it over and snip it as close to the button as you can because you want to have as much
    leather as possible to work with to finish okay so there's that then you can see no
    recoil all right and then same thing on this
    side i'm going to cut that right there and this it leaves you a little bit of leather on here you can always snip it
    off even these longer pieces you could keep maybe use for earrings or something like that
    something simple and i'm just going to set that loom to the side for us
    and then it's just as simple as tying knots you're gonna tie two knots
    on each end you have four strands so it makes it very easy
    so i'm just tying those two threads or leather strands together
    okay and then same thing on the other side
    all right vicki made the comment that you could do pico edge the whole length of the pearls with the same don't think
    i didn't think of it [Laughter] was gonna do it and then i'm like no
    i'm just because i think i did pico last week or whenever so i thought let's just
    but pico please do i want to see it with pico i'm even out yeah so i have the two
    knots on this end i'm going to do the same thing on the other side
    yeah i was playing with that just settle it down trish settle it down
    because i would just keep adding and adding and adding more is more to me you know guys
    or the bling but don't pull too hard because you do not want your leather to get
    um out of whack you want it to stay straight you don't want to to get it
    like sort of deformed from tying it okay because i also have a tendency to you
    know crank down on things when i'm tying them off
    just telling you from experience guys hoping it can help you to avoid some of the mistakes i've made
    i hear you what i've done then i have a nice amount of leather on either end
    to play with let me get this this way and in the camera better so i have a nice amount of leather on
    either side to play with which is awesome but i'm just making sure those knots you can put some gs hypo on your knots that
    you make with your leather as well so what we're going to do first is put our button on because um
    that will then enable us to decide what size buttonhole that we want okay
    so what i do is i'm going to take two of the strands and i'm going to take the ends and i'm just going to cut them into a sharp
    point it makes it so much easier to get it through your button shank and this
    button shank on this particular button is very small as you can see here just has one of
    those little tiny loops on it but it does two strands of one millimeter will go through it
    just get that one a little bit shorter so they're about the same
    and then i'm just going to hold those together and feed that through the shank and you can use any buttons guys jules
    has some gorgeous ones in the shop as always but like i said um
    you can get you know just at any craft store too if you want something metal
    see so that pushed right through there and cutting that that's a good trick to keep in mind with leather because
    even with putting our um fire polish or on the ends of the
    strands that we keep you're going to want to cut that angle on it makes it easier okay and then i'm
    just going to take these two threads on this side and tie it with these two threads to
    secure our button when you leave yourself just a little wiggle room with your button you don't
    want to crank down on too hard but it's enough to
    be able to have some movement with it okay and i'm just gonna tie that twice
    make sure i have it where i want it looking good
    and i can thank my friend gloria for these gorgeous buttons this was part of my birthday gift so she did
    get me those so pretty yeah she did good she knows me after 25 years
    she sure knows me so there are some beautiful wooden buttons
    oh yes on juloom.com so everything resides and lives at jeweloom.com so and
    keep keep in mind guys with the wood buttons um if you want them to be like i did with this one i just put some color
    on the edges of this rose button and how it just made it pop yeah i love what you did there yeah you could put resin you
    could put you know a little resin in sprinkle glitter put some more resin on top i
    mean sky's the limit guys so we have our button on
    so now i'm gonna go on this side i'm gonna start making my button loop
    and i'm just gonna take these four strands and i'm gonna treat these two and two just like they're one strand and
    i'm gonna tie them together to start making a loop
    okay and i just kind of want to get that
    first knot in and what i do and maybe there's an easier way you guys can tell me but this is the way i do it
    i put the beaded piece on my wrist and hold on to that knot that i made
    and then see if the button will fit through the amount of thread that i left there
    or or thread or leather okay and so i think that's going to be a really good amount so i'm just going to
    hold on to that and back it out back that butt now and then tie
    another knot to secure it all right
    so i'm just gonna check one more time just before i tighten everything down for good
    yep i even could move it down just a hair i think i will just and just let
    that bottom since this is not tight you can kind of tighten down that bottom knot that you made bring it down a
    little closer and then make sure you're centered as always so it doesn't look out of whack
    and then snug it on down it's nothing on down the road
    i don't even remember what that's from gonna ease on down he's on
    it's all good my favorites okay so what i do with this side guys
    i'm going to glue this with some gs hypo and i'm going to cut my leather strands you don't want to cut right tight tight
    tight against it you want to leave yourself just a little room there
    and then make sure you put your um glue on it and then on this side
    as you can see on the project that i had made already i did add
    the fire polish to the buttonhole end
    on those such a pretty addition i love that i mean you can't go wrong with those beads
    you just can't and the combination of things that i have here you know
    just beautiful stuff but so it's as simple as this guys take a few of your fire polish
    and then we're going to cut i left mine different lengths because i kind of like the way that it just
    look i like the way that it looked so i'm going to cut angles in the ends of all of my
    leather strands okay so i'm just going to do the same thing that we just did earlier
    and just cutting that as an angle it almost makes it like a needle
    vicky says gotta have those dangle downs somewhere i mean you know i'm the queen of dangle downs
    yes yes yes yes i am we love our dangles and they go down so
    seem like money there we go it's coming a little loose off to go back through that but
    um then you're gonna take your fire polish and you're just gonna thread it on to your pieces of leather
    it can be a little grumpy going through so sometimes you have to kind of
    fiddle with it a little bit to kind of get it to go on of course the first one i pick up is
    like heck no of course there we go i'm gonna cut this just a
    little more of an angle
    you know i'm wondering if these have a little bit smaller holes than the ones that i use
    on my other project here i'll just get those out and use them these ones worked pretty good let's see
    if it makes a liar with me as well i'm sure i could get it if i you know messed with
    it long enough but let's see going for simple now
    just going for simple yep he's arguing
    oh my goodness yeah i mean what it went on like butter
    of course but when you go live there's a little bit of finagling but you know
    slow mature right and i'm just kind of pushing and twisting guys you could ring these holes as well like
    one of our smart people said because i'm like fighting with it and
    i'm not thrilled about it so i'm gonna take my old school reamer here and just clean it out just a little bit
    more make life
    easier see if that helped
    i at least want to show you one of them goodness sakes it's not usually that hard
    i'm sorry honey oh that's okay here it goes here it goes
    yeah so just remove a little bit if you have to guys that seems to do the trick
    so i just fed that through and i grabbed the end of it i push my bead the whole way up and then just make a little teeny
    tiny knot on the end
    of course what oh vicky oh vicky said hard to hold
    your teeth just right when you're talking to us hold your teeth
    i don't get it i don't either but they'll know honey i know it's probably
    funny but you know i'm a little slow you might have to clarify that one for me no i don't so i'm just going to take my
    tweezers here and help me get my end through with that and i just pull that down to a nice
    snug little knot and then i just trim it so it looks nice
    and there's one on and then you just do the same thing
    apparently you have to bring them and then put them on but that is the basic guys we'll do one more
    here hopefully and then we will be ready to sign off
    and we're gonna get a nice snip on that one again
    let's see if that helped and if it didn't well you just get in c1
    tonight then and that's okay that's okay
    yeah i just i'm not one to give up so it's just the curse of the live i
    know right well we'll go with that guys you get the idea just thread it on there
    and just put your knot on the end and you can take a little bit more time with it i'm sorry it's blurry but no
    worries but that gives you the idea oh my goodness so pretty
    and here's your finished one again as always guys if you have any questions
    anything like that you can always reach out to us we're happy to help oh
    there you go guys i love it i love it vicky clarified you have to put your teeth and tongue
    just so while threading a bead or a needle yes yes that is a hundred percent
    right yes i get it now you are right girl you gotta hold it
    just so huh well i will yes spotlight me so you can flip around
    okay all right oh the hair i must have been getting excited
    everything's backwards on here so i'm like what what right right yeah i hope you guys enjoyed
    that i can't wait to finish these other two that i made somebody's gonna be getting some pretty bracelets
    ah of course this one's mine it's just gorgeous honey thank you all
    right thank you thank you just like baba just like what barbara
    barbara barbara just like butter all right
    thanks all right don't forget to if you're new to the show don't forget to uh subscribe
    to everything like youtube uh newsletter and facebook for jewloom
    um and we are designers for jewel loom everything's over at jeweloom.com
    uh trish's affiliate link was in the comments and in the description and we
    were so thankful to have you guys yeah thanks a lot guys i hope you enjoyed it it's always fun
    and another fun project next week come join us yes ma'am
    see you in the next one guys thanks again