SIGN UP FOR MY NEWSLETTER AND RECEIVE 3 FREE SEED BEAD PATTERNS PLUS 15% OFF

0

Your Cart is Empty

Shop
  • Read our story

  • Each of our carefully researched, styled, tested and distributed collections reflects a particular aesthetic and ethos. We hope some of these speak to your own style, and help you refine and redefine your own look and style philosophy in the process.

  • Birthday Cake Bracelet

    November 04, 2022

    Birthday Cake Bracelet

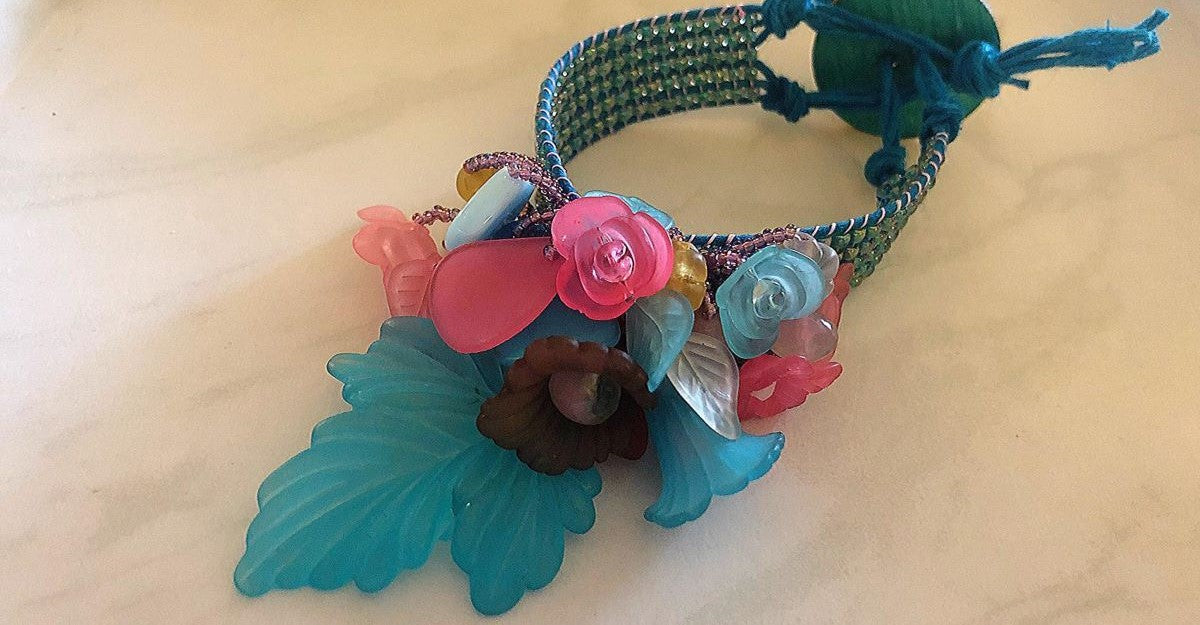
    Looking for a party in a bracelet? Designer Tricia Giazzon teaches how to make a Bracelet made with October's Birthday Cake Workshop Kit. She demonstrates how to make a simple base and how to do loops decorated with beautiful acrylic Flowers.

    Warp every other groove for this bracelet by using this tutorial, using the hemp of your choice:  https://youtu.be/2FT8VkVpD0U

    Supplies Used:

    Subscribe to the Jewel Loom YouTube channel to access past & current tutorials:  https://www.youtube.com/c/JewelLoom   

    You can subscribe to the monthly workshop with kit (Creative Soul Box) here:  https://jewelloom.com/collections/subscriptions?aff=6   

    Sign up for the Jewel Loom newsletter & get 15% off your first order, plus a free pattern: https://jewelloom.com/pages/save-15-on-your-first-order-get-a-free-pattern?aff=6     

    Receive text notifications for Jewel Loom shows & special deals by texting "Sign Up" to  1-805-768-0568

    You can find Tricia online through her link tree: https://linktr.ee/pinkpoodlecraftstudio  

    Check out the Jewel Loom Blog for past & current tutorials, plus read details on project: https://jewelloom.com/blogs/craft-hangover 

    Join the Jewel Loom School Community (off Facebook) to share your loom creations, be inspired by others, & a place to ask & answer questions. https://www.juliannaavelar.com/offers/5ss8HfCp/checkout 

    Follow Jewel Loom on Instagram: https://www.instagram.com/jewelloom/ 

    Jewel Loom Facebook pages: https://www.facebook.com/Jewelloom  &  https://www.facebook.com/JuliannaJewelsAvelar 

    Jewelry Making with Jewel Loom community page:   https://www.facebook.com/groups/228056324285807 

    Please contact Jewels with any questions you have about her looms:  email -  hello@jewelloom.com or text - 1-805-768-0568


    Transcript:

    hi guys welcome in welcome in hi everybody I
    hope you're having a great week so far it's been a beautiful day here today in
    Pennsylvania we were almost since I think in the low 60s today and there was
    no Breeze blowing it was just so nice out just a beautiful perfect fall day
    and that's me I love the fall days they're my favorite so I hope you're all doing well hope you
    all have gotten a lot accomplished so far this week made some Beady goodness
    hi everybody hi Maria hi Robin hi Melanie hi Lois everybody's coming in hi
    Amber I'm glad you're feeling well enough to come in Amber good to see you honey hi
    Lisa so excuse me I have a little bit of a
    something happening but anyway so this week this week's been uh busy I did have my knee injections
    again today so you know just plugging away trying to avoid that surgery as
    long as we can so we have a really fun fun class
    tonight and it's going to be simple but it's going to be really fun we're going to be using the birthday cake kit from
    joloom.com and let me just tell you that this kit speaks to me
    the colors in it are gorgeous they're pastel they're florals there's all kinds
    of stuff that I just love as you can tell florals and pink but
    um so we're going to make a really pretty bracelet excuse me but first I want to go through
    and I want to go through the kit with you and show you everything that comes with it if you have not subscribed
    to Jules uh box you want to go on to jeweloon.com
    and you can subscribe or you can choose if there's boxes left from the the month
    before you can choose just to purchase your call on that but I highly recommend it it's always such high quality and so
    much fun stuff I just couldn't recommend it any higher so I'm gonna get our
    camera switched here and then I'm gonna go through the kit with you okay so let's get started
    just take some moment guys don't don't worry if you see black for a couple minutes or a couple seconds a couple
    minutes that'd be bad so here we are here we are with our beautiful
    birthday cake kit so of course it comes in a box and beautiful Jewels tissue
    paper in the blue with a thank you sticker and we always get our Abyss coffin our tea so you can have a
    wonderful experience making your pieces but I'm gonna start I'm just gonna dump
    this out up here and I'll bring this in here and show you I'm going to start simply with our seed beads that we
    received this month some really pretty purple rainbow ones I think these are
    the iris rainbow tohos in 11 O's and then
    I know this doesn't look like much but I've already used a ton of them out of here to do our project tonight and I'm
    going to use probably a lot of these ones just to show the first part but you do get you know we got a nice supply of
    these beautiful teal rainbow um edoes so always a treat with those
    of course I match my nails to the kit that was not intentional but it did work
    out so um and then we got this really gorgeous Czech class mix and this one is so so
    fun guys and there's like some uh points of some natural stone here's like a
    quartz point here is I believe this is Jasper or highlight but really really pretty we've
    got some gorgeous Czech glass in there every shape and size a different variety of colors again in those pastels that
    really sing to me I can see that big pink one in there I'm going to be grabbing that so that's really awesome
    let me just stick that back in the bag here quickly you can never go wrong with Czech glass
    can always use a check glass mix that's for sure oh there we go
    so next we have some beautiful strands these came in our birthday cake kit this
    month now these check glass uh beads are gorgeous they're like a
    varied color I hope you can see that how you have the blue and the green
    they're just super super gorgeous so we got a whole strand of those we got
    this gorgeous a b coated pink they almost look like chips but they're all
    the same shape so for me being um
    maybe not as knowledgeable on this kind of shape here I'll put it on here like that so you can kind of see
    um but I love it it reminds me of chips and it has the
    um a b coating on it so that's really cool and then a gorgeous opalite strand
    of three millimeter fire polish and it doesn't want to focus on that there we
    go just gorgeousness there and then we got these awesome
    acrylic flowers and leaves and petals I mean look at that guys
    that is so cool look at that leaf I think I want to make that the center
    of my piece that's my goal but these are super gorgeous you could use them year
    round because there's leaves in here there's petals there's little roses little flowers
    you know just the sky's the limit you can even stack them
    say if you want to put in the middle of one of your pieces you could even stack stack them like that and put a gorgeous
    piece of Czech glass in the middle and that could be the middle of your bracelet so there's a lot of potential
    here with these acrylics I love them so much so let me get this
    cleaned up I hope you enjoyed that I think they are this is an absolutely adorable adorable kit
    that in there okay so for tonight I do have our Loom
    warped already and I am using the original into the camera there for us
    um you're gonna need your eight O's for the base and I'm just going to pull out the
    remainders here that I have because we're gonna go ahead and get started on that I have worked this with the 0.5 but
    you can also use the one millimeter because I have actually used that on the one that I have prepared so you'll be
    able to see both so you can do whatever you're comfortable with
    okay and I'm just gonna pour out our eight nose here and so I've threaded my
    needle I have our thread tied on to the leftmost position here as always and if
    you need to learn how to warp the jewel loom we have tons of videos over on the
    jewel loom YouTube channel and you'll be able to check those out and learn that way just saves us a little time on our
    lives so there's six strands one
    Groove wide okay so you can see there angle that up a little bit I have six
    strands of hemp and one space in between each one of those strands it's just that
    simple so basically we have these six strands and so that means we're going to have
    five beads across because that gives us five rows okay excuse me I'm sorry
    and so it's just as simple as picking up five of your seed beads
    okay
    and dropping those down and we're just going to build our base
    here I'm going to put my needle underneath the bottom there and pull my strand as I always do again I'm working
    bottom to top you can work top to bottom it's all
    preference and I'm just pushing those beads up between the lines of the hemp there
    and then I'm running my needle over top of the hemp and through the beads over
    to the other side okay
    then we're going to pick up five more
    the same thing drop those down shuttle my needle across and do the right
    and I'm just going to put those beads into the position I want them to be and push them up between those orbs
    and we're just going to continue this I'll do one more Row for you here it's you know basically it's the same concept
    the whole length of what size you want to make your bracelet so say
    um you wanted to make a seven inch bracelet well I want to make six inches
    of beaded space and then allow that inch for the play in the for the button the
    buttonhole and things like that if you want to make a five inch bracelet you
    would make four inches worth of beaded uh area and allow that inch for the
    closure okay I'm just going to pick up five more here
    push that up so you can see it better
    foreign
    I think we might have a troll Joan
    and then we're going to do five more
    and again underneath
    okay all right and we're just going to lock
    these beads in actually I put one more bead on then I should have so I'm going
    to slide that off
    hi Marianne this is actually Trish so I'm not sure
    um you're referring to is the green that you were asking about so I'm not sure if
    Jules was the one that you talked to I'm not sure what you're referring to
    okay so we're just going to lock that in
    and then we're going to move on to our loops
    no worries Joan no worries ever I'm gonna do a fantastic job honey
    foreign okay so I'm just going to pick these beads up and then we're going to move on
    to our loops because I learned to clean my mess up as I go along it's a lot less stressful
    right do I always do that no but make sure that you have a button on
    hand guys I just got one of these really cute floral buttons out of jewels the wooden ones and just use my alcohol ink
    and colored it to make it a pretty turquoise color
    so here is our base that I created okay so I
    counted these rows I measured this to make sure it was six inches first then I
    went in and I counted my rows I have 48 rows here so what I try to think about is when I'm
    going to do loops excuse me I try to think of the bracelet
    in thirds you can put Loops the whole way up the bracelet you can do whatever makes you
    happy you could divide it in quarters for all that matters but I like to do it in thirds so I go so
    that means that I go in 16 rows from this side and 16 rows from this side and
    then I'm going to have 16 rows in the middle okay so that's just how I like to
    do it if I want to put a um an addition onto the bracelet of Loops I
    like to keep them mostly in the middle because I find for myself I just prefer it that way but you again you do you so
    what I've done I threaded a needle once I finished my
    base here I tied off and hid the knots on my piece here
    um this is you want to make sure and glue your knots this base is the measurement
    that I wanted as I said so I threaded another needle to get started
    I'm just going to pull this out so I can show you and this is the 16th row right here guys
    this is the one that my thread's going through so I put my thread in there from left to right
    okay then I'm gonna pop up here to the 17th row and I'm going to go through the
    first two beads right to left and push my needle up and out okay
    and now we're going to be ready to put our first loop on so I'm going to use some 11 0's here
    and I'm gonna get my fire polish out some of my other Czech glass
    and just kind of we have a lot that we can play with here to give it a really cool look so I don't
    want to miss out on that and we're going to definitely want our flowers so I'm going to put the flowers into a
    bowl here might be a little more manageable
    okay that in our beauties I'm gonna just set those up there and I'm going to open up my three millimeter
    check fire polish
    I may decide to open up the pink and the blue as well just not sure yet so
    there we go so we have lots of fun stuff to work with at this point foreign
    so on my first loop I have my seed beads in here my 11 O's and I'm going to add
    on eight beads eat seed beads these are liminals as I said
    okay we have our eight on we're gonna push those down the needle then we're going to decide what do we
    want for our Center bead on this particular little Loop so I've already
    decided I kind of want to keep it a little smaller toward the edges and a little bigger toward the meadow so I
    think what I'm going to do here is I'm going to pick out one of my little flowers my acrylic flowers
    and I'm going to put I'm going to go ahead and string that on and then add eight more seed beads
    let's move down here so they're a little more handy
    I'm just going to add eight more
    okay let's slide those down I have to blow out any candle dewy I
    don't think I have enough I'm sorry I don't understand I'm a
    little naive and I don't get it all the time guys so I
    apologize so I just cracked a bead up there because it was giving me trouble so I'd
    just rather just crack it and move on so now that I have the eight seed beads the
    flour that I want for the center and eight more seed beads and remember we're coming out of the second bead from the
    right here I'm gonna go back up and over and I'm going to go back through the
    first bead through the second bead and through the third and fourth bead
    and then up and out okay
    tools looking over here and I'm just going to pull that
    until we get a pretty little Loop just like so okay
    I just think these acrylic pieces are going to make this so adorable so now
    we're into the middle column so I think what I'm going to do here is I'm going to add a five or excuse me 10 seed beads
    on three and that's two more because we get eight and ten is going to be in the center so
    there's three four five
    ten slide those down
    and now we're gonna pick a piece for the center now I'm going to keep my largest piece I believe for in the middle
    of the bracelet look how pretty that Leaf's gonna look on there just gorgeous
    um so I think we'll just start adding leaves on maybe as we
    go or flowers let's put a beautiful pink rose there I love that and this is nice
    because it goes side to side with the bead hole this one does particularly
    all right and then we're gonna grab 10 more beads
    foreign
    so then what I'm going to do is I'm going to go back through the third and
    fourth bead and then come out of that fifth bead
    on the other side so we have an odd amount of beads so say
    if we had six across we could do two two and two I'm just doing two two and one
    um for my Loops but however you want to do it so there's our little rows on there
    and now we're going to pick up eat again
    all right and let's put a pretty piece of Czech glass on I think and I'm getting another stubborn bead here
    we go thank you let's take this beautiful
    green bead and I can't see that there you go
    and then eight more seed beads
    okay foreign
    a lot of arguments tonight from these beads I think
    so now we're just going to put I'm just going to go back and loop it through I'm going to grab this
    second or this bead here right over from that that would be the from the right it would be the one two three fourth bead
    so I'm going to go through the fourth and fifth bead okay it's kind of overlapping your Loop that we made with
    the third and fourth bead but it'll be fine okay so if you have five weeds that's the way to
    to work and if you have an odd amount or if you don't mind you can just go through a one bead then and
    work it that way okay let's put him where he needs to be
    there we go and then just pull that snug
    as we go so there we go we have three Loops already put onto our bracelet
    okay so now we're gonna I'm gonna flip the loom this is how I like to do it it
    makes it a little easier excuse me
    and I'm going to go through the first two beads again just like we did on the first row
    come up and out
    [Music] until there I had to get out of my way
    all right
    and now we are going to add eight seed beads
    foreign
    and I'm going to add an acrylic p uh a piece of acrylic here that I
    really like how about one of these pink leaves you really can't go wrong on what
    you're picking out of here guys it's all so adorable
    so I'm just putting on eight more there finding those beads down
    and then going back through the first the second the Third
    and the fourth bead
    pick that up to get a better angle on it but all right so now we are
    coming through there so I want to get back across there
    so don't get tangled there we go so there is another loop
    so now we're going to do 10. as I work closer to the middle I'm going
    to get larger and larger until we get to our Center piece okay
    so we are picking up 10.
    okay and then I'm going to add a piece of Czech glass
    and you can do this how you guys whatever order you like however or do you want your Czech glass and your
    acrylic pieces to be you know yes Vicky I am starting the height of
    the loops so the first set of Loops I'm you using eight beads on the other side
    the center is ten beads on either side of the focal and then back to the eight
    you can stagger yours however you like um I know everybody has a technique with
    their Loops that they're like for this particular project I thought it would be nice to have the longer in the middle
    and then as I got up to the bigger pieces it would give it a little bit more room to kind of work with there with those extra beads
    so yes my dear so we're going to pick up 10 more because we're in the center
    so now the next row will really start building our size more so in the center
    I like to get the first few done and then work out from there so I'm going through
    three four and five to come back across
    and there is our beautiful piece of Czech class in the
    center once these all start to pile up on top of each other it's going to give you a really really pretty look
    so let's do eight
    or four six seven eight
    that shows down I think I'm gonna put one of these blue
    acrylic flowers on aren't those pretty and then eat more
    foreign
    so we have that and now we're going to backtrack just a little bit and overlap we're going to go back through the
    fourth one that already has a loop coming out of it but that's okay and then
    in through the fifth one as well and then pull it snug
    to get your Loop
    okay there we go so again I'm going to rotate my loom I
    know seed beading can be a little boring but I promise this bracelet's worth it
    at least I guess to some people others they they love it
    okay so I'm just going back through as I rotated the loom I'm going through the first the second
    again picking a bait you could vary your colors of seed beads
    too guys I mean this Kit's nice because it has absolutely everything that you need but
    um you know you could vary your colors and really make it over the top
    which I would not be opposed to doing okay so we drop those eight down
    and I'm gonna get a piece of Czech glass this gorgeous gem
    cut purple look at that one
    four five six seven and eight
    Maria says seed beading is never boring well I'm glad Maria I can tell that you
    like to do it believe it or not before I started on the loom I swore off of seed
    beads I did not care for them never thought I
    would have a future with them and here I am so so we're going to go back through one
    and two three and four and out of four you've seen the Rhythm there now
    pattern all right so now I'm going to start see this one here we put is a little bigger
    in the middle so now I'm going to start really looking for some girthies let's see what we got
    for lack of a better term okay this is a good one because I'm going to teach you so say if you have one that goes front
    to back and you're thinking well how am I going to do that how I'm going to get that on there and then get a loop out of
    it okay so the first thing you're going to do is you're going to put on your 10 seed beads
    see
    okay I just put those on
    if they cooperate so we have our 10 seed beads on for our
    one side now so now what I'm going to do is I'm going to take this flower and I'm going to go
    up straight up through it with my needle okay I'm going to run it down
    and then I'm going to pick up a piece of Czech glass or cheap a piece of fire
    polish whatever you prefer for the center of your flower and I'm going to run that down to the
    center of the flower okay so now what we're going to do is we're going to bypass
    the speed in the center and go back down through the flower
    but not through our seed beads okay and I'm going to pull that
    until I can get that to be nice and snug down on there okay did everybody catch that
    so here's what it looks like we have the 10 seed beads coming out
    I hope you can see that and then the floral on the top and the seed the fire
    polish in the center and we have our string coming out now that we can put on our other 10 seed beads
    to finish our Loop okay so let's put 10 on
    and there's the train we have a train just like candy I have a train just like candy Cooper does
    [Music] so now that I put those other 10 beads on we're going to just proceed the same
    way we would as if we put a center bead there without having to sew through it like we did so we're going to go through
    three for and out five
    right so I'm going to pull that nice and snug and there we go he's sitting up she excuse me she's pink
    so oops I missed out going down five so we want to make sure you go out of five
    when you put that one on okay so then you can go ahead and put your next Loop
    all right so let's add eight more see here
    yeah I really really love this kit it is so pretty
    it is adorable
    all right and then
    a nice piece of Czech glass about a bright blue
    whoops
    so we're doing eight mate
    so and then we're going to go back through four and five
    and I just left I'm lifting this up guys to pull it I'm sorry it's just a habit I
    do that when I'm stitching at home and not teaching so I apologize when I do that it's not intentional so I'm gonna
    flip my loom again and look how cute we're coming along
    so let's see how many rows have we done so far we've done one two three four
    okay so 16 divided by three
    that's gonna give us but yeah I can do math um
    is six no that's eighteen hold on a second
    okay 16 divided by three I'm just trying to decide exactly where I want a pepper and my biggest piece
    okay so at about five rows we can start adding in
    um if we want to put these larger bits in so we've done four is that right is that
    what I just counted and forgot yes so I flipped my blue
    and we are going to go ahead in and go this is going to be our fifth row
    so we're going to go up through one and two and up and out of two there okay back
    through
    and we're going to grab eight I think I'm gonna put these out here I like to work from the mat I just I guess
    it's a bad habit but it's just a preference I have so I can see things a little better
    so let's put on our eight
    all right
    and I think I'm gonna go with this big piece
    of gorgeous pink Czech glass
    that's been that's been hollering at me the whole time I've been on here so we might as well just answer it right
    so add eight more
    there will be plenty enough beads here to make multiple pieces
    um like I said you always get so much with these kids Jules is always so generous
    and usually uh throws in some extra treats for us now and then it's so nice
    okay so I'm going back through one and two and then out three and four
    if I'm a new ring here you can't see it but I'm maneuvering my needle so I can do that there we go up and out of four
    here I go I was getting ready and lifted up again I gotta get Jonas install a buzzer so
    when I lift it up she can hit the buzzer for the no button or something
    so let's put 10
    foreign
    okay so we're gonna have our 10 beads on here foreign
    Center piece I'm going to add a couple more beads because I had a couple
    there that wasn't that were not working so let's see here what's really gonna
    make this piece pretty I wonder if that's going to be too much
    though I think we're only probably going to be able to get away with one great big one
    I don't know and just kind of eyeball it guys as you're going to see you know how it's
    coming along let's put one of these calla lily flowers on that would be a really pretty addition so I'm going to put that
    up and through just like we did the other one okay whoops one second
    there we go and so we have our 10 seed beads on I'm putting the calla lily flower on just like we did the others
    you know what I'm going to do though first I can see the hole in the bottom of this is a little large so that my 11
    0's don't go back through that I'm gonna put a piece of fire polish at the bottom
    I put my 10 seed beads a piece of fire polish foreign
    ly flower on okay and then you're gonna pick whatever
    bead you want for the center I'm going to see if this really pretty pink and green one would work for the center
    and I'm going to drop that down and we're going to do the same thing we did earlier we're going to go back
    through back over this bead we're not going to go back through it we're going to go
    over that bead through the Calla Lily and I think I'm
    going to do the fire polish too and then we're just going to tighten
    that down Joan you're making me laugh
    you're a goofball okay so and ten more
    it's okay and just push those down
    okay and then we're going to go through three and four
    and out five I'm going to work for a few more minutes
    on this and I want to get to the center piece at least and then we can do
    I can show you how to take it off the loom and how to put your button on
    and as I'm working through here I'm kind of you're seeing me kind of back out go back through back out you just kind of
    have to bend flex your needle slightly and move it around to get it
    um over those warps and through those beads okay this one's going to be really
    cute I can feel it oh yes look how that just dang
    dang come on [Music] is that the cutest
    all right so let's move on so let's pick up eight
    seed beads
    yeah it does look like a birthday candle yes it is a beautiful kit guys I'm glad
    you like it and I'm glad I had a chance to work with it it's super super pretty okay and I
    think I'm gonna pick um some yellow I'm gonna pick up this yellow acrylic
    and you could add instead of just doing one bead at a time here you could add
    you know if you want to add a petal to that we could certainly do that you could add a leaf to the underneath of it
    just by sliding that on just like so
    and that'll give you a little bit different of a look and then add your seed beads
    it's
    this is all about building building up your piece and layers
    that's what really makes it look cute I think
    so and then back through four and five
    and out five foreign
    up through one of those seed beads and you don't want to do that because that'll mess up your Lube so just
    continue clean your thread keeping it from getting tangled around everything just
    kind of guiding it move the other Loops out of the way as
    you're coming in there so there we go one with a little cute leaf on it
    and now we're gonna flip again and here we go through one and two
    so we are going to work this one as let's see so
    yeah we're gonna work this row as our Center because we're getting
    closer to the center but then that way I can take this off and show you guys how to finish it too so here we are we're
    gonna put eight on this side now you could do 10 the whole way across here or you could do you know lower
    um loops and add bigger pieces however you wanted to handle it but I'm just going to do the same pattern with the 8
    10 8. all right so there's four
    so I have seven and eight
    all right so I'm pretty well convinced I want to use that leaf for my center but
    I think also I'm going to do acrylic for every every one in this row just to kind
    of build that Center up so let's see what we want to do here so let's put
    let's do a leaf
    up and through that hole through the side hole of this pink flower
    okay put that in the view there oops I'm going to thread that on and then
    we're going to put another leaf on
    and then eight more seaweeds foreign
    oh yes Nancy that's a great idea you could use seed beads as candles throughout this piece as well
    if you are actually making a birthday gift and making it so it does look like
    that you know because this is lots of fun this is birthday cake in itself so
    the little candles would be adorable
    and you could put little pieces of three millimeter fire polish on top as the wick that would be adorable
    all right so we have our eight seed beads and we're just going to Loop this through
    one two three four and then out four and this is where we're going to put on
    our big mama Jimmy here okay so you can choose of course you can
    whatever you like if you want a flower in the center if you want a leaf
    if you want a great big piece of um fire polish or you want to put one of
    these on you can certainly do that as well but I am digging this so we're going to use it
    so let's put on 10
    .
    okay and then I'm going to go up through there's a hole right here on this Leaf so I'm going to go up through it
    and the hole isn't too big I don't think our 11s will go through it but let me just double check
    no it will not so I've had my leaf on there and I'm just going to add on 10 more
    yeah I mean if you put this on it's going to move around quite a bit guys but that doesn't bother me I like
    movement in my pieces it's all you know your call six
    seven eat all right
    all right so let's pull those down and we're just gonna go
    through and see how I'm pushing back my my Loops here guys so I can see you
    could skip a row if you wanted to be able to have more space to put this gravy piece on you could skip a row
    um but I'm just pushing my Loops out of the way so I can see what's going on so I can go through three
    and four and remember you're gotta work slowly through these beads because they
    do have thread through them already okay I'm just going to lift this up and
    kind of guide this with my hand as I'm pulling this thread
    again so everything doesn't get you know crossed over and mixed up and Tangled
    and there is our Leaf I mean can you even
    so I'm going to set him out of the way here if I can if he just stays up there
    that would be the trick there we go and now we're coming out of five so we're gonna do eight more
    okay bracelet is the frosting on the cake pretty Trish thank you Nancy thank you
    so much I think Jules knew that I'd be really
    into this so she's like could you make us a bracelet with this I'm like oh
    yes I certainly can no worries there so let's see what we
    have on the other side here I think I put pink flower with blue
    so let's put we're just mixing the colors up here
    kind of making everything sort of work so I'm gonna do a leaf
    another Rose but I'm going to do the purple rose this time and another leaf
    now if you want shorter Loops like I said guys go ahead um that'll just keep things a little bit
    tighter in there I like how it gives it a little bit of room to groove though with the longer loops
    so I'm just going to go back and then go back through four and out five
    okay
    pull that through and I picked it up again my buzzer needs to go
    so there is that so far guys
    thank you Vicky I appreciate that I I I try to Wrangle them and then inspire you
    all um so that's all we have guys and so we have room here that we're going to continue that over
    um I don't want to keep you too long tonight but that'll give you the idea you're going to just do now we're kind
    of in the middle-ish we're gonna work over until we have about the same space on the other side okay so that's
    basically what that's going to come down to I'm not going to cut this thread but no
    um because I do want to finish this bracelet so I can get a pretty picture for Joan um but
    you would if you were at the end here you would weave your
    thread back through to the center make two knots pull the thread down as I do
    and so that Knot's on the back and then put a little bit of glue on your knots and the same thing on this one this was
    the first string that we weaved through that 16th row okay guys
    so I'm just going to put my needle in through here and we're going to cut it
    off because I can go back and put those loops on it's not as easy as it is on the boom but we can certainly do that
    and then we're just going to cut it off I'm just going to scooch the scuff this
    stuff over a little bit there we go and here I have my button that I colored
    just as simple as that you could put any kind of clasp on it guys you know we've taught you how to put on ribbon ends
    we've taught you how to put on slide connectors so go back in the videos
    um if you choose not to do a button like we do tonight you'll be able to reference those videos and do whatever
    you would like on yours so I'm just going to turn my loom over and I'm going to take my cord cutters
    and I'm actually going to flip this because I like I have this thing where I like to cut the side that's knotted
    um some reason I'm weird but you know so I like to do so I'm just gonna support my
    work I have my fingers around my work hold on get my camera see that
    around my work these two fingers and then I'm holding on to my loom as well okay and I'm pressing down here with my
    thumb so I'm kind of keeping this pressure and I'm just going to start trimming
    okay now I've got all my threads cut
    and I can feel them pulling back on me and I'm just slowly going to relieve that with my tongue I don't want that to
    fly I don't want it to throw my work I don't want it to break my loom I'm just going to release that
    slowly okay whoo
    so here we are we're at the ends we're going to just tie some knots simply
    I'm going to do three strands together
    now on the hemp yes I used I showed you the 0.5 on this one that that I warped
    and started with the seed beads on and this one is the one one millimeter so
    you can choose whatever you like I think on my finished piece I like the one because it's a little more hearty and we
    have a lot going on here but again your preference so I'm just going to tie all three of
    these and I'm just going to make a knot simply and I'm just going to work that knot
    down get it so you can see it here I'm just going to slowly work that down to the bracelet
    okay just like that and then I'm going to do
    three over here because we have six strands
    should I go three through yes I do and then again I'm going to work that
    down and I'm just slowly pulling the strands and pushing the knot
    all right so we're going to put our button on on this side just to keep it simple we have our button it has nice
    big holes so we can probably fit all three of these through one hole
    pretty easily and then the same thing on the other side
    and then we're just going to tie our button I'm not going to crank down
    on this yet I'm not going to do two three knots on it just yet I'm going to do a simple knot and then once I kind of
    make my buttonhole and I can kind of gauge all that then I'll do the second knot because I want to make sure that
    um it's going to fit me before I go gluing down tying you know tons of knots
    in it so I'm just going to do one knot with all three strands
    all right I'm going to give myself a little bit of play here you could also do another knot here if you like the
    look of that before your button that looks nice as well it's an option
    okay so we're just going to put one knot here
    okay so we have him ease and hold I don't know why I think I have to call
    them hymns and hers and so what I'm going to do here guys is we have the loops still on this end so I'm just
    going to go in with my cord cutters and I'm going to cut those loops easily and do the same thing on the
    other side that we did by tying the knot
    okay so thing on this side
    [Music] let's just work it down
    and this comes together pretty quick this project does um it's nice because your base is just
    simple it's the same bead you can whip it up fairly quickly um and then you just get to have fun
    with your Loops so and then once I have those two knots I'm just going to come up here and I'm going to tie one more
    knot but I'm going to leave room here and I'm going to kind of take my button in here and kind of gauge where I want
    that knot to be so about right there we'll see how that works out
    I'm just going to take all those strands put them around and just make one knot there
    so we don't have to cut down any of the threads and I'm just going to use my pliers to help me along here to get some
    of those through
    okay so I'm just pushing those through working them through the center there make sure I have
    everything in there see [Music]
    two behind now
    I don't know about you guys but I talked to my work sometimes so
    it just cements how crazy I really am right okay so again I'm not going to crank
    down on that too much till I see if that's gonna fit and you can see that's going to work good for our button
    it's going to fit in there nicely we're going to be able to have enough room to maneuver it in and out of there
    yeah you could certainly put your rod in that's a that's a great idea
    um I haven't tested it out to know if there's any downside to that but
    I would think it would work all right so I just tied that nice and
    tight and I'm going to do one more knot over here no
    again before I crank down on this is when I would put it on my wrist
    so I would lay this normally it would not have a needle in it so I wouldn't be in danger but I can see that that's
    going to go ahead and fit around my breasts pretty well so I'm just finished tying that second
    knot and I recommend gluing everything up guys before you cut start cutting
    strands soak glue let us sit even overnight and then
    you know go from there but cut from there and eat so there we go
    guys there is the basics of our birthday cake bracelet I hope you like that I
    enjoyed it I always like creating loops and using different items to create with
    so let me get the camera turned around here
    so let's turn this foreign
    so I hope you guys enjoyed our project tonight I really enjoyed making it I
    always love hanging out with all of you it's a highlight of my week I was just telling Joan when I came on here tonight
    that I was kind of Punky because of my shot in my knee so it always brings me up and it always brings me joy and puts
    a smile on my face and I hope I can do the same for you guys so thank you thank you all as always for
    joining us thanks to Joan for her assistance as always she's my girl
    and we will see you next week guys we're gonna have a fun earring project
    um to do next week so make sure you check that out and we'll see you next week guys take care bye