Your Cart is Empty
Bead Wrapped Pipe Chain Cuff - Jewel Loom School with Joan
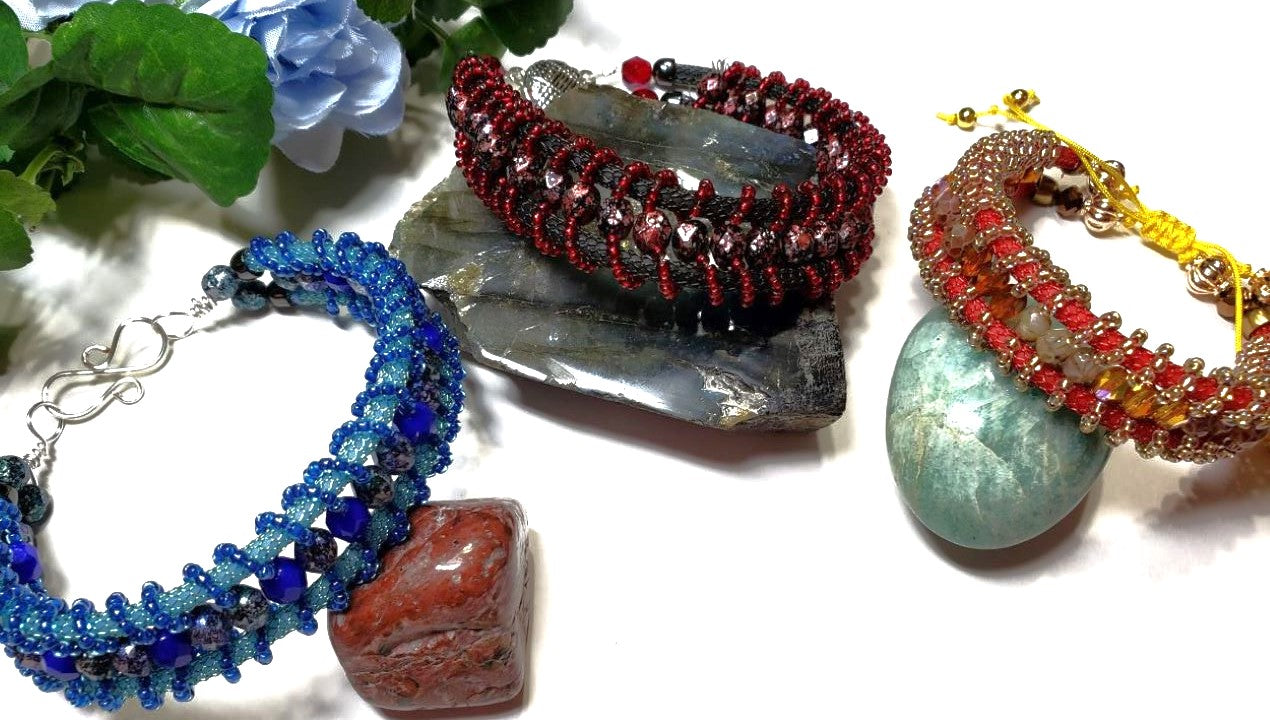

Joan is showing how to do a different type of weave, using SilverSilk Pipe Chain as the warps, in this tutorial, since this month is dedicated to the SilverSilk Loom. She also shows how to finish this cuff with 3 different types of closures.
In Part 1, she shows how to do a figure 8 pattern weave, covering the Wildfire thread with seed beads, while working from both sides of the loom with 2 needles, wrapping around the SilverSilk Warps…an easy pattern with a different look! She also explains a quick way to finish the pattern.
In Part 2, she shows three ways the Pipe Chain Cuff can be finished off, so you can choose your personal preference. The first way is with bead stringing wire & attaching a clasp. The second is using Beadalon’s Elastic Stretch Cord Needle to feed cord through the pipe chain to form an adjustable bracelet closure. The third way is 20 gauge German Style Wire & forming wrap loops on the ends to attach your own closure or form your own closure out of the wire.
Supplies Used to Weave the Cuff:
- SilverSilk Loom: https://jewelloom.com/collections/silversilk/products/silversilkloom?aff=11
- 6mm Fire Polish Beads were used in this tutorial, but 5mm is also a great substitute: https://jewelloom.com/search?q=5mm+fire+polish+beads&aff=11
- 11/0 Seed Beads: https://jewelloom.com/collections/seed-beads/size-11-0?aff=11
- SilverSilk Pipe Chain: https://www.silversilkonline.com/pipe-chain
- SilverSilk Double Strand Endcaps or Pipe Chain Endcaps: https://www.silversilkonline.com/custom-findings
- Wildfire: https://jewelloom.com/collections/jewelry-making-buttons/wildfire?aff=11
- Jewel Loom Needles: https://jewelloom.com/collections/accessories/products/beadalon-jewel-loom-needles-beadalon-jewel-loom-replacement-needles-6-pack-jewel-loom-julianna-jewelry-supplies-beading-needles-beadwork?aff=11 OR
- Big Eye Needles
- Cutters
- Thread Burner
Below is the list of supplies for ending each style of cuff:
- SilverSilk Pipe Chain Endcaps are used to finish off each design: https://www.silversilkonline.com/custom-findings/p/pipe-chain-end-caps
- 4 or more beads of choice to finish the ends before the clasp
Finishing With Beading Wire (watch at :55 mark in Pt. 2):
- 19 or 49 strand Beadalon Beading Wire (the more strands, the more flexible the cuff will be, which will help to close the clasp), the largest width that will fit through your smallest hole beads you use at the ends
- 4 - Size 2 Beadalon Crimp Tubes
- Closure of choice - I used a 2 strand clasp, but you can crimp both beading wires onto a jumpring, then add a single strand clasp to the jump ring.
Adjustable Clasp (watch at 3:06 mark in Pt. 2):
- Beadalon’s Elastic Stretch Cord Needle
- Cord of Choice, no larger than 1mm - I used .8mm Knotting Cord
Wire Ending (watch at 25:03 mark in Pt. 2):
- 20 or 18 gauge Beadalon German Style Wire - at least 2 11” pieces
- 18 gauge or 16 gauge Wire of choice, if you want to make your own clasp - I used 16 gauge Artistic Wire
- Clasp of choice, if you choose not to make your own.
- Artistic Wire Sizing Drum or something round or oval approximately the same size as your wrist.
- Hammer & Steel Bench Block or Nylon Jaw Pliers to work harden clasp, if you make your own clasp.
SilverSilk Bead Board: https://jewelloom.com/collections/silversilk/products/silversilk-wood-bead-board?aff=11
SilverSilk YouTube Channel: https://www.youtube.com/@silversilkandmore
Subscribe to the Jewel Loom YouTube channel to access past & current tutorials: https://www.youtube.com/c/JewelLoom
Sign up for the Jewel Loom newsletter & get 15% off your first order, plus a free pattern: https://jewelloom.com/pages/save-15-on-your-first-order-get-a-free-pattern
Receive text notifications for Jewel Loom shows & special deals by texting "Sign Up" to 1-805-768-0568
Check out the Jewel Loom Blog for past & current tutorials, plus read details on project: https://jewelloom.com/blogs/craft-hangover
Join the Jewel Loom School Community (off Facebook) to share your loom creations, be inspired by others, & a place to ask & answer questions: https://www.juliannaavelar.com/offers/5ss8HfCp/checkout
Jewel Loom Facebook page: https://www.facebook.com/Jewelloom
Jewelry Making with Jewel Loom community page: https://www.facebook.com/groups/228056324285807
Please contact Jewels with any questions you have about her looms: email - hello@jewelloom.com or text - 1-805-768-0568
Transcript - Pt 1:
foreign
[Music]
School concierge and also the silver
silk
um social media Ambassador mouthful
there and I'm here to give you a
tutorial on the I'm using the silver
silk loom using silver silk pipe chain
and we'll be using seed beads and fire
polish beads to do a totally different
weave we're going to be weaving beads
around the pipe chain around our warps
and also between the warps
and so let's get started so you can see
how this is done
and thank you for joining me okay this
Laying out beads
is what I'm going to use for my project
I went ahead and laid out the beads so
um I could just go down the line and I
usually use
um like with this 33
um six millimeter fire polished beads
for about six and a quarter inches
that's what I want my weaving to be
and I'm going to use fire line and some
seed beads
and of course some pipe chain
and my soap so glue
so what I do is now that I've already
cut off pieces off of this one for for
another project so it's not as long as
what you get through the silver silk
store
but um
so what I'm going to do just to you know
save as big a pieces as I can I'm going
to put one end in at the end put it
through
make sure you can see that
okay
I'm gonna go to the other end
directly across
put it through
and I'm going to skip a space and come
up the other way
don't worry about wasting any of them
the pipe chain because these are great
for spacer beads or even beads a longer
piece can be for ear wire now if you
want to make it longer what you can do
you know have a longer piece do the same
thing with the end
here
and make the longer piece in the middle
so that's all one piece and you're not
cutting off a lot
so like you could use that for a pin
vent or something
Adding beads
now I'm you know using my jeweling board
but I just find when I'm using small
seed beads 1711 I can um pick them up
better on a bead mat so I'm going to
pour some of these out here
and just to let you know well
I won't skip ahead sorry
for the fire line
now I'm using like turquoise but most of
my beads are blue and the seed beads are
like a bluish turquoise I just thought
the turquoise and the blue would be pops
of color next to each other will be
really pretty and this blue would blend
in
so
um the way I'm doing this normally I'd
say you know don't do any more than a
wing stand but I'm going to do a one and
a half wingspans maybe a tiny bit more
of the fire line so I'm going to cut
that the other thing that's a perfect
length and you'll see why I'm using a
longer piece because it's not going to
hurt
and I found I can get the whole project
done in one piece without having to add
any um but if you need to work with
shorter pieces go ahead
and this is an unusual project
because you're going to be work I'm
I'm going to be working with two needles
and I just found it's a lot easier this
way you know to keep it uniform on both
sides
so I'm you could use your Jeweler
needles I'm you know you've probably
heard me say this before I'm a big fan
of the big eye needle because when I
make mistakes I can easily remove it get
it off and get it back on again
so just a matter of opening up the big
eye needle
to get it in
and I usually try to put about the same
because I'm working together with them I
try to put about the same amount of
thread in on both sides for the
beginning of this
and you'll see why in a minute
I may not have to be real accurate but
this guy
okay
so then you want to take your first bead
and put it on the
string and measure it so it's straight
down you know right right in the middle
then I'm going to take these needles one
on each side
put it under the pipe chain
and I'm going to start working at this
end because when I cut off the smaller
pieces I can still have a longer piece
with that middle piece
so
hold it up and this is where it's kind
of good to have your cork board or your
bead mat you know your cork on your
beadboard or your bead mat here so you
can stick your needles in
but we're going to start out by see I'm
underneath I'm going to take one side go
through
the bead and then I'm going to go
underneath the other side
whoops
Angus who made a mistake there
let me adjust my threads again
I'm going to even them out
okay
so then
um
I mean that's a long link you can you
know shorten
your length is as you can because you
can always move the
needle back through
you know move the thread so I'm going
over with the other side and underneath
and then I'm pulling the thread together
okay
now I mean that locks it in place we're
not doing any knots but we're going to
do that three times in the same B just
to kind of lock it in place since we're
not doing any knots in the beginning so
I take my needle on my right side
through
and I go underneath and you'll see why
I'm doing this in them in a minute
because
it's you know instead of doing it the
normal way because it's the structure of
the beads plus with the pipe chain
there was no way to tuck the
um
the knots in right there so I'm just
trying to minimize knots so I'm pulling
those together
one more time go over the pipe chain
through the
bead
under the pipe chain
and I'm gonna I have tried where you
know when you see this type of stitch on
other bracelets when they tried the um
narrow it down at the beginning and go
smaller bead to bigger it was because of
the thickness of the pipe chain it was
really taken up most of the design of
the bead that's why I came up with it
this way
so now I have it locked in place the
blue Blends in pretty well with this
aqua
Adding seed beads
I'm just going to
shorten these cords a little bit before
I start the next step now since I'm
using six millimeter
um
fire polish I found
you know when I do in the wrap around
with the seed beads
on my bracelets that I just need
um nine
seed beads on each side
so
let's pick up nine sometimes if I do do
a pile I can just scoot it through and
I'll pick up some
three
four
five
six
seven eight
and one more
nine
okay now I'm going to do the same with
the other side
one two
oops
that I if I find there's two if I find
I'm not picking them up that way and
then I start picking them up the normal
way
okay that's three
this is not going to want to do it for
me too much
[Music]
six
seven
eight
nine
okay
so once I get that done
I'm going to pick up my first B my
second bead I guess I should say
Put the Needle
through one side
and Put the Needle on the opposite side
through so they crisscross each other
through the middle of the bead
and I pull it
like this but then this side that's
coming over here I have to tuck it over
under that side so it's coming out from
under
and then I do the same with the other
one
oops but you don't want to get in that
Loop when you're doing it
there
because you want to set it up for the
next one so I'm just scooting it up
there until I get for the
of the next
um
bead
and we're going to count nine again
three
four five
six
seven
okay
nine
okay put fat in the mat and let's do the
other needle
lettuce there
that's the bad part is doing all these
little seed beads takes a little bit
longer with the tutorials but I'm not
going to show this the whole length
because I want to take the time to show
you several different ways to finish
this off or a few different ways I
shouldn't say several
[Music]
six seven eight
nine
okay
Adding the second bead
so then I'll get grab my next bead
let's tighten that up
and I crisscross my needles through the
bead
and pull them out
the other side if somebody comes up with
a better way of doing this I would love
to hear it
we could put it in the blog and also in
the comments on the videos too or even
in the description of the videos
but this is the easiest way I found to
do it and if if you don't want to do
seed beads if you find a cord
that's thicker you know I mean that
would show against that like um
here for example here's some um like
knotting cord like that would go against
it and you wouldn't have to use beads as
long as you're bead in the middle can
fit it through twice then that would be
a pretty design too without having to
use seed beads
on the sides
and another thing is you know when
you're looking at this board it's not
only good for silver silk but if you
have other thicker cords you want to try
such as
um you know leather cord or even you
know remember the other side it goes
even thicker so you can try this with
you know leather cord or other thick
cords too
seven
eight
now if you're using size five
um millimeter fire polish you only need
eight of the size 11 seed beads on each
side because one of the bracelets I
didn't make I only use size five fire
polish five millimeter
um
so you know just adjust your seed beads
according to the size of the um
the beads you're using in the middle
because you don't want a really loose
strap or maybe you do it depends on the
look you're going for
six
seven
eight
nine
okay
slide those down make sure this is tight
so that's where it's supposed to be
and then I grab my next bead
and I crisscross you know Put the Needle
in on needles in on either side
crisscross through the middle of the
bead
pull it
and then make sure
that the needles go underneath
the cords because they start out on top
and that way the um the wrap around look
for the seed beads will be there
so
so I don't I don't want to keep going
with this and the tutorial I'll finish
it up and show you how to finish it
but this is how you know just keep doing
these steps until you get to the length
you want like I said I'm going to go to
about
um six and a quarter inches or 33 six
millimeter beads or 33 6 millimeter
beads yes so
um unless something else occurs that I
want to show you I'll pop back in but if
you
you know just re play this part of the
video if you're having problems
Finishing the bracelet
okay now we're going to finish off the
bracelet Just One Last Hand if you're um
as you're working if you find the um
beads are a little bit loose just
tighten them up and you can give it more
or less tight before eat before you
finish the next bead so I have my seed
beads on my
wire just uh on my thread to
you know make this go a little more
quickly
put my needles through the big bead you
know crisscross like we've been doing
tighten it up but the needle now that's
on
um this side of the bead will go
underneath that cord
and the needle that's on this
this other side of the bead will go
underneath the other cord
and then you tighten it up like you've
been doing now to finish it off
we're gonna keep wrapping around the
cords just like we've been doing with
figure eights but we're going to do this
three times just like we did at the
beginning
so this goes in watts and underneath the
core
and I need to tighten that because it
got loose
and then this one goes over the cord
through the bead
and under the next cord
and then over
through
and under
grab the other needle
go over the cord through the bead
I'm taking it through and then I'll go
under whoops it's getting tangled up in
there
I want to keep it on the opposite side
so it doesn't get all tangled in the
beads
foreign
do not see what I did okay
somehow both mine ended up on the same
side
okay
so now it's time for this one to go back
through
it'll be the third pass for both sides
so I go through the bead and under the
cord
okay over the cord through the bead
and under the cord we want to make sure
everything's tight so things don't
loosen up
now I'm going to tie it off
it's kind of hard to find a place to tie
it
so I'm just gonna
tilt this sideways so you can see and
um
I think I'll take one side
go through the bead so I can get both
needles on the other side
and then getting that needle under the
cord so it could be even with the next
to it in the middle
so since let's see I know it's hard to
see but after passing the needle through
I've got both
um threads on one side of the bead
we're going to tie a knot there
and just try you know this is about the
easiest way I can find to kind of hide
the knot
and then I'm going to
paint one more time tight
then um we're gonna make we're going to
get our thread burner you want to be
really careful we'll tell you what we'll
take it off so you can see what I'm
doing
taking it off the limb
so I have my nut here and I'm going to
use my thread burner so I can make a
little ball on each one so they won't
pass through the knot
so I'm gonna
be careful not to go through any of the
wefts you know you're weaving
and cut your
cord
make a little ball at the end with
what's
still a little bit up I left a little
bit so I can make that little ball
okay
okay I'm going to cut the other cord
or if you want to weave both threads
back through to hide your cord you know
like we usually do but I just find it
easier to do it this way
make my little ball
so I'll go back through it'll be too big
to go back through
so we're going to get our needles out of
the way
now we have to decide how we're going to
end it
um the easiest way to end it and you've
seen Jules do this on a tutorial from a
couple weeks ago is you can trim
your ends
which I put the
um
end cap here and like trim it to the
edge
and then you know just close up the end
caps I'll put the link because I'm not
going to do that this time because the
way I'm going I'm going to show you
several different ways to finish it
um different ways
without
um on our next tutorial
and so you know but as far as cutting
goes just decide what you're using at
the end
I'm going to be using the silver soap
pipe chain
end caps so I'm just putting it against
to figure out where I want the Top If
you leave a little bit of space between
the bead and the
um
between the bead and where the end cap
starts that's not going to hurt anything
I'd rather leave a little bit a tiny bit
too much space in
not enough
so I cut it and I'm going to try to cut
evenly
with the other side
and do the same thing on this end you
know my knee beads are nicely smoothed
out
measure it
and remember the pipe change makes great
like spacer beads or
um you know just decorative thing you
know things so save all those pieces
I've done quite a bit with the smaller
pieces
so this is a little bit uneven so I'm
going to just trim a little bit more for
this thing
Correction
okay I just want to make a correction
here and when I am using six millimeter
fire polish beads I don't need 33 of
them to make a six and a quarter inch
weave I only needed about 27 to 28 and
made about six and a quarter to six and
a half inches
um when I was planning that
I was thinking my wrist was seven and
three-fourths but I've lost weight and
it's seven and a quarter now but I do
like looser bracelets so that worked out
fine when I used the five millimeter
fire polish that's when I needed 33
beads to make it about six and a quarter
weave so that I just wanted to correct
that off so you don't get confused if
you're trying to figure out how many
beads you need according to how many
inches
okay at the end of this tutorial I did
give you an idea of how to quickly
finish off your cuff by using the silver
silk double strand end caps and
um that is a quick way but next in next
week's tutorials I'm going to be showing
you or discussing
um
three or four other different ways so
we're splitting this up so it doesn't
end up over an hour long so I hope you
join me next week for different ways to
finish off your cuffs especially when
you're using the silver silk pipe chain
um if you did use silver soap capture
chain or per less chain to do this type
of weave around
um
I would do the double strand cast or do
some seed beading or wire wrapping
around the those to hold them together
Danielle Wicks has a great tutorial on
the silver silk
um uh YouTube channel on how to weave in
caps with seed beads and super Duos and
also
um Neely has some great wire wrapping
for the ends on on the silver silk thumb
YouTube channel too
so I hope you join me next week and
thank you for joining me tonight
and
Transcript - Pt 2:
last week I showed you how to weave a cuff a different way to weave a cuff on the
silver silk jewel loom and so now I'm going to show you different ways to finish that cuff
so the tutorial for last week's will be in this in the description if you want
to check it and I'm sorry that I won't be in chat tonight to post links but
everything is in the description for the videos and we'll and I'll post a blog in
the next several days so you can um get all the information in both videos in the same blog
so let's get rolling on um our first video on our first section on how to
finish a a cuff
I want to show you the first way I finished this bracelet
I use beading wire and as you can see the bracelet is finished because this is
my prototype but I used um 20 49 strain beading wire through it
and um put it through both strands first of all to cover the ends I'm using these
um bead caps you can get the Silver Six store that's made just for the pipe chain
and I'll have the link in there and as you can see on this finished one I used
the um I'll just call it black I think it's rhodium sorry I forgot to check the name
bead caps on this sand and um then after I
then I use beading wire and I use 49 or 19 strands so it's more
flexible seven strands a little too stiff and since the pipe change is a
little stiff too you don't want too much stiffness to your cuff and in this case I use the magnetic
clasp with where I can connect each wire and to it and I just crimp the wire ends
so I'm sure you can find videos on crimping uh or you've probably done crimping
yourself so just to add decorative I put some fire polish beads at the ends
too before I did the crimps onto the um chain
and so that's just like another color story I did with the black pipe chain
and some fire polish from the Jill store Jolene store
and size 11 seat red seed beads so that's an easy way to do it
the second way I finished off one of these bracelets
is by using
0.8 millimeter thick nylon beading and knotting cords so I guess it's similar
to um the Chinese knotting cord and I actually
got this from Danielle Wicks I'm not sure she still has some in her shop
but um so what I did was I got this Beetle on
elastic cord needle and I thought I bet this is thin enough to pull this through just to make it easier because I had I
knew I'd have a hard time getting um
the needle in the needle in there just trying to show you the top of the package
so you can see I already have one in here and this I made it longer than I needed
because we're going to be doing some um knotting so we can you know tie it
together and have an adjustable clasp or you can use like they have these silicon
beads that you can feed this through instead of making an adjustable clasp
so I have my needle out and I went ahead and put it on the first two beads as you can see on here I put I put the bead cap
on a beat in a couple different beads just to decorate the ends more and if you
accidentally make your cord too short you know you're designed Too Short
that's another way to extend your design so it doesn't look like you accidentally
did it it looks intentional so I strung on the first two beads
and I'm just going to go through here I'm going to go through the bead cap
and then I'm going to go through the pipe chain
hold it down it'll make it a little bit easier to push it through and of course it might take the B cap off the other
end so once I get it all the way through you
can see I pushed it all the way through I um
put the other two beads on
and for some reason this is not wanting to go right on the bead like all the
others did there we go hope it comes out
[Music] and I'm just gonna measure the um
this beading cord or this knotting cord to the length that I already have
because I know I'm going to be trimming some off I just want to make it easier and um have longer length
and to be honest with you the first time I put it through I did double it but I
made it too short and then I got to think well I don't want two strands coming out of each um
thing and then having four strands on each side to make it real stringy looking so I just decided to use a
single strand but I'm going to double it a little bit to get it through see there's a little hook
at the end of this and I'm going to feed this through that little hook
like for any of you that have used it on elasticity or something that's what I'm
doing here so I got it on the Little Hook let's make sure you can see that
okay now
I'm going to pull this out
I have to get the bead through the right just a minute I'm just going to
tug on these beads to make it easier because that one I probably should have got a different
Beadle with a bigger hole because I didn't have problems with the others I lost my original bead
there we go and don't worry we're gonna straighten
this out once we get everything and so right now it's a little messy
such as keep holding your beads together
and pulling on the needle and once I get to
the big cap again I gotta tug a little bit harder and tug this bead over that little hook
that one has a little bit bigger holes so you know if you don't want to do so much tugging just use a little bit bigger
whole beads
and guess what I I should have used bead stuffers at the ends of this I let my
one of my beads fall off
now I just wanna make these about the same length
so I'm measuring this out you know to straighten up the length of
these
so you can measure or something just make sure they're approximately the same length on each end
okay now that we have the string through we're going you know I got my silver
silk um poaching B camps and a couple beads I'm going to tie knots at the ends of these
to hold the beads in place now we're going to put knots in the
cords I put just to show you I put a um
um wire guarding at the end or whatever you call Bead stopper I mean and to hold it
in place so it doesn't keep sliding through while I'm trying to make a knot now you can make these knots with any
kind of not until you have I was trying to think of something that I you know I have all of them but I was trying to
think of something that if you don't have a knotting tool you might have in your house so I'm going to try this bead
knitting needle now you can do this with any knotting tool you may have but if you don't have
a knotting tool I wanted to find something that you might have in your house some people have used t-pins you
know thick needles like upholstery needles or something I just grabbed this um this knitting
needle to see if it would work so I'm going to stick the tip in the knitting needle in and put it up against the bead
I'm going to tie my knot and gently guide it down the knitting needle when I get it up against the bead I'm going to
take the knitting needle out finish tying the knot
guarding the knot down
[Music]
okay it is a little loose there and on the other side I made a double knot because that hole is kind of big in the
last bead so I'm going to try this again and make another knot
over the first knot
and make sure it ties over the first knot
then I'm going to tighten the knot down you know you could even do this maybe
with um make the barrel knots
so now I'm gonna adjust this make sure it's tied up against this so I can do the other end let me turn this around
so I got the other end I'm going to start the knot
you know like you normally would went around itself put the knitting needle in
tighten it and push push it down
keep pushing it towards the bead and as you're pushing it towards the bead
take the um knitting needle point to guide it
towards the bead [Music]
some people take another bead and push it the knock down so it's uh against it
I do have a little wiggle room there but like I said I wanted to make a stronger knot
or double knot so I'm tying it again
making sure it stays over that one beat that one knot and pushing it down
there now to make it adjustable
since this is so so thick I'm just I'm just going to guide the wire the
lines like this and then we could do some adjusting afterwards
and I'm actually going to use um let me cut this in half
use some more I'm going to see if the Chinese not in quarter worked big with this
so we're going to do square knots over the Chinese knotting corn so it
take this
and you know double it over you know put it underneath the cords double it over
and there's just tie a knot in it I mean just like one single strand knot
on one single knot and then we're going to start doing the
square knot so you take you know wrap it around
this goes over the cord and it goes under the other cord that's part of that knot
and then this one it goes over the cord that just came across so you kind of have a p but you want to go under the
four cords up through the loop on the other side
and then you tighten it up now you're going to do the opposite now you're going to start on this side
put it over put this cord over that
take take these take the other cord underneath the four
and take it through the loop on the other side tighten it up
okay now we're going to go back to the this side over the four chords take the the
right cord over the the left cord that came across
underneath the four cords up through the loop
tighten now it's the right side turn to go over the
four chords [Music] and it's gonna
go under and then the left core is going to go under
well it's going to go over and then under the four chords tighten up we're just going to do three knots like this
so the left goes over the four chords the right goes over the left cord under
the four chords and then through the loop on the other side
[Music] and one more now it's this time guys
charm go over the four chords [Music]
and then the right left goes over the cord that just came across
that's going to go under the four chords [Music] through the loop
you know if this is kind of confusing just um
look up um square knots you'll find a great diagram you might even find some videos
that might explain it if you're not understanding how I'm doing this okay now what we want to do is take our
burner and we don't want to cut the four cords
we only want to cut the cords we're knotting with so or you could take off the ends
slice through it pat it down so it stays there it kind of burns it into the
side there [Music]
Pat it down okay now what you want to do now is figure out
where you want to cut these cords
and tie on some beads so it doesn't go through the knot so I'm going to be tighten this on my wrist
because you know you don't want your dangly cords too long
[Music] and so but you don't want to cut them
too short because you want it to be going over your hand too
so
I'm going to take this and um so you know I I gently I want to even
that up some
just want to make sure to go over my hands since I did some adjusting
and it's still a little bit too loose so I mean too tight
so you just have to play with it you don't want to do the finishing until you can get it over your hand comfortably
you know if you're making it for yourself or for the other persons
so okay so that seems pretty good so I'm gonna that's about where I'm gonna have
a little Bangles that I can grab to tighten it
what I did first was I went about an inch down from where I decided it would be comfortable going over my hand
you know I made cures about even on each side and then you know if it's slightly off
from each other it's not going to matter make your knots
and with this I just kind of smoothed it out so I can go through these beads they have slightly larger holes we're not
really big holes so I just kind of smooth it out here or you could put it into a big eye needle or a collapsible I
need off to feed it through size took it against the knot [Music]
and take the knot down if it's not really close to it you know just like you could see on this
one it's going to slide around it'll be okay unless you're you know one of those per you know a perfectionist which I could
be at times as far as my not as far as my jewelry
goes [Music]
so I'm just trying to get it close to the knot as I can because I want a huge gap in there
but a little gap's not going to bother me on the dangles then I'm going to do it with this one
too one more [Music] one more night about an inch down
from my adjustable knot [Music]
smooth out the end I feed it through the hole
[Music]
[Music]
you know you can even use seed beads on this part price size eight or size six
would work too
be a great use for using up some of your seed beads or some of your beet soup
okay now I'm just gonna um I mean you could cut it but I want to
use the thread burner and go down a little bit below Maybe oh a quarter an eighth of an inch below
the knot to burn it and seal it up so it doesn't um
[Music]
so it doesn't Fray you just do the same for all all the
other four
[Music]
[Music]
okay now I try on your bracelet you know make sure your beads are all smoothed out
you know from trying to fiddle with all that stuff
[Music] put on your bracelet
and grab the ends
and adjust it [Music] foreign
that's another way to finish off the bracelet [Music] when making the adjustable bracelet yes
I know I missed a bead and I saw that when I was editing
uh you know but it's not going to bother me to wear it but I just wanted to point that out I
did see that but and I don't really feel the need to cut it apart to add it again
so but if you notice it great eyes
okay okay now we're going to finish this cuff with wire and I'm using Beetle on German style
wire 20 gauge if you want to try the 18 gauge go ahead I'm using German style
wire because it's like along the lines of half hard wires it's a little bit firmer good try to hold the um
the cup shape when we get it formed but like the artistic wire or a lot of other
craft wires are dead soft or almost dead software you know you might lose your
shape you know especially especially since we can't Hammer this with all the glass beads in it and we're
shaping it after we already get the beads in it that's why I was concerned about it so I already got one wire through and it
went through pretty easily if you want to try 18 gauge wire go ahead and try it I did try 16 gauge and I I really
struggle getting it through so this wire for it was about 11 inches
long for the six inch I think this one was about six and a half inch weave
my wrist is seven and a quarter so it's going to be a little bit wider than that but I'm as you can see
it's just sliding right through just like a knife through better
okay so then I'm gonna put the oops I forgot the B cap on that one and we need to put
the bead caps on and I only had silver I mean not silver
um I only had the rhodium or the black color for the
pipe chain and the antique gold so I thought the rhodium would look a little bit better with this than the antique
gold since we had a lot of silver in it I mean you can use whatever these is you
and I picked out some of the beads
you know that I had already used it I just I just think it looks nicer to finish it off with the bead next to the
end cap so we'll put a bead here on each end
I only have a bead where I have the bead stopper
now what we need to do is we want to bend the wires toward each other
make sure your beads on your bracelets are nice and even
I honestly don't want to leave a gap I just want to bend it right there on top of the bead
and then where um like right in the center on the longer piece I will I'm going to pin it right in the
center and then steep stop these from sliding
around I'm going to bend those two towards each other
oops
oops it's wanting to go its own way okay
and then I'll take that and
do that boards and what I'm going to do
is take one side and wrap it around a couple
times up to on the other side you can see how I'm just quickly if you
find it easier to hold it I like using chain a bit chained up with
suppliers because they stand on my way better bend it around a couple times and you
can see I probably used a little bit too much wire but I'd rather be safe than sorry
trim that in this instance that's a little bit less wire I'm going to use this and to
make a a leap because I'm going to build a
clasp into this wire so I put my chain nose pliers right here
and then bend and that gives me a little Gap to make a loop to hold it in place
none I'm gonna use my six step prior I'm going to use the third one
and I'll look that up and put it in the notes on how um how big that is so if
you have like you know different different male making pliers or even a marker your artistic
wire Mandrell so you can use one of those
to make your Loop so so I said I want to make a small the
smaller one so let me get the smaller one up here I'll show you what I'm doing
so I got the got it in here and I'm going to bend it around
twist my plier so I got that
I'm going to use my chain nose pliers to hold them in place why I wrap
my wire around the stem and so it was um about two to three
times then I just gotta trim the extra off
and I'm going to tuck that end in
the side so
there we go so I got a nice Loop now on the other end
I'm going to wrap a little bit here
a couple of times and this end I definitely need to hold
it in place to wrap it
some people do use two pair of pliers to wrap it I just have an easier time using my fingers
I'm just doing it enough to make this steady you know there's different ways to do
this I'm just showing you the way I plan for this [Music]
wire off so you can see I'm wrapped up here and
we're going to use this and to make like a little um
hook before I make the hook
you want to get something to shape your bracelet around
I have this artistic wire and what do they call it um
sizing drum and when I measured it my wrist is seven and a quarter inches and
it works perfectly for my wrist but you know if I was eight inch I would just go a little bit past it or you can like use
pill bottles or something and they even have a round one if you'd rather have a round bracelet
I'm going to shape it around this so I can figure out where I need to make my hook
so as you can see I'm going to need to make my hook right in here so it's going to be a kind of a
long hook
and if my bracelet is loose I don't mind
I'm gonna you you also need to decide do you want
your hook to go upwards or downwards I don't like it digging into my wrist so I
go downwards I got this and I'm going to trim it some
see that's still too little
let me turn it halfway and I'm going to make a little circle here with my the
smallest which is about two millimeter
you have
so when I put it on my wrist
it fits right in there and then we can also push that down so it doesn't slide
out easily I mean if you think it's going to be too
wide you can even put a couple beads on here so
looks like I couldn't have extended my bracelet a little bit more for this I'm actually going to see if I can make
it a little bit smaller because I don't really like that
you also have to make sure it hooks in
and if you have a problem with it too what you can do is make two Loops maybe a little bit smaller on each end and
then add your clasp
so I'm just gonna add this like that
you know it's just playing with it until you get what you want so I got my Loop and I'm gonna
what was that
and we can make sure it [Music] closes
if I don't like this I may end up making a loop you know what I'm going to do I am going to make a wig to make a that
had a class too because I really don't care for that so much for trying that
so you can make your lips smaller too since you're just going to be adding a clasp to it but since I already made the
one Loop I'm going to make it a same size on both sides
then I'm going to cut that side off
you could before you close your Loops you could have added your class then I'm going to check and see
could do
I have some 18 gauge wire here
and I'm just straightening it out with my nylon gel pliers
I'm going to make like a little s hook
I'm going to tip just curving around so I got a little loop at the back back
and I don't really want it real big
so I'm putting that down or you know the loop down and I'm going to take this
around like this until it touches the loop
and then I'm going to do the same thing on the other side
so I have something like a figure eight Loop but I want to make that look I have a figure eight Loop but I want to make
a little loop at the end too on this side
now this you could foreign
pliers to work Harden it
might take several squeezing but I can already feel it's work hardened
or you can tap it with your um like a nylon hammer
on nylon plate or something if you don't want to wire your wire and once I do that I could put this
in one end leave this side slightly open
and
and then I have a clasp once I can stay on there all the time
and the other side the site slightly open and like I said you can add any class
you want to I just quickly made that
and here's what it looks like on the drum
made slightly too big but I don't mind bracelets being too big on my wrist
I hope you enjoyed this tutorial and different possibilities on how to finish off your loom bracelet your pipe chain
Loom bracelets and we would love to see which how what you do with this tutorial
it you know it'd be great to see pictures post them on the jewelry making with jewel loom page and the silver
silkies page please tag me tag nelay tag Jules in it you know by using our names
and we would all three love to see these and if you have any questions please ask
here in the videos you know please tag my name so I can find it easier or you
can ask the questions on the um on the jewelry make with jewel loom page and
I'm sure they won't mind if you ask on the silver silk silkies page also or you can message me on Facebook
well um thank you and um hope to see you again soon take