SAVE 15% OFF ON YOUR FIRST ORDER PLUS GET 3 FREE PATTERNS. SIGN UP BELOW!

0

Your Cart is Empty

Shop
  • Read our story

  • Each of our carefully researched, styled, tested and distributed collections reflects a particular aesthetic and ethos. We hope some of these speak to your own style, and help you refine and redefine your own look and style philosophy in the process.

  • Easiest Way to Create Beautiful V Shaped Fringe Jewelry

    May 01, 2025

    Easiest Way to Create Beautiful V Shaped Fringe Jewelry

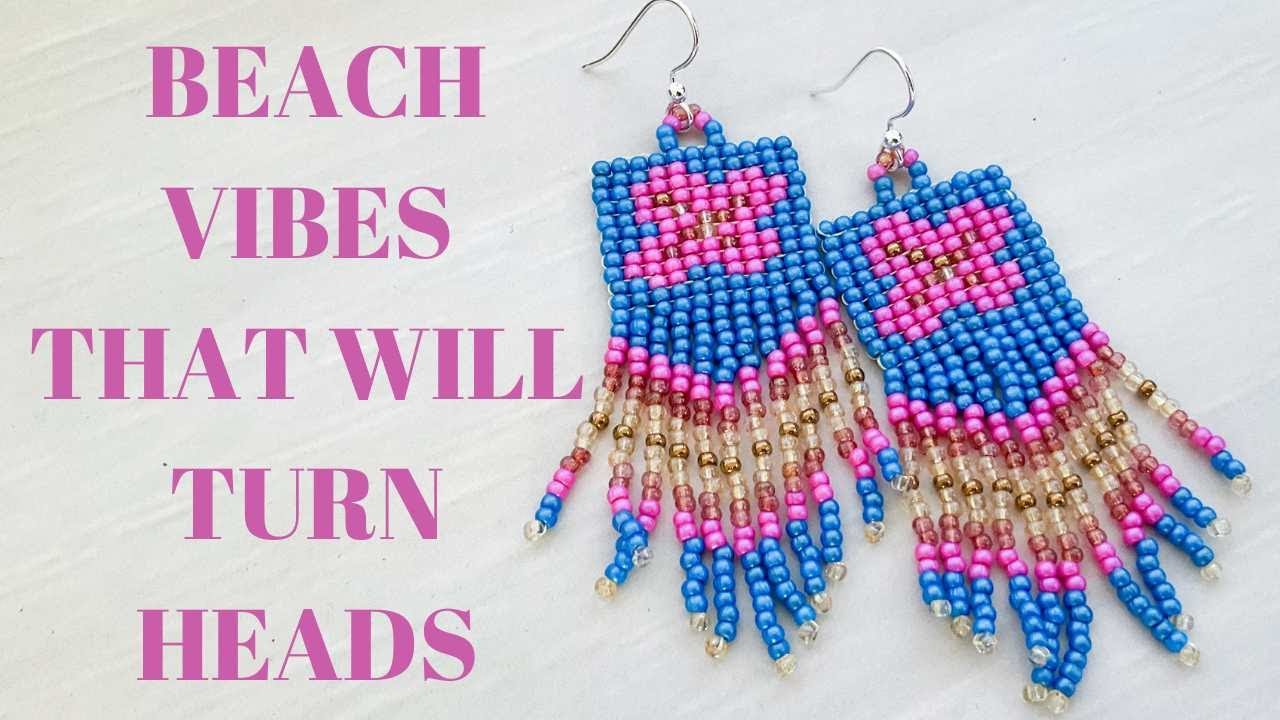
    Danielle Wickes teaches how to make these beautiful fringe earrings, using a section of a loom pattern for the top. After she finishes weaving the beads, she shows how to remove the project from the loom and finish off the edges. She also demonstrates how to create a loop for the ear wire and how to make the V shaped fringe at the bottom of the earrings. Though Danielle is using the April Creative Soul kit, you can also create your own pattern for the top or use a section of a pattern you already own. These are techniques you can use in other loom projects...or even your beadweaving projects! Join Danielle for this Jewel Loom School tutorial and learn more techniques to expand your jewelry making techniques. 

    Watch the tutorial below:

    Buy your earring looms here: https://jewelloom.com/collections/jewelloombeadlooms/products/2-pack-micro-tiny-wisdom-warrior-earring-loom 

    Save 15% off your first order, plus Get 3 Free Patterns:  https://jewelloom.com/pages/get-3-free-bead-patterns-and-save-15-percent-on-supplies

    Shop Looms and jewelry making supplies at  https://www.jewelloom.com

    Did you know Jewels has a Book? It’s true! You can get a digital copy of the Jewel Loom Inspirations book here:  https://juliannajewel--bellacraftspublishing.thrivecart.com/jewel-loom-inspirations-ebook/

    You can find Jewels here:

    Where to find out more about Danielle Wickes:


    Transcript:

    hey happy creative soul April earrings
    video i'm going to show you how to make
    these gorgeous little just I don't know
    they feel Hawaiian to me it I started
    with the idea of cherry blossoms to
    match the bracelet um so that's kind of
    where I was going with it and and then
    this Hawaiian flower happened and so now
    we have these gorgeous summer ready
    fringe that um really complement the
    bracelet still so I'm just going to show
    you what they look like on really quick
    and then we'll go ahead and just dive
    into how to make them which is super
    simple really really easy to do let's
    see if I can make sure you guys can see
    them bring them a little closer so what
    do you think they're pretty cool huh i
    like them just a fun little pair of
    fringe to get your summer going and um
    let's just show you how to make them
    you're going to need your earring looms
    and you're going to need your April
    Creative Soul Seedbead
    kit here's an up close view of the
    earring beautiful loomed piece that has
    a gorgeous fringe added to it and so
    we're going to create its pair in
    today's video so to get started you'll
    want to have your earring loom handy and
    we're going to put 12 warp threads onto
    the earring loom and so to start your
    warps you'll want to locate on the loom
    the little
    notch and tie a double knot to
    it so there's
    one and here's the second side of my
    double knot and I left myself a little
    tiny tail i use that tail to go ahead
    and tie to at the end when I've got my
    warps on but for now it might get in
    your way so you can always just kind of
    press it out of the other
    direction just kind of hold it like at
    the back like that it's kind of usually
    what I do and bring your thread
    around and we're going to want to bring
    that right through the first
    comb and then through the bottom comb
    here and at the base
    here
    cross and go through the first comb and
    then I like to use either my thumbnail
    or my fingernail to hold that thread in
    place while I bring it up through the
    next
    comb pull tightly and then head through
    the next one we're going to work one for
    one for a total of 12 warp strands to
    get started
    [Music]
    all right and so there is my 12th warp
    strand and it's easier to count them on
    the side even when it's a light colored
    thread you can just sit there and count
    make sure you have 12 in total going
    across your loom and turning at the
    combs on the edges here and the easiest
    way to
    tie so this is to finish off your piece
    or finish off your your strand is bring
    it down through the comb that is a you
    know headed from the one you're exiting
    and then just kind of hold everything in
    place and bring it over to meet your
    tail thread where you can tie a double
    knot and to hold everything steady while
    you're making that knot if you want to
    you can wrap
    around the notch place where you do the
    the knot the first knot just kind of
    like wrap around like that one
    time and then hold everything for a
    second and go ahead and trim that thread
    free from your spool at this point a
    little easier to get that knot going
    when you have your strands heading just
    like that together so tail thread and
    the last warp
    strand and we'll just go ahead and do
    one and two and once you've got those
    tied you could even do a third just to
    you know make it extra strong i don't
    know so it might just be two is okay but
    I hope there's some reason just do three
    and then I'm going to trim those so
    they're not in my way for my next
    steps all right so there's our 12 warp
    strands now if you want to make your
    warps tighter me I feel like I like them
    really tight so I put this tassel maker
    in there and that makes them just tight
    as a guitar and for me that makes it
    easier to get my rows in and so let's
    start a new strand
    doesn't need to be super super long um
    because keep in mind we're going to do
    fringe using the warps so if you want to
    just go with um you know maybe 45 in to
    50 in or so probably
    plenty and a hard beading needle and get
    your needle
    threaded all right right and so from
    here you want to string on the first row
    of beads which is 11 color A and leaving
    a sevenin tail on the side that is to my
    left cuz I'm right-handed so I'm working
    with my beads over here um you want to
    leave that sevenin tail underneath
    you're coming underneath the strands and
    stringing those 11 beads now if you like
    this technique this is just my thing for
    getting beads on i use my needle
    temporarily going back through all the
    beads as a
    stabilizer and it makes it easier for me
    to do this first step
    here which is to get all those beads in
    between the strands and if you get
    something like that don't sweat it you
    can always move
    them and sometimes you can move them
    more than one at a
    time i find that once I get these lined
    up it's a lot easier for me to line up
    the
    others these as in each edge right
    looks like I've got them all but my edge
    one there we
    go so once you've got them positioned
    and don't worry if they're cattywampus
    don't worry if you're working in the
    middle we're going to slide this go
    ahead and pull that needle out you've
    got those beads in there now working
    with the eye side and this is pretty
    important this will save you some time
    working with the eye side of your needle
    go back through the beads staying above
    the warp strands
    so push up on the outer wall of the bead
    to make sure that you're staying above
    these as you pass back through the
    beads pull that
    through and then business card or even a
    bead scooper slide those beads down
    somewhere toward the bottom this isn't a
    very tall piece the loom piece is only
    going to be um a few 1 2 3 4 5 6 7 8 9
    10 11 it's only actually 11 rows that
    we're going to have to do so super quick
    but get the um you get the beads kind of
    toward toward the bottom there and then
    string on your next
    [Music]
    row so the next row is going to go on a
    lot easier you don't need to bring the
    needle back through it just position the
    first bead the one that's on the right
    and then just roll the beads from there
    right into their spots
    and we can straighten all that out later
    don't worry if it's not exactly lined up
    and again working with that eye side go
    through all those beads again heading
    back staying above the
    warp and pull that
    through and then from here you can just
    tidy it all up
    so we're going to repeat just like that
    until we finished all 11 of the pattern
    rows and then we'll take it off the loom
    and start adding our
    fringe all right once you've got your
    beautiful pattern
    loomed we can go ahead and remove it
    from the piece or remove the piece from
    the loom so I'm just going to set my
    tassel maker aside and to get the the
    piece off of the loom the best way is to
    just go ahead and
    free the strand that is knotted here so
    just the one that's knotted we're going
    to use some cutters and you can use
    scissors or flush cutters i've been
    using flush cutters to gently lift the
    knot see like that and the reason I like
    doing that is because then my knots's
    free from my loom for me to use it next
    time
    but you can always just trim the strand
    itself and that works too and when when
    you do that it will
    free this edge one
    here and you might have some of that
    knot kind of just added to the end there
    we'll just trim that and you'll have
    this one free so you see you've freed
    these two but these are still hooked
    around and that's important because
    we're going to use them as a way to pull
    in our warp strands so just go ahead and
    use your thumbnail to assist them off of
    the
    combs and that side should fall free and
    the other side will just fall
    off and so now you'll
    have a lot of warp
    strands and you'll have your two weft
    threads these are the ones we were
    sewing with there's the remaining
    working thread and the tail ignore those
    for now the two on the side and then for
    these go ahead and just pull them in and
    I'm going to just hold it up and show
    you on a piece this small it's super
    easy and it's going to give us a really
    long warp strand which is great because
    we can use it for our fringe so
    whichever side you want um I'm going to
    start pulling over here so that my long
    strand ends up down here and my thinking
    on that is just let me show you really
    quick i want it to kind of mirror and so
    I want to build my fringe down
    here and you could also
    say flip it like that but decide if you
    have a side that you think is your
    favorite to be the top it actually could
    be either but I'm just showing you now
    what I chose and I'm probably going to
    create them to be worn like a mirror of
    each other so based on that I'm going to
    start pulling here on the side that my
    WS are on and what'll end up happening
    is my long strand will end up being over
    here
    so let's just hold it hold it tightly in
    your hand grab the very edge warp thread
    that's this one right here and pull it
    and do you see the little loop here at
    the bottom it should just connect right
    there and now I'm going to take this one
    which is the next one in at the other
    side i'm going to pull on it
    and what's happening here at the top of
    the piece or this this slider here is
    that loop will go ahead and
    hug my edge
    bead pull this one same
    thing happening there on the other side
    and you see the strand is getting longer
    and
    longer on a piece this small it's so
    easy to just pull it with your fingers
    on the the bracelet if you wa watch the
    bracelet video
    um you'll see that we had to use pliers
    because the long strand going through a
    bracelet is a little harder to pull but
    this little piece super easy and you see
    I was just freeing a loop that was
    getting pulled
    in and this is why we loomed with our
    eye side of the needle if you're pulling
    on your strands right now and it's not
    not pulling
    freely freely enough for you to just use
    your fingers maybe you've caught one of
    the warps when you were
    weing in which case you will have to
    weave in at least that
    strand but hopefully if you use the eye
    side to do your warping of those just
    sweet 11 little rows there then you'll
    have the ease of doing it this way
    and always switching sides every time
    you pull up then you switch to down and
    there are going to start as this gets
    long it's going to start to pull in the
    others so just watch for
    that there's that
    one get in
    there i'm going to go ahead and just
    film the whole thing it's not going to
    take us that long
    so far so good and then we're going to
    pull from this
    side this this is going to be a pretty
    long strand at this point so just keep
    going as you get to where the loop is
    small go slow so you don't pull too hard
    and warp the edge of your piece here's
    our last one
    and so here's our strand that's going to
    become the fringe
    maker all right so now we have a fringe
    strand down here and up here we have
    several strands to work with and what
    we're going to use one of these up here
    the other two you can weave in but use
    one to create this little top
    loop so really quickly I'm going to stop
    the camera and just weave in my strands
    i'll weave in these two right
    here all right zooming in here i'm going
    to show you creating a little top loop
    and so what you'll want to do is your
    thread will be exiting this is I'm using
    my left over weft thread and so I'm
    going to just jump
    over the warp strand that's on the side
    and go through a few beads
    and this is how I did the weaving in so
    um if if that's new to you this is how I
    did that you just pick up some
    of the little weft threads that are
    running through the beads those are the
    ones you were creating as you warped and
    what you'll want to do is just bring
    your needle underneath them very gently
    see to pick them up like that and this
    is this is the weaving in method that I
    used to do those other
    strands bring that through and notice
    where I'm exiting from i brought myself
    to the center three beads of this
    piece so bring that
    through and now just go ahead and head
    up
    through however many beads you are down
    you may have gone down more more or less
    than me bring yourself to exit from that
    center edge of the center three so for
    me that's one two three four in one two
    three four and so we're going to create
    a loop of seed beads that jumps over
    that middle row and connects to the top
    row to look just like that so you'll
    pick up two and then one of the pink and
    then two of the uh the transparent
    red back to
    pink and then two more of
    those and head down through however many
    beads you want really we're going to
    need to reinforce that but the goal is
    just to go through a few of those beads
    and then you'll want to go under we
    threads again to move yourself right
    back to underneath the one where the uh
    strand starts so through
    those and then head
    up and reinforce all of
    that if your other strand is trying to
    join you just move that strand
    away there we go
    and as you're reinforcing if you want to
    take a peek at the side of the warp
    you're exiting from so the side warp if
    you want to go down through the beads
    passing on the opposite side it'll cover
    up the warp thread on that
    side so you see what I mean so right now
    the bead you can kind of see watch what
    happens there so now on both sides it's
    snuggled on top of the
    warp and so over here on this one I
    still need to do that see so if you come
    up through the beads from in front of
    the warp thread in this
    case it
    will very um symmetrically settle this
    loop you see how right now it's kind of
    in front of it this strand that's
    running the side head
    up and make sure when the needle comes
    out of that bead that it's coming out in
    front of the warp strand and then go
    ahead and head through those beads and
    if you want to try to do that maybe in
    two swoops it might be
    easier just to make sure I stay in front
    of that
    strand
    oops so like that
    and then just head through
    those my tension's pretty good so I'm
    having a little struggle getting in
    there i'm also really careful not to
    puncture strands i don't know i just
    always kind of meticulously work that
    way but there see
    now front and back that loop is staying
    right where you might want it
    to head up through here down through
    here down through this
    one and from here just head into the
    beads and weave in the rest of this
    strand there it
    is so now put a needle on that long warp
    strand that we left at the beginning
    and notice that it is a warp strand so
    it's running the side it is the strand
    that's running this whole edge so you
    want to go ahead
    and jump
    over and go under the
    left around that bead the reason for
    that is you don't want
    to start your
    fringe heading that direction right you
    want it to head down so we're going to
    go around the bead see and then down
    through the bead
    and that tip will save you having fringe
    that's a little wonky as we make each of
    these fringe strands remember the tip
    that I gave you up here about this the
    um direction so that it's straddling the
    warp you can do the same thing here with
    your fringe just take note that right
    now I'm exiting it from the front of
    that warp strand from the bead and as I
    string my first pattern row of
    fringe which in this case is just two
    two two two and then one bronze in the
    center and then we'll do two back out
    just repeating
    that two all the way to the
    edge slide that down
    and then I used the turning bead to be
    this little clear bead because of my
    thread is the same color and it kind of
    hides the
    turn so skipping that
    bead go back up through all those
    beads that we just
    strung and then just take a quick note
    remember what I was mentioning and see
    I'm in front of that strand in front of
    that warp go over it and behind
    it as you head up the bead
    and if you want to to make your fringe
    really steady you can go through two
    beads like I've done there i I do kind
    of do that when I make a fringe on a
    loom piece so from here hold that
    turning
    bead and just
    pull get the tension right make sure
    you're happy with it and there's your
    first strand of fringe
    from wherever you're exiting go under
    those WS one and then the next
    one so just like that we're going to do
    this after every fringe strand is
    added there you go and then heading down
    to start the next
    one and again I'm taking note that I'm
    exiting in front of the warp there
    i'm hoping that is easy to
    see and now I'm going to string the next
    strand for every single strand patterns
    the same counts except for the
    blue so every fringe strand starting
    here you add one more to the blue repeat
    so here's two see and then you go three
    but everything in between is the same
    then it's
    four then five then six and then you'll
    reach the center which is seven you'll
    have seven blue and then it'll go to um
    the same repeat and then seven more blue
    then you'll start going a decrease six
    five four three ending with two again so
    go ahead and do that remembering to
    straddle those warp threads so that on
    both sides your fringe is completely
    encapsulating it see you can't see the
    edge warp anymore on this piece and
    that's because after I string this next
    one I'm going to come back up and go
    through the bead from the other
    side of that warp strand so just like
    that see you just want to jump over it
    and that is all there is to it let's
    finish the fringe and then I'll show you
    how to put it to um weave in one more
    time after you've got all your fringe on
    all right my last fringe strand
    and I'm going to go ahead and just show
    you one more time that see how I've
    exited from in front of the warp there
    i'm just going to go around go through
    the bead this way and this time I'm
    going to head up through a few more
    because it's time to weave
    in well I just got through two but there
    we
    go and so here's the last little bit
    there they are all beautiful little
    French strands there so weaving in just
    going to go under a few weft
    threads up through a few beads and
    repeat and before you repeat that
    weaving in step do one little thing
    really quick um make sure the tension on
    that last strand is as you like it
    because this step will possibly tighten
    it and so just double check that before
    you keep going
    your fringe should be pretty free
    flowing and just go ahead and weave that
    in and
    [Music]
    trim so there they are and keep in mind
    if you want you can flip them so they
    mirror each other when you're wearing
    them like you can always have them be
    like that so when you put your ear wires
    on just decide which side you'd like to
    have as the mirrored front and back and
    depending on which way you did your
    flowers you may even have them flipped
    and that's okay too i think they're
    beautiful no matter which direction you
    wear them in and there you
    are i hope you enjoyed this tutorial and
    we'll see you for the next Creative Soul
    project