Your Cart is Empty

hi guys in this video I'm going to show you how to make a ruffle pip earring and
this is made with beads that are from the creative Soul uh December 2024 kit
and so there was also a beautiful bracelet and this one will compliment it very nicely um and I use leftover beads
from that kit again for creating the design so to get started you're going to want to work with your earring Loom you
could also work on your jewel loom that's going to work just as well um but the earring Loom will save you a little
bit of thread and I'm going to be warping the earring Loom uh with an unusual
configuration that will make the Pips fit really well so what I've done so far is I've tied a knot to the little side
Notch of the Loom and I'm going to bring my thread through
and I'm going to just bring it through and let's see right about the second
comb which corresponds really nicely too where it's coming up from the thread Notch the knotted spot and then I'm just
matching that here at the bottom once you're there you'll notice
that um there's a another comb on the other side so you'll just want to use
your thumbnail to secure that and bring
thread up under it like that and then what I'm going to do for the rest of this uh this stitching um
warping sorry uh is I'm going to be skipping a comb so this is unusual from
previous um Creative Design uh creative Soul designs that we've done in the past where typically for an 110 seed bead you
would go ahead and warp every comb for the desired number of warps but let me show you the design that how it looks
from the back it'll explain a little bit what we're doing to get a pip to fit we're going to want
to go ahead and have a little bit more space and what worked out was it it fits
really nicely you can really see from the front how nicely it works um that about the width of two
beads over the width of the piece made the PIP fit nicely so we're going to
string or we're going to warp skipping everyone so that when we do our looming
we're going to have two beads in between each warp thread so how many warps do we
need through you need one for every set of two we have a total of 10 beads and
you remember there's always an extra warp thread for the edge right so we're going to need six warps and so you can
see in there there's one two three four five six warps and that's going to cover up 10 beads worked in sets of
two so here's two warp threads and just kind of find find a
comb where it corresponds the comb that you go through down here is not as important just want to be able to make a
turn and make it so that it lines up a little bit it doesn't have to be
exact and you're going to skip one comb every time so there'll be one empty
one in between every one of your warp threads same thing at the bottom so I'm
going to keep going until I have a total of six
all right so again I've got a total of one two three four five and six threads and again I skipped one
comb in between each one and so here at the end here I'm
going to bring the the last of the thread back over to meet the tail we're going to use the tail to do a knot and
to keep everything kind of steady for just a second while we do that because it's going to want to loosen up on you
until you get your knot tied so go ahead and just go this way keeping your tension really
good and using my thumbnail just to kind of help me out I'm going to bring that up and
over and then I'm going to just try to keep it tight while I tie my first knot right
here there we go just going to try to keep that in the little Notch that is made for the
knot that'll help everything stay in place
and I'm going to go one more time there we go okay so you want to make sure that's
nice and tight and again it just travels from the
last place where you headed this way and I just brought it behind
here over to meet where the tail was and I just
used the tail thread to tie a knot once you've got that um maybe even
give it an extra knot you know just to be secure and then we're gonna go ahead and
trim it uh pretty short because we don't need we don't need this to be
long so I'm going to go right about there and we are ready to start
looming so to get started you're going to want to have a few colors out I used
eventually I'll use every color in the kit but um for the beginning part you're
just going to need the following colors uh first you'll need this termine and this one looks like a pink
turmaline color to me so I just named it that and uh need to get a little bit of those
out next color I used is like a metallic silver looks like that and so for this
one um I'm just going to move this
over that one we can just think of as our B color B color C is the red there's like a lava
red and then color D is black jet so we got that one here so a b c and
d cut another span of thread and about we're going to have a
lot of extra thread for the warp so it doesn't need to be that long but I think I just did a wingspan just to be safe
and it worked out well for me so about anywhere from 50 to 60 in is probably
enough thread for this next part next part and forgive me my voice is a little funny day I'm just fighting a little
cold still just the December bugs got
me but you know never never going to stop me from beating
though all right so I'm just threading my needle this is a size 10 hard beating needle and let's go ahead and we're
going to pick up 10 of the turmaline beads so just string 10 of
those and okay I'm going to bring it under the
warps and I'm actually just kind of holding the beads right now leave a tail of about seven inch
we're just going to weave that in [Music] later and if you like to start without a
knot I recommend doing that if you're going to pull your warps in versus weaving them in um if you want to do the
pulling in follow along with me here by just bringing your needle right back through and then arrange those
underneath the warp threads in between each of them in sets of
two so it should look like like that all right and you just pull your
needle out and now working with the ey side first go back through the beads keeping your thread above the warp
threads these are the warps here just keep your threads right above
that and you've got your Row one done you can use a bead scooper like
what I've got here or something like a business card or ruler and just test that you can slide it slide it down a
little bit if you find that you're having any issues with your tension you can use the uh jeom tassel
maker to raise your warp threads a little bit that puts a little bit extra
tension on and I'm going to take advantage of that here but that is an optional step that you can do only if you feel like you need
it and here is our tail thread I'm just going to pull that down out of the
way and let's get row two on So the pattern is really easy I wouldn't even
call it a pattern so so much it's just for the first few rows we're going to string 10 beads in color
B so you start with color a then b c and d just a regular whole row so there's
four five six seven eight nine and 10 10 of
those bring that under the warp threads and again they should pop right
up in between like that and then using your ey side just so you don't puncture any thread go back
through and go ahead and pull that through and this is not required I just
like to test that I can move it okay so we're going to work the rest of the
design um right up until I get to where we add the Pips so I'm going to do a red
row and a jet row and then when I get to this row I'll turn the camera back on it will do the
first pip together but so we've just done these two just this one and that
one now we're going to do red and Jet all right so now I'm going to get
some pip beads out and if you're working from the December creative Soul kit like I am you're going to have some leftovers
from the bracelet and then the bracelet we use this cool 8s punk rock confetti looking one it's not just the awesomest
and these colors match so beautifully with it so that is what I used for the earring as well you do have a whole
another strand of Pips in that kit and what I think I'm going to do is I'm going to actually redo both the earring
and the bracelet um in a little slightly reversed color way where like instead of
jet being the main I was going to make it red and then or even the silver because look at this has like the silver
in it and it gets popped out like oh it's so pretty so that's what I was thinking was either like that or like
that so this entire design and the earlier bracelet design uh featured for
this kit I could work a different color with these so I'm just going to set these aside and save them there are
enough of these Pips left typically um from a regular like even an 8 in
bracelet you'd still have enough of these um to do the earring and so for the earring you're just going to need a
total of 10 for a pair each earring uses five so I'm going to get those five out
and you see I still have all these left and and that was after making the entire bracelet so they go a long way start by
stringing the first pit bead and then string eight of the
termine beads so there's eight beads plus the pit
bead bring your needle under the warp threads over to the other side
and align them so that the first pit bead and it'll be
first in this position and you can kind of press on it a little bit and it'll just pop right above the warps just like
that and that's what you want you want to get it to stick around on the top side and then the others will just sit
two in between each and again working with eyes side I'm going to go back
through staying above the warp threads in all cases
and when you get to the PIP you might have to just kind of push it forward like that so you can see that you're getting through the hole and staying
above the warp thread and go ahead and pull that
through all right so that is PIP number one added for the next
set you'll need two silver
there we go and then you'll want to have one pit
bead so think of that as 1 two 3 four and then you disc count five six seven
seven eight there's eight nine and 10 so still
going for a total of 10 treat the pit bead like two beads
and bring it under and so everything's going to look
like that for you and again align it so that you may
have to help out a little bit on the side where the PIP is keep those two seed beads in between the first two
warps the PIP should be by itself in between the next and then those next six
beads should settle out just like that bring the eyes side
over and through so over the warp threads and through all those
beads and I just straightening everything out all right so carry on like that um the next row you're going
to want to work for red and then a pip
and then for the one above that you'll have six
Jet and a pip and then the last one you'll have eight termine and a pip and
that's where you stop adding Pips so again we're going to start see how here
we've got one two and a pip the next one will be four and the PIP then six and
the PIP then you go back to termine and it's eight ending with the p pip bead so
just create those rows and here's the last one just
turning the camera back on so you can see the last one come on and again that's eight of the termine ending with
a pit bead and I'm just going to go ahead and line that up two two two and
two and the pit bead if you just push underneath it with any luck just pop
right up on top just want it facing the top side of your
design so there's that and we're going to bring the needle back through the beads staying on top of
the warps as we head back through
all right so there we go so that's almost done we just want to put some rows on top so what I did is uh
I just added the next three colors since we've already got the teraline row here
so just add another row of silver another row of red and then end with a row of
jet all right there it is all finished and so I'm going to go ahead
and remove it from the loom now and we're going to go ahead and pull in all of the warp strands weave in a few and
then we'll create our base and our Loop for the ear wire a little ruffle base on it so the only thing you need to use
scissors to remove is this little knot that we made so um I'm just going to
trim actually going to cut the knot which will free all of my
threads so basically both ends of the warp should come free at this point pretty
easily and if not I might need to trim one more knot there let's
see my original knot from the first side so just being really gentle
remove those so there's that warp free and that warp
free and that essentially is these two strands right here for the others I like to not cut
those cuz I'm going to pull them in and the way we did the warping here is actually really easy to get them off you
just use your thumbnail and just pull they should come right off on the
other side it'll just fall
away and so what you'll have is your little design here I like to get a pair
of chain nose pliers I'll take the chain nose pliers and I'll pull the warps through while holding my piece steady so
let me show you what what I mean by that really quick uh just in case this is new new to anyone we've got these three
Loops here at the bottom and then here at the top you've
got these two Loops right here and then the individual strands of the edge warps
right so you can just pick one of the sides uh it doesn't actually matter
which side you choose I'm just going to get this out of the way so you guys can see a little better these are just getting a little bit in the
way okay I started with the right and you could
start with the left it's okay so right or left and hold the top of your piece and the bottom of your piece just so
that the beads don't you know move around while you're doing this and what you're going to do is
pull until this Loop right here gently settles against the outside edge of
those beads so just like that and now I'm
going to move over to this warp strand which is the next one there and pull
down and you'll see that Loop there settling really nicely but don't
don't pull too tight you don't want to create any kind of like puckering folding or anything like where it kind
of changes the shape of your piece so just really gently keeping the loops separate
they're going to try to pull pull each other in like that so just keep them
separate and there's that one and then last but not least you'll have this Edge
strand go ahead and secure it and pull this one up
here we go so we've got the base finished so all
we have left to do now is we're going to want to add our little ruffle to the bottom and the ruffle is really easy to
do um so let's identify our two longest strands my longest strands
are this one which is the one that when we did all the warp pulling in is the
one that's right here and then I also have the leftover working thread coming out of
this Row from when I added my last row so these are my two longest strands I'm going to go ahead and weave in these two
just to get them out of the way okay so I got those woven in in and
now starting with um I'm going to just work with this one since my needle's already on it this is the one that I was
warping with it's my leftover left thread working thread and I'm going to go ahead and bring it down to the bottom
here and I'm going to leave this one up here to do the ear wire and so I just need to move this down um and it is a
working thread so just take a quick look here at the side I need to bring it back through the row of beads by going
over the edge warp thread and so that brings it
in and you can see it just kind of hugs that little warp thread on the side and that's what we're going
for and now I'm going to pick up the W
strands so the little WS in there just going under them just like
that I'm going to bring that all the way down
let's see I'm trying to go through at least as many as I can get through here that was four rows when you do this part
where you're pulling it down try not to pull too hard so you don't misshape what you've done here at the
top so now I just want to get under that one
and I'm G get under the next
ones okay I got through the silver so far and from this row what I'm actually
going to do is turn and go through those silver
beads and then I'm gonna go down through or I'm gonna turn so so here I
am exiting from that edge silver bead and I'm going to make a point of heading
in this direction through this last row and exiting from these two beads
here heading that way and that's going to be helpful to us for doing the little
ruffle so again you want to get your thread to be exiting from the second
bead in the last row here which was our you know first row that we loomed and you want to be heading that way so
toward the next a beads and so for this next part we are going to want to
get a set of the beads
out and so I already still have out my a b c and d so that's the
termine silver lava and Jet but I also want to add a few of the
pink and you you just need a few they're just going to be used in the very very
bottom of the little ruffle so start by
stringing in order not counting the pink here just in order a b c and d so a b c
and d string two all right
two and two of the first three colors and then when you get to Jet just
string one and then add a pink bead and I'll just reverse that right back up so one
jet two lava two silver two
termine so this is what you're going for is that pattern right there 2 two
two one pink one two two two taking a look back at the piece you
notice how we're exiting again we're exiting from that bead right
there loop around and come back
through those two beads and then continue through the next
two so what you'll get is a circle it looks like that what what's exiting from here and
going all the way around and heiting heading through these two and the next
two so so far you'll have that it looks a little funny but it's going to about to look really cool so now we're going
to pick up two more two more same pattern 2 two
two of those first three colors then you want to string one jet
one pink one Jet and then go ahead and just two all
those other colors right back up to the
top so that's same thing again and slide that
down and so notice your bead is exiting from that second set of
two bring your needle either Up and Under
or over I think under is easier but you're you basically want to go
through the loop of the last little circle you made so bring your thread right up through
it so like that see now the beads are starting to come through the first one and then you'll want to go back
through these two beads right here so the third and fourth bead and
then continue through the fifth and sixth
so let's go through the
next two and then the following two so those four right there not the first
two so you'll get that see pretty cool how it comes together
let's string another repeat so here's the next repeat slide
that down and this time what you want to do is bring your needle through just the last
Loop that we made so just through that one and then you're going to go
through the fifth and the sixth and continue through the seventh and the eighth
bead so here's five six seven and bead eight counting just from
this Edge for that last row and you pull that
through you'll get that okay let's string another
repeat there's that one up through the last Loop that we
added and you're going to want to go
through these two which were beads seven and eight and continue through 9 and and
10 so the last four
there all right last one string that same sequence and again you want to bring
your needle up through the last Loop made just that last one always just
coming right up underneath and through the former Loop and in this case we're just going to go through these beads
nine and 10 of the row so just those
two as you pull this through make sure your thread isn't looping around and
catching on any of the other Loops it should just be going through the beads and just bringing you
right through so there it is pretty much in a nutshell that's how I did this little
cute little ruffle so what we have left to do here
is weave in this strand then I'm going to move my needle up to this
Strand and we'll create the loop for the ear
wire all right so let's go ahead and put an ear wire on our earring I have woven my thread to
exit from the center column and just get your thread exiting from one side of
those Center Tu and you can you can string either four or six however many you think looks
good um I think I'm going to do six beads and if you have an ear wire that
is bigger than your seed beads you can string it at the end or you can go
three and then ear wire and three beads you can always add
your ear wire at the end too by opening the loop on it um and so I'm going to go ahead and just string it like
that and then just go ahead and make a couple of trips through so go through these two
beads and make sure your ear wire is um it's it's positioned so that the front
of your earring is where you've got your Pips and then just go ahead and bring your thread through this Loop a few more
times just make that Circle and then flip it to the back do some weaving in
and trim it I'm just going to do that really quick and meet you here to show you the
finished one all right so I just did all my weaving in and trimmed at the back here
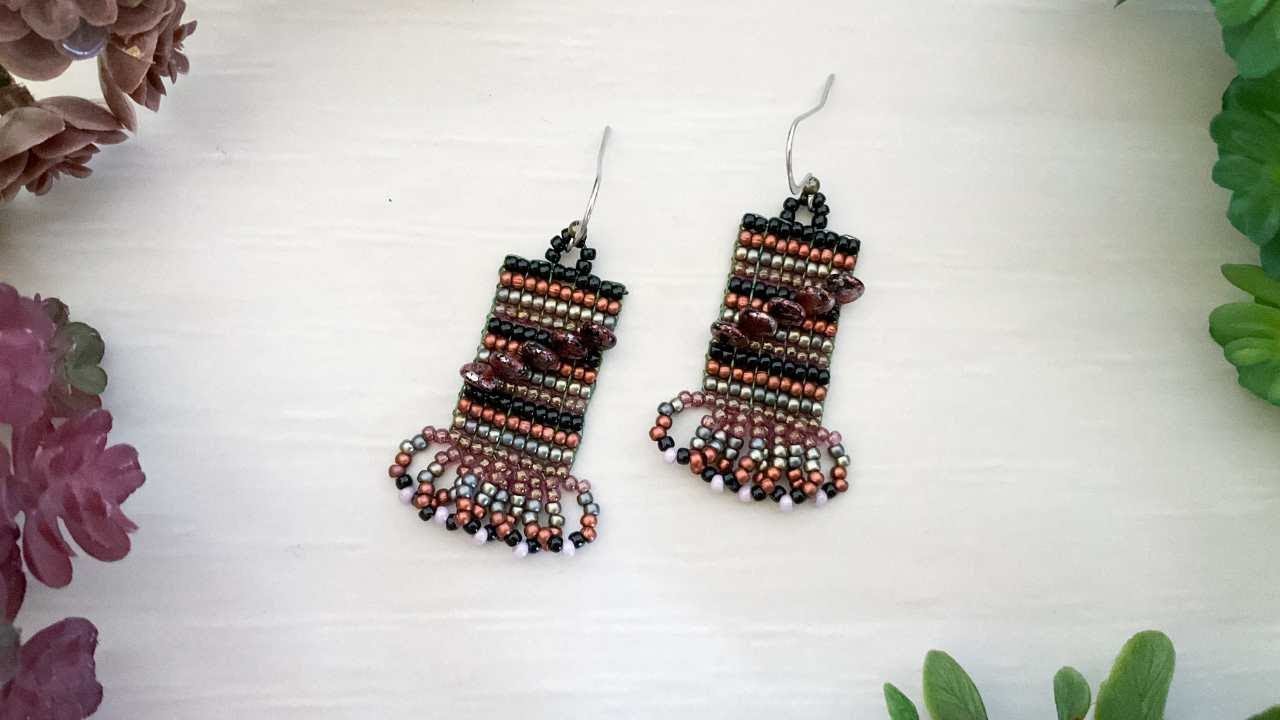
and so I have got a finished earring all ready to
go and there they are all set so I finished finish the pair and I'm really excited about how
cute they are they're just such a neat little design a little ruffle at the bottom if you're having any trouble with your Loops double check that your um
threads haven't overlapped anywhere in your Loops that can happen sometimes when you're stringing it you should have
a nice flowy little look like that and you know just checking as you go and the loops at the Top If you want
to straighten those out you can always take some round nose pliers um I only ever have to do this once and then they
just kind of stay like that but you can make them pop by just going like that
and you'll have cool little suspension for your ear
wire and you can wear them with your bracelet from December 2024 creative
soul and it will be a nice complimenting set but
still looks pretty different right so I hope you enjoyed it and if you like this video please please give it a thumbs up
and don't forget to follow uh the jeom creative Soul playlist and YouTube channel and we'll see you for the next
looming video have a good day bye