SIGN UP FOR MY NEWSLETTER AND RECEIVE 3 FREE SEED BEAD PATTERNS PLUS 15% OFF

0

Your Cart is Empty

Shop
  • Read our story

  • Each of our carefully researched, styled, tested and distributed collections reflects a particular aesthetic and ethos. We hope some of these speak to your own style, and help you refine and redefine your own look and style philosophy in the process.

  • How to make a Festive Necklace with Tile Beads & Sari Silk on a bead loom

    September 23, 2022

    How to make a Festive Necklace with Tile Beads & Sari Silk on a bead loom

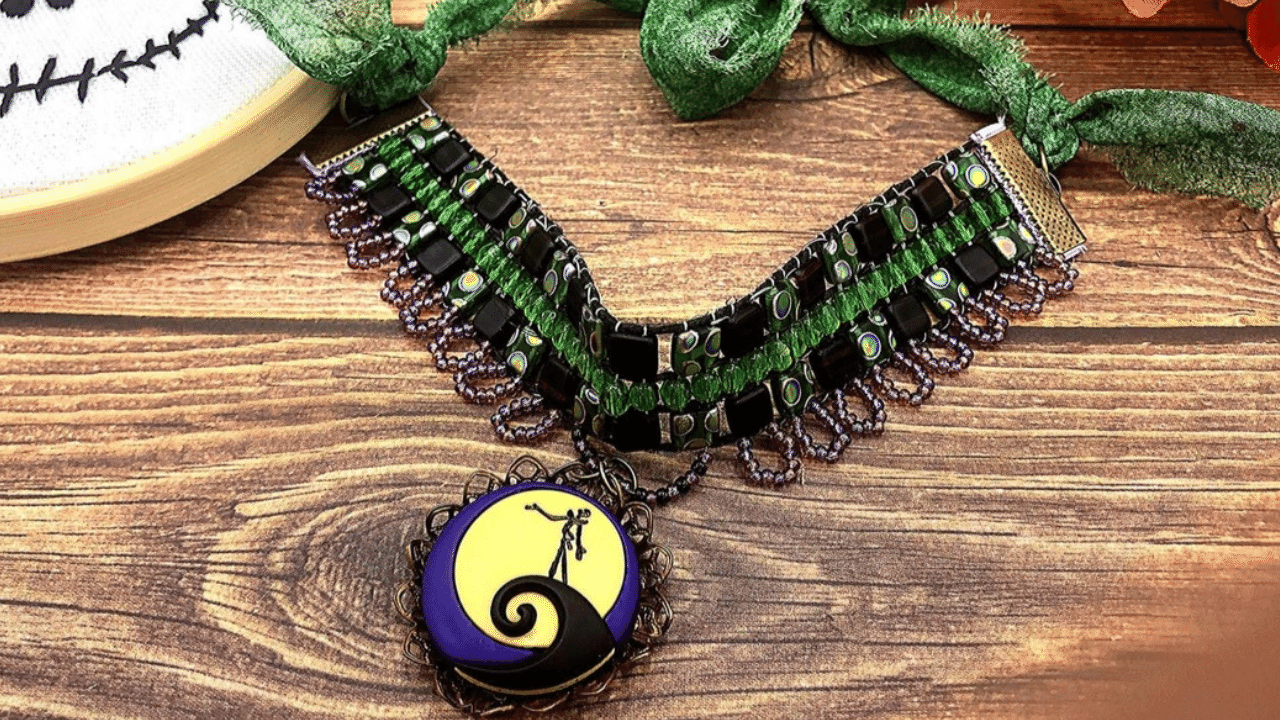
    Join Tricia Giazzon, as she  teaches how to make a Glamorous Nightmare Necklace with Tile Beads, Fire Polish Beads, Seed Beads, and a Sari Silk Tie on this Jewel Loom School Live tutorial. This fun design is perfect for the upcoming Halloween Season. Learn to warp for different size beads, plus how to give your design a loopy/lacey edging. She also shows how to use ribbon crimps to finish off this loom design. Plus, as a bonus, Tricia teaches how to make your own glue on bails. How would you change up this design up to wear for Christmas?


    Items Used:

    You can purchase the different Jewel Looms and materials at the Jewel Loom website. You can also support Tricia and Amber by using our affiliate links. This week's links are geared toward Trish:  https://jewelloom.com?aff=6  

    Subscribe to the Jewel Loom YouTube channel to access past & current tutorials:  https://www.youtube.com/c/JewelLoom   

    You can subscribe to the monthly workshop with kit (Creative Soul Box) here:  https://jewelloom.com/collections/subscriptions?aff=6   

    Sign up for the Jewel Loom newsletter & get 15% off your first order, plus a free pattern: https://jewelloom.com/pages/save-15-on-your-first-order-get-a-free-pattern?aff=6     

    Receive text notifications for Jewel Loom shows & special deals by texting "Sign Up" to  1-805-768-0568

    You can find Amber and Tricia online through our link trees: 

    Check out the Jewel Loom Blog for past & current tutorials, plus read details on project: https://jewelloom.com/blogs/craft-hangover

    Join the Jewel Loom School Community (off Facebook) to share your loom creations, be inspired by others, & a place to ask & answer questions.https://www.juliannaavelar.com/offers/5ss8HfCp/checkout 

    Follow Jewel Loom on Instagram: https://www.instagram.com/jewelloom/ 

    Facebook pages: https://www.facebook.com/Jewelloom  &https://www.facebook.com/JuliannaJewelsAvelar 

    Jewelry Making with Jewel Loom community page:   https://www.facebook.com/groups/228056324285807 

    Please contact Jewels with any questions you have about her looms: 

    Creative Soul Box (monthly subscription tutorial with supplies): https://jewelloom.com/collections/subscriptions


    Transcript:


    and we're live hi guys how's everyone tonight I hope you're
    doing well hi friends I'm here tonight somebody back with us I was going the
    wrong way super excited to have my partner in crime back with me tonight
    I feel so grateful and happy for that that's just a treat right there so but I
    hope everyone's doing well tonight um we have I have had a kind of a boring
    week this week I've been down puts a lot of pain unfortunately but I've been keeping my
    hands busy making and making hi Maria
    hi Maria burst in the door look who's here
    look who's here with us tonight guys what a blessing Amber do you want to
    catch us up on what you've been up to today I laid on the couch well
    I kind of did that myself today it's raining here uh I actually did get
    to beat a little this week I made the Spanish cuff beautiful from the
    Ambassador the Ambassador uh creative Soul Jewel box
    so yeah I've been doing a little beading this week um that's awesome honey yeah uh do have
    to do another round of chemo that'll take a year but and some radiation yeah
    but feeling pretty good from surgery now yeah you just seem like you're just day by
    day getting more back to yourself and that's wonderful yeah that's wonderful
    so this is a good start coming with us we just have missed you I know I've
    missed being here versus just in the comments right right absolutely we
    always have such a good time yeah let's see who else is coming in here's Melanie she says oh I'm sick had
    dental surgery been in bed all day this will cheer me up oh honey thank you for
    being here you always cheer us up oh Zach says yay
    oh Melissa made it I have to make another life hello Melissa Brenda
    Sherry good to see you oh and Terry said perfect timing that she just strung her
    loom for an unknown to me project first timer and new to jewel loom well
    welcome Terry
    we love it we love it well I hope that I can teach you some things tonight and
    Miss Amber down the line here she's going to be getting back on the horse and teaching as well and we're hoping
    that we can certainly um help you out any way that you need there
    and then there's Miss Maria she said your bracelet's beautiful oh
    she's so dear thank you and Paula's joined us
    foreign
    all the girls yeah so oh Melissa's so good to see Amber and Trish both of you oh
    yay we're so glad to believe me yes
    thank you too yep yep I have my loom prep Zack says well
    do you know how many you're supposed to do maybe they counted your beads yeah
    maybe they probably did because we have some Smarties on here they know what they're doing and Eileen is here oh it's
    good to see you too friend you are ready Elena oh my goodness come on in guys got
    lots big crowd so tonight we're going to be doing our nightmare necklace that was
    postponed last week because I was not doing well at all
    um so we're gonna the party is here Joe says yes
    um so we're gonna do our nightmare necklace this week and this is a little bit cool can you see it at all there we
    go yeah definitely um and this is a super cup uh fun necklace for uh the holiday and we're
    using our button again um I'll go over that on different ways
    that you can put your button on or if you have lockets or pendants or something like that you'd rather put in
    the middle you can certainly do that so this is our project and we do have the
    sorry silk tie on the back so I hope you guys are ready to get started
    there's Robin hello Trish and Amber pleased to be here and it's good to see you doing better first thank you and how
    good Miss Amber is doing too to be with us tonight so what a treat what a treat
    so I'm gonna hug and switch my cameras here okay and then we can go ahead and
    get started because this is quite the project here guys and just take just a second for my
    camera to register here hey Vicky's in the house
    friends if you have a chance make sure you like and also uh share
    um share our lives so we can get more new friends hooked on looming yes for sure for sure
    okay guys so to get started I'm gonna use the original Loom but you can certainly use uh the wisdom Warrior
    the small wisdom were not the extra small one but the the one that is the
    same size as your original okay those either one of those will work I feel like sorry about the camera I'm gonna
    move that up just a smidge so we can see there
    there we go okay so I'm gonna start as always by uh prepping the loom here with
    our warps so I'm gonna take my uh original jewel loom here again I remind
    you every week but I will continue to do so because I am guilty of breaking these
    so remember these are flexible not bendable
    period end of sentence [Music]
    end of that into my tummy and pop my bar into this bottom hole
    here and I'm just going to give it a flex just enough
    so I can get my bar to pop up in there just like so okay
    so we have it prepped and ready to
    um put our hemp on now so I'm using the 0.5 hemp on this you can use if you want
    to use the um hi Danielle hi honey
    um if you want to use the one millimeter you could certainly do that too
    um as always on the projects this is all up to you guys on what makes you happy
    with sizes colors just make it your own so I wrapped around this knot twice
    and I'm just going to tie a knot on here actually I'm going to give myself a little bit more there to tie with it
    makes life just a little easier so I'm leaving myself you know a good three inches four inches
    here to tie this to the knob okay just like so and then
    I'm gonna give it another tie just just regular knot all right just like that
    and then I'm going to flip my loom over and I'm going to bring my hemp over the
    top of it and put my hand down into one of the grooves just on the edge here
    and then I'm just going to pull that across and as I'm pulling this across I'm going to keep the tension the whole
    time as I'm putting this onto my loom okay and I'm going to go in approximately the
    same area on the other side because when the with the first one you don't have to be exact but the rest you're going to
    want to um excuse me
    destruct it um the rest you're going to want to keep your spaces okay so we're
    gonna go four two four that's it that's all we're doing on this one it's a simple concept so we're gonna skip four
    grooves so one two three and four so we're gonna go right in there
    and I always double check myself okay and keeping the tension and you can
    see I brought that over and as I bring it over and I'm going to take my hand and reposition it I'm keeping my thumb
    on top of that to keep that tension the whole time okay so then now I have the hemp and I
    can keep tension with this hand I can go ahead and rotate again
    and do four one two three four and then I'm going to grab this button
    oops sorry I'm on the frame there guys on the back keeping the tension
    we're going to skip two and same thing I'm going back across
    skip two grab our button and I can fill my hemp
    don't you do it it likes argue with me sometimes so I
    look like this one two three four one two and then we're gonna do four here
    again this is simple this is a simple warp anybody can do it
    for and I'm going to do four on the end there flip again
    do four on this end one two three four and then into the fifth one
    and then we're gonna tie off around the knob on the back and I'm just going to
    go around this a couple times okay and then again I'm placing my
    finger there oh we just decided to not at the end that's fine you can just
    foreign just get right off there so I'm still holding
    tension on my strand here and I'm going to put this string underneath the other
    um uh strands of hemp sorry guys we're gonna fade there for a second and then
    I'm just going to tie this off I'm going to take this and as I'm doing this I'm still trying to keep that tension on
    everything okay I'm pushing my finger down up here sorry
    going off the screen there I get into it sometimes I just get Slip
    Sliding Away on the screen and I'm just going to take this little bit I think I'm gonna use one of my
    pliers just to give me a holding hand here and I'm just going to reach you this circle on this real fine stuff
    sometimes I need to do that because I like using my pliers too yeah because I just can't get a grip on it
    with my Clumsy fingers so I do that and then once I have that tied on it and you
    see how I pulled with my pliers guys it tightened it up really good that way okay and that's the key to doing your
    warps that is the key because it needs to be
    tight the better your warps the better your whole project will go okay yes
    all right so there we go we have four two four all right
    I'm not liking the camera for some reason and now I'm just going to take the bar
    off and I'm just going to do the same thing that I did to put it in I'm just gonna push it against my tummy back here
    you don't need to see my tummy but you know what's up there got a spelling
    huh your goddess belly my God spelling that's right and same thing I'm just
    gonna give it a flex pop this top Rod out and then pull the bottom out and now
    we're ready okay
    oh you know I'm decided y'all make everything look too easy Melissa said
    well Melissa at any time honey if you have any
    questions or you know need anything we have a great group here and everyone will be happy to help you out
    anyone will be so okay so now I'm just going to trim this
    off so it doesn't get my way at an excess bit of string there I've already threaded my needle because
    you know been there done that it's easier just to thread it off camera so I threaded my needle and I'm using
    the black wildfire and the 0.006.15 okay guys
    so I'm just going to tie this off I'm going to move this up here move that stuff
    foreign and you can see the bottom I'm just going to tie this off
    on the left that one popped out let me pop that one
    back over sometimes you'll get it like when you're loot when you're putting your warps on one will pop over a space
    or whatever and you can just give the give a little bit of a flex and just push that strand back where it's
    supposed to go so on the left hand uh warp I'm gonna put my Wildfire down through there and
    I'm just going to give myself a knot and I'm going to leave a tail
    so that way then if I want to weave it back in at the end I can do that now let's see let me get our necklace
    out here so you can see here we're doing ribbon ends so we don't need to account
    for anything extra on the End by adding seed beads or anything like that this is
    just in this pattern I did um all green in the middle but I decided
    on the next one I'm doing um it's all it's going to be variegated so it'll be a purple green a purple
    green purple green okay so it's a basic pattern but we're going to start
    look at these beads guys again I have to take a little aside here and show you
    these so the coolest they are it just screams Nightmare
    Before Christmas to me I don't know why but and then we're using these black
    ones that have um you I don't know if you can see the red striations through it
    no it's kind of hard but and then just some four millimeter fire polish
    they're on the bottom so first we're going to grab we're gonna
    just do tile bead fire polish tile bead that's going to be our pattern the whole
    way across so we'll start here with our green so
    when I'm putting my needle through my tile beads I'm kind of looking at it like I want it to sit in the project
    like so okay because I'm going to stitch through these holes first and then come
    back around and do the top holes so it's going to be um the way you want to pick your beads
    up so I'm just going to pick up a tile bead first then add a fire polish
    and a towel bead and I'm picking it up in that back hole there all right and I'm just going to slide
    these down on my wall Park and then I'm going to shuttle my needle across underneath
    okay your camera is a little out of focus Trish I'm not sure
    all right come on
    all right you need to focus people need to see
    what is happening to you it's focusing on your hand so maybe
    there we go you go all right that's the trick so as I have it underneath there I'm just going to take my my left hand
    and I'm going to push these beads up in between the warps that we made okay
    I'm about just a hair here and then I'm just going to take my
    needle as I'm holding those in place and I'm going to go through we went
    underneath and we're coming up over this farthest um work and we're going to go through
    the tile bead through a fire polish and through the towel bead and we're
    staying on top of the warps at this point because if you can think of it this way guys you're trying to sandwich
    your beads in between the the with with the Wildfire you're
    trying to sandwich it onto the to the hemp if that makes sense yes
    okay so now on the next one we're gonna do
    the next line see how our our um tile beads are kind of just hanging
    there of course they are because we need to hook in that second hole so what I what you'll do there is you want to flip
    up this first tile bead and put your needle through it and I usually just take it the whole way through
    and then I want to pick up a fire polish because there's two fire polish between each two tiles so I'm just going to pick
    up another green fire polish at that point and I'm going to push that
    down on my Wildfire okay I have that there so it's ready to
    go in position then I'm just going to take my needle and put it underneath and put it through that second towel bead
    all right see if I can do this without getting too
    and I've found guys if you are like me and sometimes your motor skills aren't what they should be
    um the if you hurt hold further down on your needle to try to push it through say a towel bead or something it'll go
    through easier at least I found that that works for me okay so now that we have that underneath now
    we're just going to go over the top here and we're going to go through the towel bead
    through a fire polish and through the towel bead so now that's one set of beads
    okay
    looks great yeah so then next I'm just gonna do a
    different color but same kind of version I'm gonna pick up one of our black beads
    here and one of our purple this is four
    millimeter fire polish guys I don't know if I said that but I should have if I didn't
    same thing I'm just putting on our towel bead a fire polish a towel bead
    sounds like I'm saying Tau but I'm not a tile trying to say that
    and I just push those down on my cording push some up in between now when you do
    your first row for any newbies out there keep in mind that it's gonna be loosey-goosey until you get it
    um hooked in there once you get it all secured you're good to go but just keep in mind it's a little can be a little
    fussy to get that first row in on any project so now I'm coming out on the right here
    and I'm going to go up and over through the tile bead
    oh come on through the fire polish and through
    another top lead how's everybody doing are they feel like
    they're getting it they understand it okay
    so same thing I'm going to go through the left underneath through this towel
    bead and we're going to pull that the whole wave through
    and pick up another one of our purple fur polish
    and I'm dropping that in and I'm going to take my needle back underneath here and I'm going to put it
    through the second tile yes got it Robin says got it good good
    good it's it's fairly simple but for anyone that's new um you you know of course you can
    certainly uh go back and watch the video or if you have any questions you can let us know we're happy to help
    um I'll how about I'll do one more set and then we'll move on to the putting the loops on
    okay so we're just going to go back with our green here same concept
    oops did you check all your tile beads before
    you demonstrated I do not I play you know
    I play it by ear but it's not a bad idea to do
    the situation I have found is I can just back it out pretty easy if
    I get to one that's not going to work I can just pull it out and just put new ones on but if you don't want bothered
    with that if that happens to happen happen to you you can certainly check them which checking them means you're just
    going to put your needle through all the holes before you um decide to use them
    just check them that way okay so I'm just going through this first tile bead again and we're just going to pick up
    a fire polish here
    and then through the second tile bead
    so far so good got it Kristen okay
    all right so let me know do you feel comfortable for us to move on guys because that's what I want to make sure
    that everyone has this concept before I move on to the next
    so next what we're gonna do is the loops on the bottom now I've chosen to accent
    it with purple I just think with the purple button it looks really cool but
    that's what we're going to be doing now I'm just going to quickly count my beads because
    it's been like two weeks since I've done this so once three four five six seven
    eight nine ten ten and twelve twelve for all the loops and then for the big one in the middle
    let's see seven
    fifteen so we have 10 and 15. now you can choose guys you can
    um um do different lengths of Loops if you want to I do have a newbie question how
    on Earth do I determine the length I need for the warp uh the bead the bead with if you're
    talking about are you talking about this way how many grooves
    because if that's the case you're going to place your beads what I usually will do is just take my beads and put them up
    on my Loom like so and I'm holding that bead
    back against it and I can see okay that's going to need about four grooves to fit in there
    so she's out so length your your warps are going to
    be the length of the Loom that you use if that's what you're asking
    no matter what you you're going to want to make sure that you have enough hemp
    to go the length of your warp for as many rows as you need okay so basically
    I've never had a problem I've always had if if you pick up your hemp and it feels
    pretty light and you've used it once or twice already you know you could be a little leery but you know you usually
    um will have enough I mean it comes in good you know pretty good size rolls but
    let me see yeah okay so here's a good example so this is one that you get from
    Jules store just like so that's a good amount of hemp you could do a couple projects with that necklace projects even
    this is one that I've opened up and I've used some off of so for this I would not
    use it for all my baby Loom I would so hopefully that helps
    yeah and just to add to what you're saying is you don't measure out uh the the warps
    um until you're done warping so I often take it out of like you showed the
    bigger bundle i t i don't cut any off until I've gotten all my warps on right
    yeah exactly it's going to be the length of the Loom and once you cut that once
    you tie it off work off the spool or the bundle roll thank you Vicky that's the worst supposed to come out of my mouth
    me too yes just work off the spool that's the
    that's the simple question so let me move this one out of here now that we have the base in place and
    I'm going to scooch these beads off here because
    we're gonna move on to our loops Terry go ahead I was going to say Terry
    you're not the only one who has made that mistake when they first started out so no worries she said she already cut
    it and oh okay that's gotcha yeah you did not want to cut it
    until you have everything on that's all right I mean we've all been there done that
    when you're learning I mean your hair would curl some of the things I did before
    so okay so I have 11-0 seed beads here and I have two different colors
    um that I am using tonight this is one that I have done that has the
    um all the tiles and all of the fire polish in the middle and you can see
    um I variegated it on this one like I said and on the one that I was working on on
    the other um Loom I do like this better with the two colors of fire polish in the middle
    but it is absolutely your choice so we're coming out of the towel bead so
    this is where we ended at the end of our so this is me down here this is where we
    started I work bottom to top okay guys keep that in mind too if you're a newbie some people work top to bottom some
    people work bottom to top I'm a bottom to top person um but it does not matter which way you
    do it do whatever is comfortable for you and it'll work out just fine okay
    so here is where our um strand of wildfires coming out
    and that's where we're just going to start right with that for our loops and see we have a question on average what
    is the length of the beaded part of this necklace I love it
    um and let me measure that because like I said it's been I did five and a half inches
    is what I did on this part let me just double check it on this one too oops yep five and a half inches is what
    I did for the front part okay okay so now this strand is this Wildfire
    is coming out of just where we ended our last Stitch of our tile beads and fire polish and all I'm going to do I'm going
    to just put some of these on my mat because I prefer to pick them up off of there um is just start picking the beads up
    you can make um like I said you can make different sizes of Loops if you prefer I just did
    all of them consistent except for the center one okay so I'm just going to pick up ten purple
    three two
    seven come on eight
    nine and ten and so we're coming out this top
    hole of the tile bead so I'm just going to take my needle I'm going to push these down make sure they'll go over my
    needle because foreign mess up my needles and then they don't
    want to go
    down I think this might be one that I've done that with
    okay yeah I'm gonna have to switch needles
    guys hold on just a moment please please hold can you play some old music please
    [Music] well what what I'm saying Kenny G when you need them right I know right but
    what I'm saying guys with that needle is if I get too aggressive with them and I'm pulling them through something maybe
    that's a little snug it might mess up the eye of the needle or if I've used it
    a hundred times which I tend to do with my needles it will also do that
    okay [Music] all right let me drop that I'm gonna
    pick out a really pretty one from in here so that one's bent after I bend them you
    know I shouldn't be putting them back in here but be amazed how long I keep needles
    I know and I have a hundred of them I don't know why I think I need to do
    that all right let's lay some here and whenever one looks the best that's the one we're gonna use spent
    fence all right there we go there's a good one fingers crossed on that one guys
    oh no you have to thread a needle yeah I'm surprisingly I'm getting better at
    it than I had been in the past I still choose not to at the beginning but yes
    like the curse of the live video or something five yes absolutely
    six seven eight nine ten
    and there we go right over see I knew it was my fault and then I'm just gonna go into the
    second hole of the towel bead on the top here and go through the fire polish the
    second hole of the towel bead on the other side and just pull my Wildfire and
    there's our first Loop okay so now I'm just I need to get back
    um I need to get down to the next row so all I'm gonna do is I'm going to take my
    um thread and I'm just going to hop over to the next row because this is black thread it'll blend right in so you
    really won't see it so I'm going to go through this next row shuttle across to the other side
    and sometimes it takes a little bit of finagling to get back through your beads
    okay so we're coming out on the other side here and we're going to pick up 10 more beads
    okay you can see how I did that so I just hop from that row to the next row
    okay and 10 more beads
    yes um Rhonda that's for sure you could certainly make this into a bracelet if
    you wanted to um I just added the sorry silk you would not have to do that you could just put a
    clasp on the end of it and just use a button as a charm or put whatever charm you wanted on it
    absolutely sewing again some more of these picked up here
    0.5 6 7 8.
    10 I can hear a doggie wrestling outside
    the door [Laughter] and I know who it is and it's dark out there and she really shouldn't be in the
    dark ago she's 14 years old you know yeah so I'm
    just gonna work across here the same way
    going through and if you wanted to put on both sides you certainly could you would just do
    the same thing so if I came out of this side of my
    um when I came out with The Strand on this side I would just do a loop here and go back through and then work myself
    back over to the next row just as simple as that
    so let's see I'm going to look and see how many Loops I did till the center
    um so I did one two three four five six seven eight loops and then on to the
    center and then I did I did Center a job go me go me
    eight on each side and then we're gonna do our bigger Loop here between three
    beads three three towel beads okay so there's two
    yep yep three four
    five six
    and it's just as simple as that guys working your way down
    okay next one
    I'll be doing on time there uh we're doing well we
    let's see let's uh it's 7 30. so you're doing well oh good good
    so we'll do the loops here at least till we get to the center so I can show you how to do that
    nine and ten how are we doing out there guys
    let me know looking very pretty thank you Becky
    if everybody's been able to keep up and understand I know this it's kind of a basic project but it has a big wow to it
    you know you don't have to do something that's oh that is
    um you know tremendously hard to really make an impact the beads you choose
    um the style you choose makes a big difference OC I just mutilated that one
    um can make a big difference in the impact of the piece
    Okay so let's shuttle across again
    you know
    yeah there's something going on there
    so I'm not my Edo's not wanting to go through so I'm
    just going to take my pliers and just give it a little nudge to get it through oh there's the head of
    my other oh that would stop it from coming yes yeah that's what it is there we go we'll
    get that off man that'll make life a lot easier for us yeah I'm aggressive
    there's no games play dear I'm aggressive yeah but when those eyes come off it's hard to see them
    though so yeah it is yeah it is I'm sure there's all kinds of stuff floating around in my living room
    because that's mainly where I do my loom work because it's uh my the loom work is
    so relaxing to me um so I like to do it sitting in my
    comfortable chair down in the living room yeah
    I never can agree on that I like to do it on my uh when I'm sitting on the
    couch yep foreign
    six seven eight nine and ten
    well my husband usually find things that get away from me like wire pieces with his feet yes me too Joan and I'm so
    scared I mean I don't want him to get Mario's feet but I'd rather them get a Mario's feet than the girls
    yeah because that would just feel so bad of my pup got one in there I feel bad
    when Mario does too mostly laughs he can recover mostly he can recover but
    I don't like to abuse him but you know if push comes to shove
    he's a man he could take it so I'm just going to flip this around because I feel like I'm having some
    trouble maneuvering it so keep that in mind too guys if you feel like you're not quite getting the angle you want you
    can flip-flop your loom as much as you want appropriate for Halloween necklace to
    lose your eye then find it unexpensive there's Vicky
    [Laughter] so we're on number six now we're almost
    to the center
    okay it's so quiet sorry I'm just enjoying watching you oh
    no problem it's no problem it's quiet when I'm here by myself so yeah I mean I'm never by
    myself I have Miss Joan back there helping me but you know what I mean yes no one talking to me on while I'm
    working yeah there was no more funny Vicky quotes or anything no no well I I just
    feel like I don't want anyone to get bored with repeating the process of what
    I'm doing you so much um but there comes a point where you just
    have to do it and yeah to get to a certain area you know
    okay there's six seven eight
    nine ten and guys if you're looking for some gorgeous 11 O's
    um Jules just got a load of them oh yes yeah and now that doesn't want to go
    over there all right I'm gonna get aggressive no one just close your eyes
    so look I'm cracking the speed causing problems it was and it's just if
    it's making me mad it's going just get out of my face [Laughter]
    so we're just stitching back through and we're just gonna shuttle that needle
    right back into the next one so that was seven one two three four five six seven
    so we're on our last one until we get to the middle yay yay
    this is Halloween this is Halloween yes ma'am
    all right and our thread is shortening up too so
    hopefully have enough that we don't have to start a new one but it won't be the first time
    um five
    seven eight eight nine and ten
    yeah I've been really into Nightmare Before Christmas this year I mean I love
    it every year but it just seems like this year I've just been everything and then Hocus Pocus is
    coming out on the 30th so I'm like getting crazy with that too all right now what's happening
    is there another bead given you issues making me angry you're just gone don't
    talk to me all right so we're going back down through here and we're just gonna start
    in this one area here coming down through like we would normally and I'm
    gonna just simply do and I'm really struggling for length here guys but I'm going to try to do it we're just gonna
    do 15 beads every other so a black or purple a black a purple you
    know four five I really love the color combo you picked
    eight thank you
    [Music] nope got two purple in a row because you see it's just like no no
    don't oh man see if I can thread it while my beads
    are still on it can I be that way do the bomb if you can
    I probably will be to but
    give it a try no no I am not the bomb so in case I'm
    wondering you are the bomb anyways for our new loomers uh while Trish is
    getting her needle on there uh when you're first threading your needle a
    great way to get it on there is to squish the end with your needle nose
    pliers or something the thread not the needle yes yes because I know my brain and I would
    have went to you no you squish the thread and it helps sometimes to make it easier to thread
    you know what I'm not doing this I'm just gonna new thread yep new thread it
    because I'm gonna need to finish the other side anyway
    let me grab my bonfire and this will be a good example to show
    you guys how to kind of stitch a thread in okay
    okay and this is what Amber was talking about earlier guys you just take your wildfire
    and a chain of plier and just flatten the end of it
    okay and then we're just gonna thread it on
    so all right and so what I'm going to do here
    I think I'm going to come in this way on that row that we just on the one that we
    just did and I'm gonna run my needle through there leaving
    a bit on the end so we can tie these off and then I'm going to go into the row
    that I wanted to be in originally with my New Strand of wildfire here
    and as you can see I'm kind of rocking things and moving things because you know it's already has a thread through
    it guys so it may be a little bit of a wiggling idea when you're first doing you know
    going through to make your Loops only because like I said it's thick the thread is thick inside the beads already
    so now we're gonna do what we set out to do 10 minutes ago and
    yeah 15 beads what's that I also find that when you do hemp for some reason
    the beads seem tighter um I find it harder sometimes so
    they're gonna be like no no it's so we have two four six eight nine
    ten eleven twelve
    thirteen Fourteen and fifteen
    okay and so okay how would you add thread now not that that happens to the
    rest how about I add thread now
    like I just did you mean or I'm confused by that question because I just added thread
    I think that's what she because she asked it before you okay okay so I'm
    coming out of this top hole of this towel bead and we're going to skip the towel bead and
    go into the next one into the furthest hole on that next bead okay
    [Music] all right and that's going to give you that larger Loop in the center
    okay so I'm going to tie this off right where we are guys only because I want to
    get be able to show you how to finish and how to do the button okay I'm just going to give these
    a tie off for the sake of time
    okay you're about the 12 minute Mark honey okay
    so I'm going to just trim that off and then I'm going to tie these off over
    here and there's Loops here so I'm just going to take these two threads that I have and I'm going to tie them together
    a couple times here and just make a few knots and you're not going to see it under the loops anyway okay now if this
    was an edge that didn't have anything there I would definitely weave it back in and also for the sake of time so
    let's just do that and now I'm going to cut these threads
    and then sorry guys I was off camera again we're gonna take it off of the Loom how I do
    that is I stick my two fingers like scissor motion kind of and hold on to
    my project okay and I have it cupped in my hand as well underneath sorry there
    we go it's cupped in my hand and I'm just holding on to that and I'm just giving the
    uh Loom just a little Flex back and then I'm gonna go in and I'm going to cut my
    threads that won't protect your project and your loon by
    doing that it just doesn't give you that bounce back that can you know
    it's not the best for the project so here's our project off of the Loom
    and I'm just going to do a salvage out a salvages on it if I can speak fast 10
    times fast um a salvage on it and I'm going to
    um I could have done it on the loom which would have been the smart thing but we can also do it off the loom
    so I just have a little bit of ribbon that I'm going to take this is your quarter inch ribbon this is the one I
    tend to go to the most I'm just going to cut a couple pieces I'm going to get myself a paper towel because I do not
    want to get glue on my little mat here
    so I'm gonna get a paper towel again if you do it on the loom which I
    will do for you guys sometime I promise um you won't have to deal with this but
    all I'm going to do is take my project here and I'm going to lay my ribbon
    underneath the one end like so and just lay it there I'm going to go in with
    super glue you can use these 6000 you can use whatever glue you like I mean
    that helps for having to peel your project off the ceiling girl you're a silly goose
    yes she is and then we're just going to squeeze some of the empty um super glue
    onto the no on to the project all right and I just
    take my ribbon and just fold it up and around just like so
    hold it together you don't want it to stick to your paper towel either so it's just a quick little
    glue on there and then what I like to do once I get that hooked on there
    is I will take I'm going to fold this back over itself so I'm going to cut
    this Edge is sticking out
    just like so and then I'm going to bring this over
    and I'm only going to glue it halfway across because that way then you're going to have finished edges on both
    sides so we're just going to take and put a little bit more Super Glue onto
    I think I'm gonna have to grab my other bottle um on to this side
    no yep I'll be right back guys
    [Applause] as you can see while Trish is grabbing her other glue we do have a Facebook
    community um where you can share your creations and ask questions but we also have it
    off Facebook what's that uh off Facebook I was just mentioning the off Facebook
    Loom Community School oh cool hopefully this one is good yes it is
    and then I'm just going to fold this back over like I said guys simple as that
    hold it there for a couple seconds don't get your fingers stuck because it is super glue and then that is not fine
    so and that is your uh finished end
    and I'll all go in then is just cut my strands just like so
    and I'm gonna put ribbon crimps on this because just what I wanted to do
    so I'm just going to take my ribbon crimp and I'm going to lay it over top of this ribbon here and see
    you know if I want to shorten this up at all this way um so not so much of the bottom is
    showing but I don't mind that I don't mind that showing so I'm just going to take a pair of flat nose pliers that
    I've dipped in tool Magic because I don't want to scratch my findings
    I'm just going to hold our ribbon end just like so and I'm going to put it over top of that Salvage Edge that we
    just made and I'm going to give it a squeeze I'm going to squeeze it in the middle
    and I'm going to squeeze it over on this side and squeeze it over on this side don't get too aggressive because if you
    get too aggressive guys you're going to have indents on on your in your Ribbon Crimson it
    doesn't look nice so that's the basic concept on that so
    let's go on to so we're going to put a jump ring
    on either side in here and I wanted to something that I can fit
    the sorry silk through let me see what size I used on this one okay
    see what we got so I'm going to pick out a couple of the larger ones this looks
    like and this little thing comes handy dandy that's a seven millimeter
    I like my little mat it helps me along
    other measurements up top as well yeah I'm sorry you can't see that but it has the millimeter oh nice so those are
    seven millimeter jump rings like this
    and we're just going to hook one of those up
    front to back as we always do and we're going to hook that through the
    end of our ribbon crimp just like that
    and close our jump ring and this is what's going to give us our Junction to
    be able to hook in our um sorry so sorry silk thank you
    all right so all I'm gonna do is just take I have some of this beautiful sorry silk that I got from Jules oh it's
    gorgeous oh isn't that pretty I mean she has these packets of all different colors and I love them
    so I'm gonna take the end of this and I'm gonna just push it through
    the jump ring just like this I'm going to take my plier and help me along there
    and I'm just gonna tie it because as you can see on this one I did kind of like
    um just a knot and just left the end hanging
    no it does not matter honey as she's asking does it matter what side
    the teeth show on the ribbon crib um
    no it doesn't matter you and I want to make sure that they're basically the same though if you
    can see there okay so as I come through here I'm just gonna
    knot this off twice we're keeping it very loosey-goosey here guys just kind of
    keeping it simple I just like the way that looked I think it kind of added to the project
    okay I like that too yeah yeah I I kind of thought I was digging it so I'm gonna
    cut a little bit of this off because I don't want it quite that long
    okay and then I'm gonna cut my sorry silk and I'm gonna give myself
    probably at least 20 inches because we're going to want to talk be able to tie it in a bow on the back and I'm
    going to cut it okay so we would do the exact same thing on the other side
    this is how far we are so far okay so now what comes we have a few
    more minutes here and I'm going to show you what I did as far as the button in
    the middle so this is a button that came with out
    of this dress it up packet the Halloween one um and I just thought it was so cool and
    it went so well with this project what I did let me get my button out here
    what I did was I cut the shank off the back of it
    just like so let me grab my right cutter so I don't ruin my cord cutters
    okay I'm just gonna cut that shank off and then I had this piece that I had gotten from vintage a long time ago it's
    just a piece of metal with a hole in the back and I kind of opened that up
    so I could fit my button in there and just glued it inside that piece
    and then put jump yeah and I just put jump rings on it and hooked it to the necklace so what do you do if you don't
    have this piece of metal right so there's a couple options first you
    could just glue a jump ring onto the back of your button you don't even have to cut the shank off okay so this is a
    mini button and you can see yeah I've glued a jump ring onto it and you can just hook whatever you want into it or
    you can glue about a glue on belt on to the buttons that works great too
    um also you could use a piece of 20 gauge wire and make the swirl with a little hook
    inside oh yeah and making your own bail in other words making your own bail
    um you know if you just have a piece of 20 gauge wire um I I will show you guys real quick how
    to do that and then we will be having to sign off here pretty directly
    okay so I'm going to get my round nose pliers out guys and this is just a piece of 20 gauge wire that I have here this
    is just artistic wire thank you so much honey thank you Danielle it means a lot
    coming from you dear you're a wonderful designer um
    so again say you don't have this piece of metal we're going to make this little swirls that anybody could do with a
    piece of 20 gauge wire so I'm just going to take my round nose pliers and I'm just going to give myself
    a loop just like so simple as that and I'm just going to take my chain nose
    then I'm going to grab that Loop and I'm going to use my thumb on the back here
    and I'm going to roll this grab and roll grab and roll and you're just going to
    work that and make sure when you're grabbing it you're grabbing it tight so you can get
    a nice rotation out of it because it your your pliers will tend to slip
    around a lot if you're not holding on to it the way you should okay so we're just
    rolling until we find the size that we want to
    be able to glue on to the back of our button okay so if you have a tiny button keep it small
    if you have a bigger button and you want a little bit more grab you know
    make it bigger but that's all there is to it that gives us our little Loop there
    and then all I did I took my chain nose pliers
    and I just give this a little Bend up like so to kind of Center it and then I bend it horizontally
    okay once I do that I'm just going to trim The Wire
    how about a little a little about a quarter of an inch I guess it
    would be looks like it to me and then I'm going to take the round nose pliers and grab the end of that and
    I'm just going to roll it back to put a loop on the top okay
    all right and then all I did is I just Twisted I took my chain nose pliers and
    just Twisted that and so that way then I could link this
    Loop right into this like so okay so if we glued this onto the back
    we could just open up this ring that we made on the top and hook it right into
    the piece that we just made and you can just do that with a scrap
    piece of wire so there's a few options on that guys and basically that is after the mess I
    made here um that is our nightmare necklace
    and I will show you this one this is the one that I finished let's go the right way Trish there we go
    this is the one that we have finished oh thank you so much thank you Marianne I enjoy it it's super
    fun I'm I'm usually just a fall person but this this year for some reason I guess
    I'm just getting excited for Halloween I want to do a bunch of projects so this is our finished piece with our sorry
    silk on the back and
    that is it guys that is it so let me switch my camera back here
    here if you have any questions guys let me know oh thank you Joan I appreciate that let
    me change my camera the Zach says absolutely beautiful Maria fabulous so
    beautiful everybody's saying thank you so much guys I really appreciate that
    um I enjoy doing it I enjoyed teaching you I love it all if you have filigree bead caps you can
    flatten them get outside the box yeah I mean use what
    you have if you you know shop your stash you know it's always fun to buy new leads but for things like that if you
    want to do an attachment and you don't have anything fancy it's nice to know you can just whip out a
    piece of wire and just or a jump ring and just hook it in yeah so how much you can do that is
    it guys I hope you enjoyed this I'm gonna put this onto our little neck here
    super fun project for Halloween yay questions as always guys let us know and
    we will certainly get back to you and help you out with them and I think that's it my friend
    cool you can even make a garter for a bride you could that's a good idea yeah
    you'd have to add something I'd be into that something stretchy on the end I think yeah yeah you have to think
    through that yes so it would hook on well yeah at least for a while
    so okay guys well I thank you so much for joining us tonight and we're so grateful
    to have our beautiful Amber back with us tonight and hopefully more to come
    next week we're going to be doing we're going to skip the pumpkin earrings next week since I was sick for a week and
    we're gonna do the um breast cancer awareness cuff next week and then the first week of November
    we'll do the pumpkin earrings how's that sound to everybody you mean October right of October
    do you remember I did that when I was talking to you about it too I was in November telling her I'll do this and
    now she's like do you mean what you skipped my birthday oh my god oh yes and
    we have a birthday coming up October 5th for our girl here so it's extra special
    this year yay so you are very welcome guys and I will
    see you next week and hopefully Miss Amber will as well yeah we love you guys take care and
    we'll see you next week bye