SIGN UP FOR MY NEWSLETTER AND RECEIVE 3 FREE SEED BEAD PATTERNS PLUS 15% OFF

0

Your Cart is Empty

Shop
  • Read our story

  • Each of our carefully researched, styled, tested and distributed collections reflects a particular aesthetic and ethos. We hope some of these speak to your own style, and help you refine and redefine your own look and style philosophy in the process.

  • How to Make a Beaded Ring on Bead Loom - From Warping Loom to Sewing Ends Together

    January 11, 2025

    How to Make a Beaded Ring on Bead Loom - From Warping Loom to Sewing Ends Together

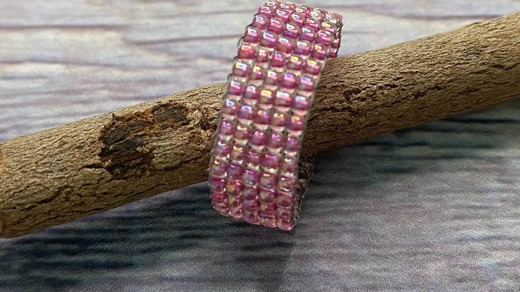
    Learn how to make a basic beaded ring, using Beadalon's Baby Loom. You will learn all the steps, from warping to weaving the ends together. Once you learn the basics, you can get more creative & embellish the ring on top, on the edges, or both. You can even weave a ring, using a pattern. Julianna C Avelar, creator of the Jewel Loom & Baby Loom, breaks down this tutorial into four small videos, so you can easily find the step you are looking for. And, just as a reminder, the Small Wisdom Warrior sustainable Baltic Birch Loom is also great for this project. You can also use larger looms, but will have more warp threads waste.

    In this first step, learn to warp the Baby Jewel Loom for your bead beaded band ring. For this ring, using Size 11/0 seed beads, you will need to create 6 warps without skipping any grooves. If you want a wider ring, determine how many beads across you want to make the ring, then add 1 for the number of warps you will need. For example, if you want 5 rows, add one, so you know you will need 6 warps. If you want to use larger beads to make the ring wider, you will have to adjust the spacing between warps.

    Next you will weave the beaded band. Jewels walks you through how to start the weaving & end the weaving, also. 

    The third video shows how to remove the beaded ring from the loom, including how to weave in the extra weft thread ends, before removing from the loom & finishing the ends of the rings before the next step. The weft is the thread you are doing your weaving with.

    The last video teaches you how to prepare & weave the finished ends together to form your ring.

    Now you can pop your ring on a finger & wear it proudly!

    Shop for the Baby Jewel Loom, Jewel Loom, & other Jewel Loom accessories: https://jewelloom.com/collections/jewel-loom-bead-looms-for-jewelry-making 

    Supplies needed:

    The Mini Wisdom Warrior, made of sustainable baltic birch wood, is also a great choice in making this ring. Shop for the Mini Wisdom Warrior at this link: https://jewelloom.com/collections/jewelloombeadlooms/products/mini-wisdom-warrior-beading-loom 

    Get 3 Free & Easy Bead Patterns for signing up to my Newsletter: https://jewelloom.com/pages/get-3-free-bead-patterns-and-save-15-percent-on-supplies 

    Shop for Jewel Looms & Jewels' Designer Looms: https://www.jewelloom.com 

    Did you know Jewels has a Book? It’s true! You can get a digital copy of the Jewel Loom Inspirations book here: https://juliannajewel--bellacraftspublishing.thrivecart.com/jewel-loom-inspirations-ebook/ 

    You can find Jewels here:

    Read my Blog: https://jewelloom.com/blogs/jewel-loom-inspiration