Your Cart is Empty

[Music]
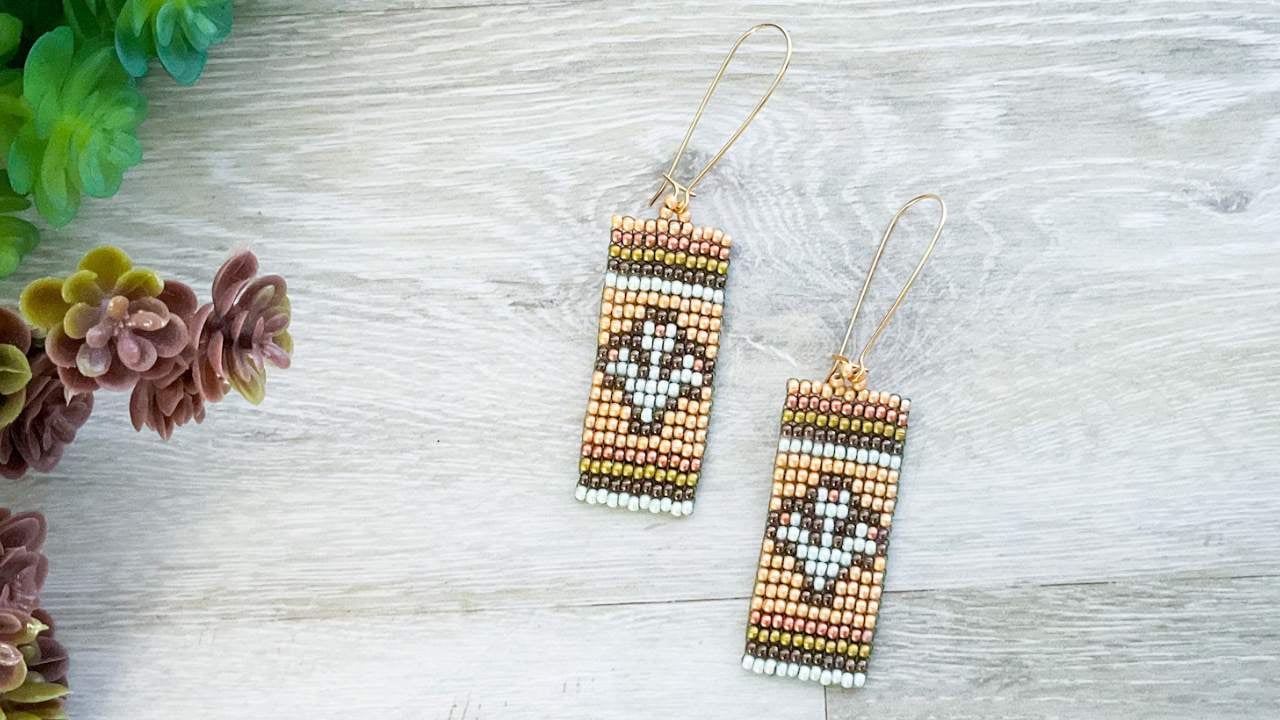
hey everybody I have a um bonus earrings
tutorial for you today and we're going
to be making these really
cute you can say either Cactus or
thistle earrings they complement very
nicely and they're an adaptation of the
same pattern we used for the thistle
bracelet which is right here next to me
show you that really quick that video is
already posted on jom Creative Soul
playlist and so this beautiful set of
earrings is going to be um what we're
doing today I'm going to be using the
earring looms and so if you have your
earring Loom handy and your March 2025
creative Soul bead kit you have
everything you need to jump in and if
you're new to creative Soul or looking
for how to subscribe to the kits check
out the link in the description for how
to um get your subscription sent to you
every month we do a new project every
month and um I always do a bonus earring
or like some kind of little bonus
project to use those leftover beads in
the kit all right so let's dive into the
tutorial hey to my creative Soul besties
um this is a um bonus earring tutorial
that uh is going to be using the beads
from the creative Soul March 2025 kit if
you're not already set up to subscribe
to this beautiful kit I highly recommend
doing so there'll be links in the
description for sign signing up for the
monthly uh delivery of gorgeous bead
palette and projects so um every month
we do one main project and that was this
this month's the thistle bracelet and so
that video is um available for you to
watch um but the class today is to do a
bonus earring and so I thought together
we would make the match to this this
really gorgeous Cactus earring it's
actually a match to the thistle bracelet
in fact but um I felt like in this
profile view it looked more like a
cactus or a little succulent plants so
it can kind of be whatever you want it
to be so we're going to start by warping
our jewel
loom um oh forgive me we're going to be
working with the the earring Loom today
um this was made on the blue jewel loom
the original um and then today I'm going
to work with the the earring Loom
however you could do this on your
original jeel Loom as well if You' like
to I'm going to be using the thread from
the March 2025 uh creative Soul kit and
I'm going to be using the beads from
that mix as well and so what I've got
here on the mat is I've laid the beads
out as uh a b c d and e from the pattern
and then I'm going to prepare my loom
with um enough warp threads to cover
each bead in the pattern and so we're
going to start with 12 warp
strands and so I'm just going to go
ahead and
tie a double knot with a thread right
onto this Notch here
so there's
one and just going to turn it
around and I'm still working from the
spool we're going to
need an undeterminate amount of length
you know so I start with a spool so I
can just kind of get there from there so
there's our tied to the
Notch and so go ahead and just bring
your thread
up through the first one which is just
adjacent to where you
knotted and go through one of these
Combs here on one
side and then the corresponding one here
at the base through one coin here one
comb not coin and then just using your
either fingernail or thumbnail whichever
is easier hold that thread in
place and you can bring your thread
right up through the next comb
[Music]
crossing here at the top and I'm just
going to carry on just like
that we might have our little tail
thread in the way here so just let me
pull that out of the way I decided to
keep it um so I can tie to it at the
end there we go so there's three warp
strands there's number
four and so just carry on like that if
that tail thread's in your way you can
always washi tape it kind of to the
bottom but we're going to use it once we
have all of our strands in in place just
as a place to tie off
to so I just keep going
two if you count on the side it's easier
to see one two three four five so keep
going till you have 12 of these uh on
the on the
loom all right so there's my 12th warp
Strand and I'm going to bring
the the thread you know through the comb
that's adjacent here and then go ahead
and head over to this side where you
left the tail and then just wrap around
a few times
[Music]
if you can try to get the thread to sit
in the notch like that and from here
what I'm going to do so I'm just going
to grab some Flush Cutters really quick
or some scissors whatever you've got
handy and then trim free from the
spool and then go ahead and just
tie a double knot with the tail
thread I think this is the easiest way
and historically I've trimmed the tail
thread but um I do like having it here
to tie off to you I think that it really
really really helps but at this point we
can trim it now that we've got
our secured warp
thread right there on our
Loom and now it's time to create our
pattern so again you're going to want to
grab your spool and this time start with
about uh I put 60 Ines in the handout
and that should be plenty to do your
entire pattern with without having to
add any
thread and we're going to thread our
beating needle
fold over um enough that it makes it a
comfortable working length and then just
bring your needle
underneath the warp strands and I'm
going to turn my work area just to be a
little bit on its
side and then I've got my loom here and
I want to show just one more little
trick that is optional but um awesomely
the earring looms come with the tassel
maker and as a super cool gift from
Jules that she includes when you order
your um your tiny earring looms I use
these in uh not only to make really cute
tassels but also as a tension maker if
you bring it underneath like this and
you
turn like that just to kind of add a
little tension to those strands it acts
kind of like the opposite of how the bar
works in the original julum I don't know
I just think it makes it easier to get
going like after a few rows you may not
need it in there anymore but it really
tightens this up so those first rows
just are so much easier to get started
so in the pattern that you um would have
gotten with your kit or will be
downloadable um in the link from link
for when you signed up uh you'll want to
go ahead and just take a quick look
at that pattern and go ahead and create
Row one now if you're a top down Loomer
Row one might be the top of the pattern
for you in my case I'm I like to loom
from the bottom toward the top so I'm
actually starting with the bottom row
which is a bunch of color e so I'm going
to be stringing 11 color
e so there's
four um five six
7even 8 9 10 11 let me just check that
make sure I've got it
right so there should be
11 got it okay leave a tail that's about
12 inches so you'll have plenty to weave
in and it'll be really easy to get um
you know get your needle through and all
that and then I'm going to go back
through all the
beads this is how I start like all my
loom patterns I I String it I get the
tail positioned correctly about 12
inches or so and then I just temporarily
I like to bring my needle back through
the beads and position them underneath
the warps
each
bead this makes it so much easier to get
started it holds everything in
place and this Loom is perfectly I mean
perfectly spaced for all of these 11 o
seed beads so it works out really nicely
and then you can go ahead and remove
your needle and then go back through the
beads making sure this time to stay
above your warp strands and you can see
right here I kind of missed one I can
tell because I'm looking at it if you
see that happening just pull that needle
back out you just want to make sure you
stay above the warp strands in each of
these
cases so just like that and I did work
with my eyes side and that's to avoid
puncturing my warp strands because I am
going to use a method of weaving in that
involves needing to be able to move
these but there you go that's what
you're going for right there if you have
a business card or like a bead scooper
or something like that I'm going to use
a business card today cuz I have
handy you can just go ahead and
slide slide your beads just like
that and get them to move if they move
like that you know you've got it perfect
like they're just going to be really
easy when we do the war pulling in so um
let's do one more row together and then
we'll skip to taking it off the
loom so bring your needle underneath the
strands again and then pick up 11 of the
next color in your your pattern for me
that's a row of 11 color D because I am
working from the
bottom and this time we don't need to
bring our needle back through it we can
just
pull that edge bead right up in position
and all the other beads should just go
and pop right in place for us especially
since our tension is so good so just
like that and once you've got that hold
it and go back through the beads staying
above those warp strands and if you kind
of like push up against the bead wall
kind of like what I'm doing here it
really
helps so just like that and then if
you'd like you can test that by sliding
it a little bit I'm going to need to
straighten my beads out one more
time oh here you go looking for my bead
scooper there my bead scooper is metal
so a little bit
more strong than a business card they
both
work even one of those like little
triangle trays you know what I'm talking
about like those little
bead sords even that any kind of little
just flat surface will work for
them and there we go so I just need to
finish stitching the pattern and then I
will go ahead and uh bring the camera
back on and we'll take it off the loom
together and finish the
earring all right so super easy peasy
we've got our beautiful earring here and
something I always do with earrings is I
just bring the other one over and check
and make sure I did it the same
yay I did okay and so um I'm going to
take out my tension and I'm going to go
ahead and flip the loom
over and all we need to do to free it
from the loom is we just need to free
this knot right here and it's the only
spot we need to cut so I'm going to just
cut right
here just to get that knot
free the rest of it should just come
free as I pull these around any luck if
you need to
trim just kind of here at the top too
sometimes I do that yeah there we
go all right so what that'll do when you
free that knot the one that we had tied
there to the side Notch is it will free
your two side warp
threads so so far so good and for the
others we're just going to use our
thumbnail and just read them from the
cone
here and they'll just come right off at
the bottom here these will just fall
free we set our beautiful earring Loom
aside for the next
one and I'm going to pull these warps in
really quick make sure the little Loops
are
separate and then if you have some chain
nose pliers handy go ahead and use those
to just get a grip on the
thread holding the
piece just go ahead and
pull on one side and the thread you'll
see it move here at the bottom the
little Loop there at the bottom should
move and bring that up till it meets the
bottom of your piece and then move to
the bottom and do the same
thing pull that
down over here we're going to grab this
one so you see just go top bottom top to
bottom switching pulling either up or
down for the next warp strand in from
the last
one every time you're just going to be
switching top to bottom
and on an earring it'll go pretty quick
we just don't have that much length if
you were with us for the bracelet um you
saw that that took a little longer
but still exactly the same same process
to a tea just takes a little extra
time and I just wanted to show
sometimes the loops will grab another
strand or another loop just watch for
that here we
go I'm actually really liking the bent
nose pliers for this what do you think
guys I I randomly grab them I usually
grab regular chain NOS but I feel like
this is working out really nice could
that and here's another example of
grabbing one of the other Loops it does
this a lot so you just free
it and then keep
going I'm just leaving the camera on for
this whole thing I figured it might be
cool to see the whole thing sometimes I
skip ahead in some of these videos
but um I've ever done a whole one
oops there we
go and the reason I press down on it is
just to keep all the beads from you know
they they typically don't scrunch up you
know really that bad but I do this
anyway just out of
habit on a longer piece they might on
this one probably get away with not
doing it
but and if they start to curl like that
you see how this one is curling just go
a little
slower you can even kind of hold
the hold the loop if you want
to there we
go all right so now we only have a few
strands that we have to weave in this
side and this one which I'll probably
keep to do my Loop and then the two w
threads so really quick refresher on
weaving in just in case that's new to
anybody um let's start with the one I
got my needle on
already uh which is this top one this is
a WFT strand WFT is the ones you're
doing your looming with back and forth
so it's exiting from a bead so with a W
strand what you'll need to do is jump
over the warp side so this is the side
warp here the one that's running down
and this is the thread I'm weaving in
the one I'm wiggling right now I'm going
to jump over the
warp which will
bring my needle
in and then just pick up a
one of the one of the W strands
so in fact you're kind of going under
it's going under itself in a way this is
that this is that W strand that we were
using but see there's one
two and three see how I picked those
up that's a really really nice way to
weave in it's quick and it's
secure and I usually do that through
three times so here's number
two and here's number
three oops I'm just going to move that
back out of the
way and hopefully that's really clear
I'm going to make sure you guys can see
it you can kind of see as it as it um
reflects on the needle there that I
caught each of those WS that runs
through those row of beads all right so
there's that I'm going to just trim
that okay so do the same
thing with this strand here which is the
tail we left when we very very first
started liming you'll go over that edge
warp and weave it in the same way here
at the top working with a warp strand um
only one difference weaving in a warp
strand and that is how you enter the row
so let me show that really
quick again you'll want to thread a
needle on and since this is the Strand
that's actually running this side it's
not coming out of a bead it's actually
stabilizing that top row you can see
it's the Strand that's being hugged
there by the thread going through that
row so we're going to need to jump over
a
bead and go through maybe like just a
few beads
here and from there you resume picking
up
left sometimes this first r a little
tricky to pick up but you can do
it here we
go see really good view there of what
we've got we're just picking up left
thread go through a few
beads repeat that two more times and
trim that
strand all right so there there we go
all of the threads are woven in and all
we have left is that super long warp
strand we don't really need all of that
strand length but um I just used it
because it was there uh what we're going
to do is put
on an ear wire Loop and it's just really
really super easy it just exits right
from the top and because this is 11
beads across our Center are these three
beads right here so we're just going to
weave to exit from one of those
and again this is a warp strand so we're
going to jump over the edge
bead and then head into the
row and I'm going to try to exit
from the one of either the first or the
last of those Center three beads
depending on which direction you're
heading from it's just going to be those
Center three so I'm just right
here and what I'm going to do is pick up
four color
a and I went before cuz it looked really
nice um but you could do if you wanted
to do six you could do six as well your
hole will be about um that's about a 3
mimer sized hole so depending on what
kind of ear wire you're doing you can
size that up or size it down um but so
I'm doing four beads
here and I'm going to skip the bead I'm
exiting the next one and then I'm going
to go through the
third so just like that Loop will
form from here head right back up
through those beads you just
strung and when you do that that side
will hug the bead that you were
exiting let's get through these other
two and on this side go through that
bead the one that's you see the thread
coming out of it go through that bead
from the other side of where the
thread's coming
out so just like
that and when you pull that it will pop
that bead right in
place if you want to tighten it hold
everything and pull on that thread it
will tighten up for you really nicely
reinforce um by following that same path
and if at any point you need to tighten
you just hold everything and
Pull and then when you get to this side
you can just go through one side and
exit the
other here let me just move that really
quick there we
go if your rows are tight like mine you
might have to help
it just a little to get through that
bead I noticed that my tight t today is
really like it's more than usual so I'm
just noticing that with my
stitching there we
go all right and from here you can
reinforce it one more
time and then just weave in your
[Music]
thread yeah so we got that ready to go
I've got some round nose pliers here I
want to show a quick trick
you can use them to round out your
beautiful little Loop that you just
made by just placing it onto the round
nose this is especially nice if you're
someone who photographs your work for
sale to make them pop like
that you can just use those round nose
pliers to make the
beads do that nice rounded little
pop and then go ahead and put your ear
wire on so I used some random ear wires
that I had in my stash you can use any
ear wires you want want um even some
earring posts will probably work with a
jump ring so anything would be really
cute I just happen to have these kidney
ones um that I was going to use and
these are symmetrical front back you can
flip them so it actually just does not
even matter which side you
string could not be
easier and um I'm just going to pop them
on like that yeah there we go so now I
have these really cute just super summer
VI Vibes I love them very neat um I
think I need to try them on so let's do
that let's try these
on so it might take me a minute to put
earrings on I'm like every time I tried
to put on earrings lately I have to
find like which side it's on and there
we
go oh wow okay so I love a tile earring
because they really do have that nice
pop and they look like you're wearing a
little piece of art because I mean it is
a piece of art we just made you know our
version of a
painting is that oh yeah there we go I
did that on one try aren't they cool
here I'm G bring my camera a little
closer so neat yeah I think I'm just GNA
leave these on they're so cute yeah this
is really fun I want to do more like
this I know we've done a lot of like
kind of beautiful beaded tiles we did
those really cool Portugal inspired ones
like way oh gosh how many years ago is
that I can't remember
but um it was when the earring looms uh
first came out so um I think we need to
go back and make more of those too so I
hope you've loved this I hope you're
loving your creative Soul kits and get
ready for April because April's going to
be another awesome one really fun and
I'll also want to say thank you for
watching this video and if you could hit
the like button that would be really
even cooler and I'll see you for the
next one okay bye
[Music]
m
[Music]